Property Complaint
Property>Complaint
How to raise a complaint on Tenant's behalf?
Want to raise a complaint on behalf of a tenant quickly and efficiently? The complaint feature lets you log issues directly into the system, ensuring they are tracked and addressed promptly. You can provide details about the problem, attach relevant files or photos, mark its urgency, and assign it to the responsible person, all in one place. This helps you manage tenant complaints smoothly and ensures timely resolution.
Here's how you can do it:
- Step 1: Open the Property Section From the left-hand menu or navigation panel, click on Property and then select Complaints to view existing complaints or start a new one.
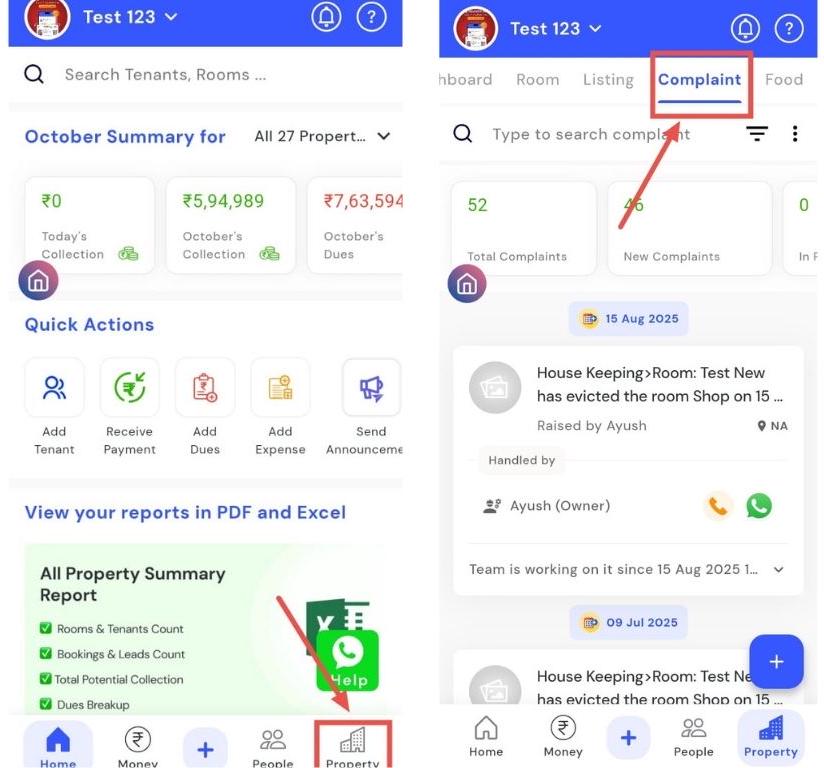
- Step 2: Add a New Complaint Tap the plus (+) button located at the bottom-right corner of the screen to create a new complaint.

-
Step 3: Fill in Complaint Details
-
Select the Property: Choose the property for which the complaint is being raised.
-
Describe the Issue: Provide a clear description of the problem the tenant is facing.
-
Choose Issue Type: Select the relevant category, such as housekeeping, food, electricity, cleaning, or others.
-
Attach Files (Optional): If you have photos or documents related to the issue, upload them.
-
Specify Location: Mention where the issue was found within the property.
-
Mark Urgency: If the matter requires immediate attention, toggle the Urgent option.
-
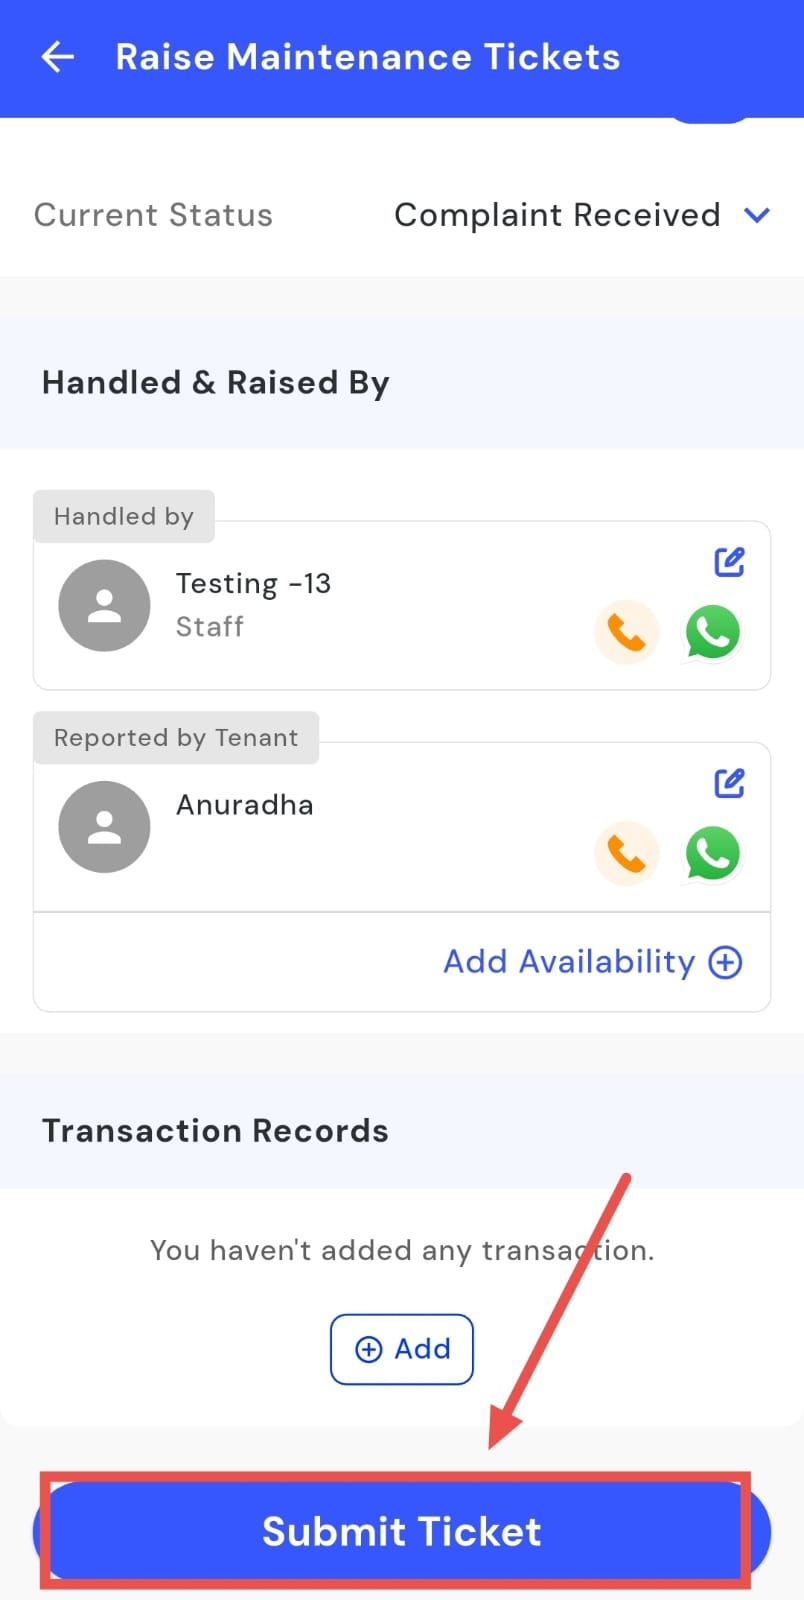
Set Current Status: Indicate the current status of the issue.
-
Handled By & Report Raised By: Assign the person responsible for addressing the complaint and specify who is raising it.
-
Transaction Tickets (Optional): If there are any relevant transaction tickets, attach or note them.
-
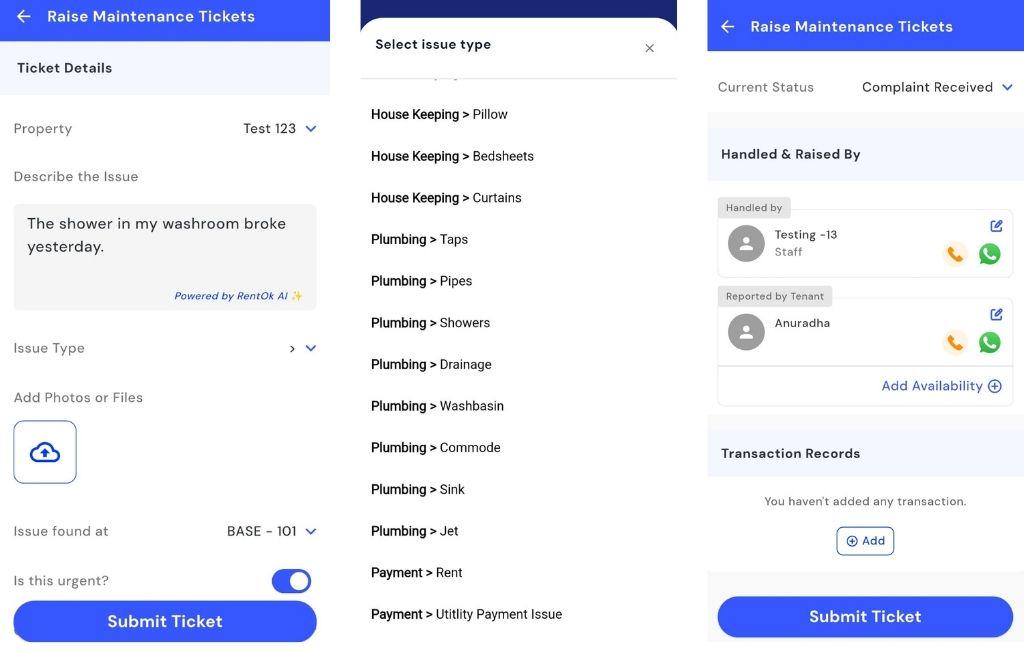
- Step 4: Submit the Complaint After filling in all necessary details, click Submit Ticket. The complaint will now be logged in the system and tracked until it is resolved.
How can I check the complaint dashboard?
Want to keep track of all complaints in your property? The Complaint Dashboard makes it easy by providing a complete overview in one place. You can see new complaints, those in progress, assigned tasks, and resolved issues all at a glance. Clicking on any widget gives you detailed information about complaints in that category, helping you stay on top of issues and manage them efficiently.
Follow these steps to use the Complaint Dashboard:
- Step 1: Open the Complaint section Tap the Property icon in the bottom navigation menu, then select Complaint.
-
Step 2: Explore the dashboard You will see the Complaint Dashboard showing various complaint statuses. Click on any widget to view complaints in that category. Widgets include:
-
Total complaint count
-
New complaint count
-
In process complaint
-
Complaint assigned to team
-
Need availability time
-
Need more information
-
Reportee wasn’t available
-
Rejected
-
Resolved
-
Urgent
-
Pending ratings
-
| Tip: Use the Complaint Dashboard regularly to track all complaints, follow up on pending issues, and ensure timely resolution. |
|---|
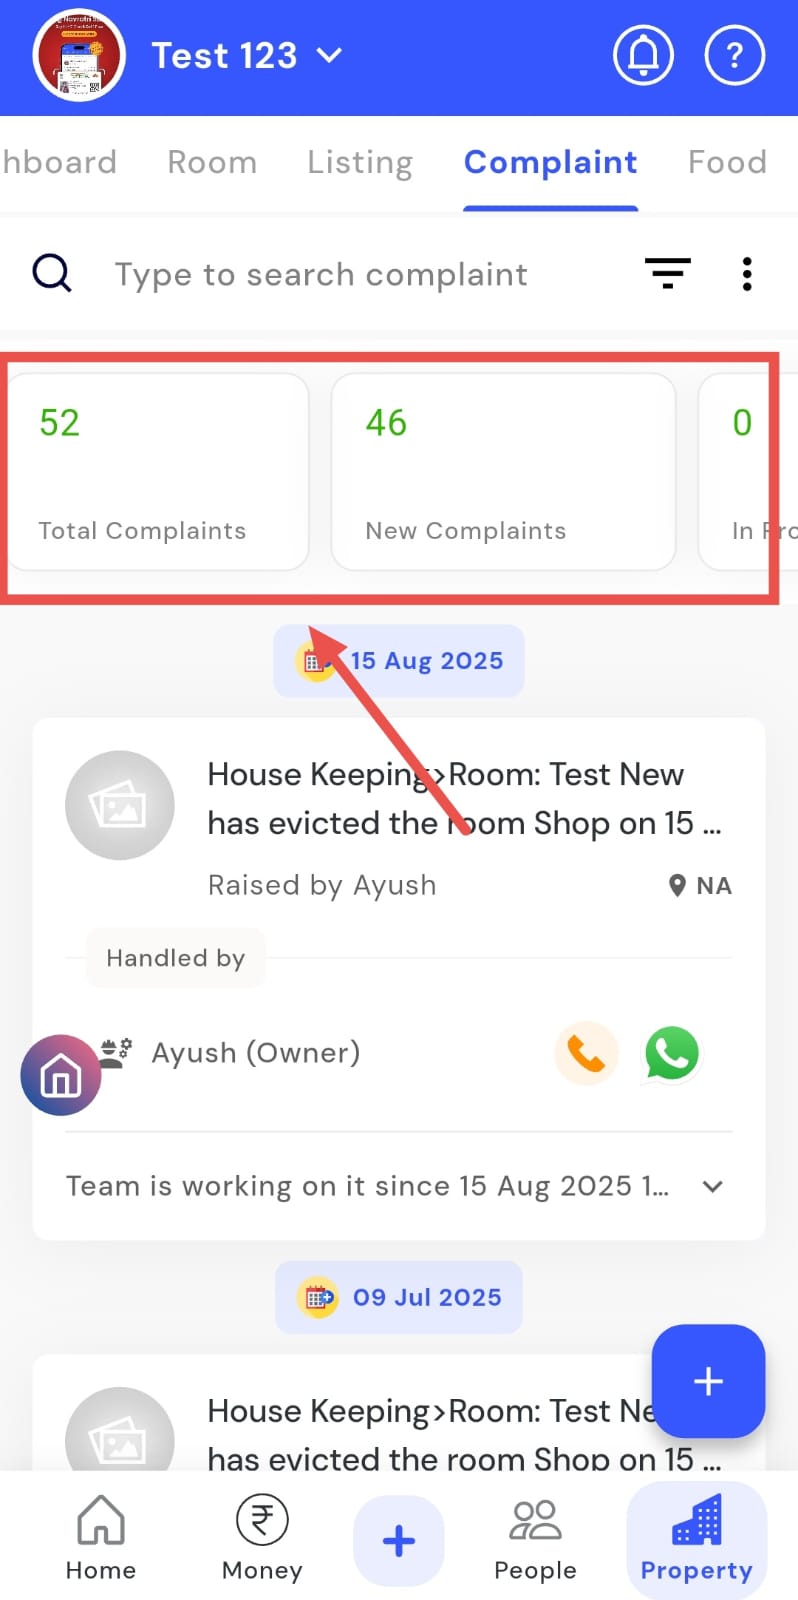
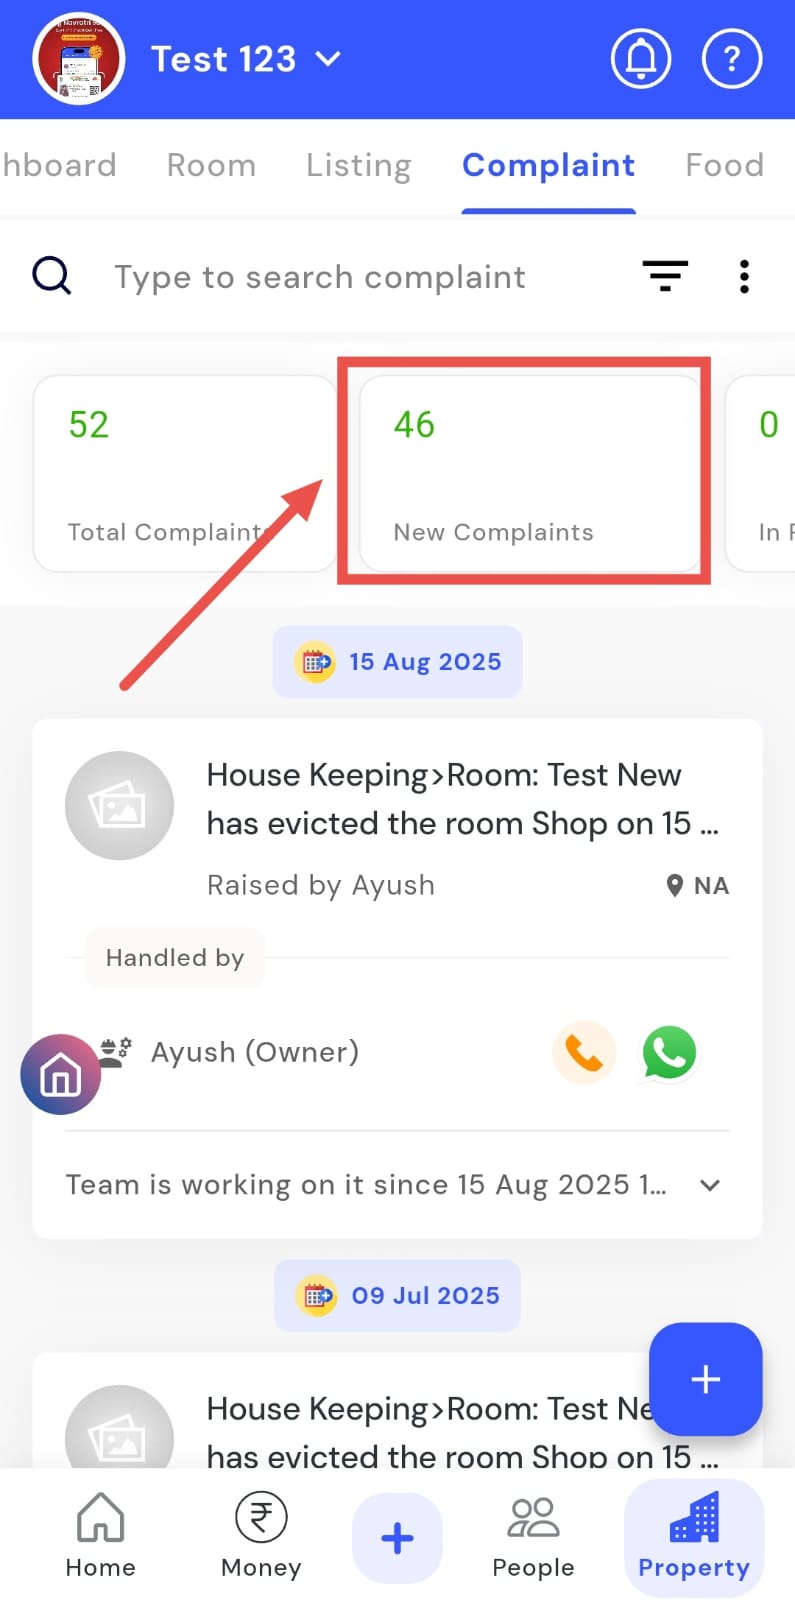
How can I view new complaints?
The New Complaint section helps you stay on top of issues that have just been reported. Through the New Complaint widget in the Complaint Dashboard, you can quickly see all recently submitted complaints in one place. This makes it easier to prioritize immediate action and address tenant concerns efficiently, ensuring that no new issue goes unnoticed.
Follow these steps to check new complaints:
- Step 1: Open the Complaint section Tap the Property icon in the bottom navigation menu, then select Complaint.
- Step 2: Access new complaints Click on the New Complaint widget, this will display all complaints that have just been submitted.
How can I access complaints that are currently in progress?
The In Progress section allows you to quickly track complaints that are currently being addressed. Using the In Progress widget in the Complaint Dashboard, you can stay updated on all ongoing resolutions at a glance. This helps you monitor active issues, follow their progress, and ensure they are resolved on time, keeping your property management process efficient and organized.
Follow these steps to check complaints in progress:
- Step 1: Open the Complaint section Tap the Property icon in the bottom navigation menu, then select Complaint.
- Step 2: Access in-progress complaints Click on the In Progress widget, this will display all complaints that are currently being handled.

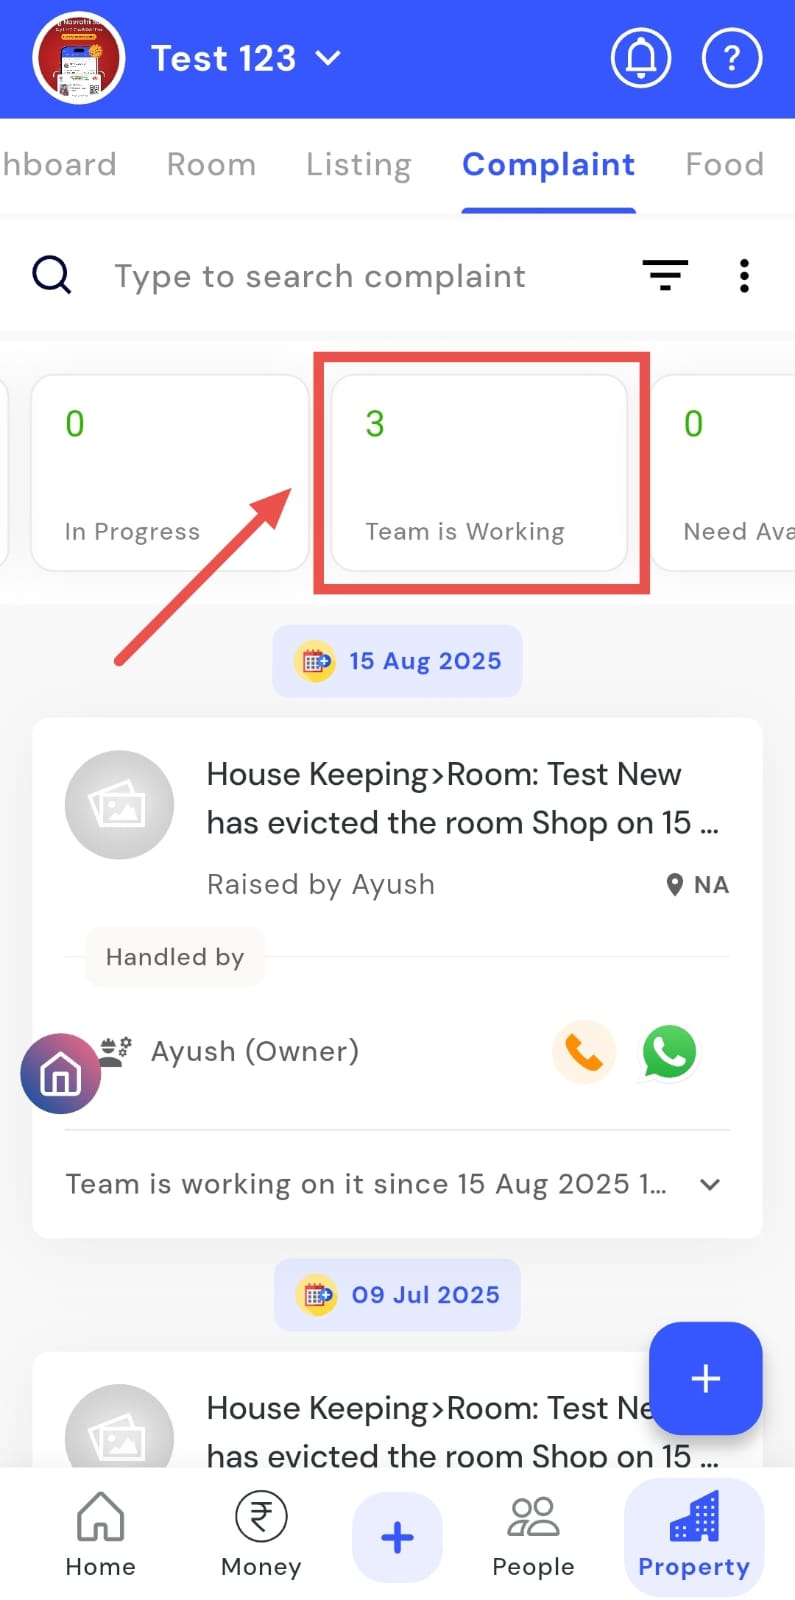
How do I check complaints that have been assigned to a team?
The Assigned Complaints view lets you see all complaints that have been delegated to a team at a glance. Through the Complaint Dashboard, you can get a clear picture of which issues your team is actively working on. This makes it easier to monitor progress, follow up effectively, and ensure that all complaints are resolved on time, keeping your property management organized and efficient.
Follow these steps to check assigned complaints:
- Step 1: Open the Complaint section Tap the Property icon in the bottom navigation menu, then select Complaint.
-
Step 2: Access team-assigned complaints You can use either of the following methods:
-
Click on the Team is Working widget.
-
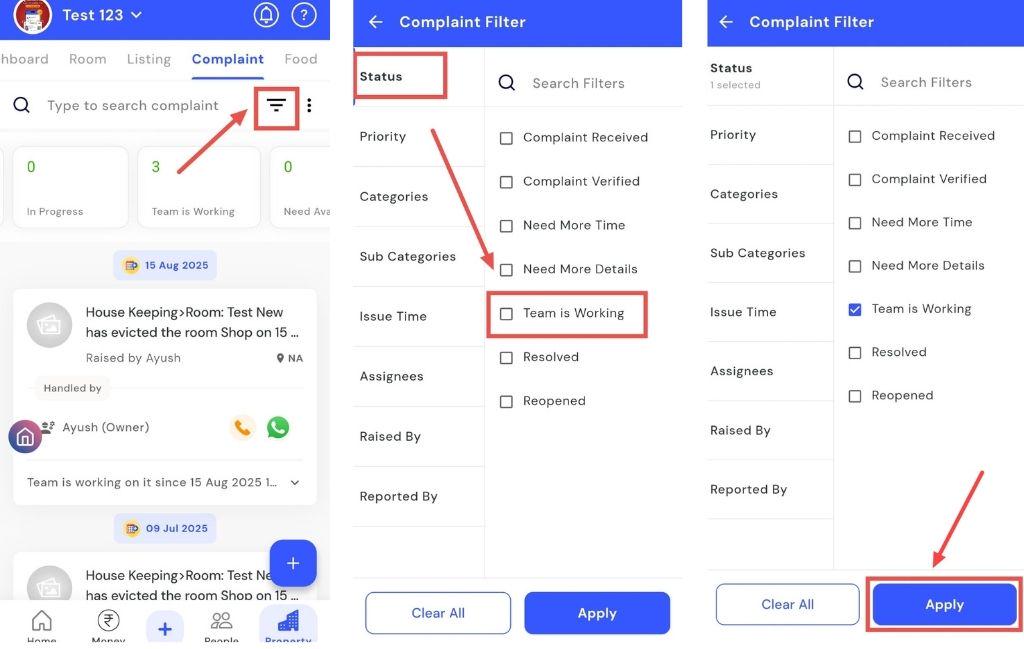
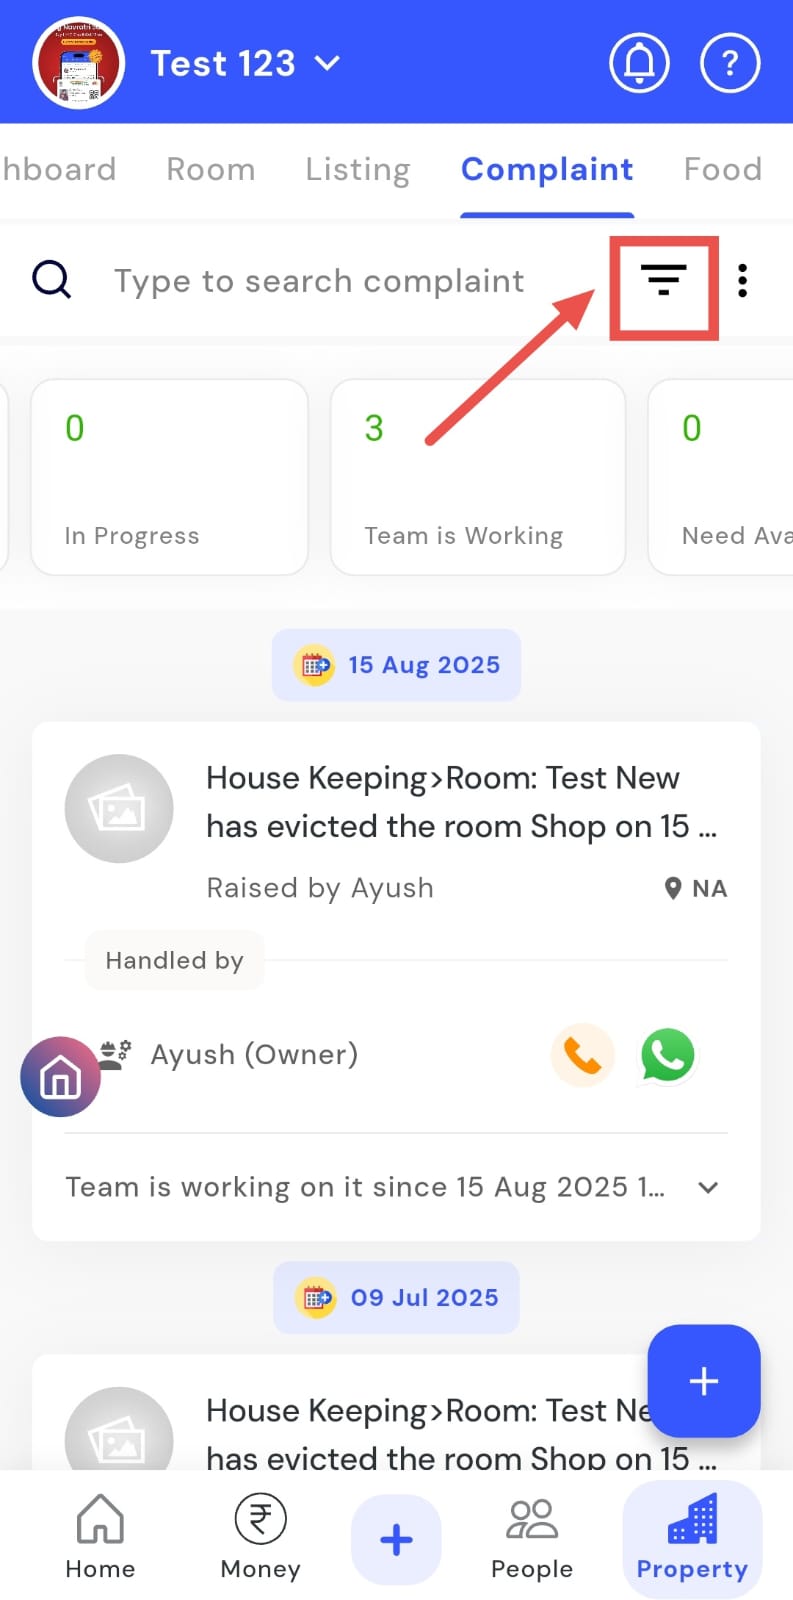
Or use the Filter in the search box:
-
Tap the Filter icon.
-
In the filter window, click Status and select Team is working.
-
Tap Apply to view all complaints assigned to a team.
-
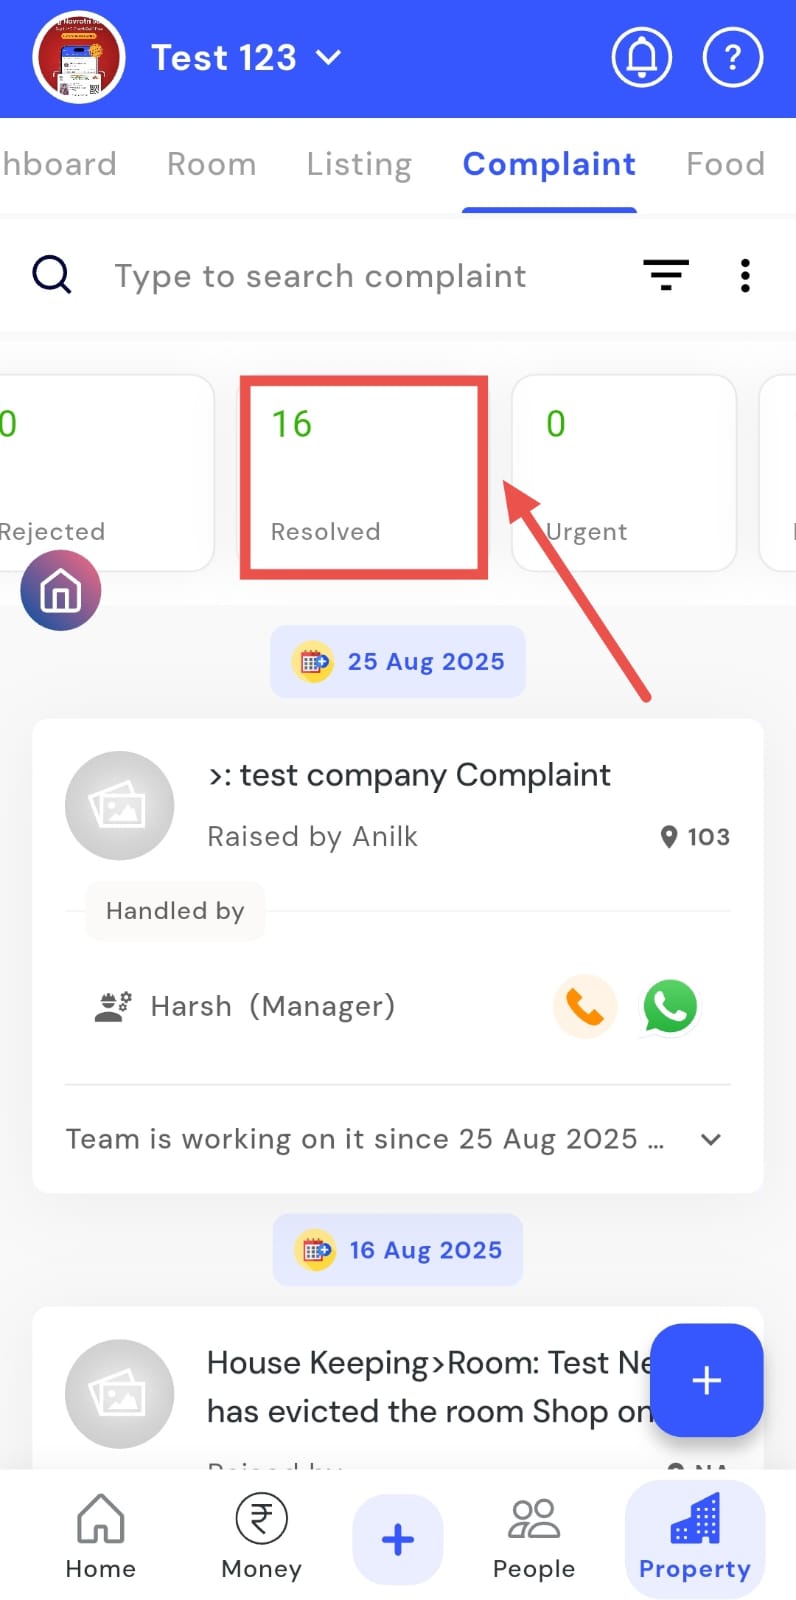
How do I view resolved complaints?
The Resolved Complaints section allows you to easily view all issues that have been marked as resolved. You can access them either through the Resolved widget or by using the filter in the search box. This provides a clear record of completed complaints, making it simple to track resolutions and ensure that all issues have been properly addressed. Keeping track of resolved complaints also supports efficient reporting and follow-up.
Follow these steps to check resolved complaints:
- Step 1: Open the Complaint section Tap the Property icon in the bottom navigation menu, then select Complaint.
-
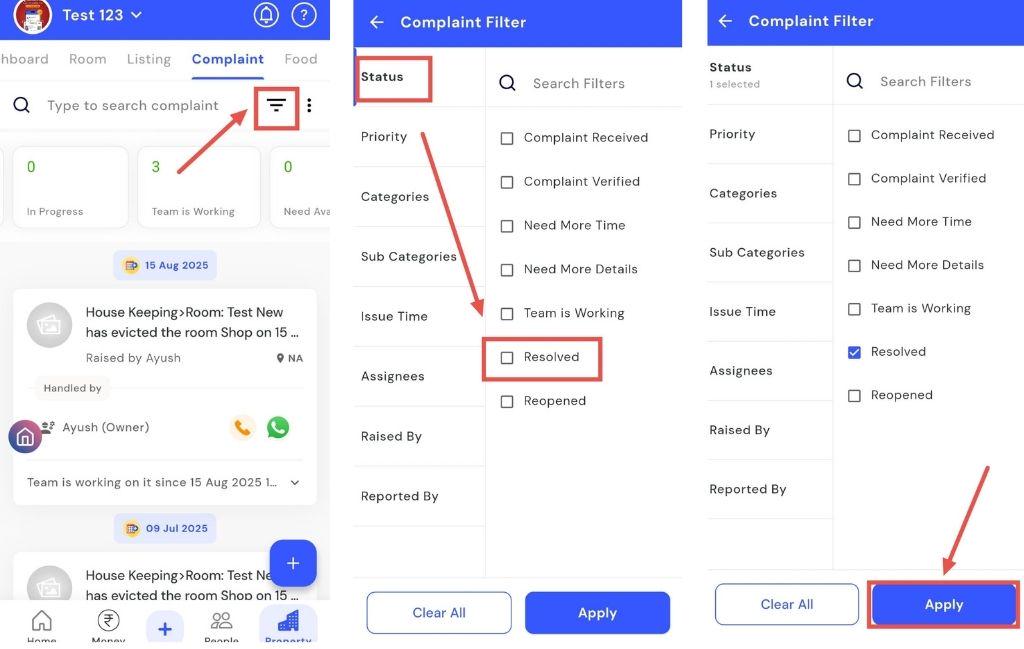
Step 2: Access resolved complaints You can use either of the following methods:
-
Click on the Resolved widget.
-
Or use the filter in the search box:
-
Tap the Filter icon.
-
In the filter window, click Status and select Resolved.
-
Tap Apply to view all resolved complaints.
-
How can I see the various complaint categories available?
Want to focus on specific types of complaints? The Category filter makes it easy to narrow them down. By using this filter in the Complaint section, you can see complaints grouped by category, allowing for quicker follow-up and more efficient resolution. This helps you prioritize particular complaint types and manage them effectively.
Follow these steps to filter complaints by category:
- Step 1: Open the Complaint section Tap the Property icon in the bottom navigation menu, then select Complaint.
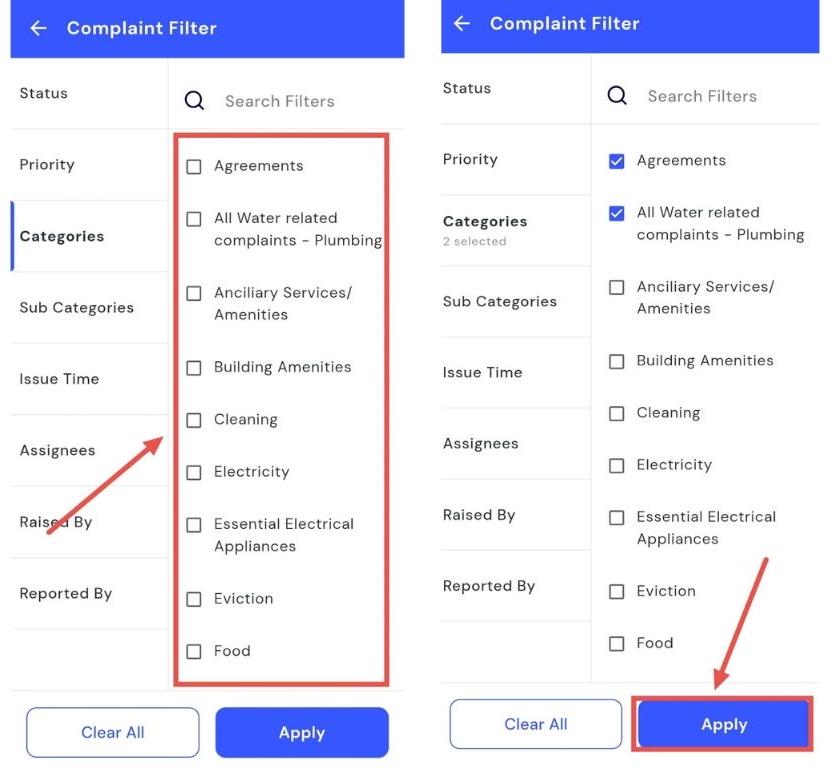
- Step 2: Open the filter Click on the Filter icon in the search box.
- Step 3: Select categories In the filter window, tap Category.

- Step 4: Choose and apply Select the categories you want to view, then tap Apply to see the filtered results.
How can I download a complaint report?
You can easily generate and download detailed complaint reports for your property whenever needed. This feature allows you to keep an offline record of all complaints, making it easier to review and analyze them over time. Whether you’re preparing for audits, compiling reports, or tracking overall complaint trends, downloading a report ensures you have all the necessary information at hand.
Follow these steps to download a complaint report:
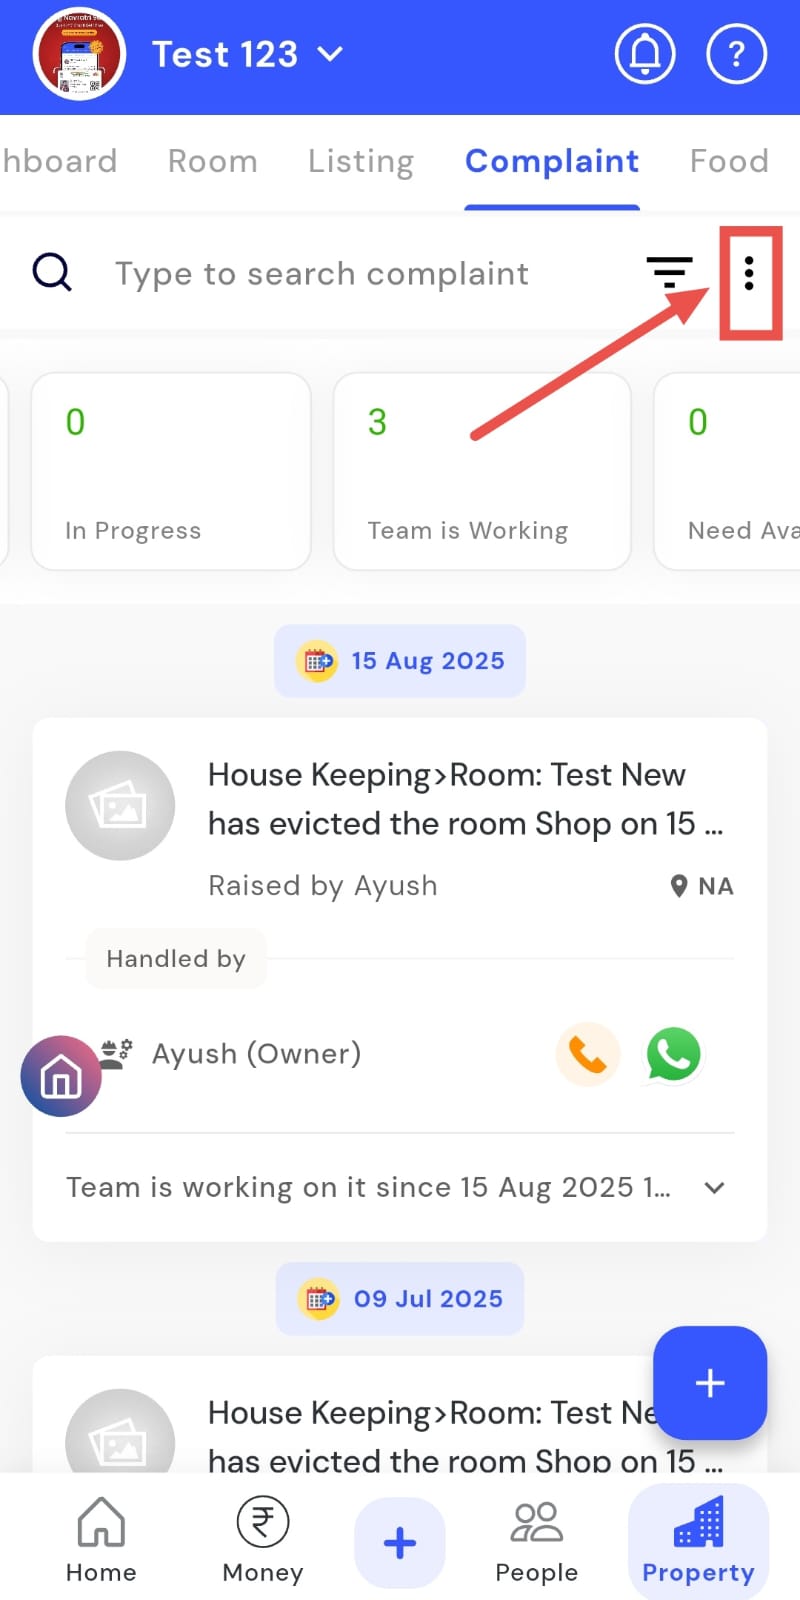
- Step 1: Open the Complaint section Tap the Property icon in the bottom navigation menu, then select the Complaint option.
- Step 2: Access more options Click on the three dots on the right-hand side of the screen. A window will appear with additional options.
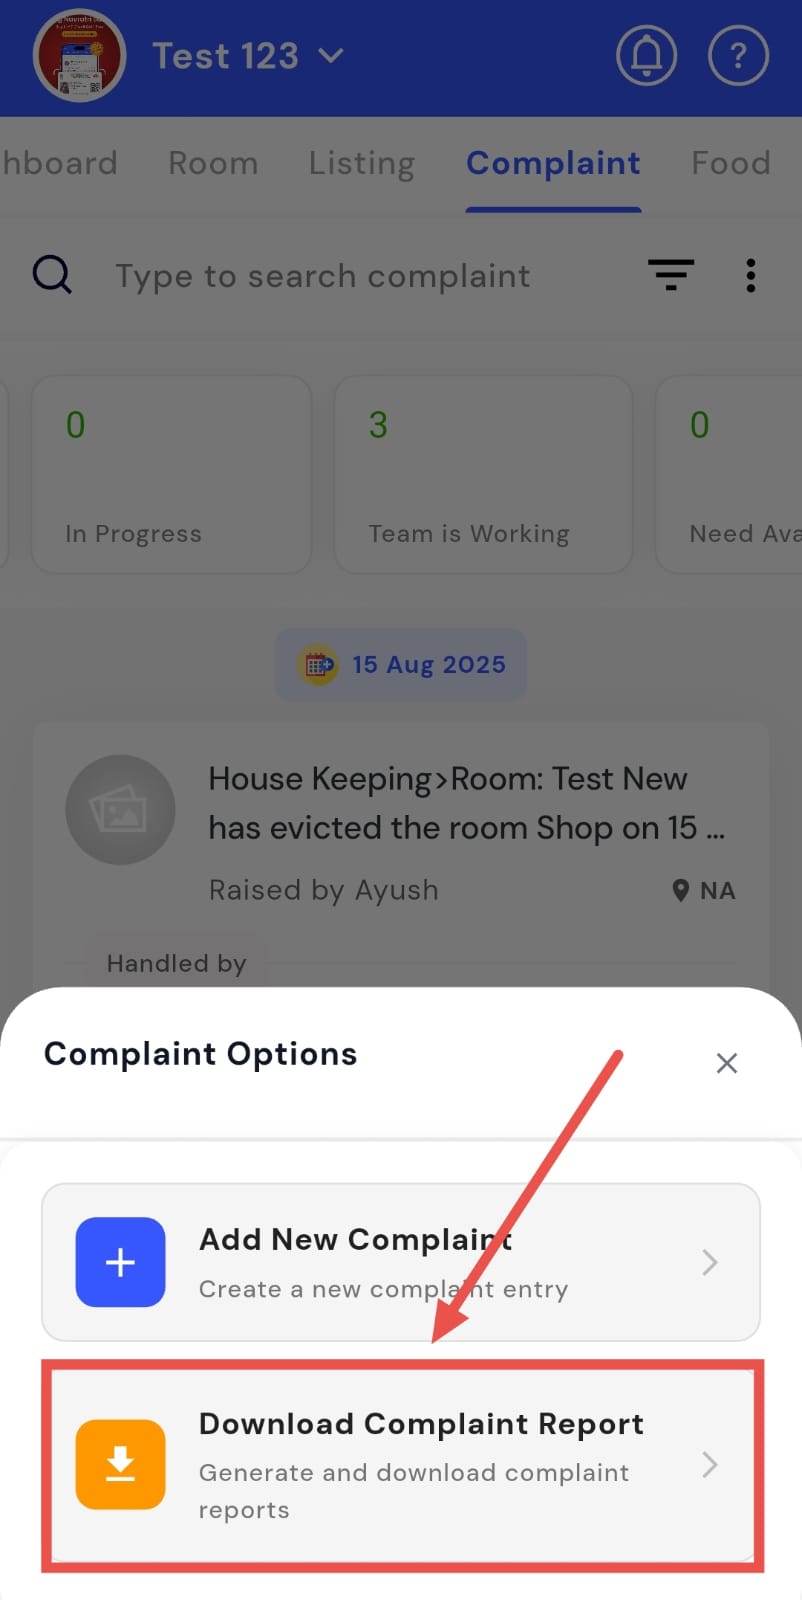
- Step 3: Choose to download the report Select Download Complaint Report from the list.
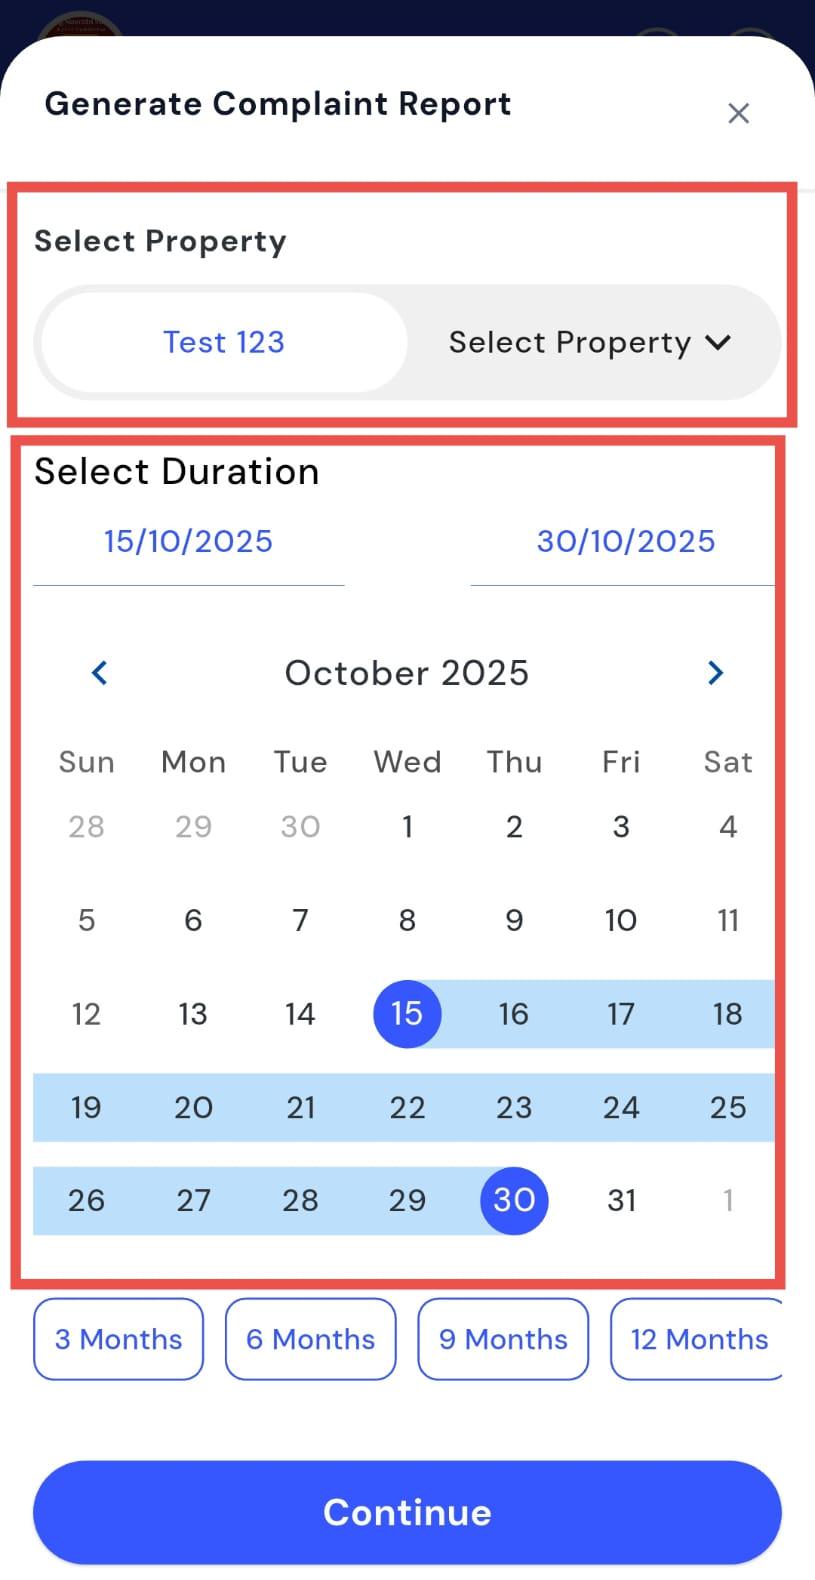
- Step 4: Set report details Choose the property and date range for which you want to generate the complaint report.
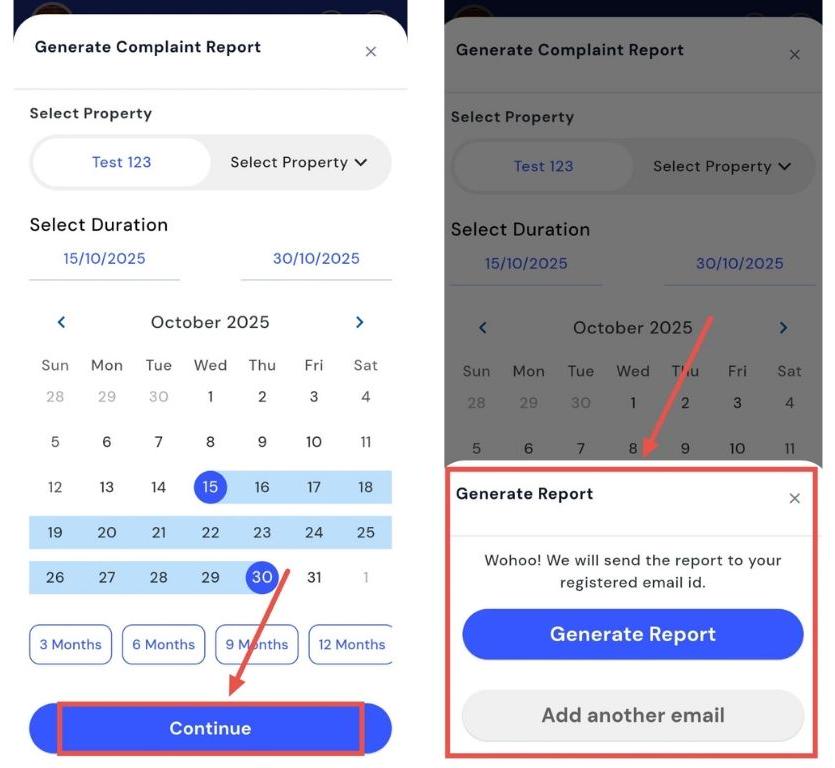
- Step 5: Generate or share the report
Tap Continue, then
-
Click on Generate Report to create your complaint report.
-
Alternatively, add your email ID if you’d like the report to be sent directly to your inbox.
How can I share the complaint with anyone?
Need to forward a complaint to a team member or contact? The app makes it easy with the Share Complaint feature. You can swipe on a complaint and select your preferred sharing method to send its details quickly. Whether it’s a colleague, tenant, or service team, forwarding complaints via WhatsApp or other apps is simple and seamless, all without leaving the platform.
Follow these steps to share a complaint:
- Step 1: Open Complaints Tap the Property icon in the bottom navigation menu and select the Complaint option to view all complaints.
- Step 2: Locate the complaint Scroll through the list to find the specific complaint you want to share.
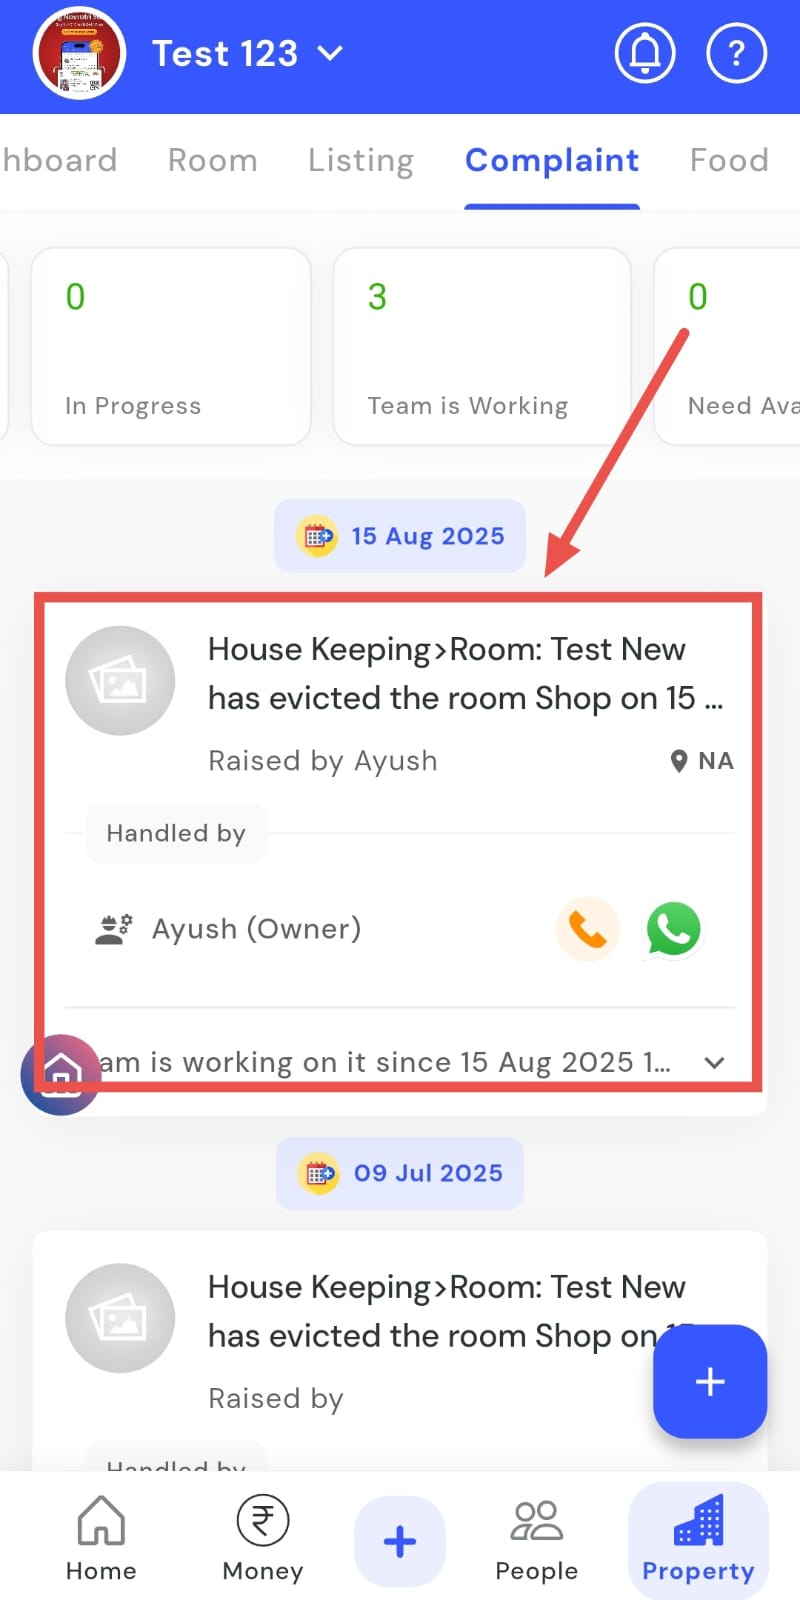
- Step 3: Swipe on the card Swipe left on the complaint card to reveal action options.
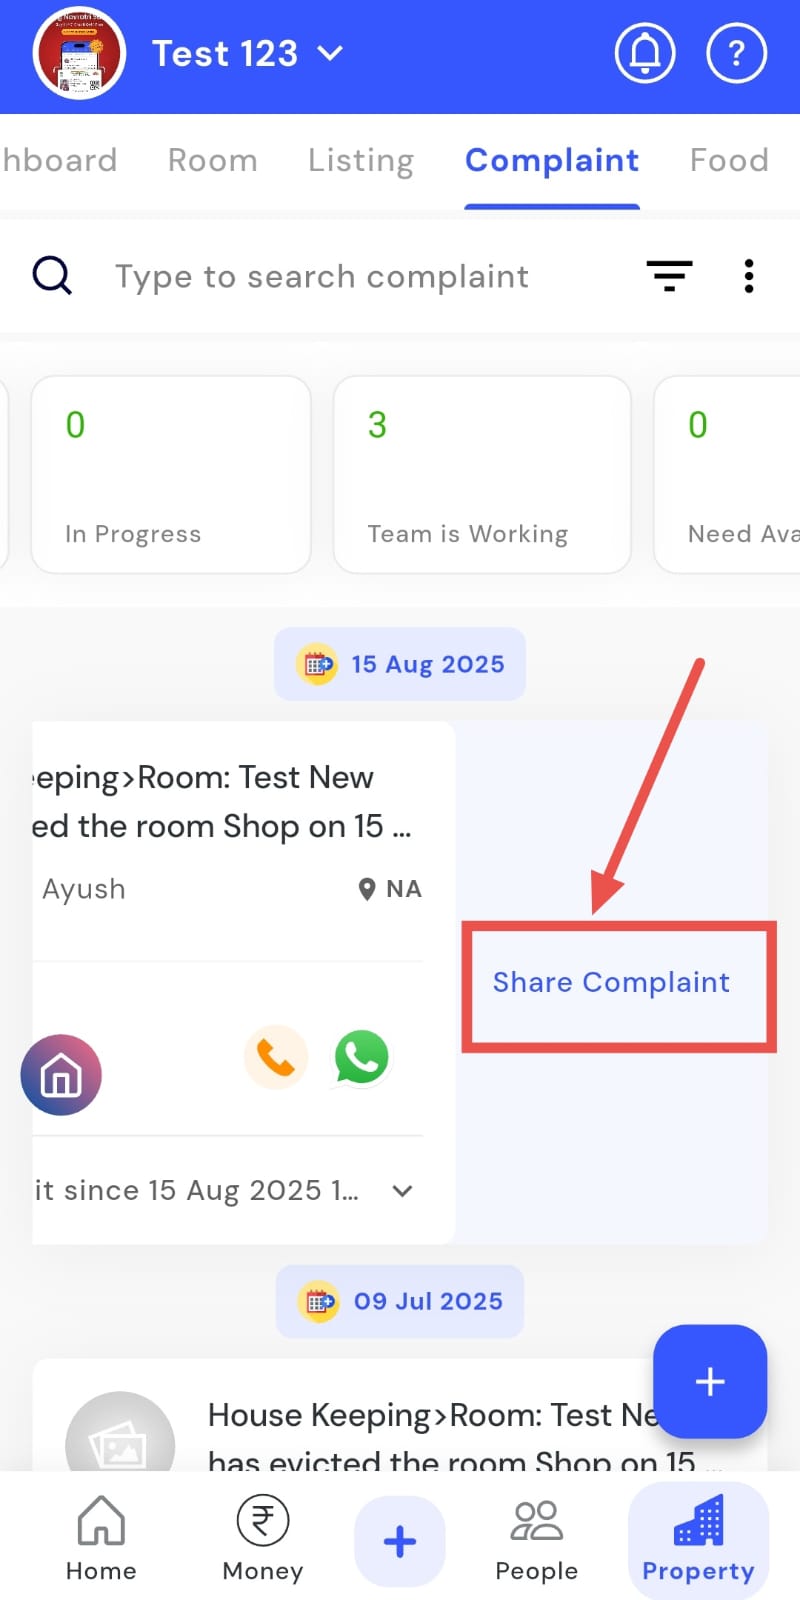
- Step 4: Select Share Complaint Tap the Share Complaint button to open the sharing window.

- Step 5: Choose a sharing method Pick WhatsApp or any other preferred app from the window to forward the complaint instantly.
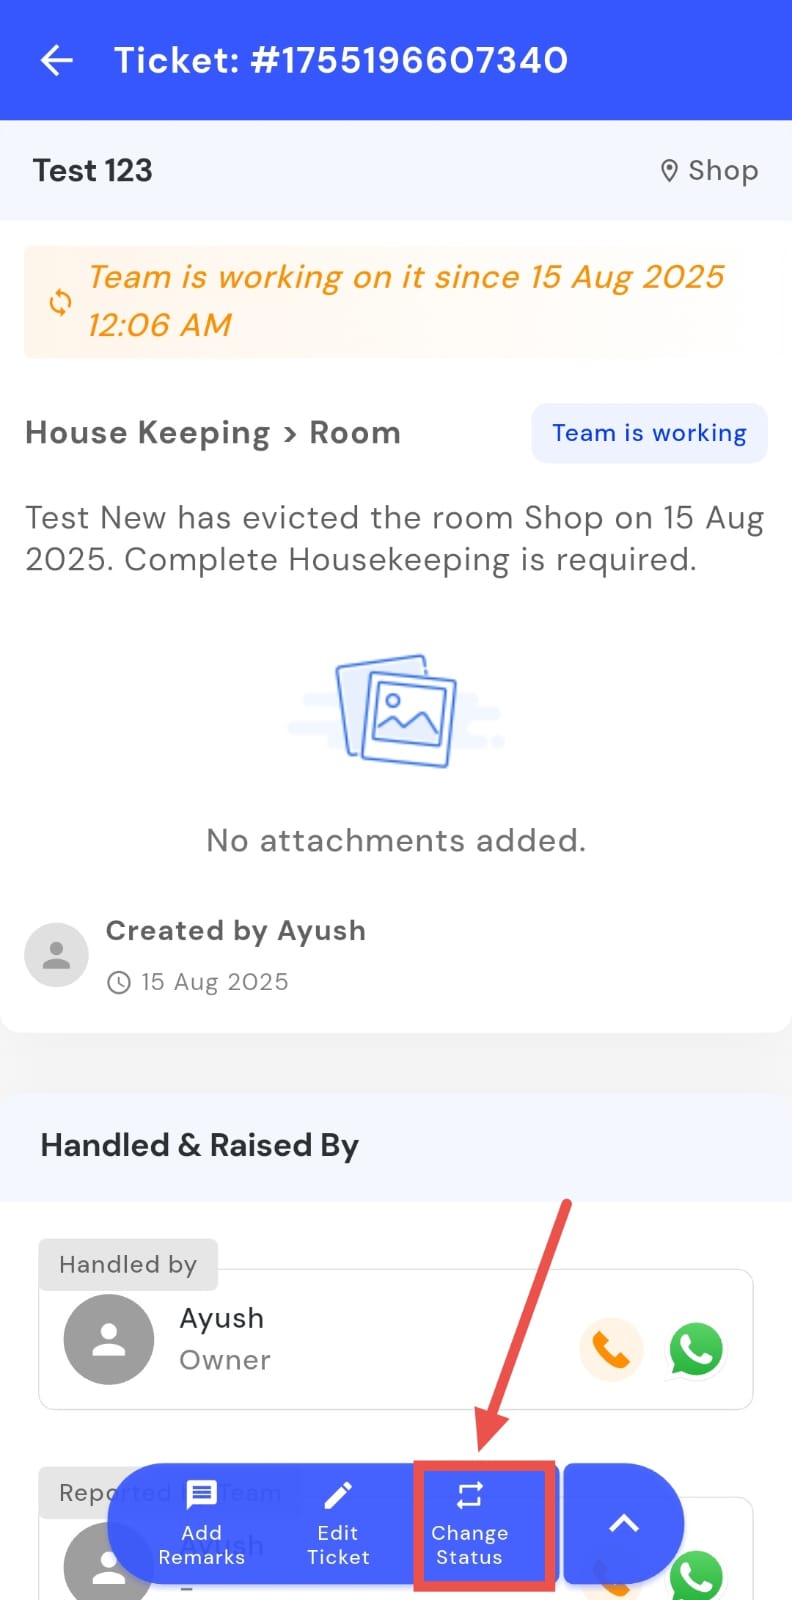
How can I change the status of a complaint?
Managing complaints becomes simpler when you can update their status instantly. Using the Change Status feature, you can modify a complaint’s progress directly from its card in just a few easy steps. This helps ensure that all complaints are accurately tracked, and team members are always aware of which issues are resolved, pending, or in progress.
Follow these steps to update a complaint’s status:
- Step 1: Open Complaints Tap the Property icon in the bottom navigation menu, then select Complaint to view all complaints.
- Step 2: Locate the complaint Scroll through the list to find the specific complaint you want to update.
- Step 3: Access Change Status Tap on the complaint card, then click Change Status to begin updating.
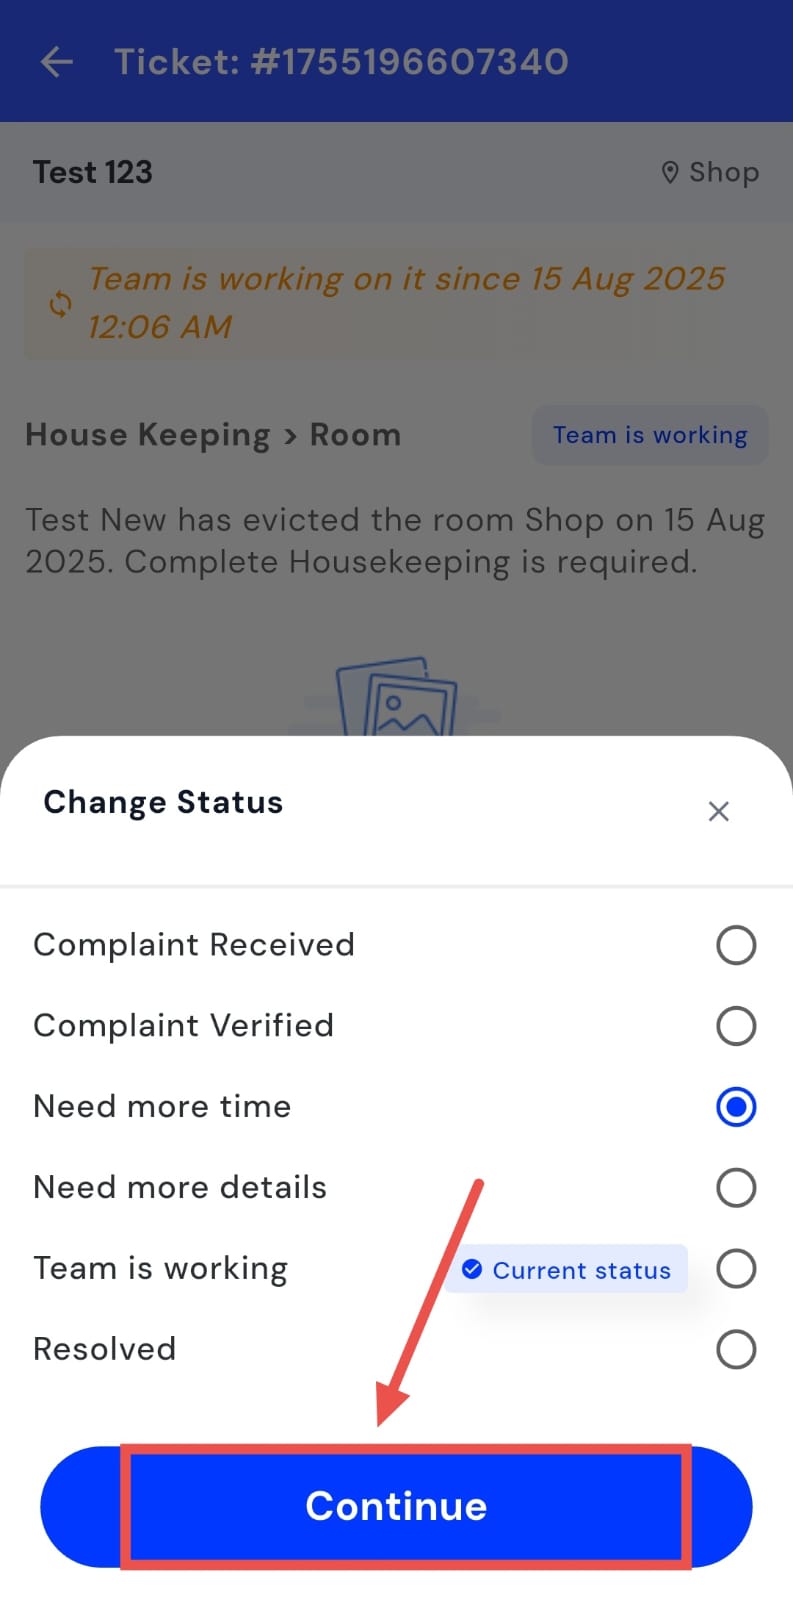
- Step 4: Select new status A window will appear with available status options. Choose the appropriate status for the complaint.
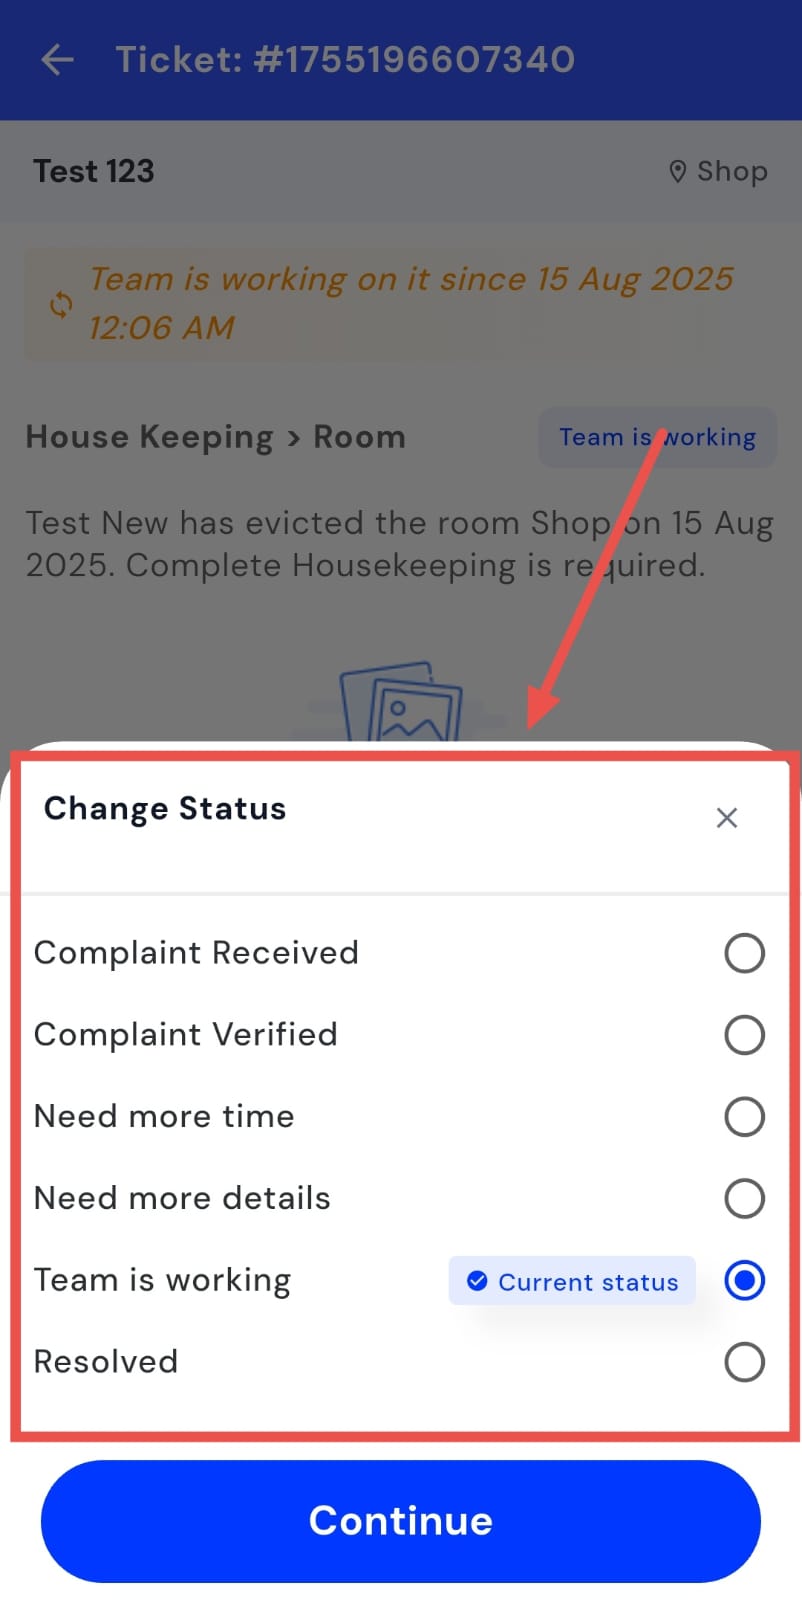
- Step 5: Save changes Tap Continue to save the updated complaint status.
How can I notify the tenant about the complaint's status?
Currently, you cannot manually notify the tenant about any change in the complaint status through the app. The system automatically updates the tenant regarding the complaint’s progress as needed. However, you can personally inform the tenant by sending them a message through WhatsApp or any other medium to let them know that their complaint has been filed and is being looked into.
How can I add a transaction for a complaint?
Use the Add Transaction feature to record amounts associated with a complaint. Maintain complete and accurate financial records by adding transactions directly under the relevant complaint. If a complaint involves a payment, reimbursement, or charge, you can easily add the related transaction from the complaint details. This ensures your financial and maintenance records stay organized and properly linked.
Follow these steps to add a transaction under a complaint:
- Step 1: Open Complaints Tap the Property icon in the bottom navigation menu, then select the Complaint option.
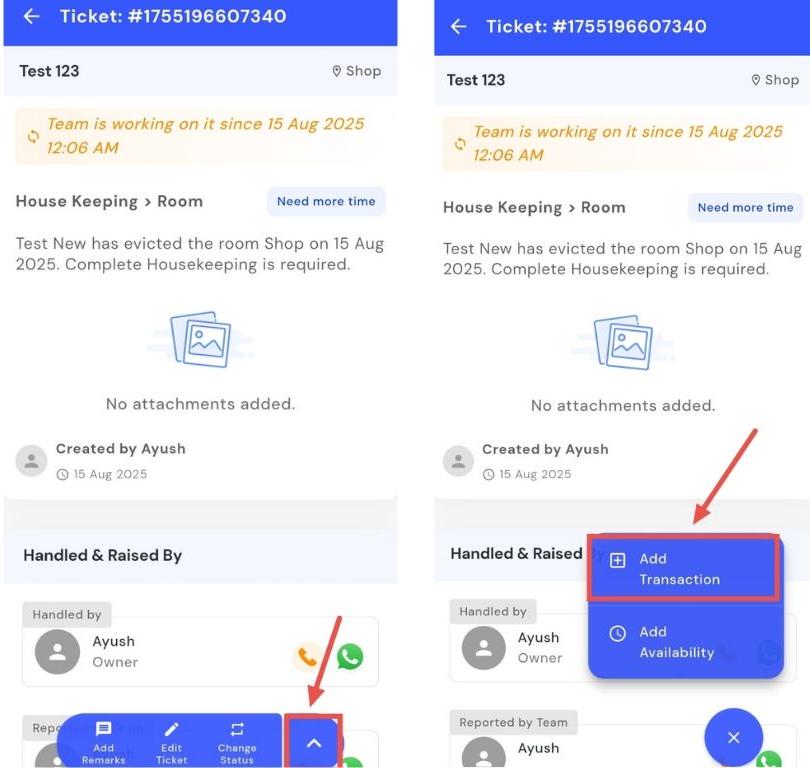
- Step 2: Choose the complaint Scroll to find and open the complaint card where you want to add a transaction.
- Step 3: Add Transaction Tap the Add Transaction option.
-
Step 4: Select transaction type You’ll be asked to choose how the transaction should be recorded:
-
Due: Select this if the amount needs to be added as a tenant due.
-
Expense: Select this if the amount should be recorded as an owner’s expense.
-
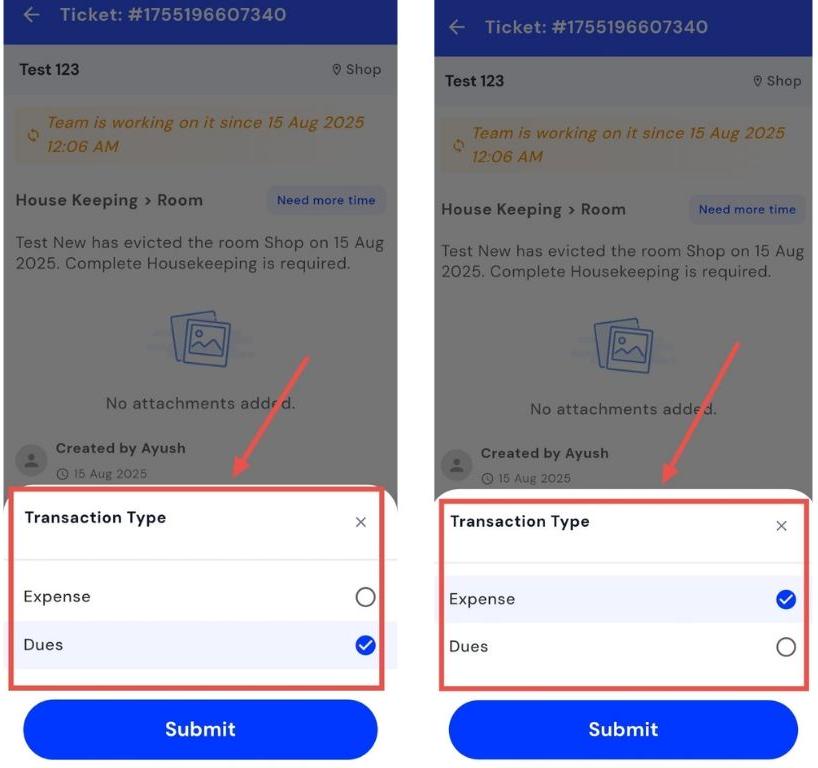
- Step 5: Enter details Fill in the amount, description, and date in the respective fields.
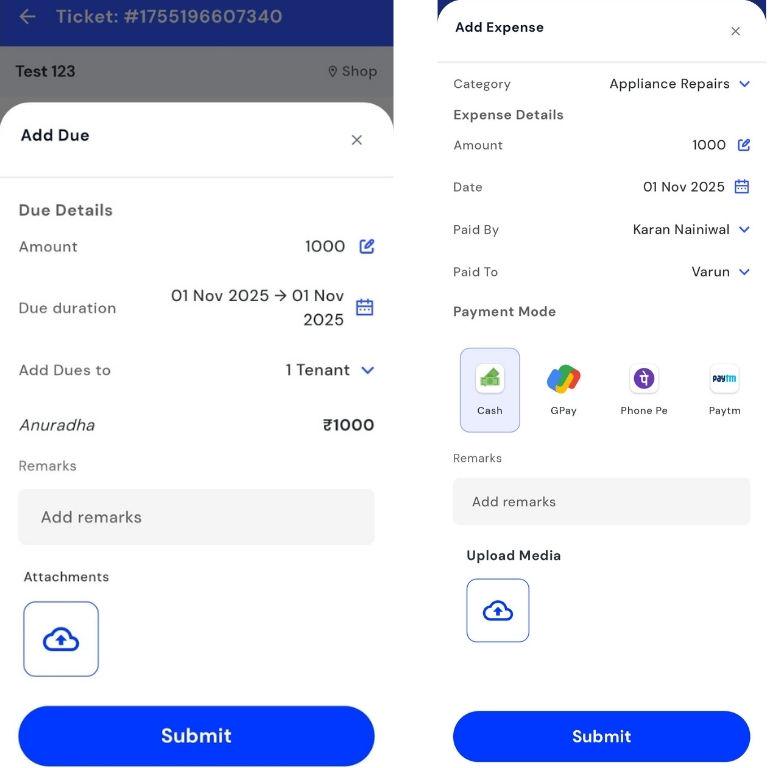
- Step 6: Save Tap Submit to record the transaction successfully.

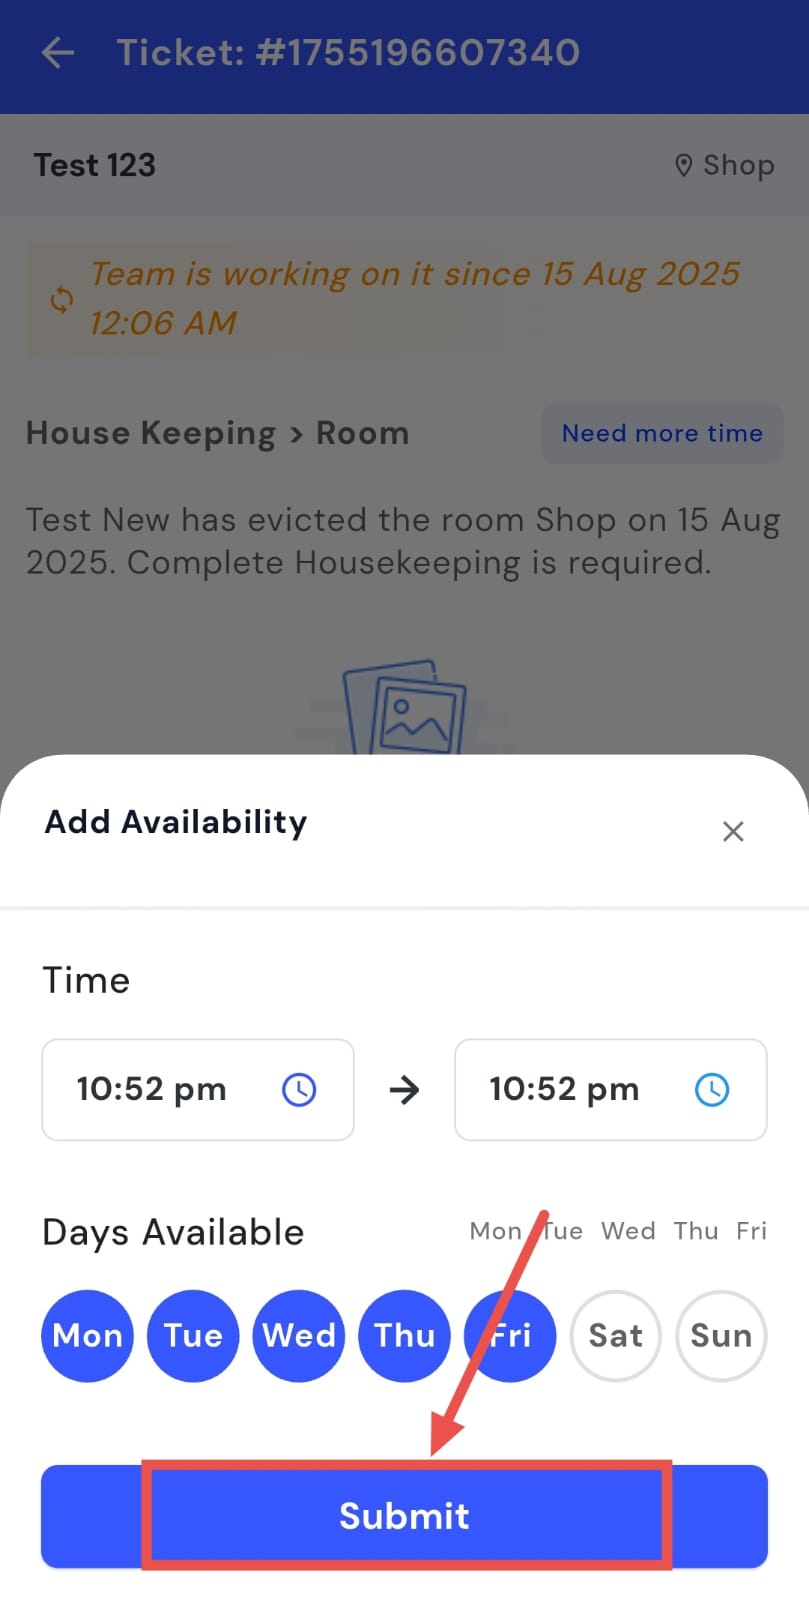
How can I add tenant availability for a complaint?
You can easily record tenant availability directly from the complaint card. By adding availability days and time slots, you can keep track of tenant schedules effortlessly. This helps you schedule visits or coordinate complaint resolutions at convenient times, avoiding conflicts and ensuring smooth follow-ups.
Here's how you can do it:
- Step 1: Open Complaints Tap the Property icon in the bottom navigation menu, then select the Complaint option.
- Step 2: Locate the complaint Scroll and open the complaint card for which you want to update tenant availability.
- Step 3: Add Availability Tap the Add Availability option.
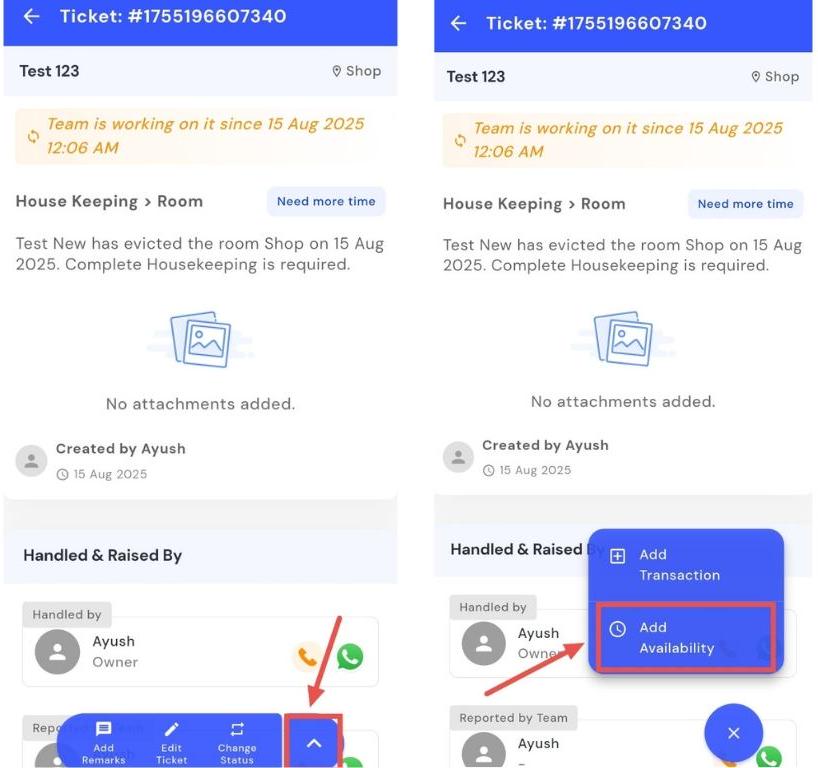
-
Step 4: Enter availability Specify when the tenant will be available by filling in:
-
Days: Select the days of the week the tenant will be present.
-
Time Slots: Enter the specific time ranges for each day.
-
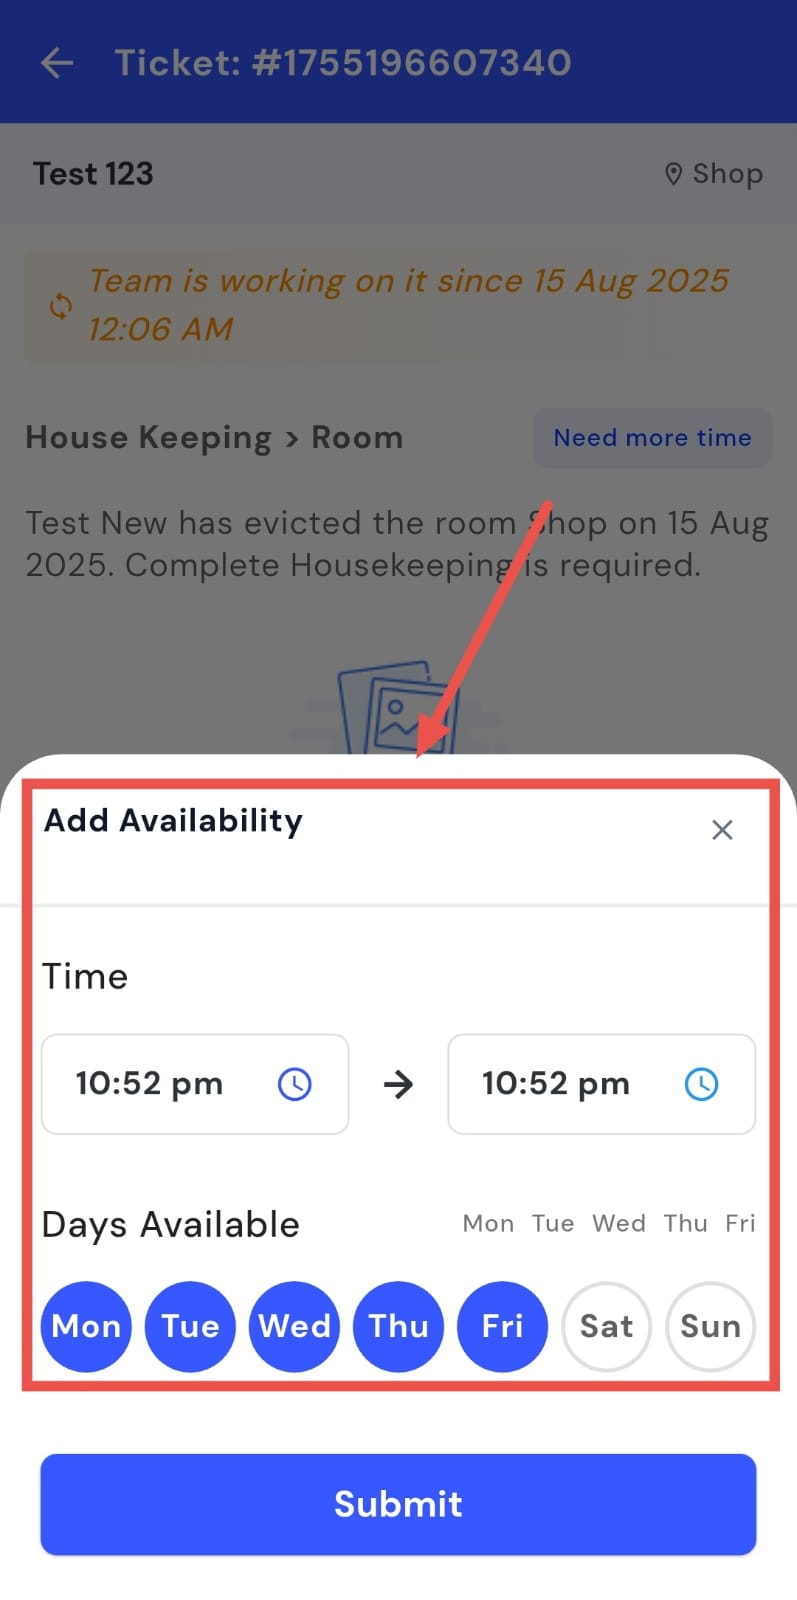
- Step 5: Save Tap Save to record the availability details successfully.