Property Room
PROPERTY>ROOM
How can I search for a room name or number?
Need to find a specific room in your property without scrolling endlessly? The search option makes it effortless. By simply entering the room’s name or number, you can instantly locate the room and access all its details in seconds. No more hunting through long lists, everything you need is just a few taps away.
Here’s how you can do it:
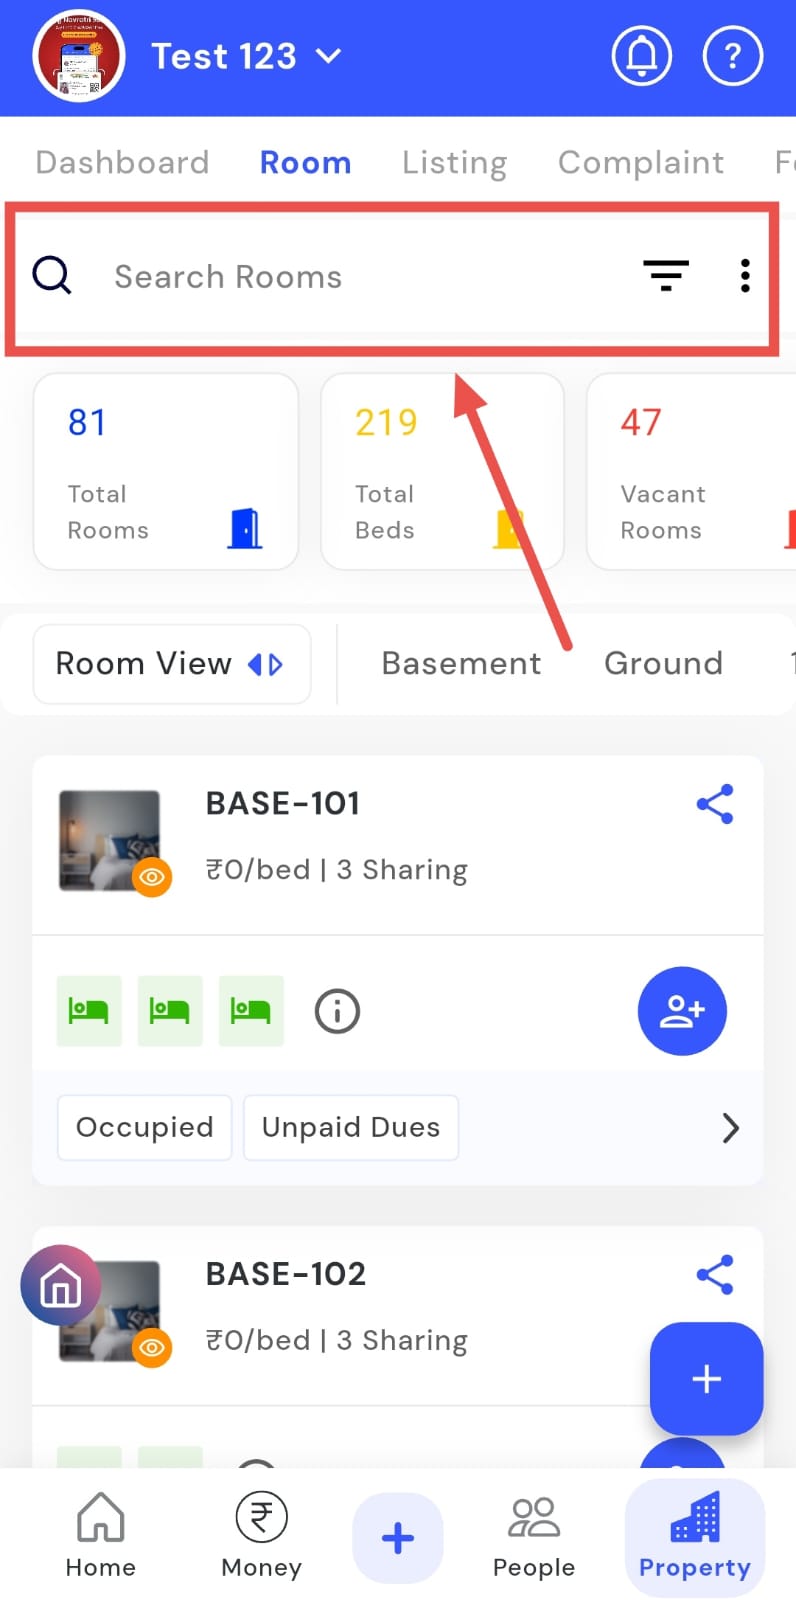
- Step 1: Open the Rooms section Tap the Property icon from the bottom navigation menu, then select Room to view the list of all available rooms.
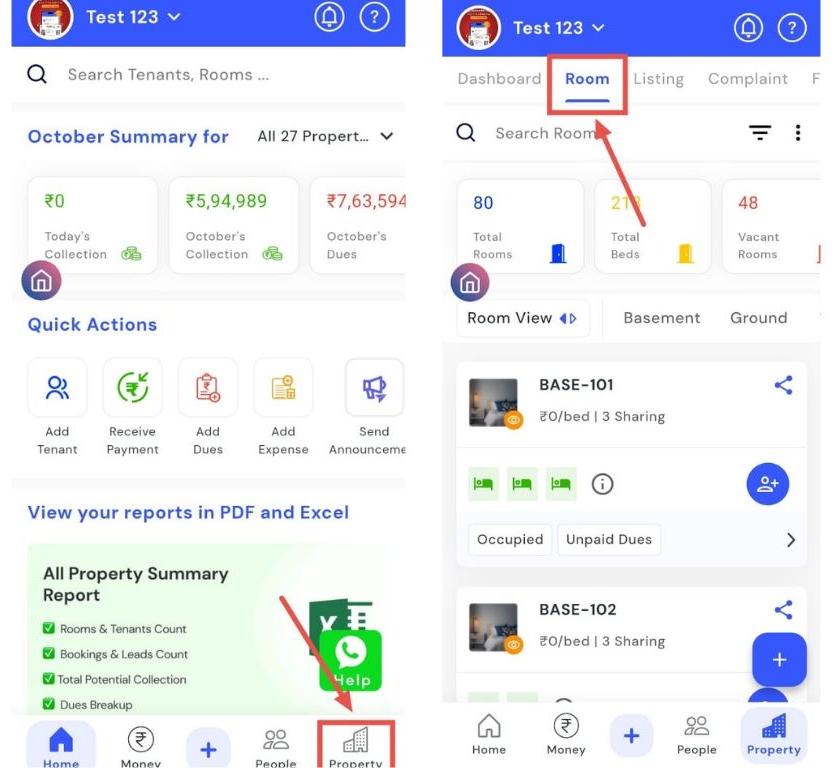
- Step 2: Search for a room In the search box at the top, type the room name or number. The app will automatically show matching rooms so you can quickly open or manage them.
How can I view vacant, occupied, or semi-vacant rooms?
Want to check the status of your rooms quickly? The Vacancy Type filter in the Rooms section makes it easy. Whether you want to see vacant rooms, fully occupied rooms, or partially occupied (semi-vacant) ones, this filter lets you view them all at a glance. It’s a simple way to monitor room availability, manage allocations, and keep track of occupancy without manually checking each room.
Here’s how you can use the Vacancy Type filter to check room status:
- Step 1: Open the Rooms section Tap the Property icon in the bottom navigation menu, then select Room to access the list of all rooms.
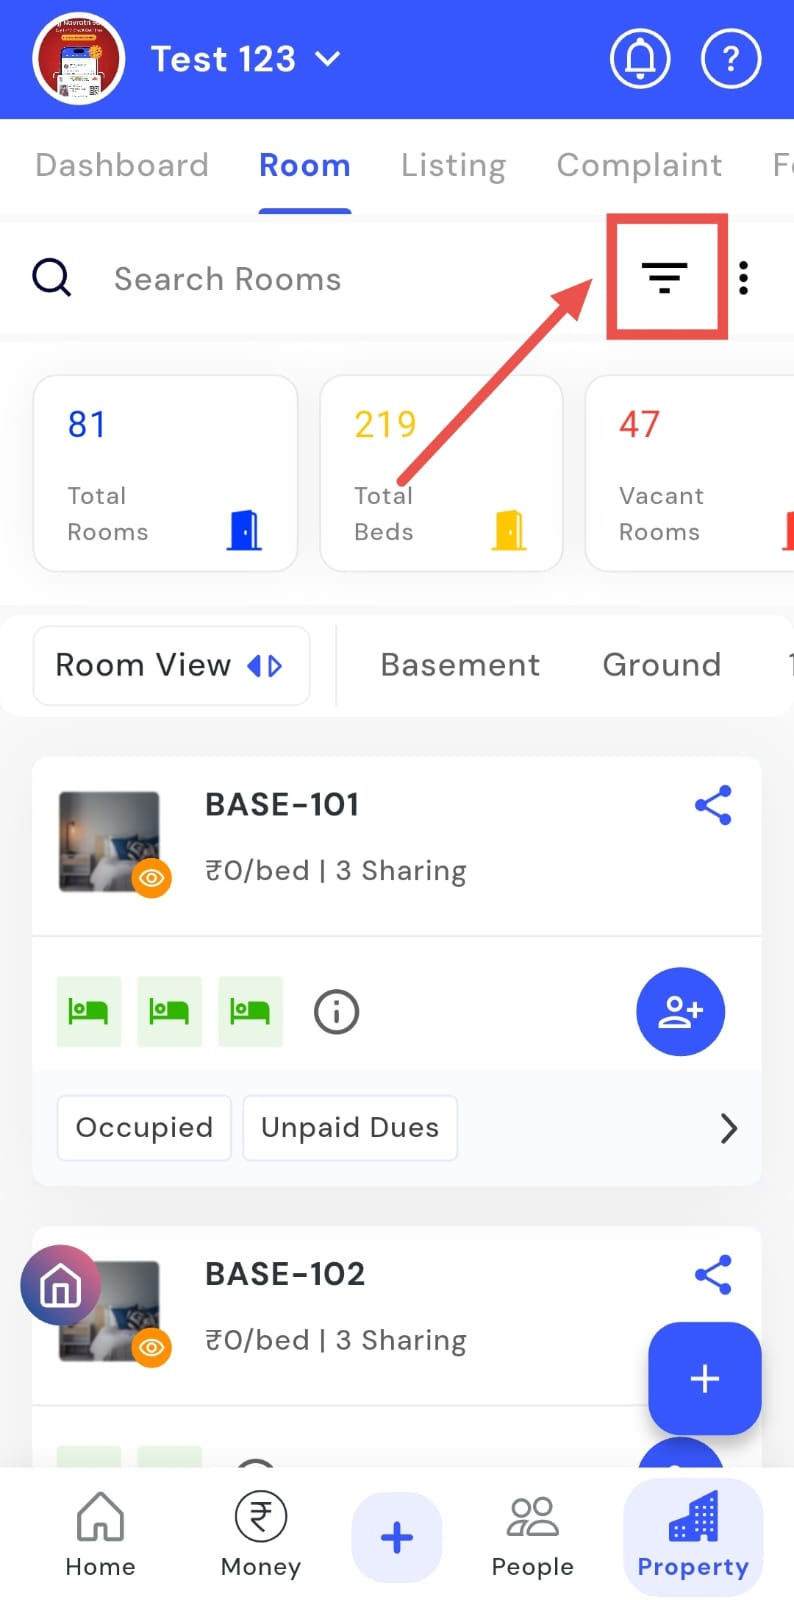
- Step 2: Open the filter Click on the Filter icon located inside the search box at the top of the screen.
-
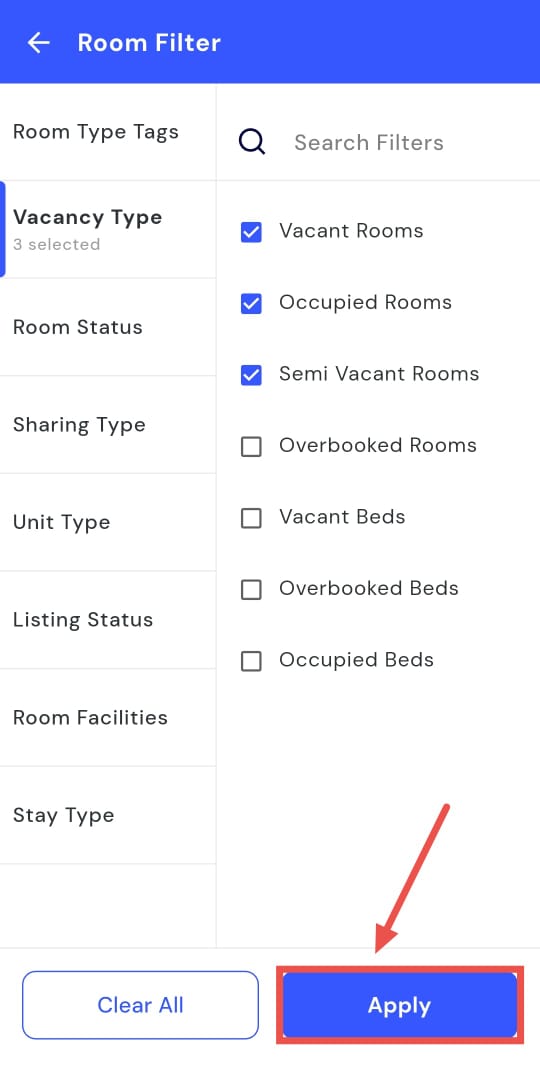
Step 3: Select vacancy type In the filter window, tap Vacancy Type and choose one of the following options:
-
Vacant – to see all empty rooms
-
Occupied – to see all rooms currently in use
-
Semi Vacant – to see rooms that are partially occupied
-
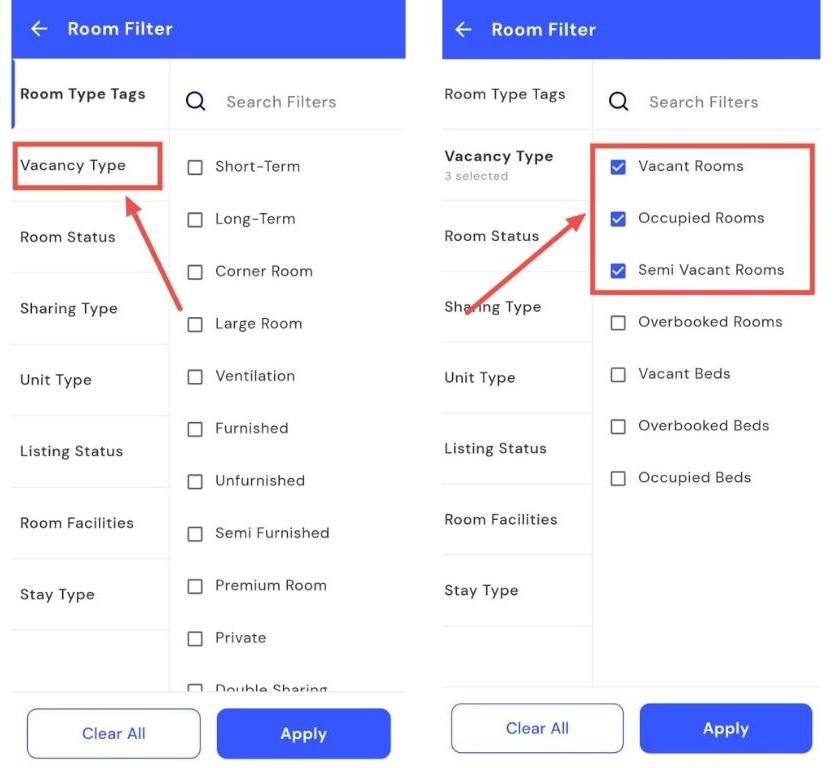
- Step 4: Apply the filter Tap Apply, and the app will display rooms according to the occupancy type you selected.
How can I view different types of rooms?
Looking for a specific type of room? The Room Type filter in the Rooms section makes it effortless. Whether you want a large room, a furnished room, or an unfurnished room, simply select the desired option, and all matching rooms will appear at a glance. This filter helps you quickly find the style of room you need without scrolling through the entire list.,
Follow these steps to check different room types:
- Step 1: Open the Rooms section Tap the Property icon in the bottom navigation menu, then select Room to access the list of all rooms.
- Step 2: Open the filter Click on the Filter icon available in the search box at the top of the screen.
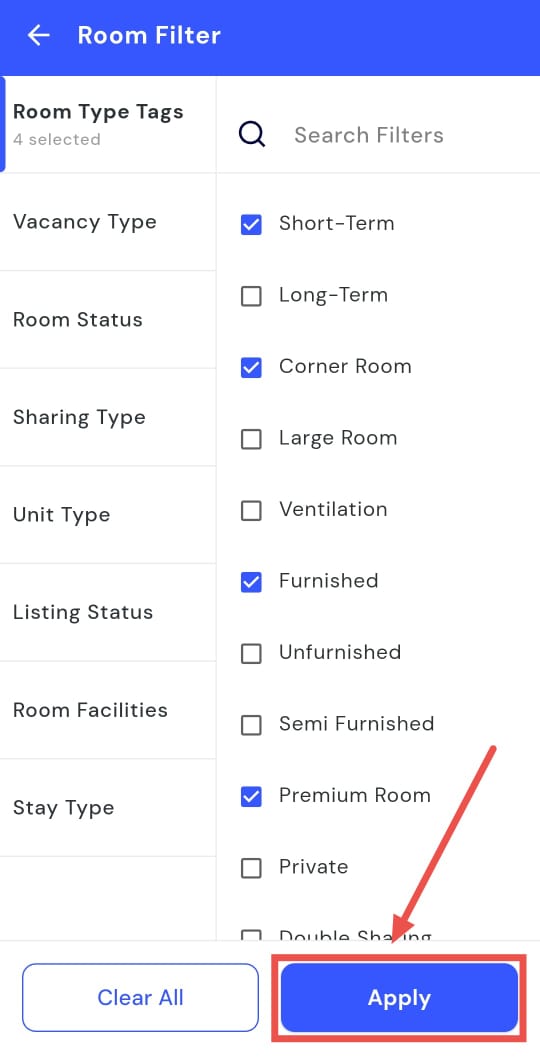
- Step 3: Select room type In the filter window, tap Room Type Tags and choose the type of room you want to view. Options may include Short-Term, Large Room, Furnished Room, Premium Room, and more.
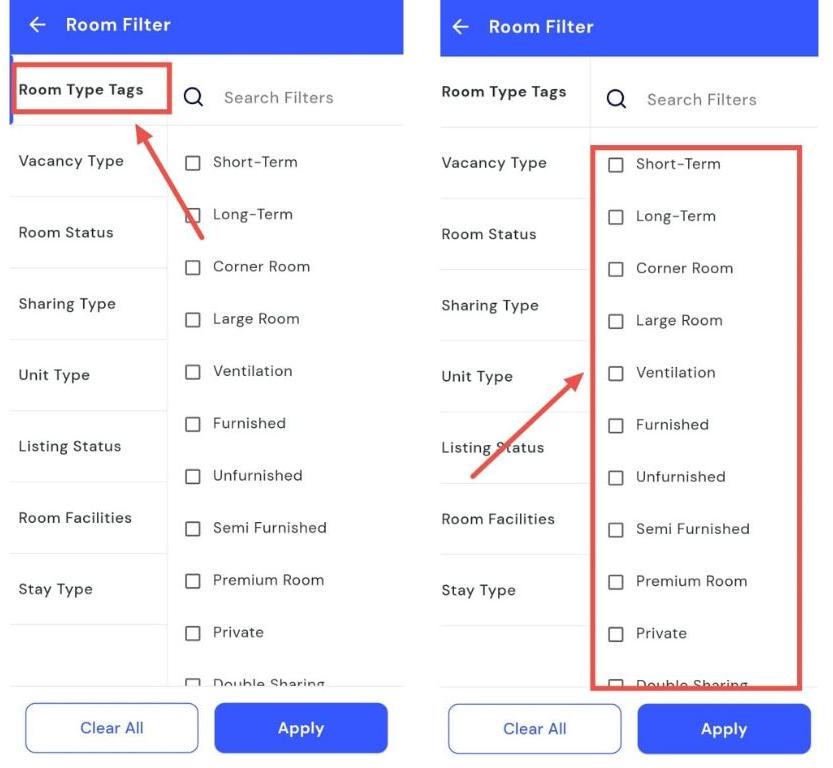
- Step 4: Apply the filter Tap Apply and the app will display rooms according to the type you selected.
| Tip: Use the Room Type filter when you want to quickly find rooms that match specific features or preferences, making room management easier and more organized. |
|---|
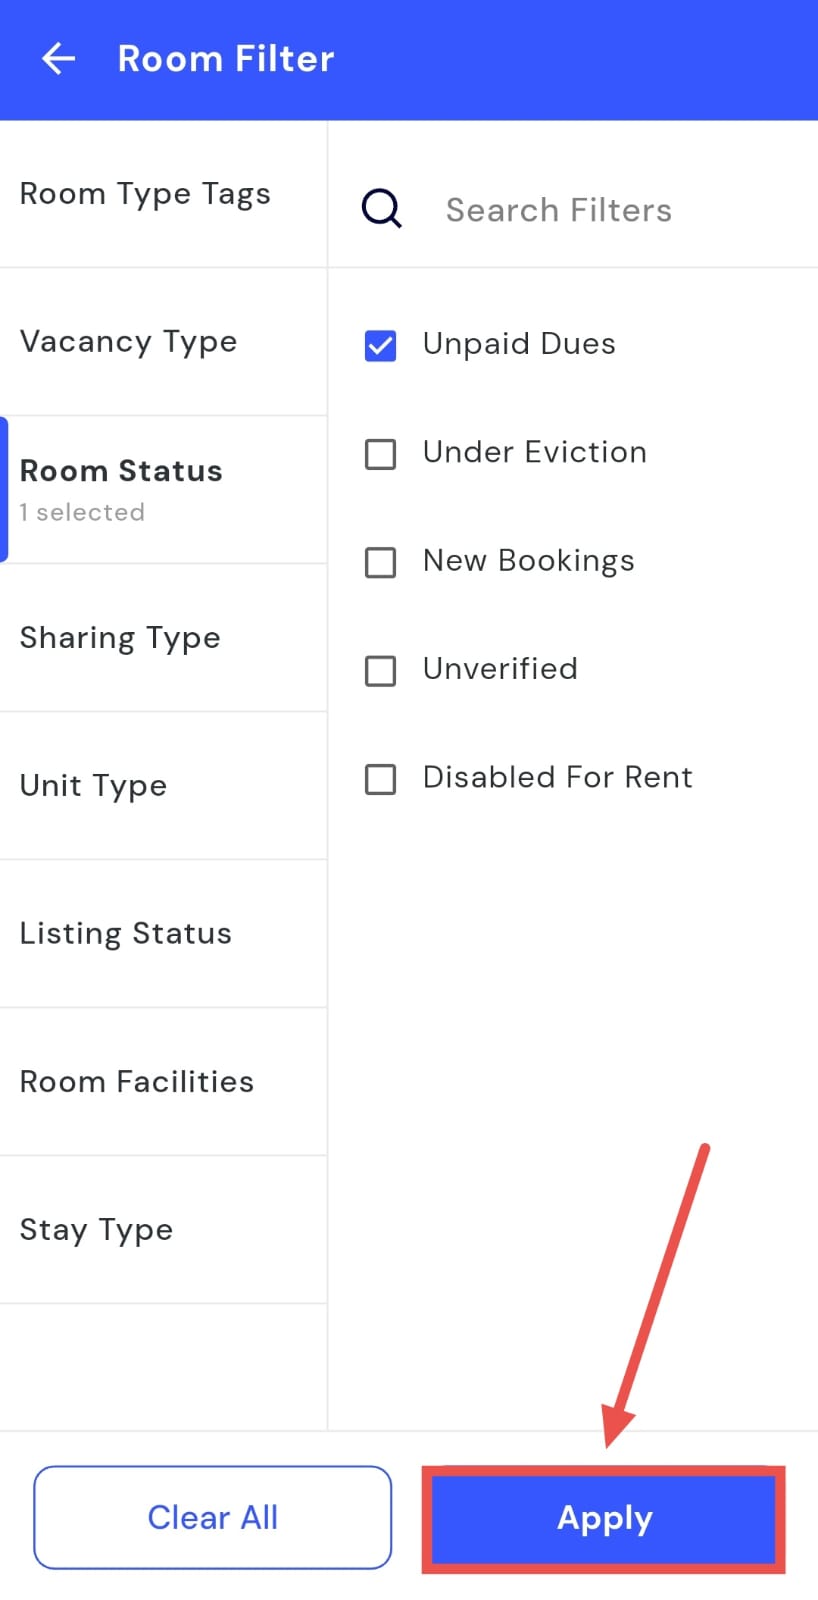
How can I check the status of unpaid dues for rooms?
Want to stay on top of rooms with pending payments? The Room Status filter makes it simple. Just select the Unpaid Dues option, and you’ll instantly see all rooms with outstanding payments. From here, you can track dues, follow up with tenants, and even prepare **financial reports, **all without having to open each room individually.
Here’s how you can check rooms with unpaid dues:
- Step 1: Open the Rooms section Tap the Property icon in the bottom navigation menu, then select Room to access the list of all rooms.
- Step 2: Open the filter Click on the Filter icon located inside the search box at the top of the screen.
- Step 3: Select room status In the filter window, tap Room Status and choose Unpaid Dues to see all rooms with pending payments.
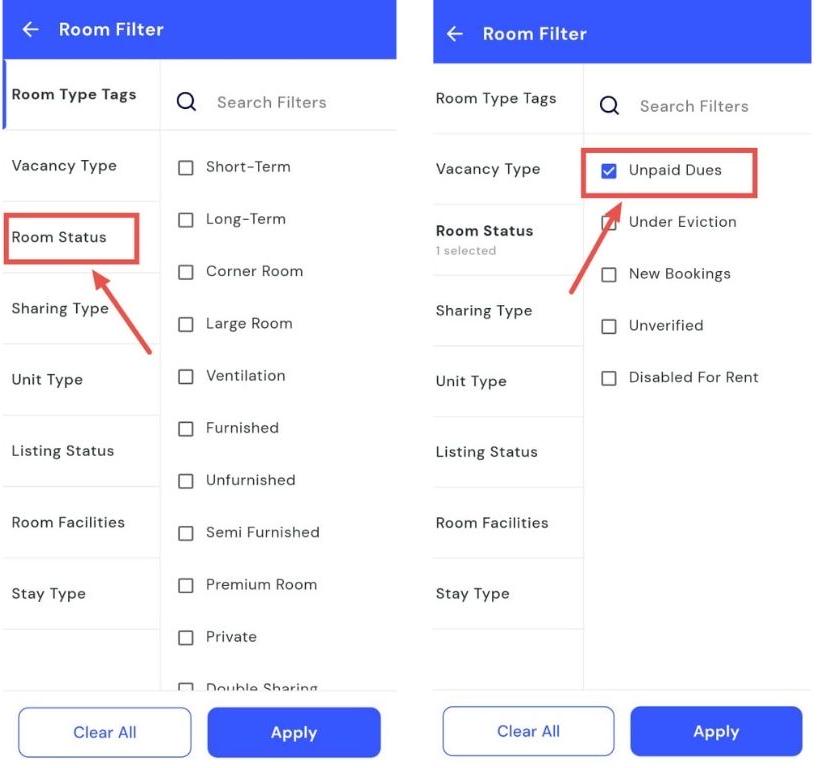
- Step 4: Apply the filter Tap Apply and the app will display rooms based on unpaid dues, making it easy to review and manage outstanding payments.
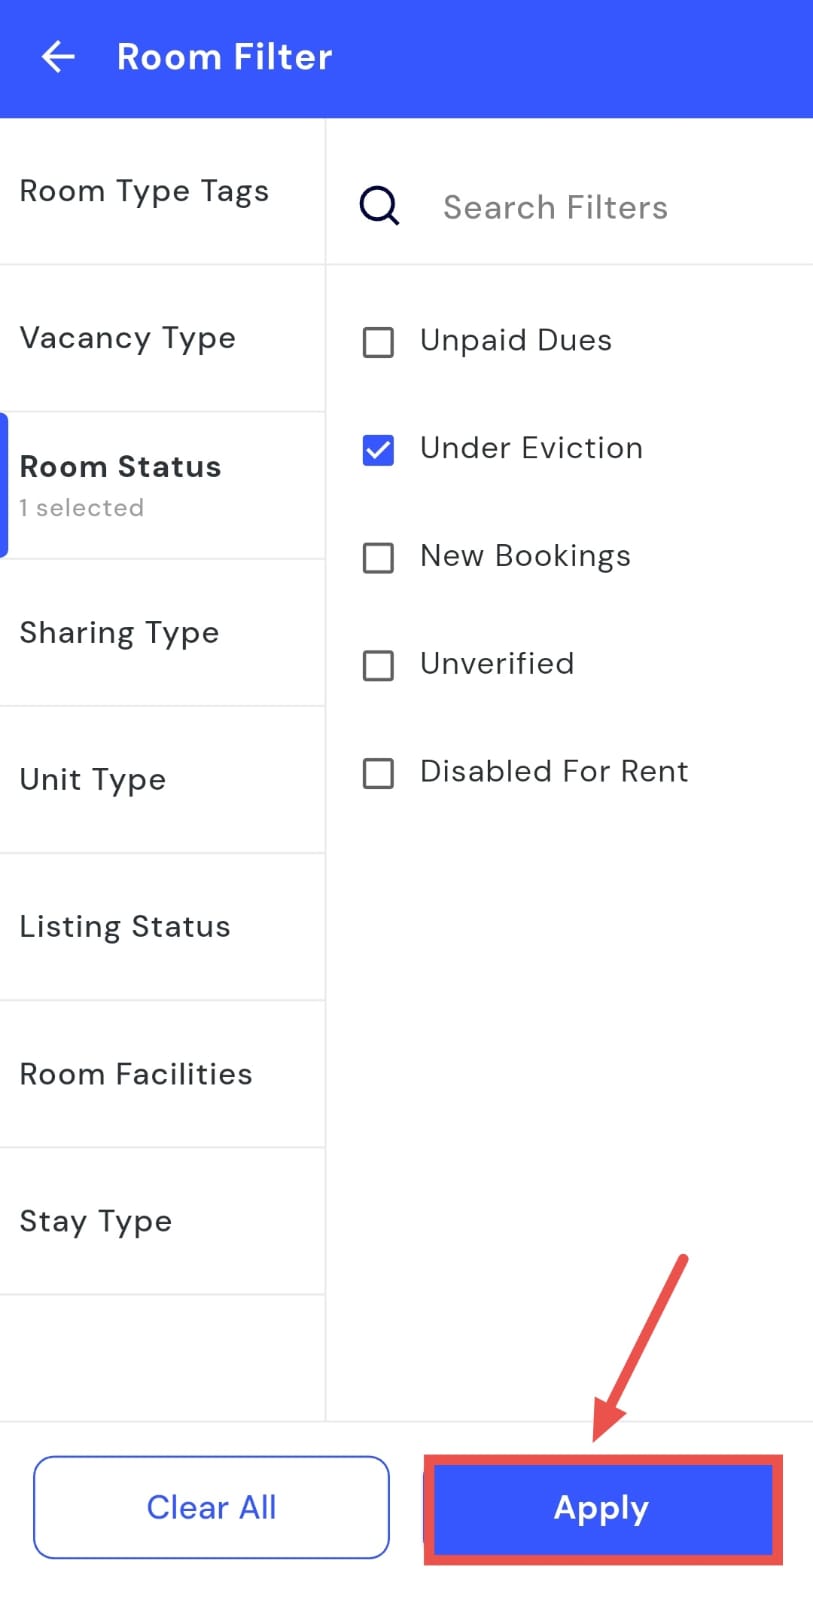
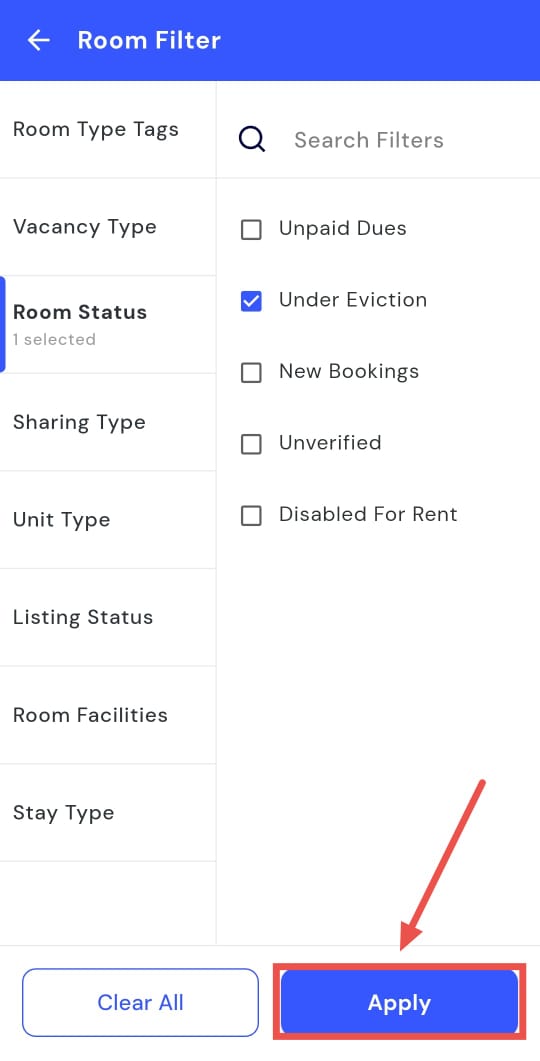
How can I check the status of rooms under eviction?
Using the Room Status filter, you can quickly see all rooms that are currently under eviction. Selecting the relevant option displays every affected room at a glance, allowing you to monitor the eviction process efficiently. This view helps in managing tenant follow-ups and preparing reports without manually checking each room.
Follow these steps to check rooms under eviction:
- Step 1: Open the Rooms section Tap the Property icon in the bottom navigation menu, then select Room to access the full list of rooms.
- Step 2: Open the filter Click on the Filter icon located inside the search box at the top of the screen.
- Step 3: Select room status In the filter window, tap Room Status and choose Under Eviction to view all rooms in this category.
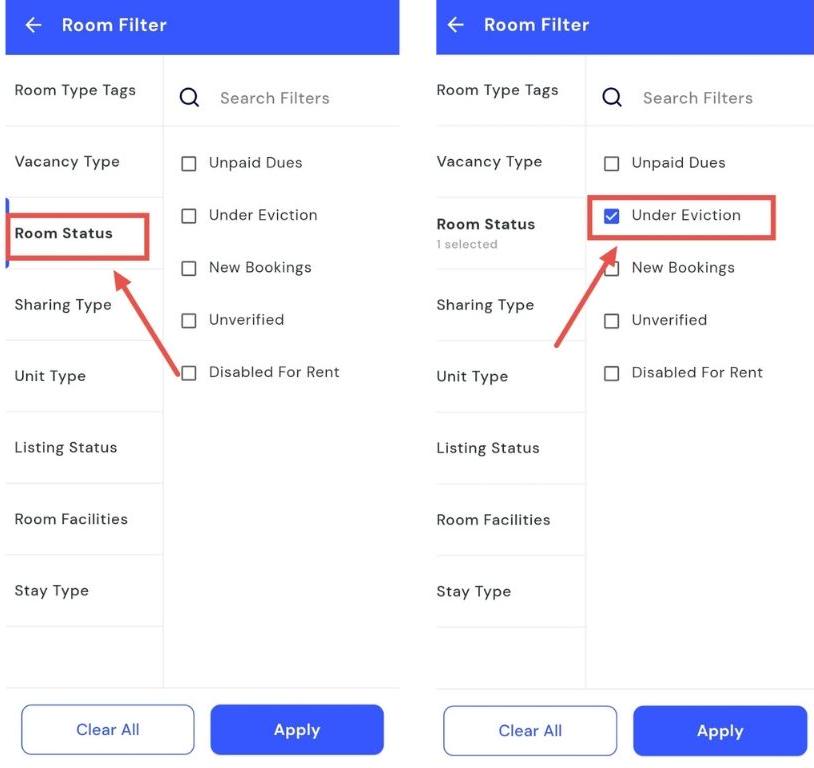
- Step 4: Apply the filter Tap Apply, and the app will display all rooms under eviction for easy tracking and management.
How can I check the status of rooms for new bookings?
Looking to quickly see which rooms are ready for new tenants? The Room Status filter makes it simple. By selecting the option for fresh bookings, you can view all rooms that are available for new allocations in one place. This allows you to plan bookings efficiently, manage tenant onboarding, and keep track of your property’s availability without going through each room manually.
Here’s how you can check rooms ready for new bookings:
- Step 1: Open the Rooms section Tap the Property icon in the bottom navigation menu, then select Room to access the full list of rooms.
- Step 2: Open the filter Click on the Filter icon located inside the search box at the top of the screen.
- Step 3: Select room status In the filter window, tap Room Status and choose New Bookings to view all rooms available for new tenants.
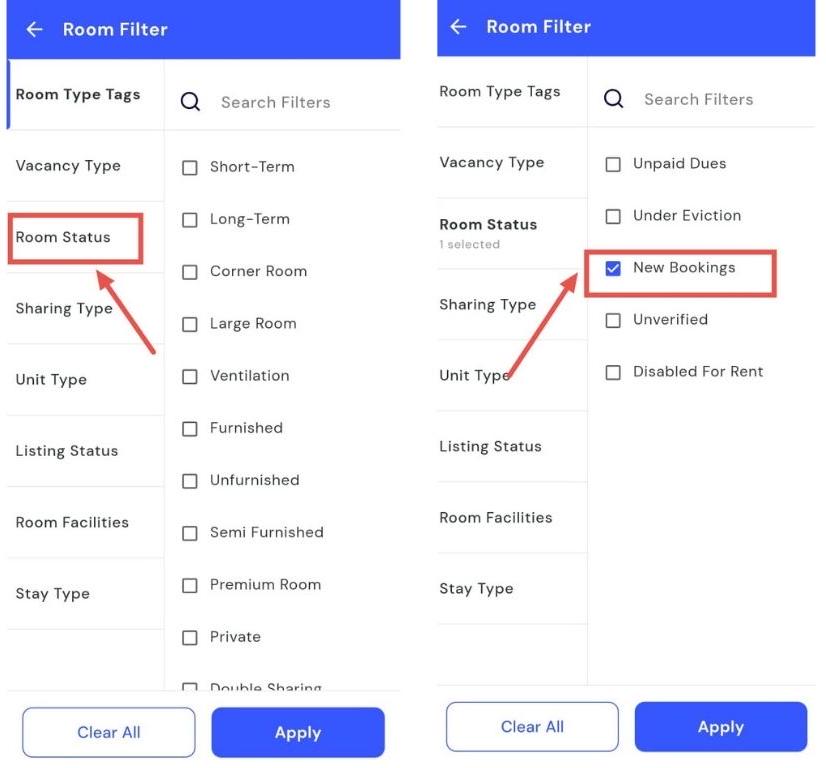
- Step 4: Apply the filter Tap Apply, and the app will display all rooms ready for new bookings, making it easy to manage allocations.
How can I see the available facilities for a room?
Using the Room Facilities filter, you can quickly see what each room comes with. By selecting the appropriate option, all the available amenities are displayed at a glance. This helps you choose the right room for tenants and manage room allocations efficiently. Having a clear view of facilities ensures you can make decisions easily without manually checking each room.
Follow these steps to check room facilities:
- Step 1: Open the Rooms section Tap the Property icon in the bottom navigation menu, then select Room to access the full list of rooms.
- Step 2: Open the filter Click on the Filter icon located inside the search box at the top of the screen.
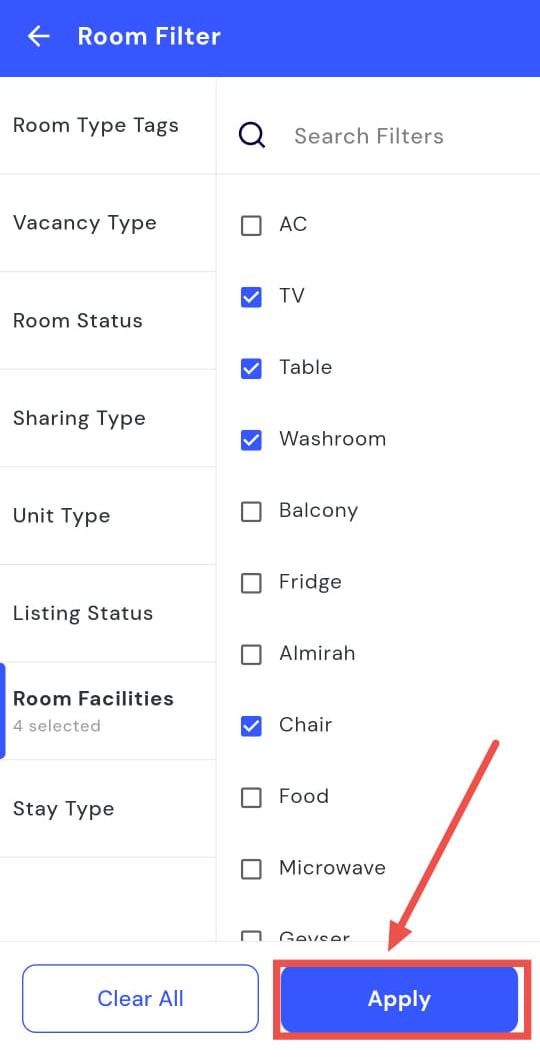
- Step 3: Select room facilities In the filter window, tap Room Facilities and choose the facility or amenity you want to check.
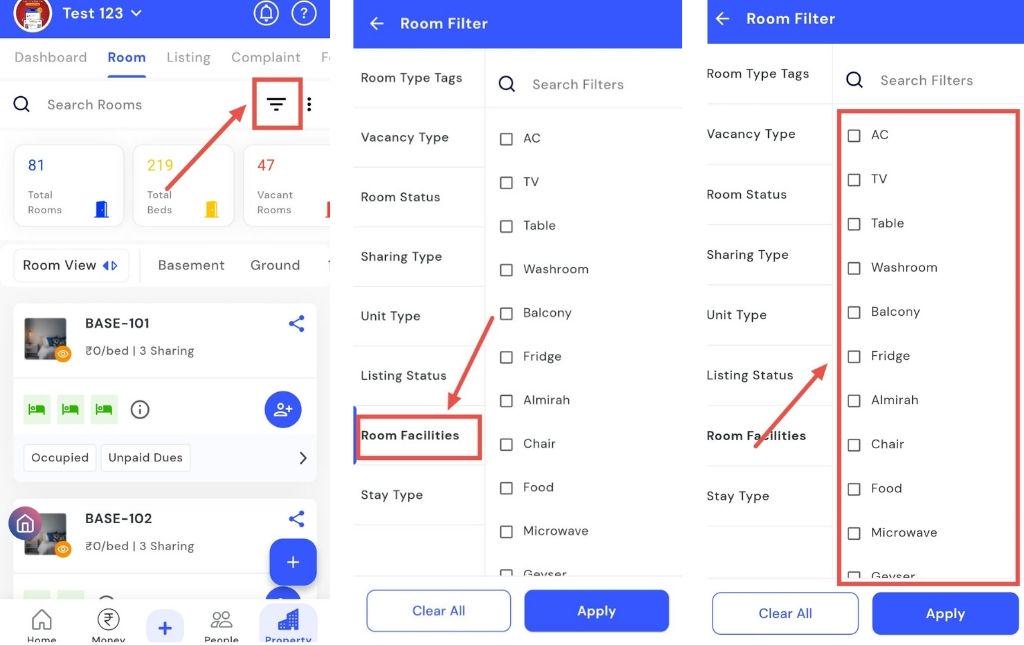
- Step 4: Apply the filter Tap Apply, and the app will display rooms based on the selected facilities, making it easier to identify rooms with the desired amenities.
How can I add a single room?
Do you want to add a new room to your property? The Add Single Room feature makes it quick and easy. On the Add New Unit screen, you can fill in all the necessary details, specify whether the room is available for rent, and select the facilities it offers, so it’s ready for management or allocation. This helps ensure every new room is properly registered and organized from the start.
Follow these steps to add a new room:
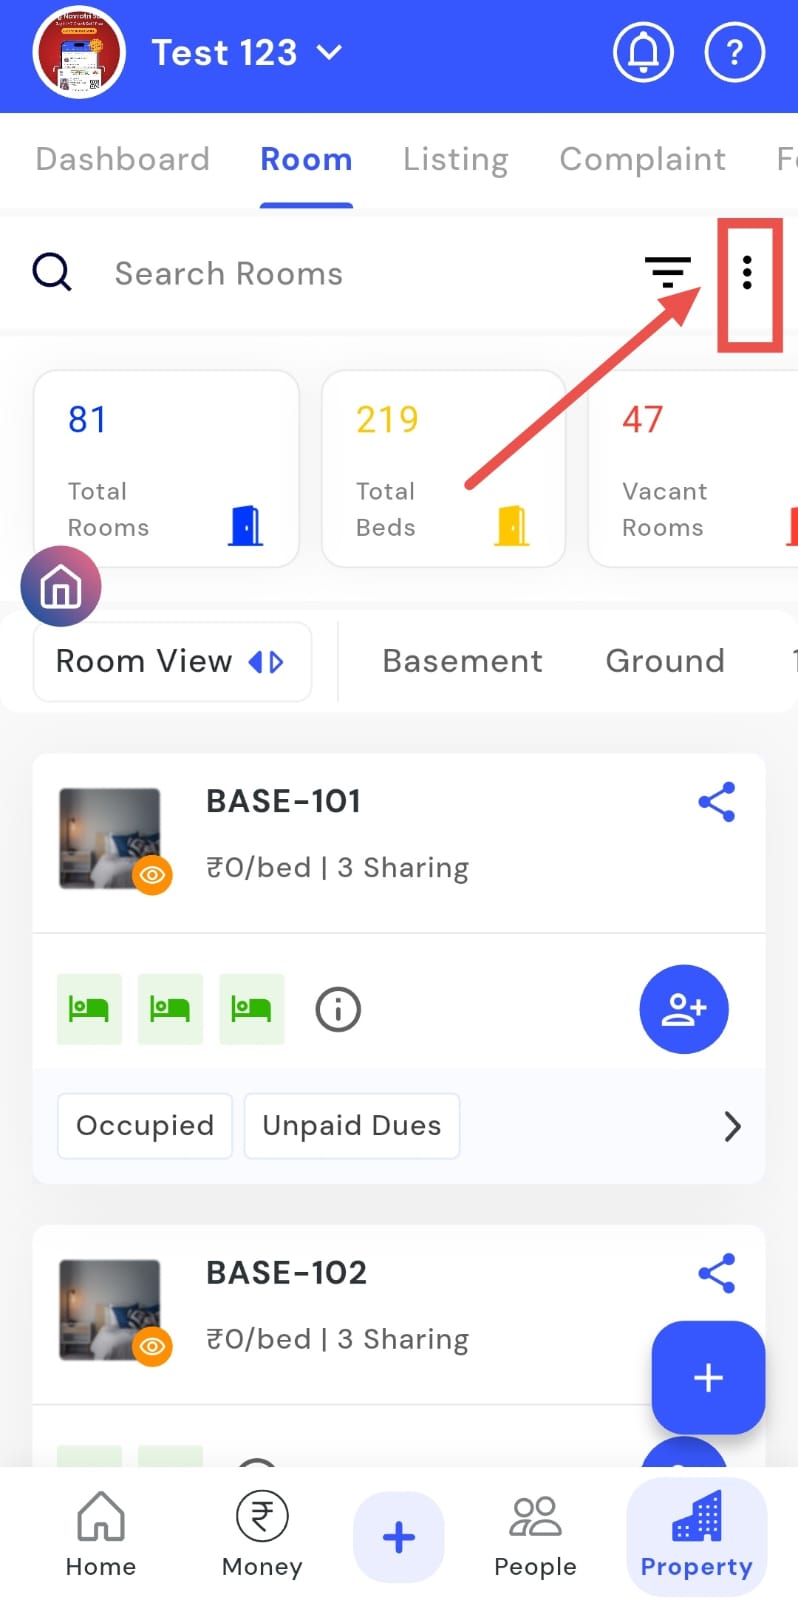
- Step 1: Open the Rooms section Tap the Property icon in the bottom navigation menu, then select Room to access the room list.
- Step 2: Open the add menu Click on the three dots on the right-hand side.
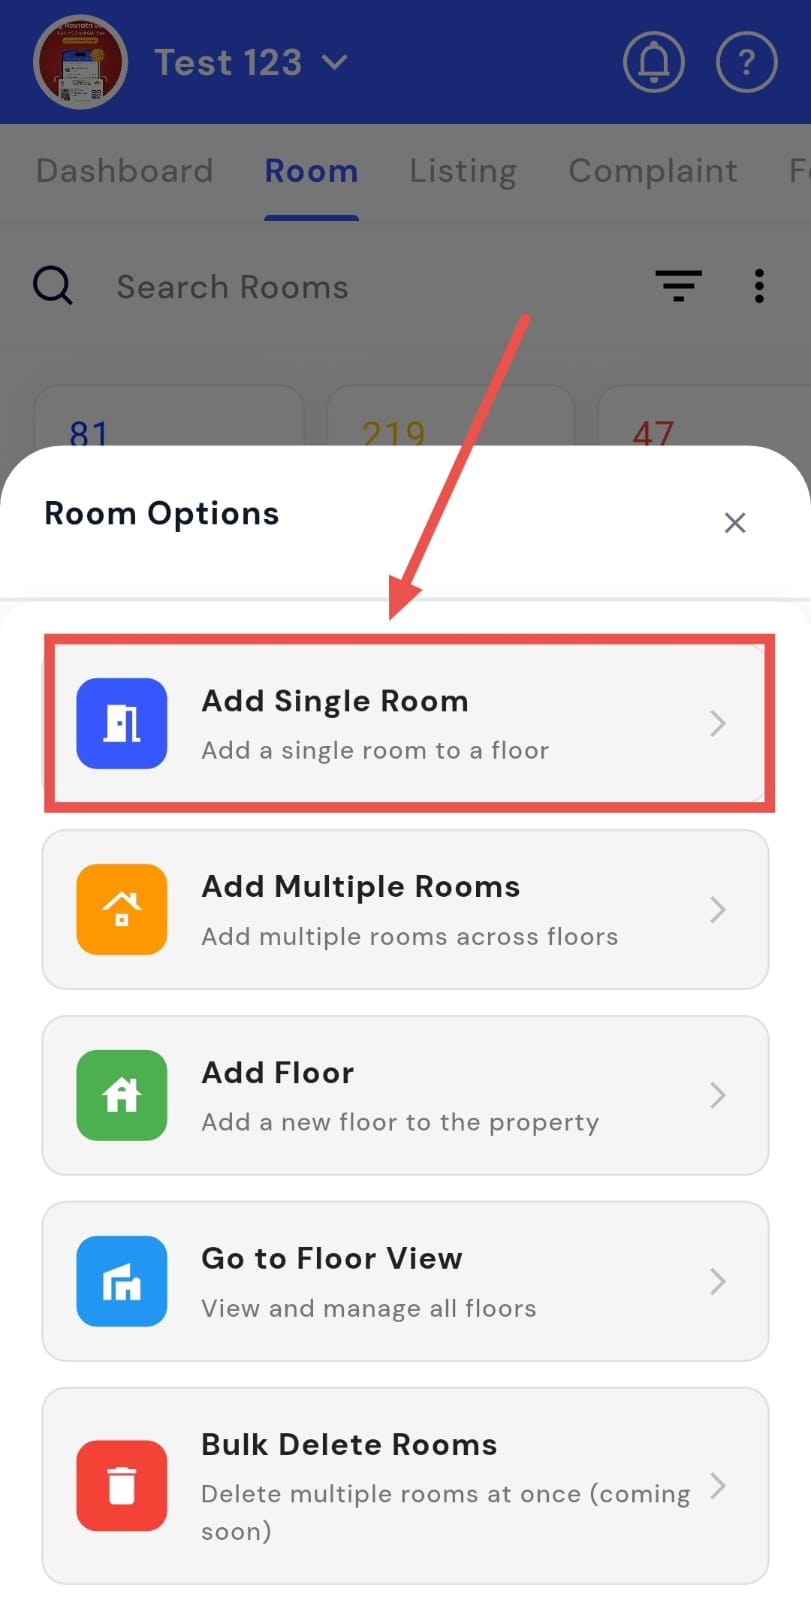
- Step 3: Select Add Single Room Tap Add Single Room to open the Add screen.
- Step 4: Enter room details On the Add Room screen, fill in all appropriate details for the room, such as name, number, and description.
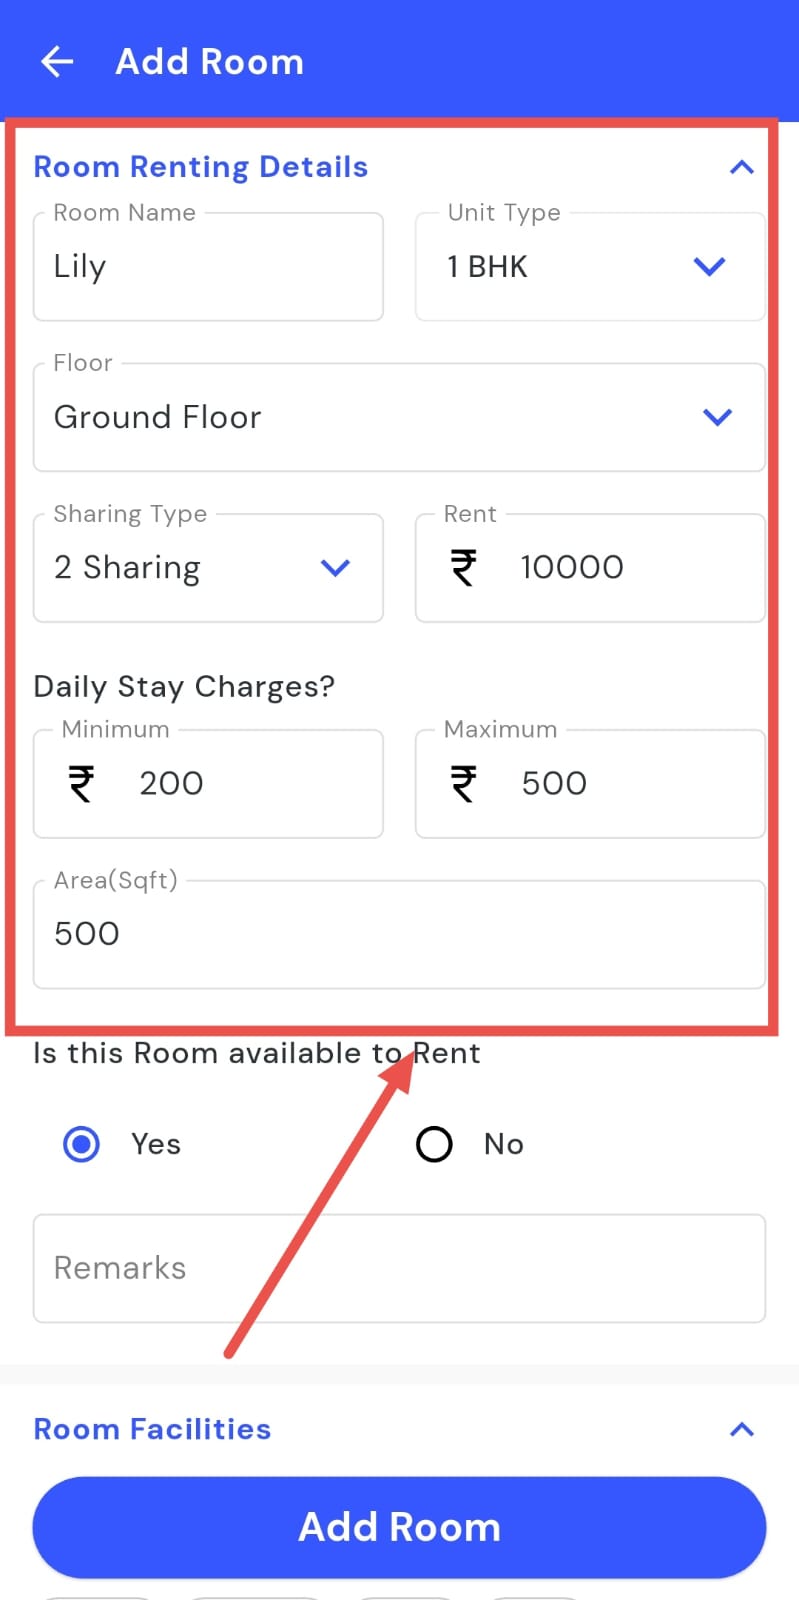
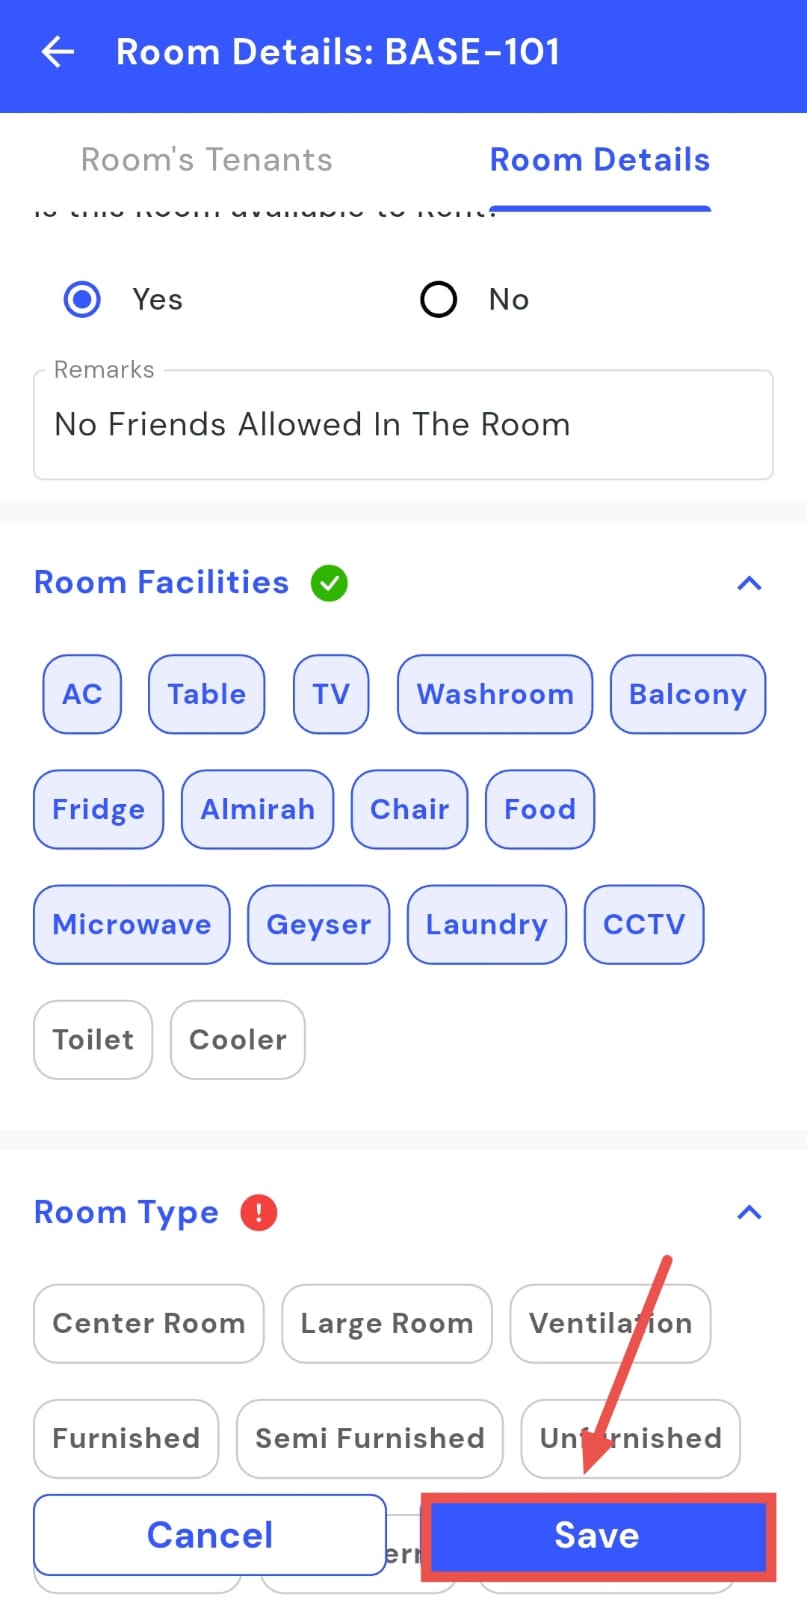
- Step 5: Set availability Choose Yes if the room is available for rent, or No if it is not.
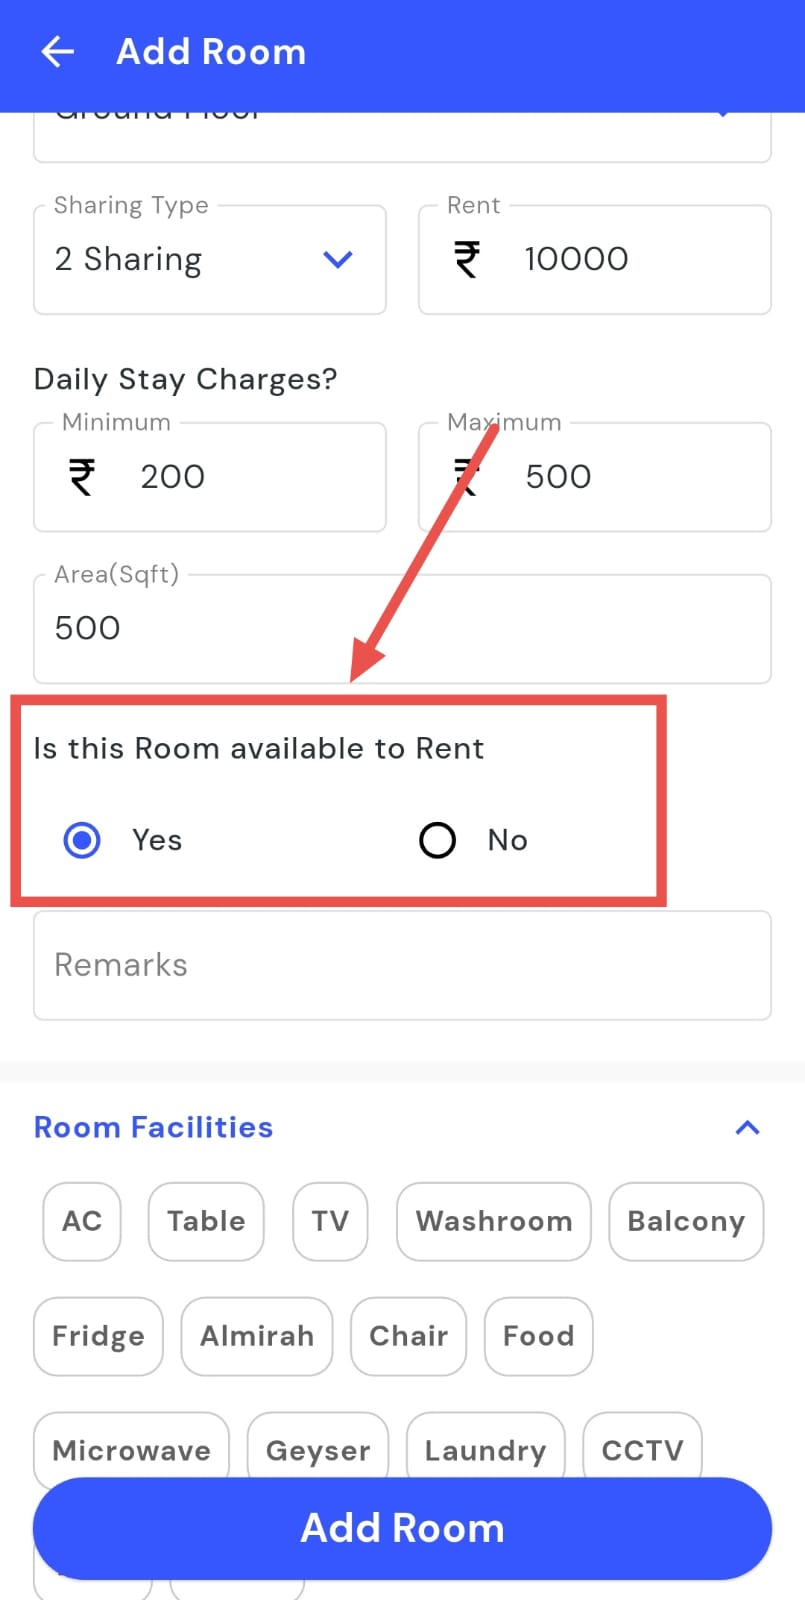
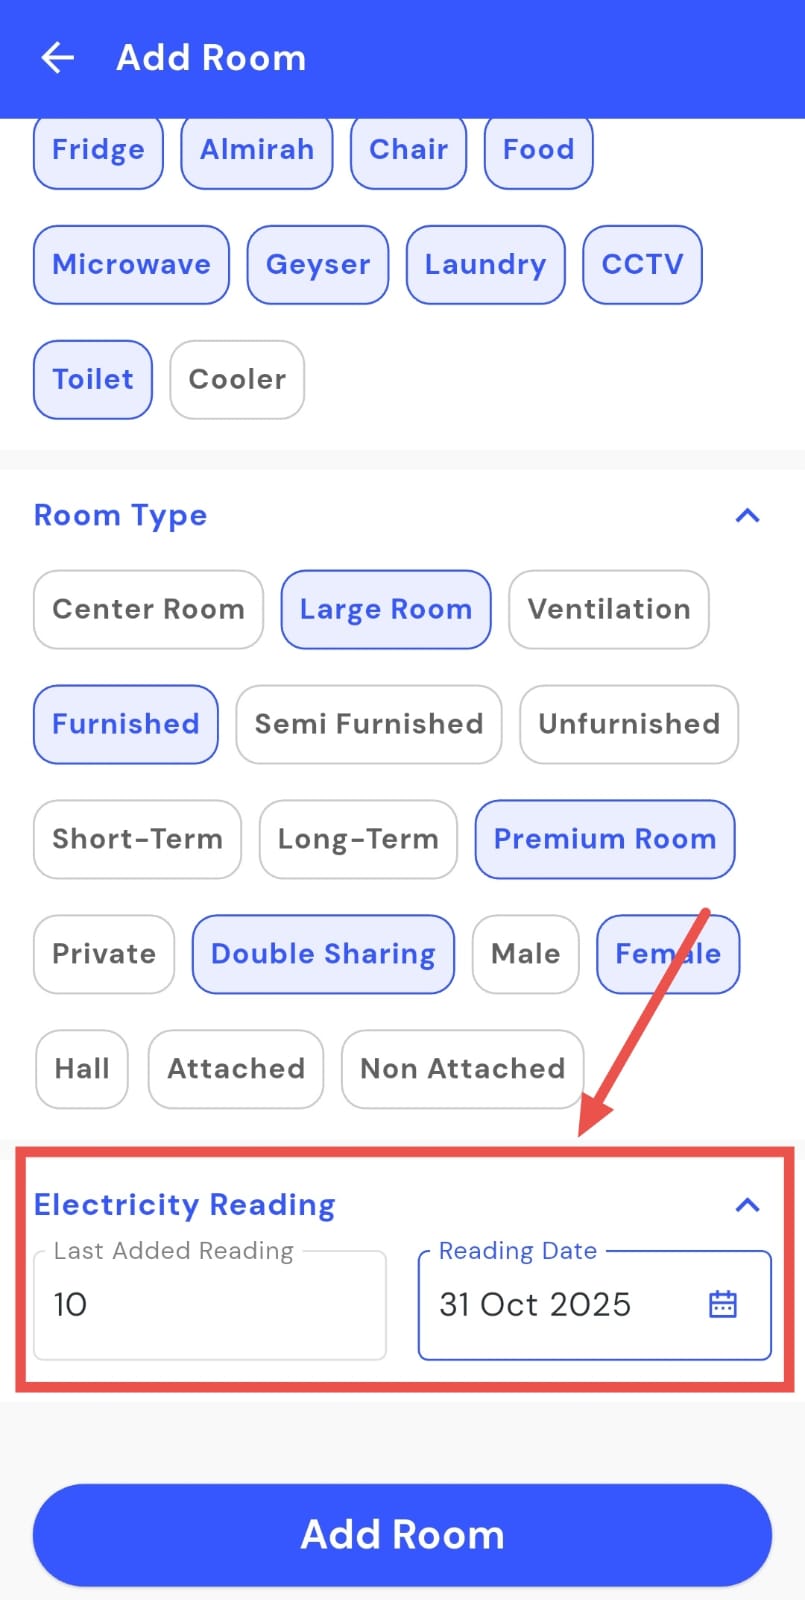
- Step 6: Select Facilities and Room Type Choose the available room facilities and select the room type from the provided options. This helps categorize the room correctly for easier management.
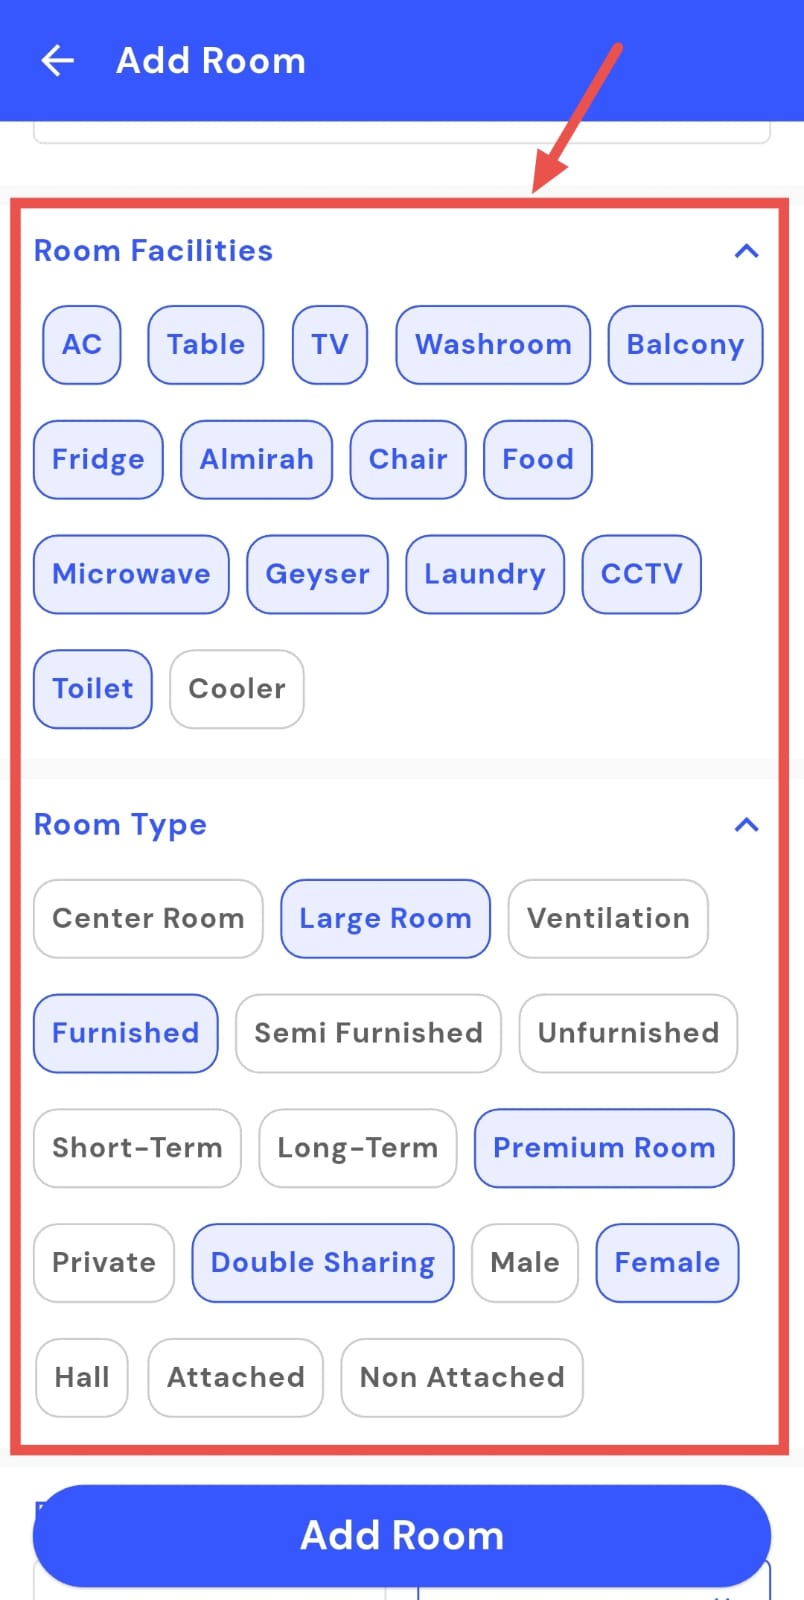
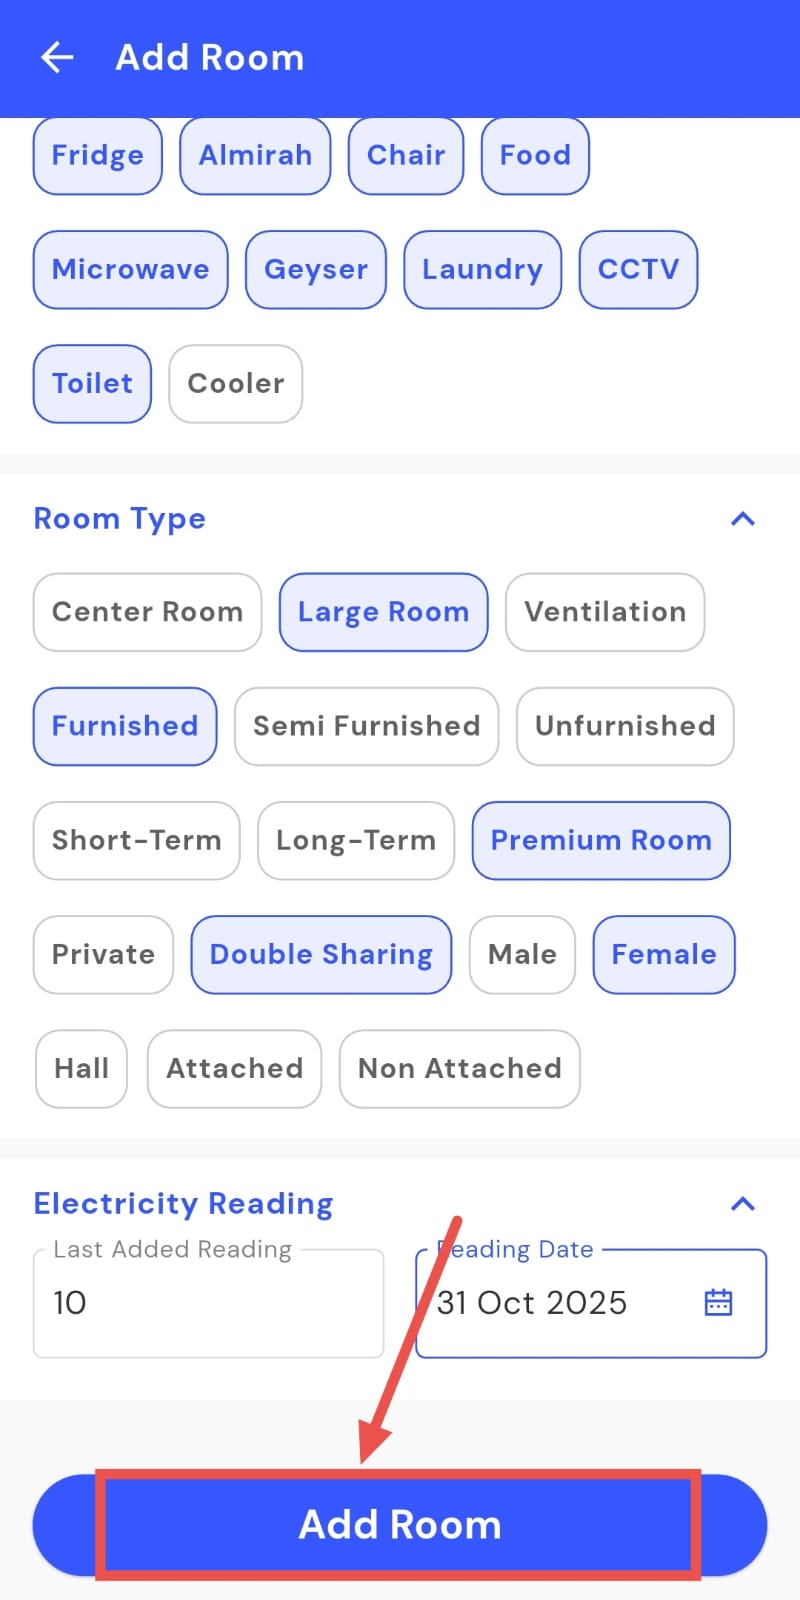
- Step 7: Add Electricity Reading Enter the current electricity meter reading for the room to ensure accurate billing.
- Step 8: Save the Room Click Add Room. The room will now be added and visible in your property list.
How can I add multiple rooms?
The Add Multiple Rooms feature lets you easily register several rooms at once. On the Add Multiple Rooms screen, you can quickly fill in all necessary details for each room, set availability, and select facilities. This allows you to save all rooms efficiently in a single process, making bulk room registration faster and more organized.
Follow these steps to add multiple rooms:
- Step 1: Open the Rooms section Tap the Property icon in the bottom navigation menu, then select Room to access the room list.
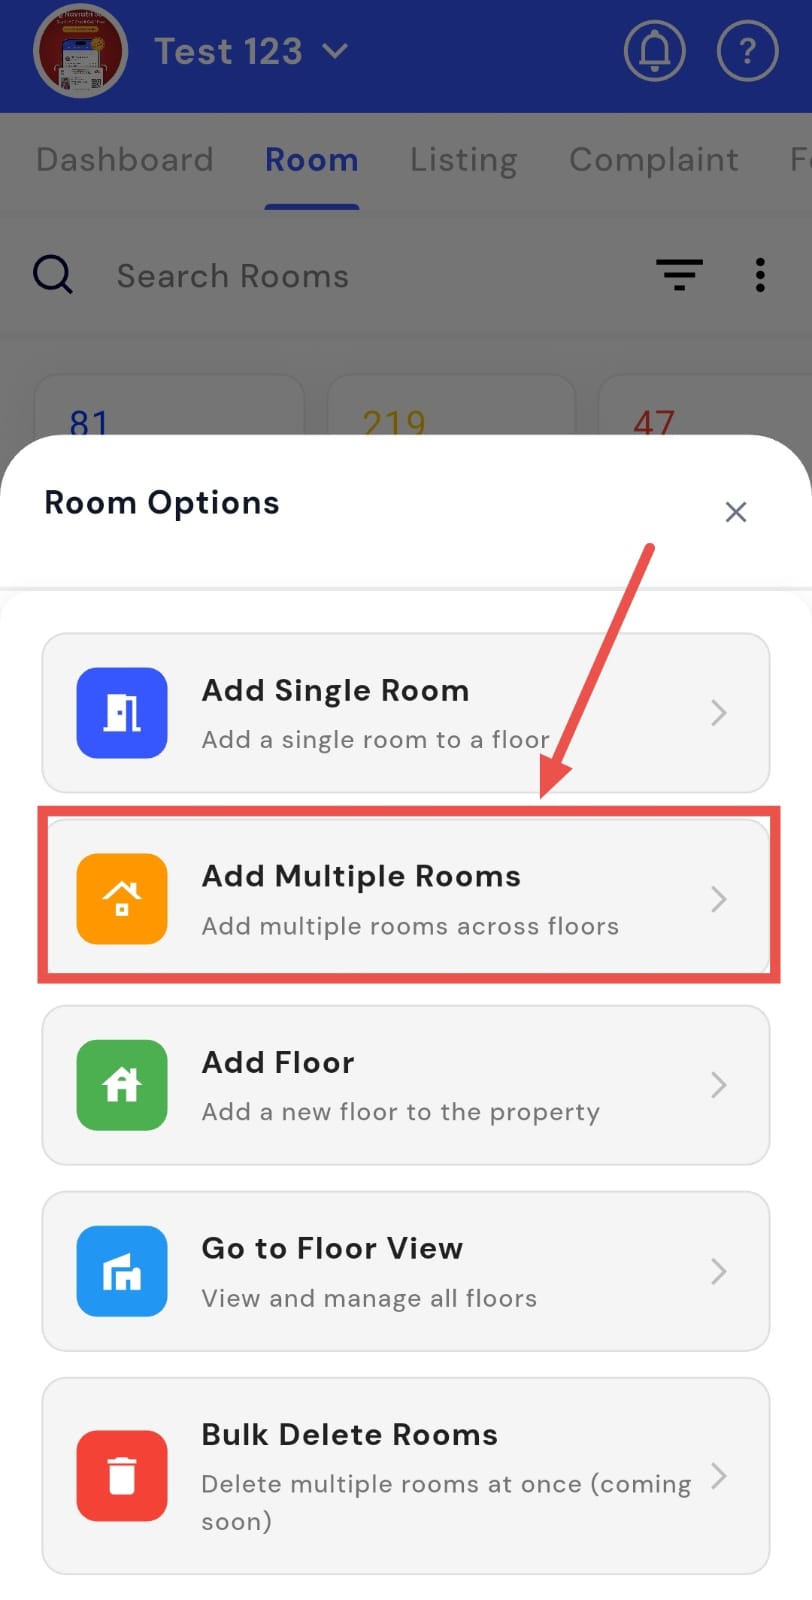
- Step 2: Open the add menu Click on the three dots on the right-hand side.
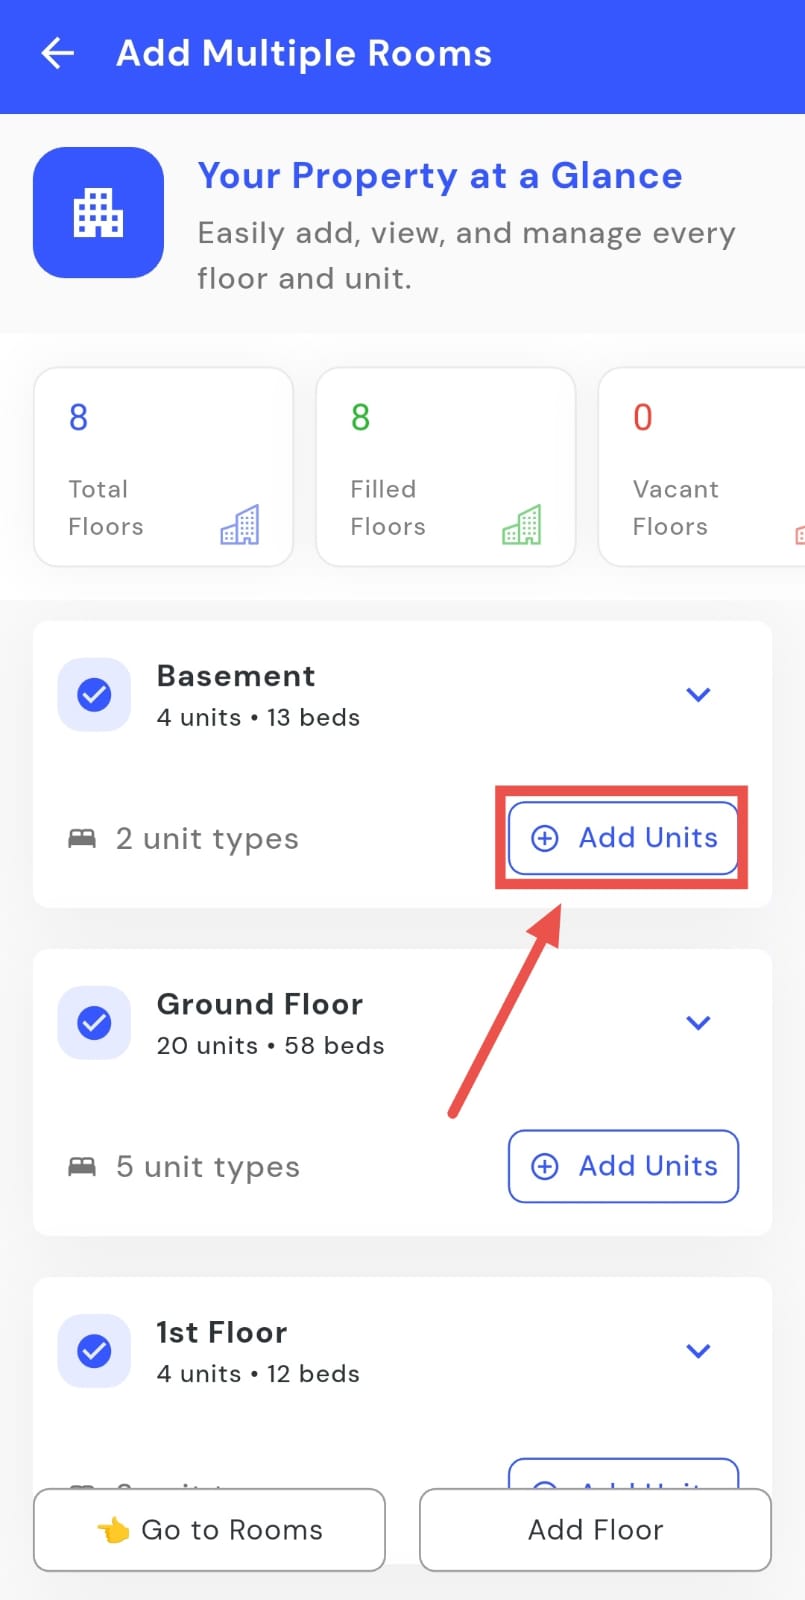
- Step 3: Select Add Multiple Rooms Tap Add Multiple Room to proceed.
- Step 4: Select a floor On the page that opens, tap Add Units under the floor where you want to create new rooms.
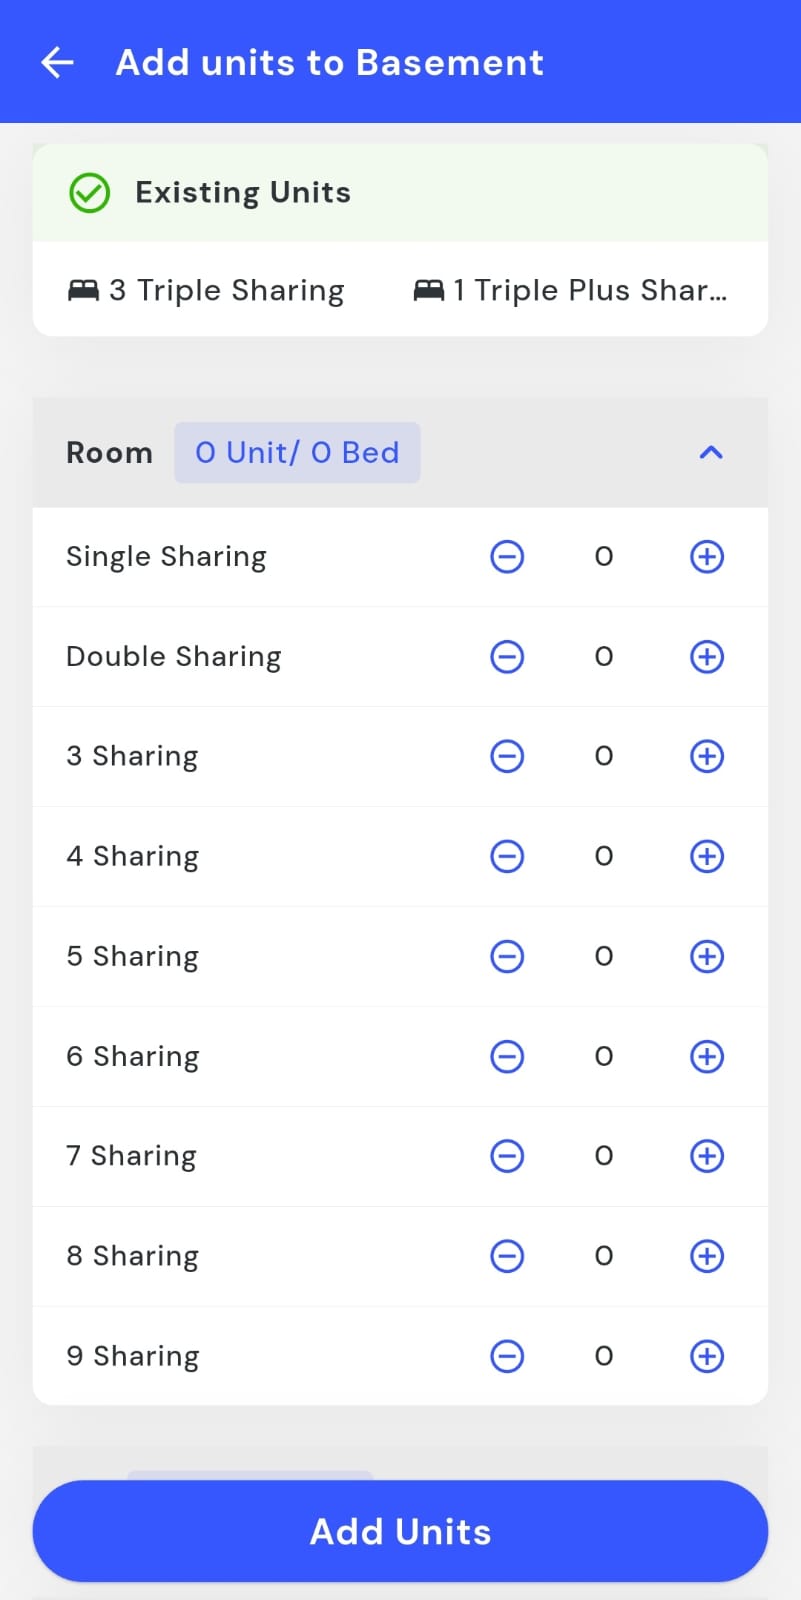
- Step 5: Select sharing type and units A screen will appear displaying different room units or beds. Choose the desired sharing type and adjust the number of rooms or beds as needed.
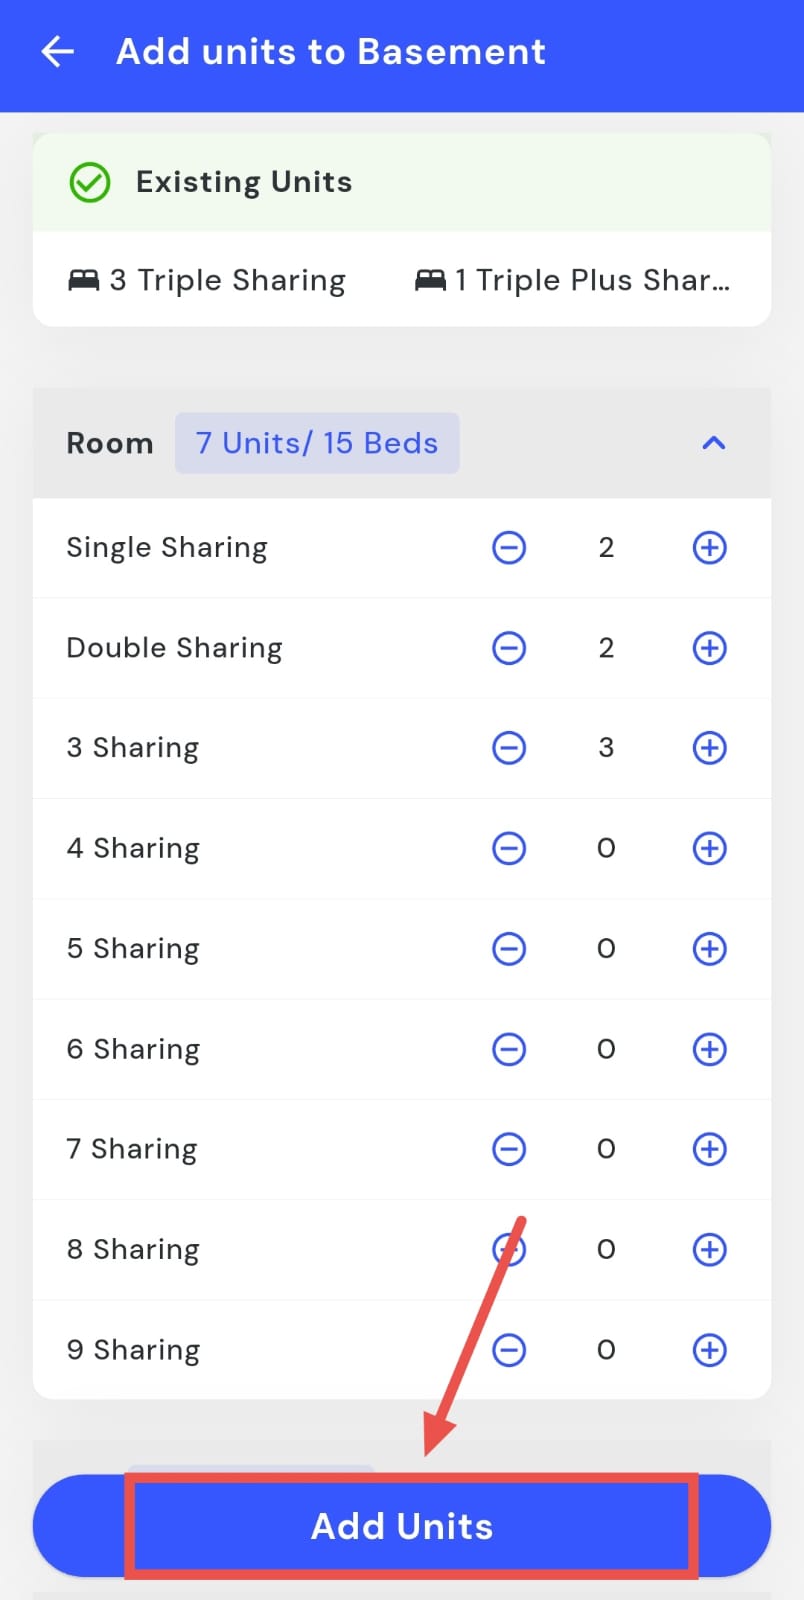
- Step 6: Add the units Once finalized, tap Add Units to proceed.
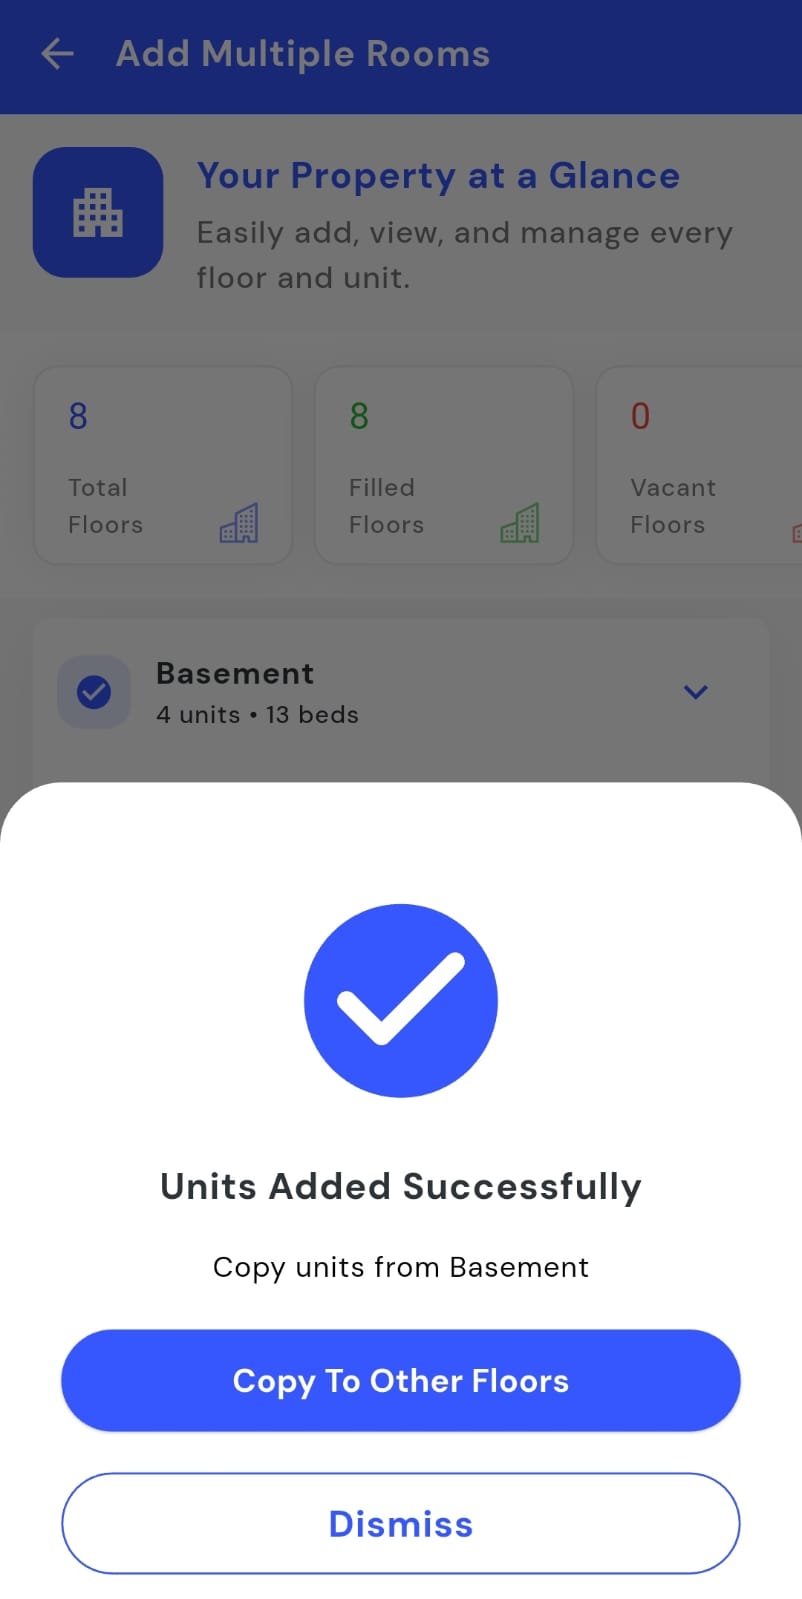
- Step 7: Confirm addition A confirmation screen will appear to indicate that the process is complete.
How can I add a floor?
Looking to add a new floor to your property? The Add Floor feature makes it quick and easy. By using the Add Floor option, you can register a floor in just a few simple steps, helping you organize rooms by floor and manage your property layout more efficiently.
Follow these steps to add a floor:
- Step 1: Open the Rooms section Tap the Property icon in the bottom navigation menu, then select Room to view all rooms.
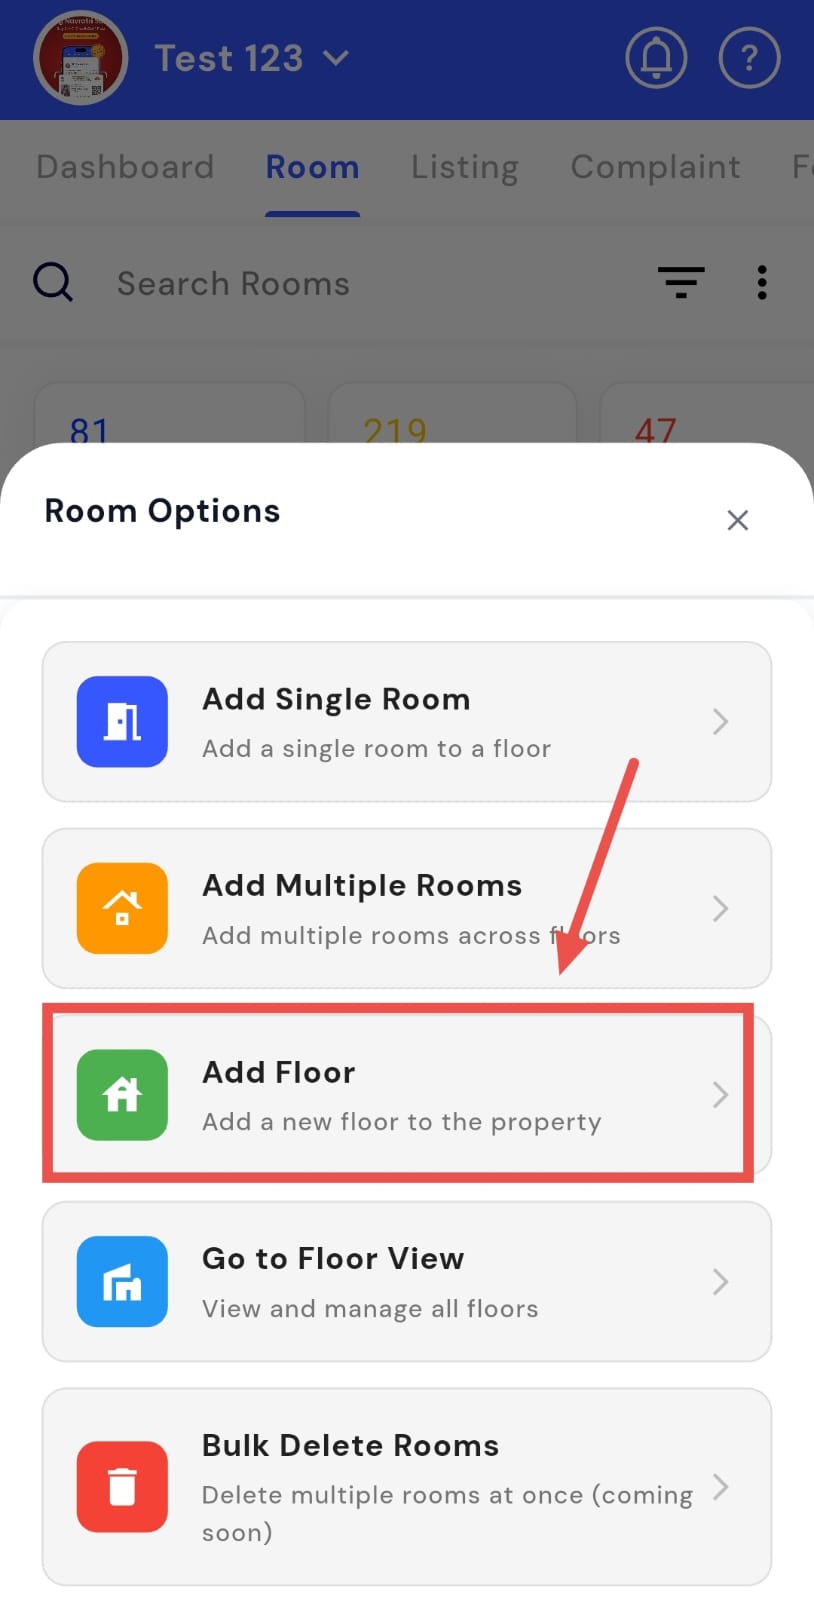
- Step 2: Open the menu Click on the three dots on the right-hand side.
- Step 3: Select Add Floor Tap Add Floor to proceed.
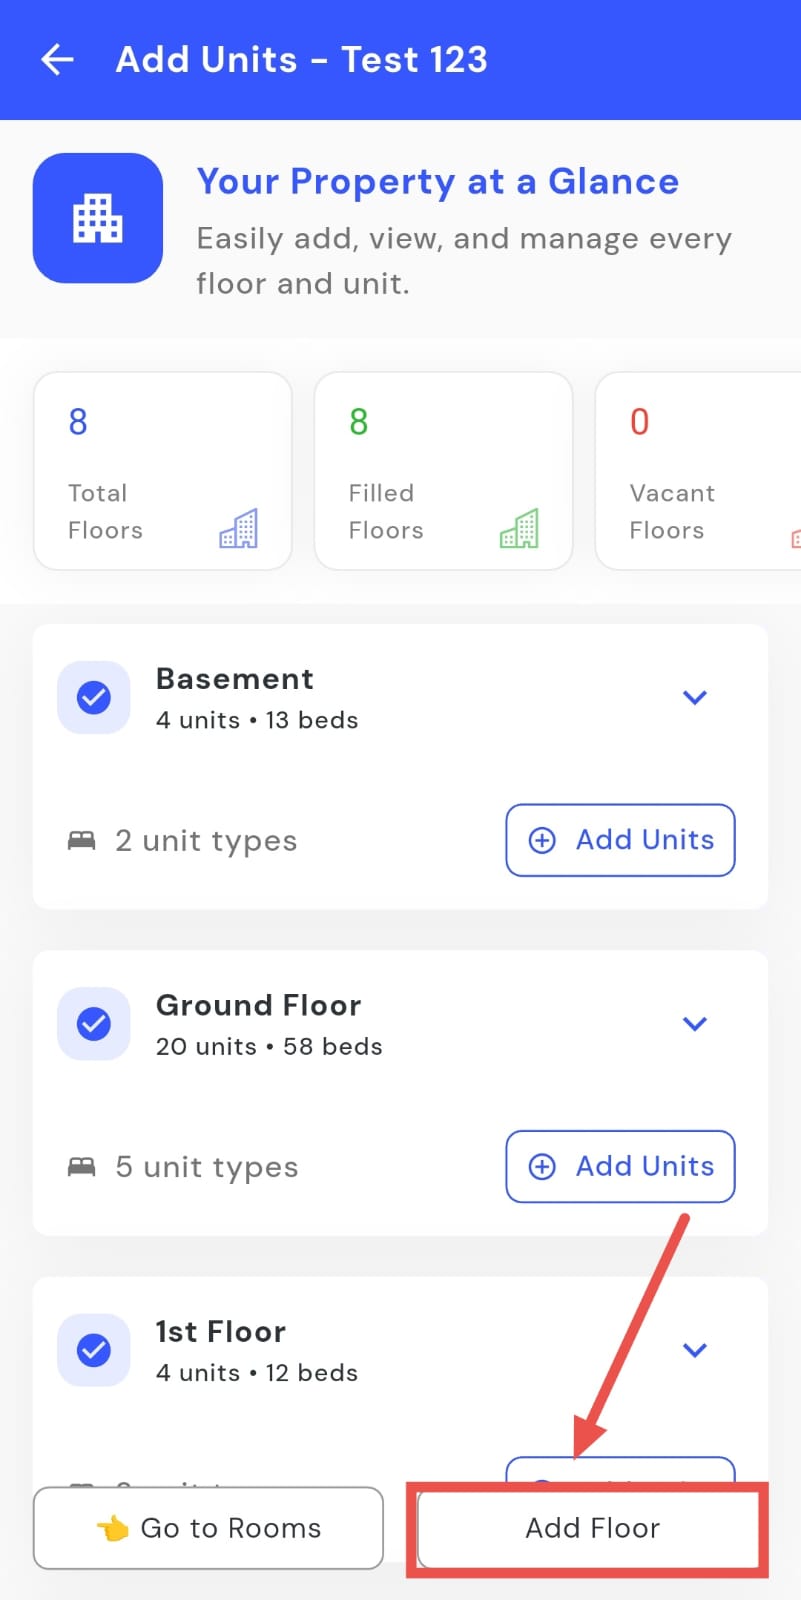
- Step 4: Open the added floor window A window will appear; click on Add Floor inside it.
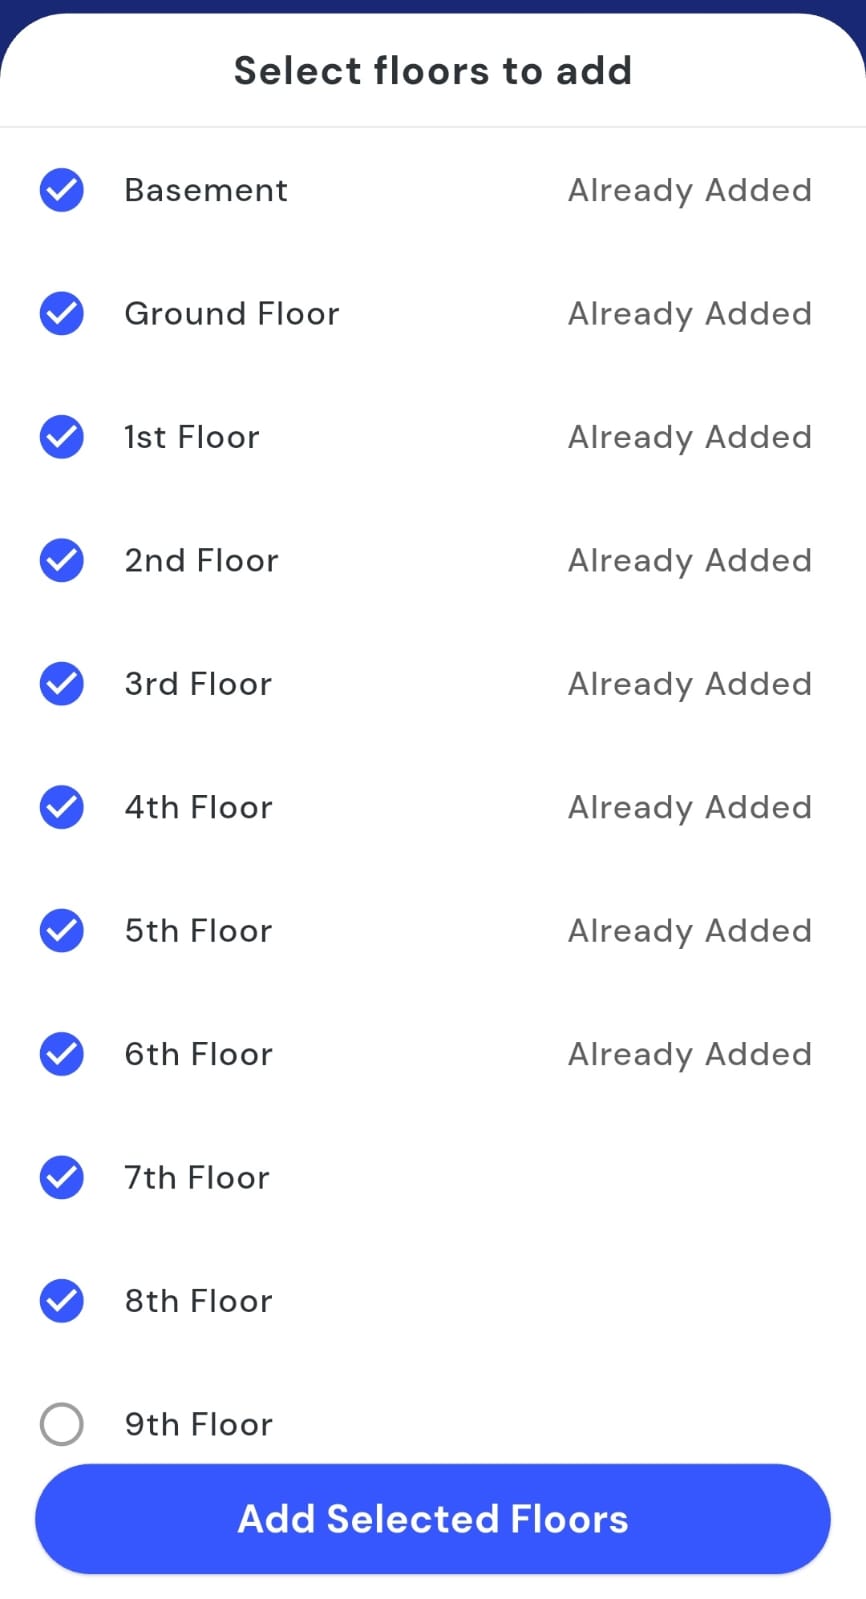
- Step 5: Select floors Another screen will appear showing the list of floors. Select the floors you want to add.
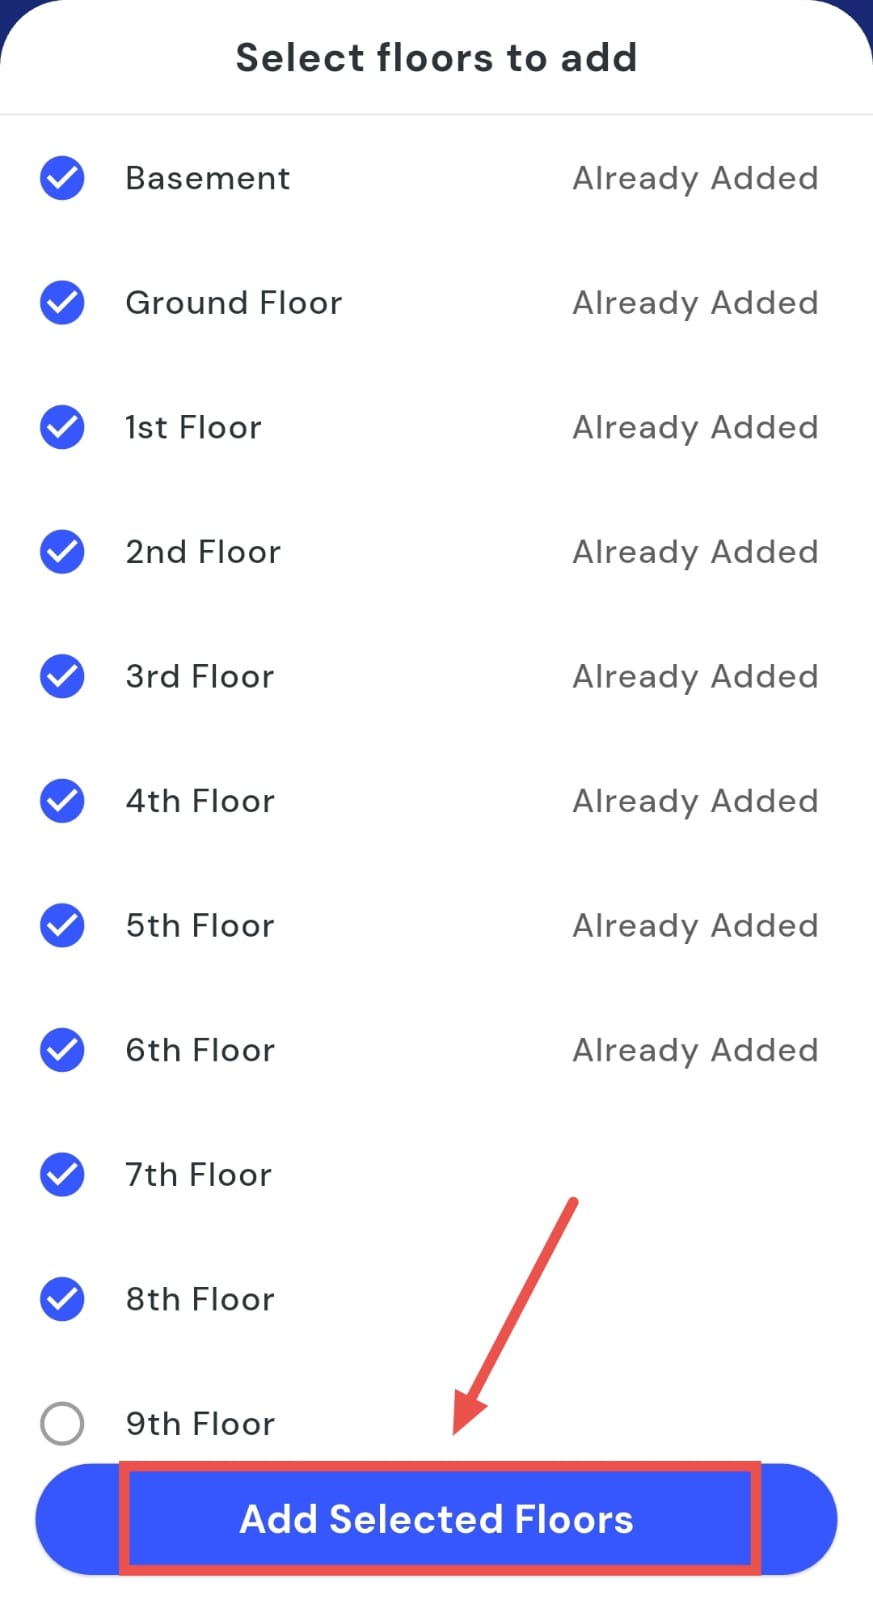
- Step 6: Apply the selection Click Add Selected Floors, and the floors will now be added to your property and visible in the list.
How can I view the floor?
The Floor View feature makes it easy to navigate floors and rooms. It provides a clear visual layout of your property, allowing you to see all floors and rooms at a glance. This helps you manage rooms more efficiently and monitor occupancy without having to check each room individually.
Follow these steps to use Floor View:
- Step 1: Open the Rooms section Tap the Property icon in the bottom navigation menu, then select Room to access the room list.
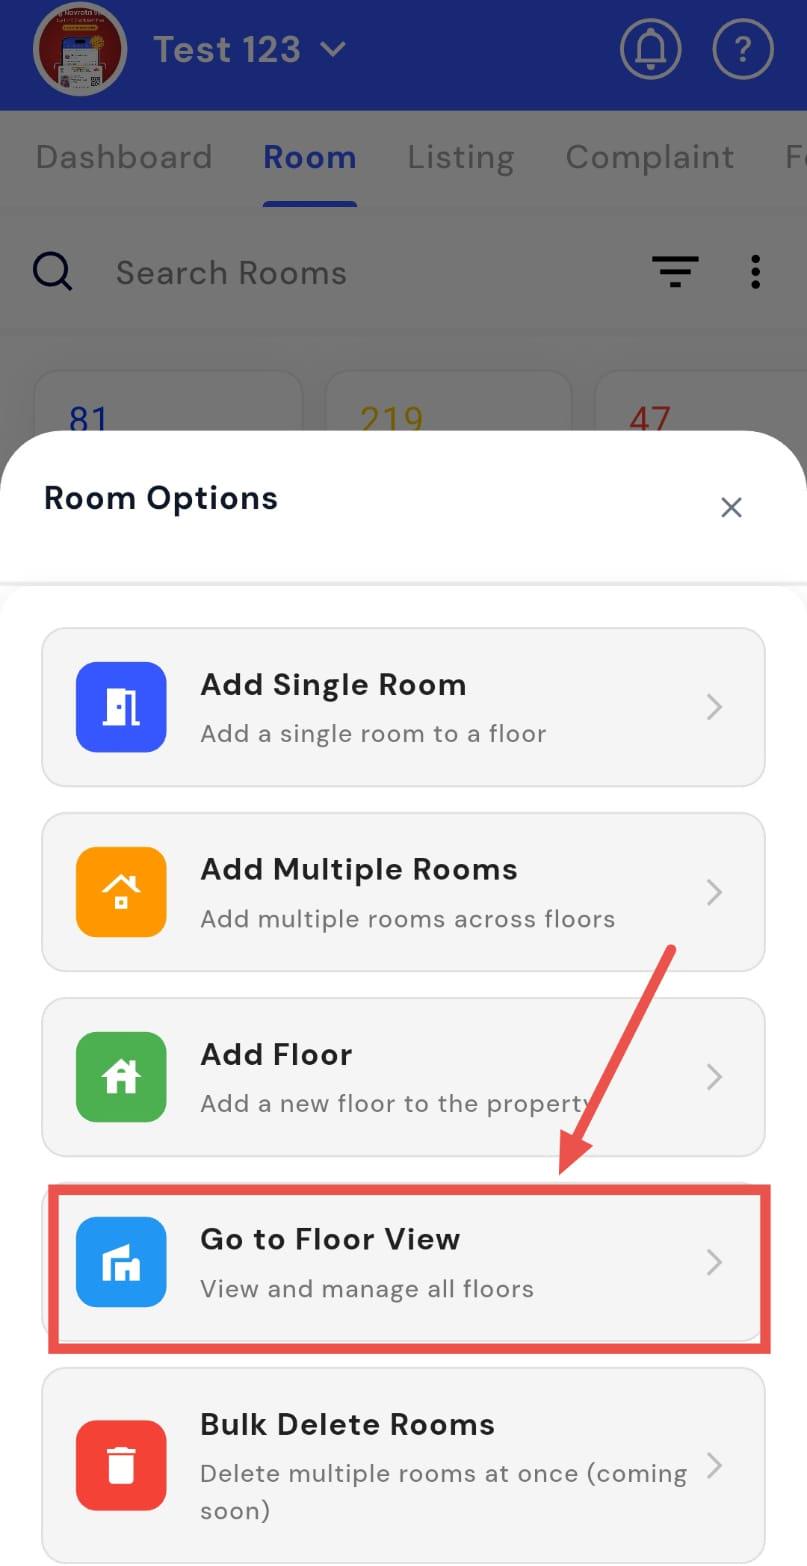
- Step 2: Open the menu Click on the three dots on the right-hand side.
- Step 3: Go to Floor View A window will appear, tap Go to Floor View.
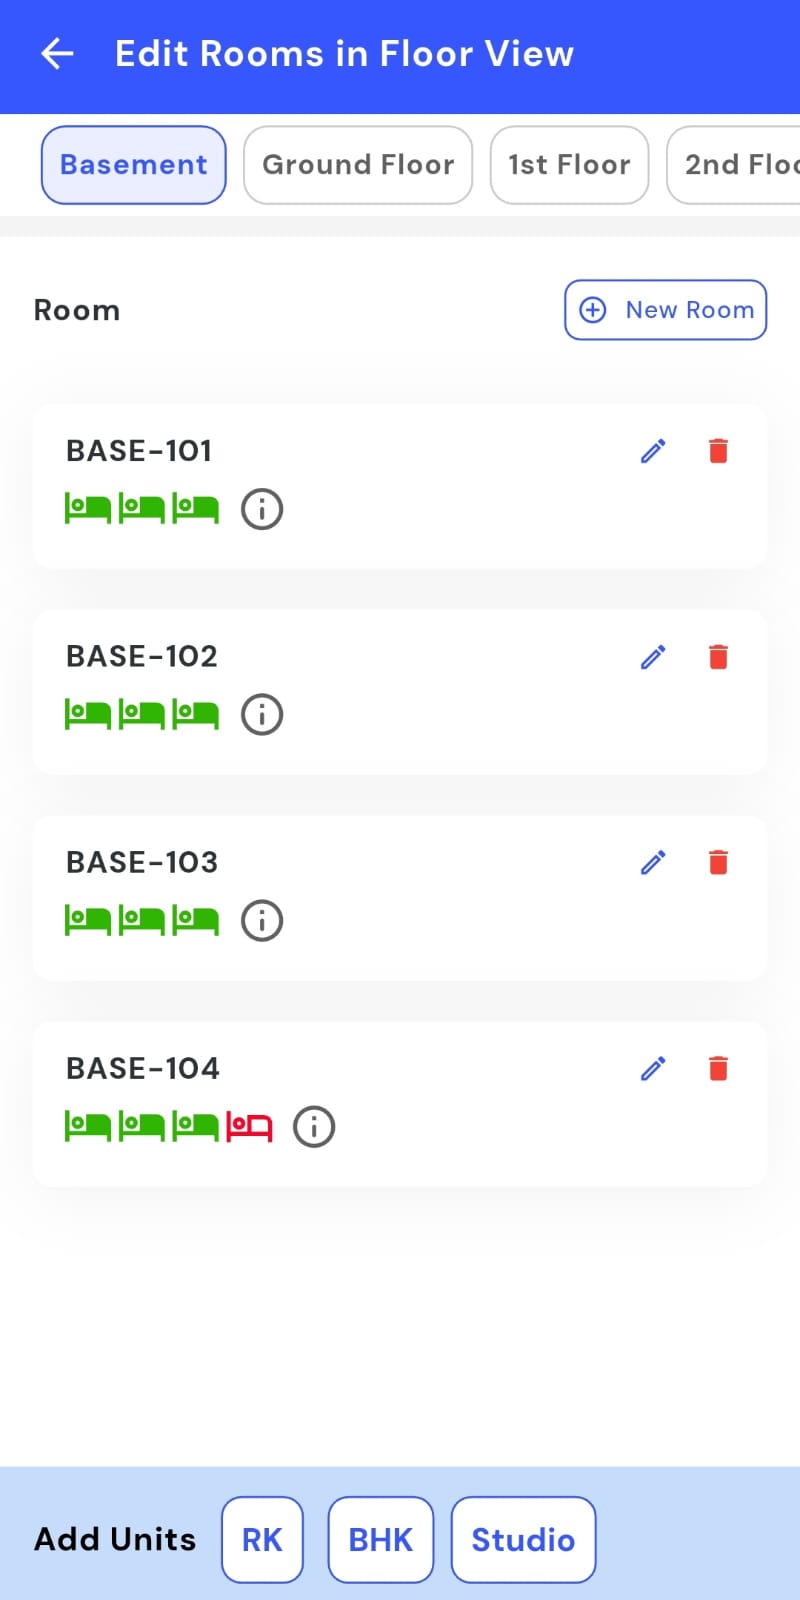
- Step 4: View floors The Floor View screen will open, displaying all floors in your property for easy navigation and management.
How do I add a tenant to a room?
Want to add a tenant to a room? The Add Tenant feature makes it quick and easy to assign a bed accurately. By selecting the room and bed, you can fill in tenant details and ensure all records are updated correctly. This helps you manage occupancy efficiently and keep your room assignments organized.
Follow these steps to add a tenant to a room:
- Step 1: Open Rooms Tap the Property icon in the bottom navigation menu and select the Room option.
- Step 2: Find the room Scroll through the list or use search to locate the specific room where you want to add a tenant.
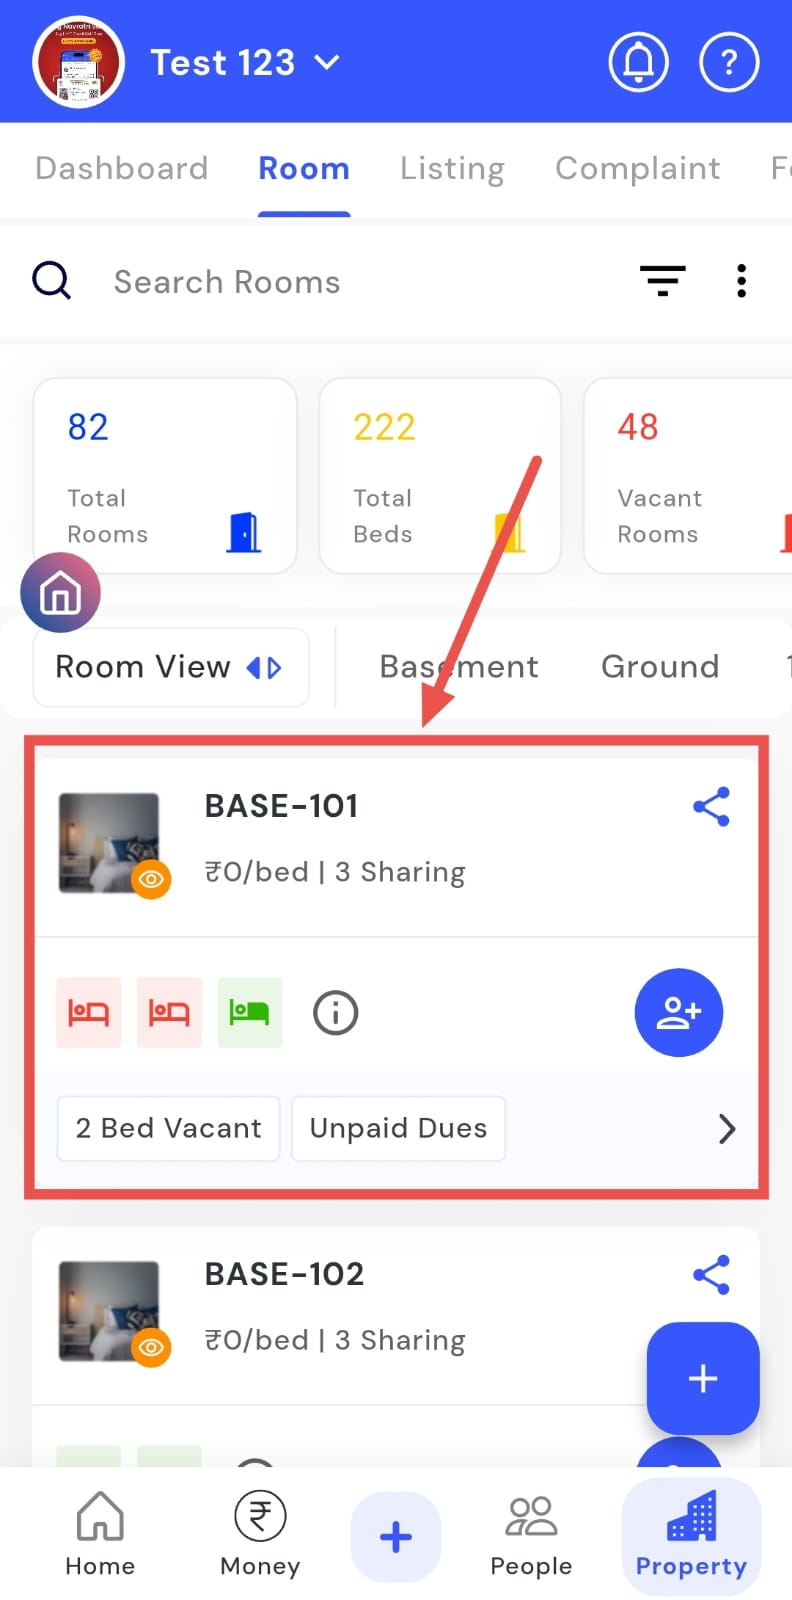
- Step 3: Access Add Tenant On the room card, click the Add Tenant logo to start the process.
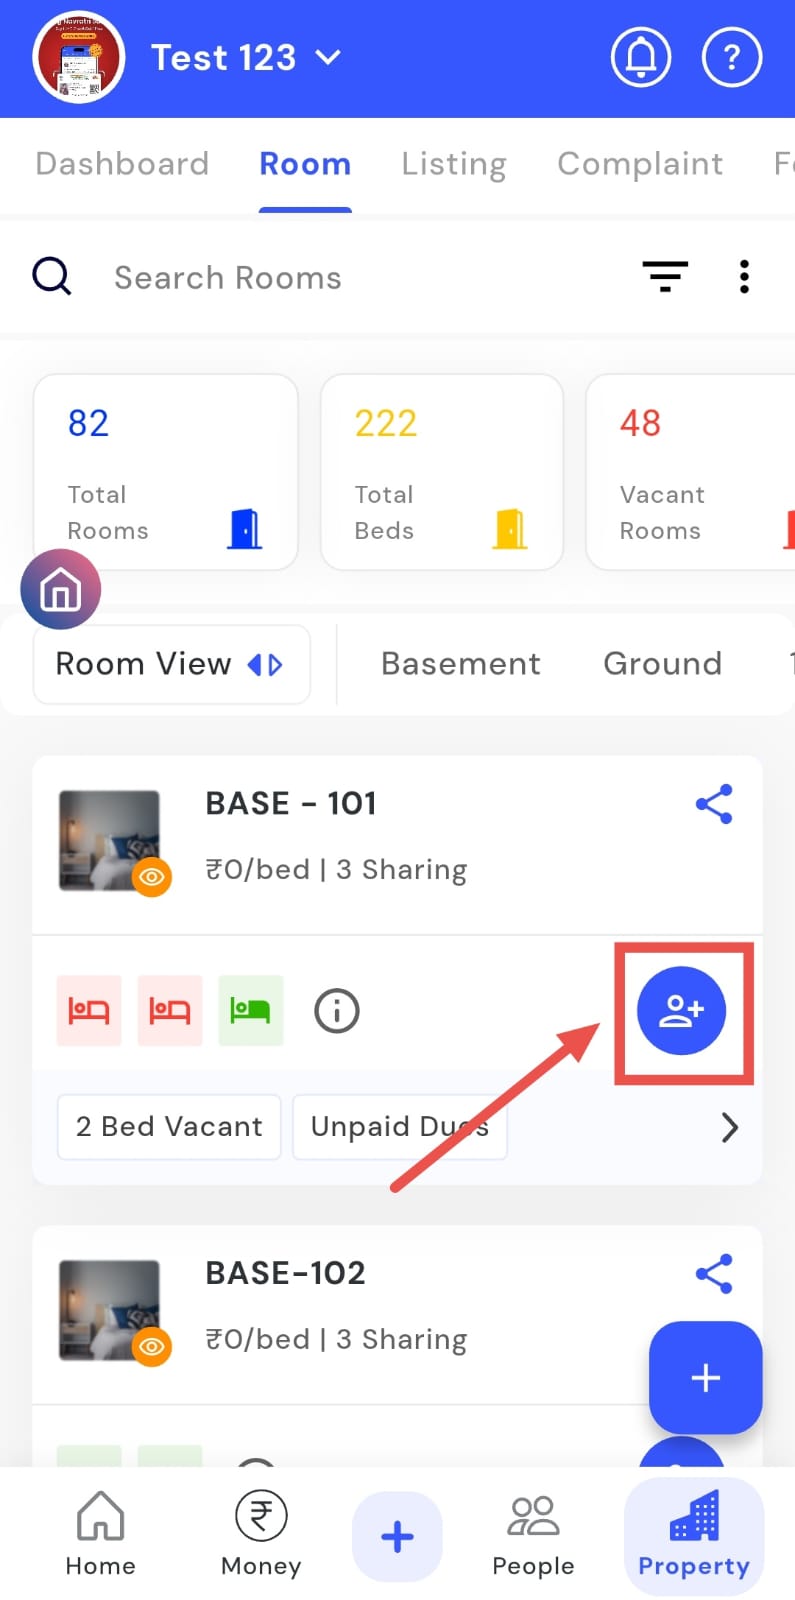
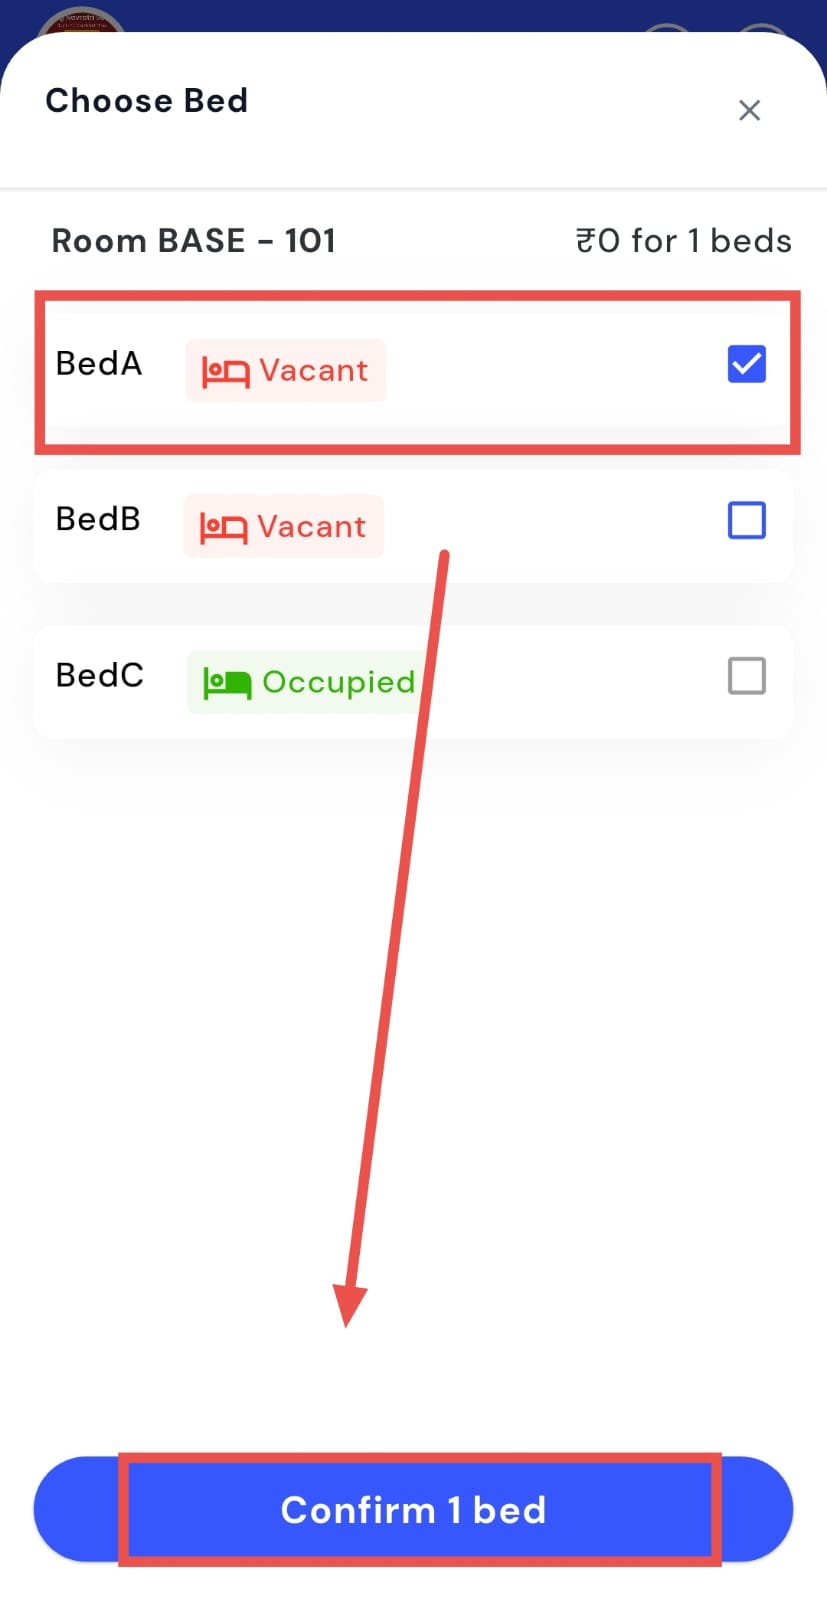
- Step 4: Select a bed Choose the unoccupied bed in the room and confirm your selection.
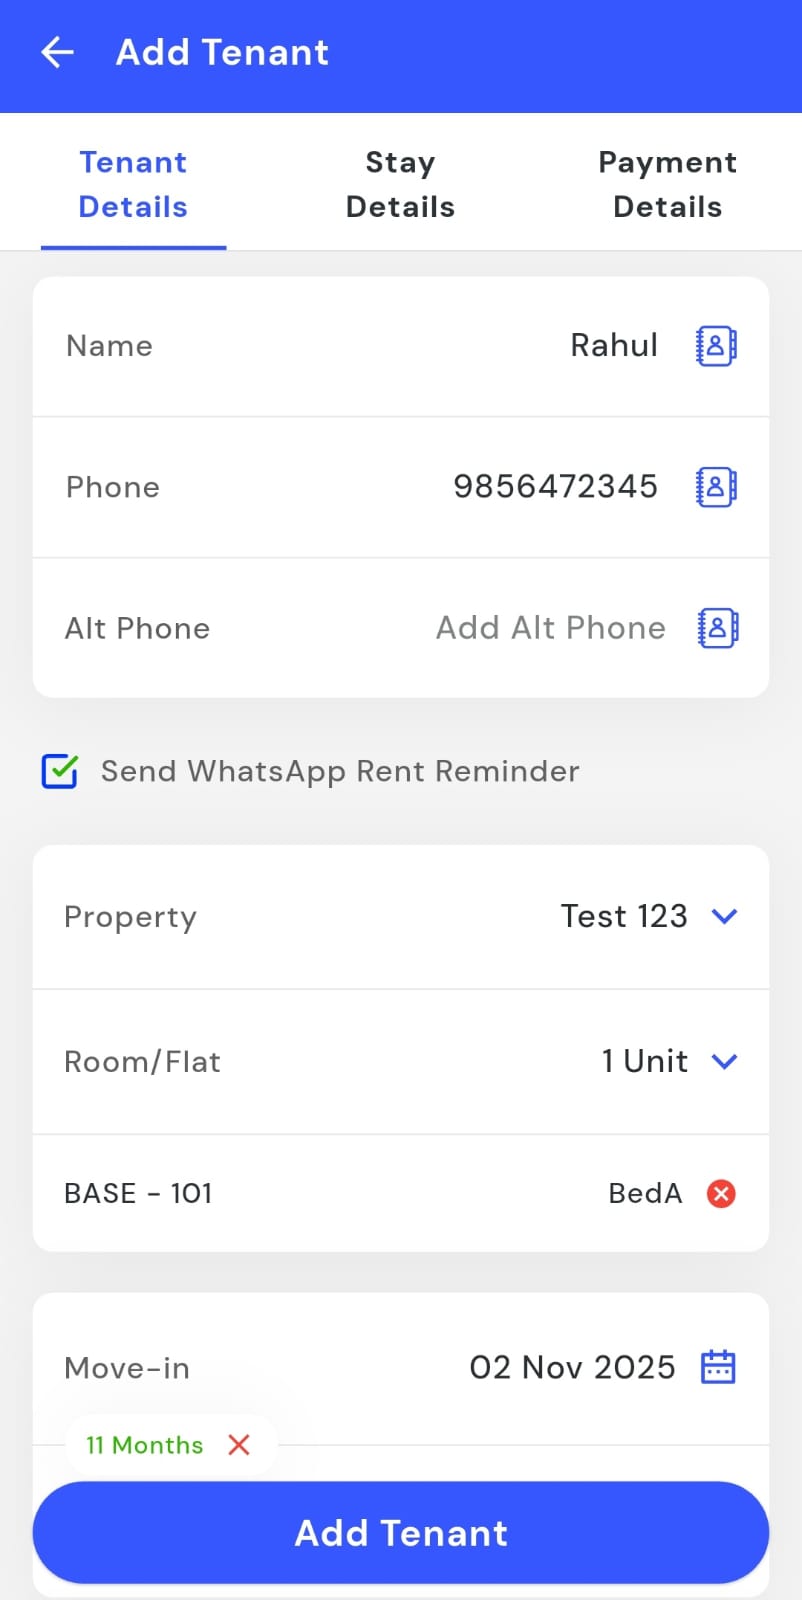
- Step 5: Enter tenant details On the Add Tenant screen, fill in all necessary details such as name, contact, and move-in date.
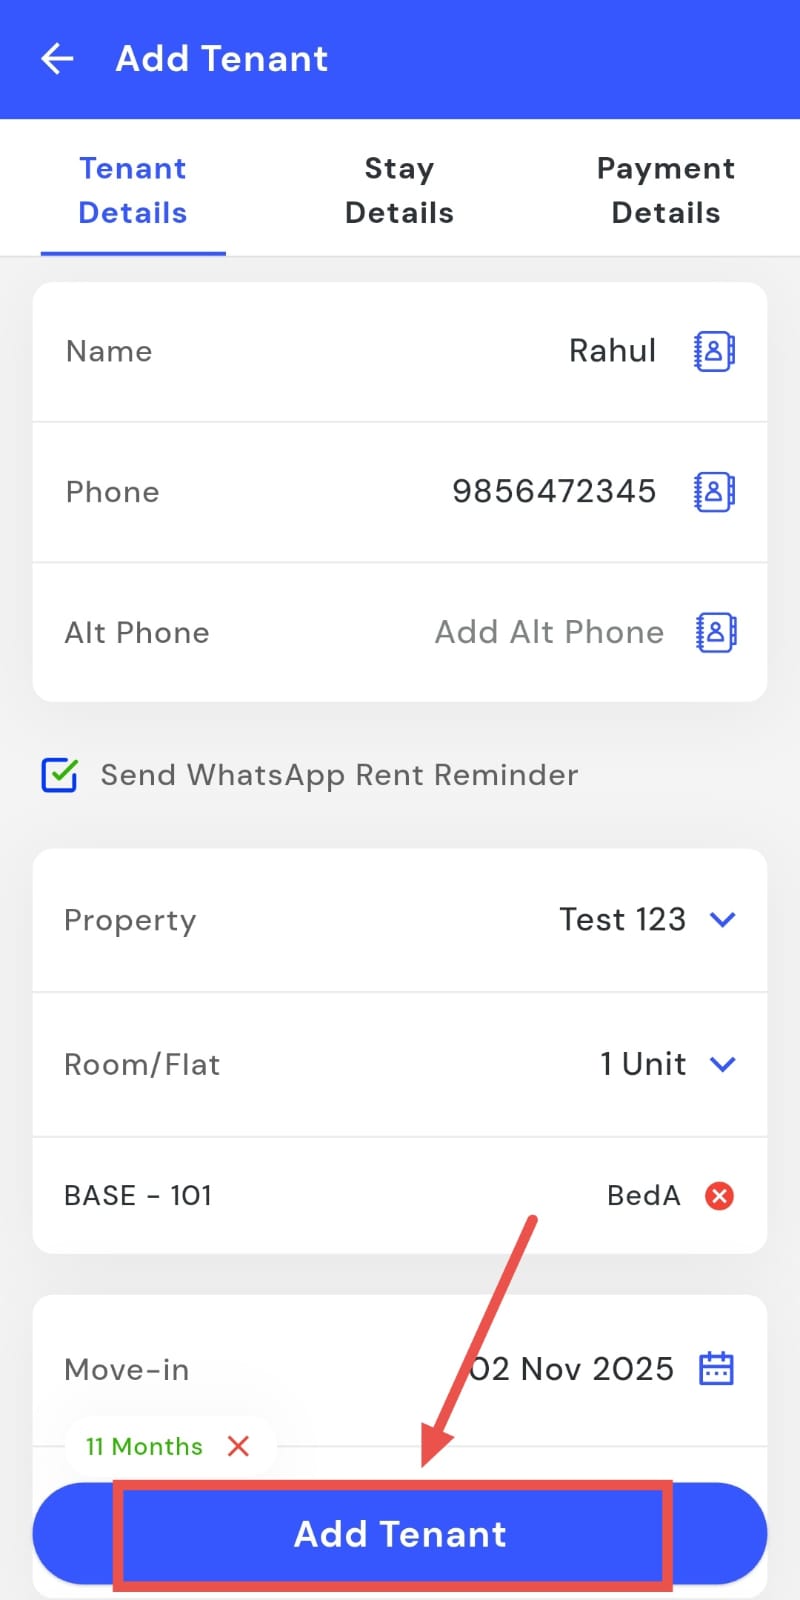
- Step 6: Confirm addition Tap the Add Tenant button to save the tenant to the room.
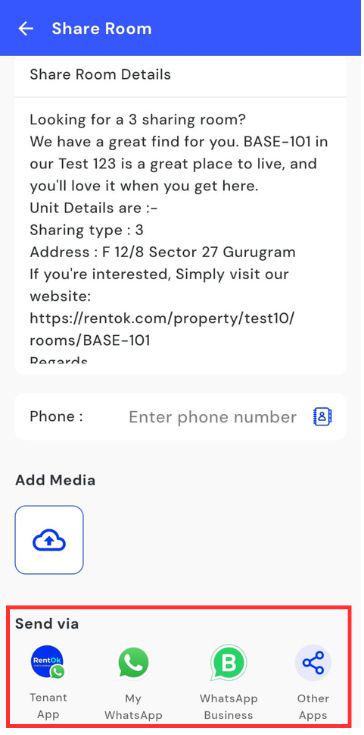
How can I share the room details with the tenant?
You can forward complete room details via WhatsApp or other apps in just a few taps. This makes it easy to keep tenants informed by sharing room information instantly from the app. By sending all necessary details quickly and accurately, tenants always have the right information without the need for manual messaging. This saves time and ensures communication stays clear and efficient.
Follow these steps to share room details with tenants:
- Step 1: Open Rooms Tap the Property icon in the bottom navigation menu and select the Room option to view all rooms.
- Step 2: Locate the room Scroll or search to find the specific room whose details you want to share.
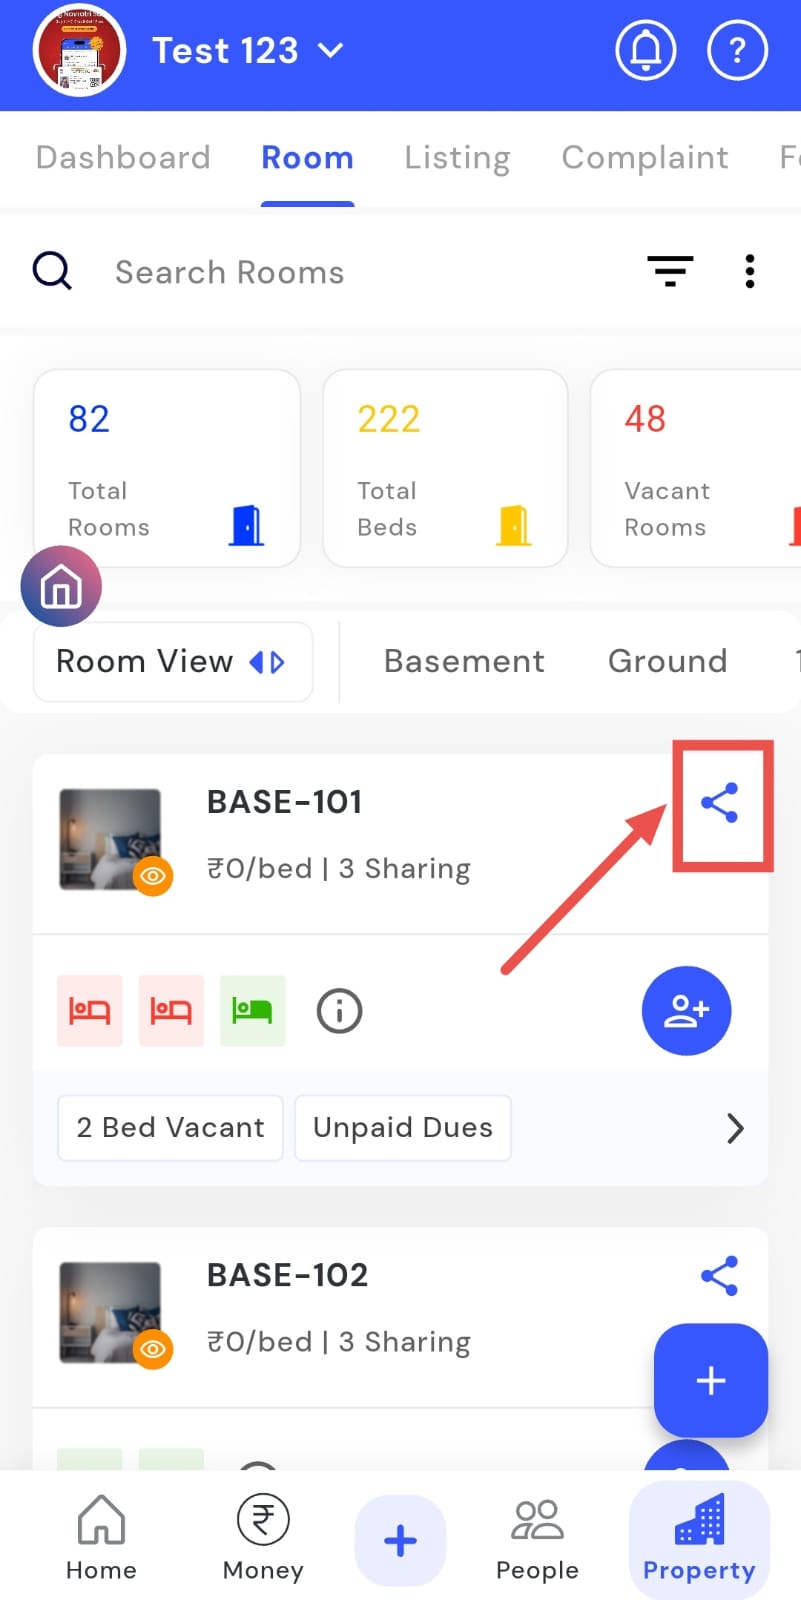
- Step 3: Tap Share Click the Share option on the room card to open the sharing interface.
- Step 4: Review details A screen will appear showing all necessary room information for the tenant.
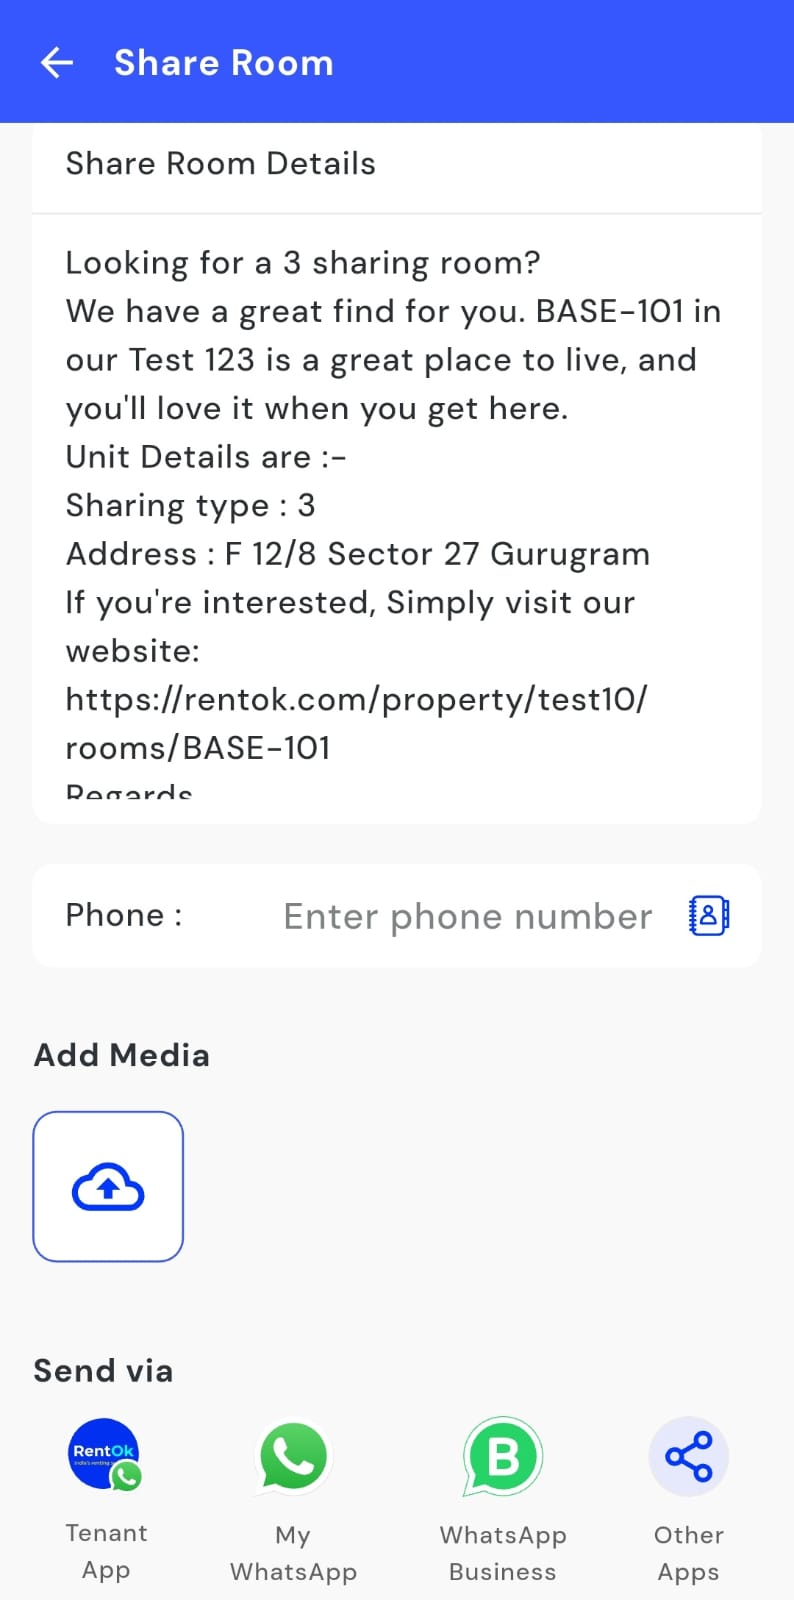
- Step 5: Send via WhatsApp The WhatsApp message screen will open. Tap Send to share the room details instantly.
How can I edit a room's details?
Need to update a room’s details? The Edit Room feature makes it fast and simple. In just a few taps, you can correct or update information about a room, including occupancy, amenities, or other key details. This ensures your records are always accurate and up to date, helping you manage your property efficiently.
Follow these steps to edit a room’s details:
- Step 1: Open Rooms Tap the Property icon in the bottom navigation menu and select the Room option to access all rooms.
- Step 2: Locate the room Scroll or search to find the specific room you want to edit.
- Step 3: Access Edit Swipe left on the room card and tap the Edit option to make changes.
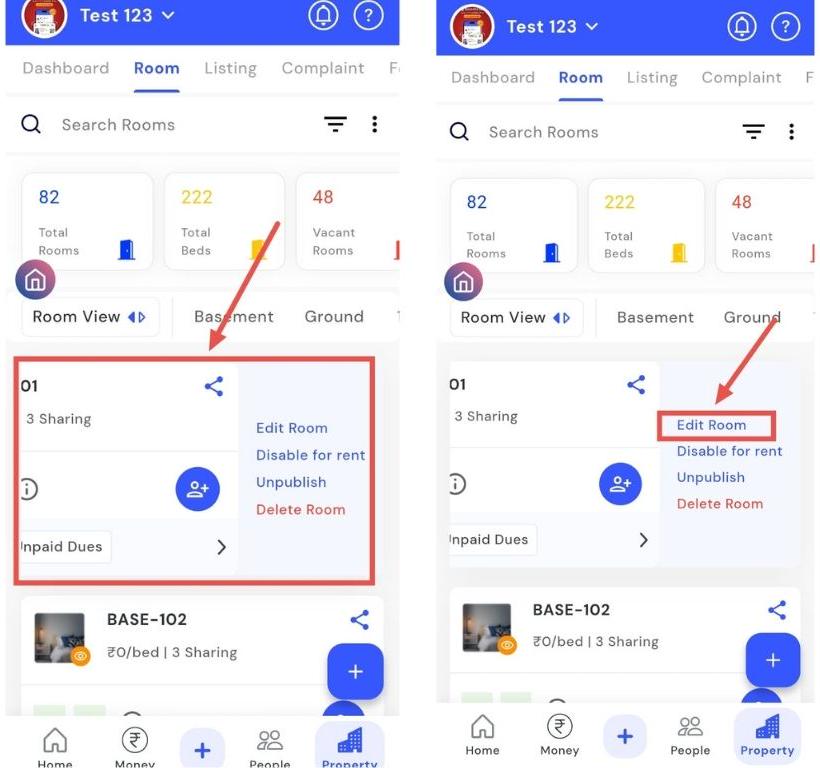
- Step 4: Update details and save Enter the new details on the Edit screen and tap Save to save your changes.
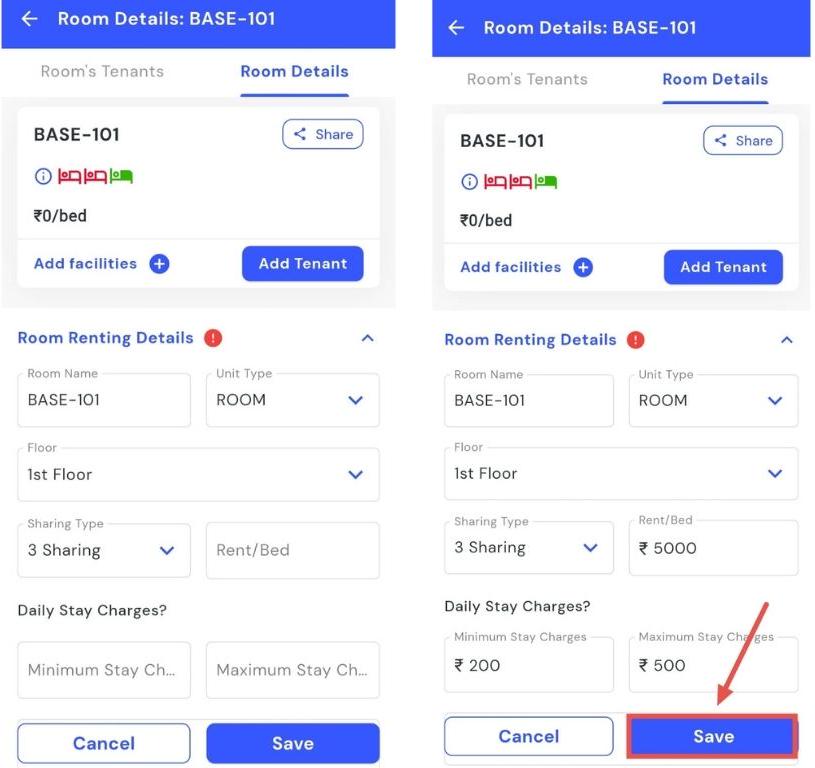
How can I change the room name or number?
You can modify room names or numbers directly from the room details screen in just a few taps. The Edit Room Details feature allows you to rename or renumber rooms, helping keep your property organized. By updating room names or numbers quickly, you ensure that all information remains accurate, easy to identify, and consistent for both tenants and property managers.
Follow these steps to edit room names or numbers:
- Step 1: Open Rooms Tap the Property icon in the bottom navigation menu and select the Room option to view all rooms.
- Step 2: Locate the room Scroll or search to find the specific room you want to rename or renumber.
- Step 3: Access Room Details Click on the room card and select Room Details to view its information.
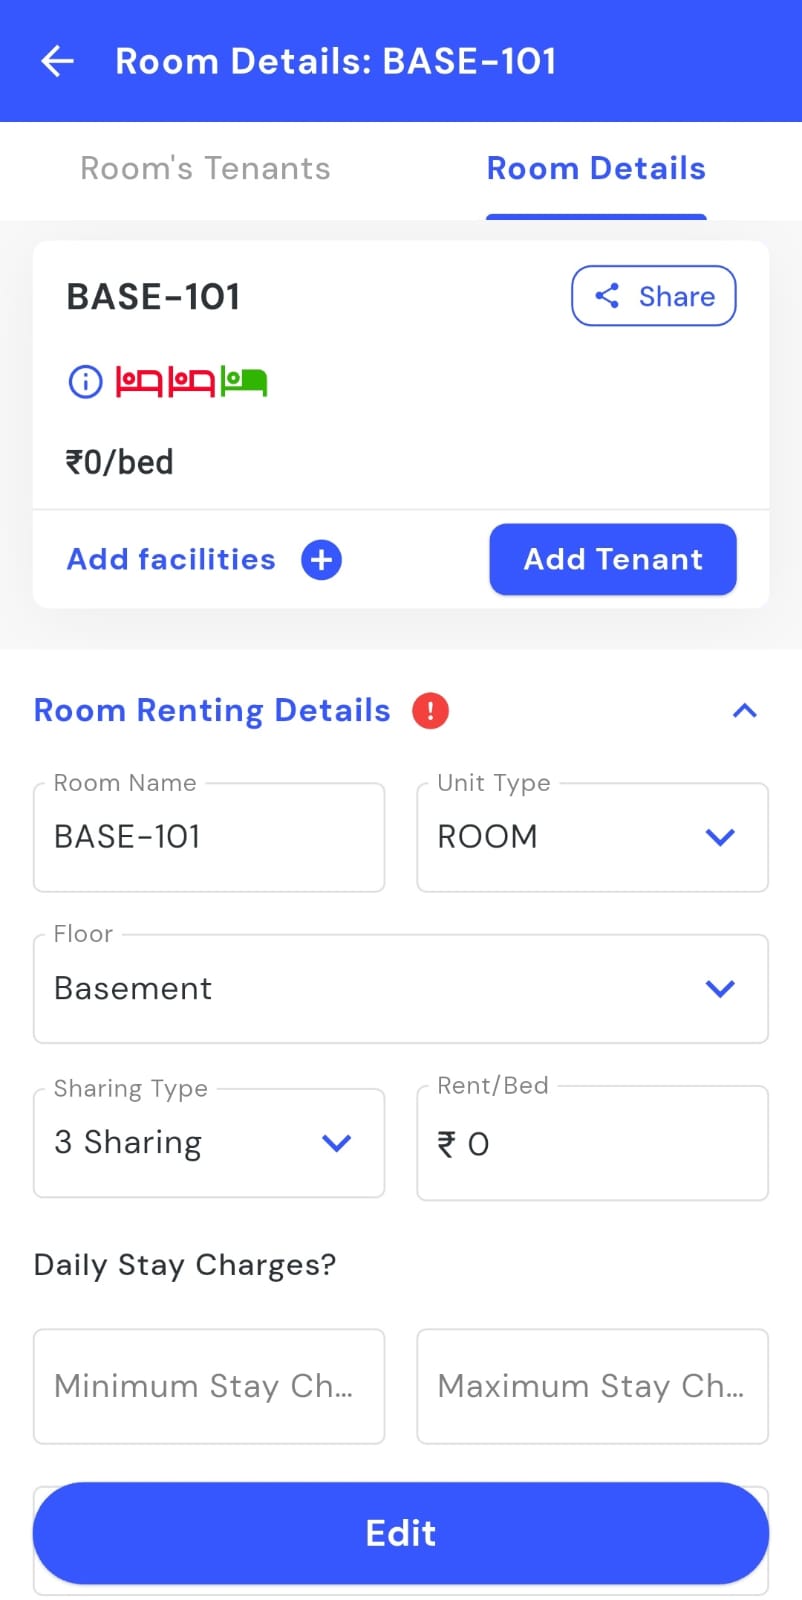
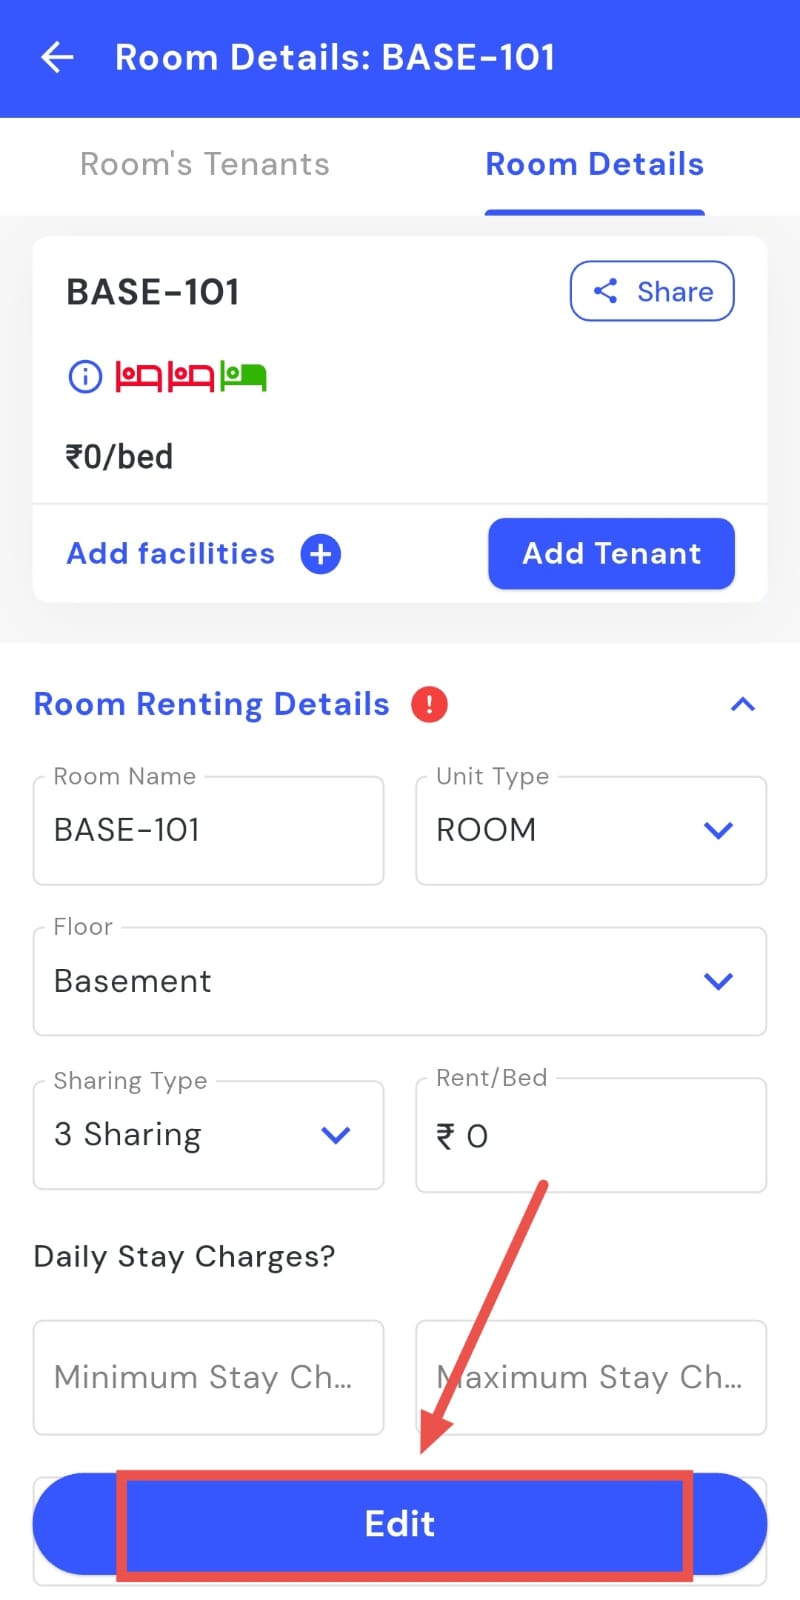
- Step 4: Enable edit mode Tap the Edit button to activate edit mode.
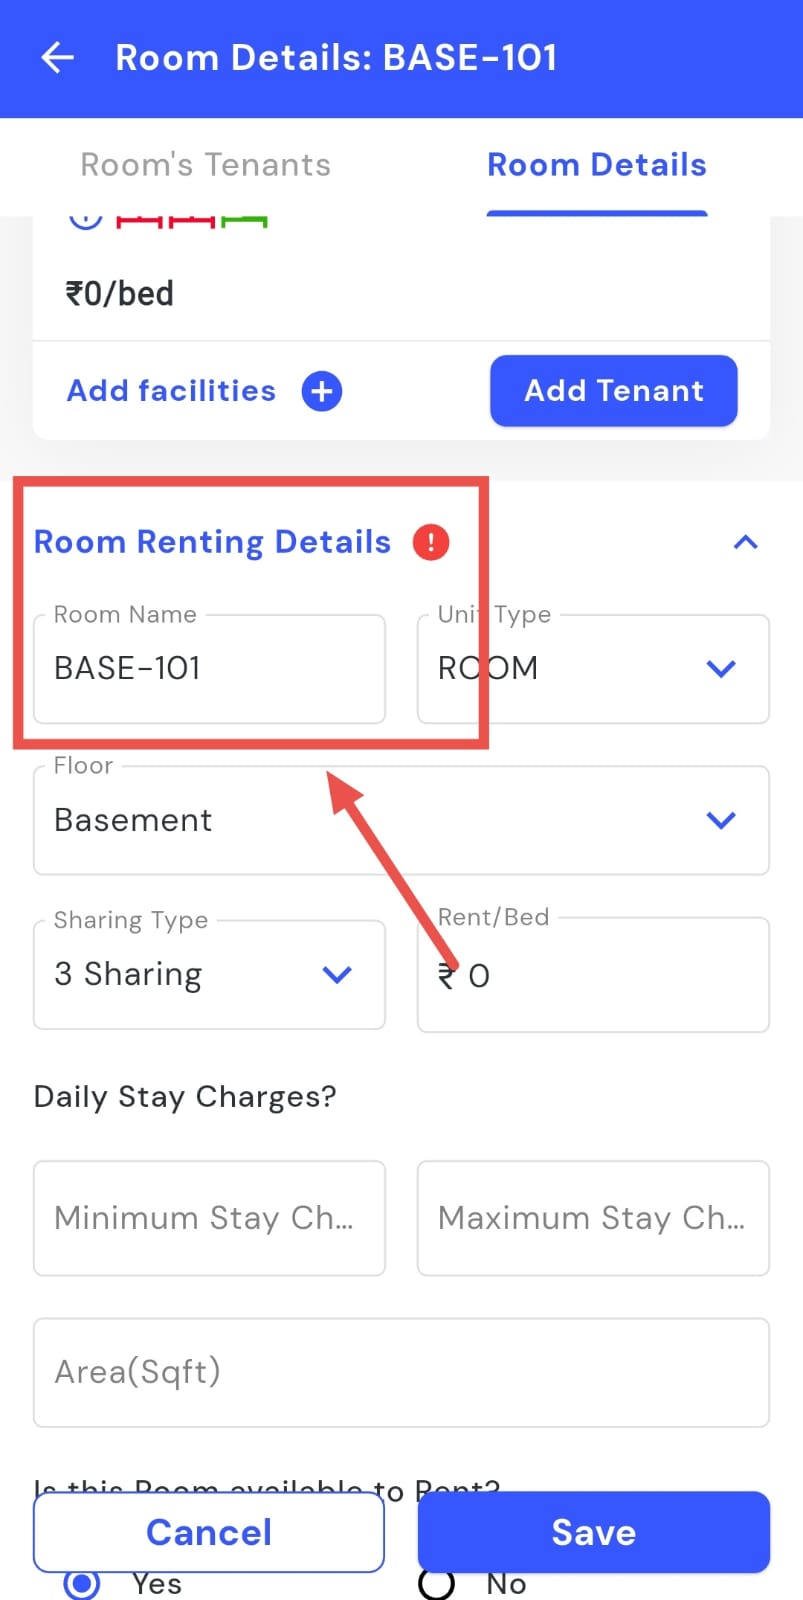
- Step 5: Update the room name or number In the Room Renting Details section, click on the room name and make the necessary changes.
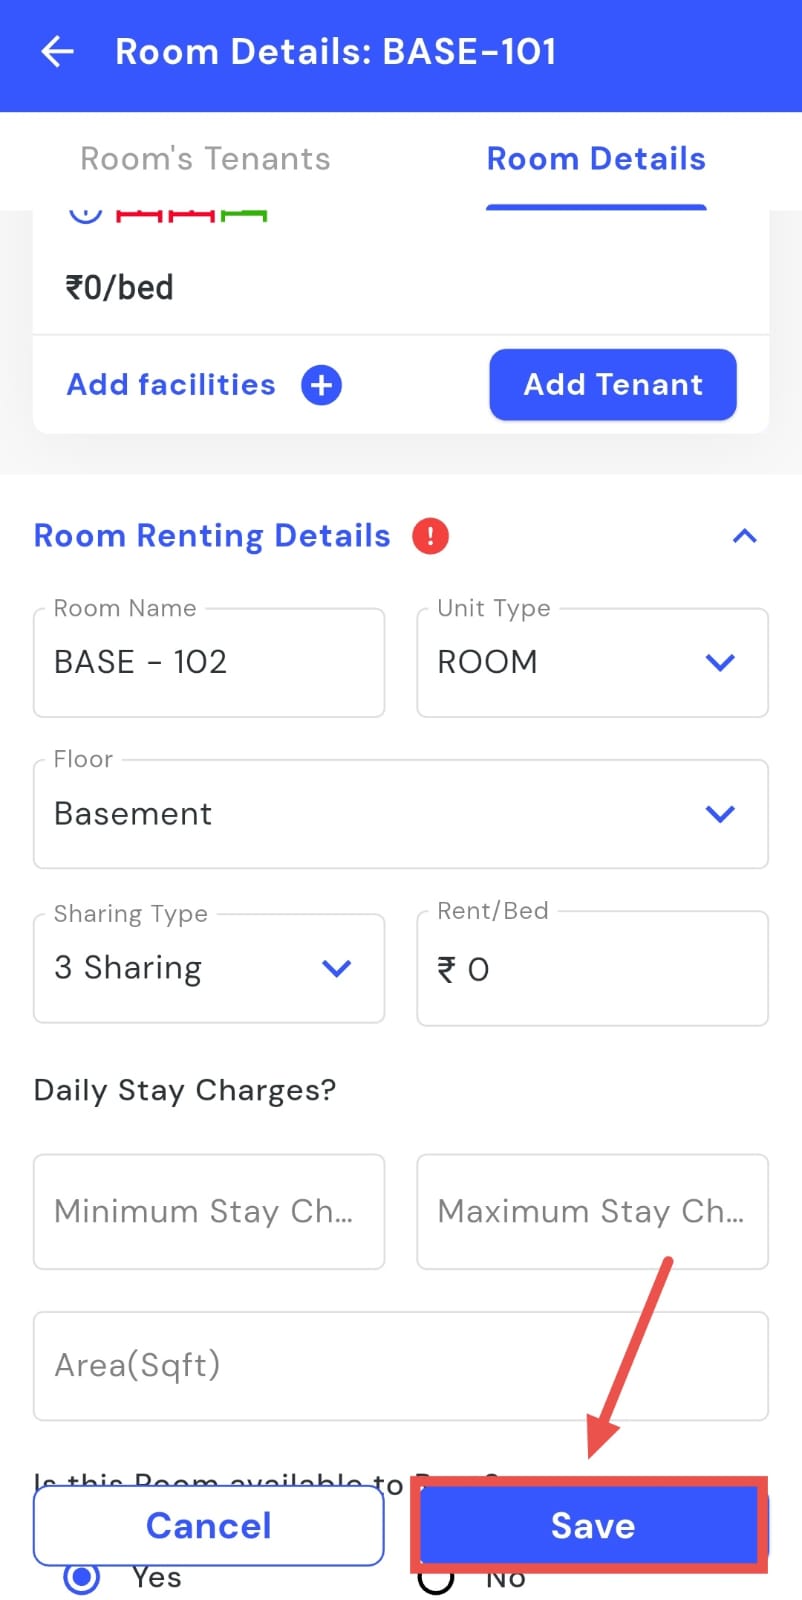
- Step 6: Save changes Tap the Save button to confirm your updates.
How can I change the room sharing type?
You can keep your records accurate by updating a room’s sharing type whenever needed. The Edit Room Details feature allows you to modify a room’s sharing settings directly from its details in just a few simple steps. This ensures that occupancy information remains correct and that the appropriate sharing arrangements are clearly displayed for both tenants and property managers.
Follow these steps to update a room’s sharing type:
- Step 1: Open Rooms Tap the Property icon in the bottom navigation menu and select the Room option to view all rooms.
- Step 2: Locate the room Scroll or search to find the specific room whose sharing type you want to change.
- Step 3: Access Room Details Click on the room card and select Room Details to open its information.
- Step 4: Enable edit mode Tap the Edit button to activate edit mode.
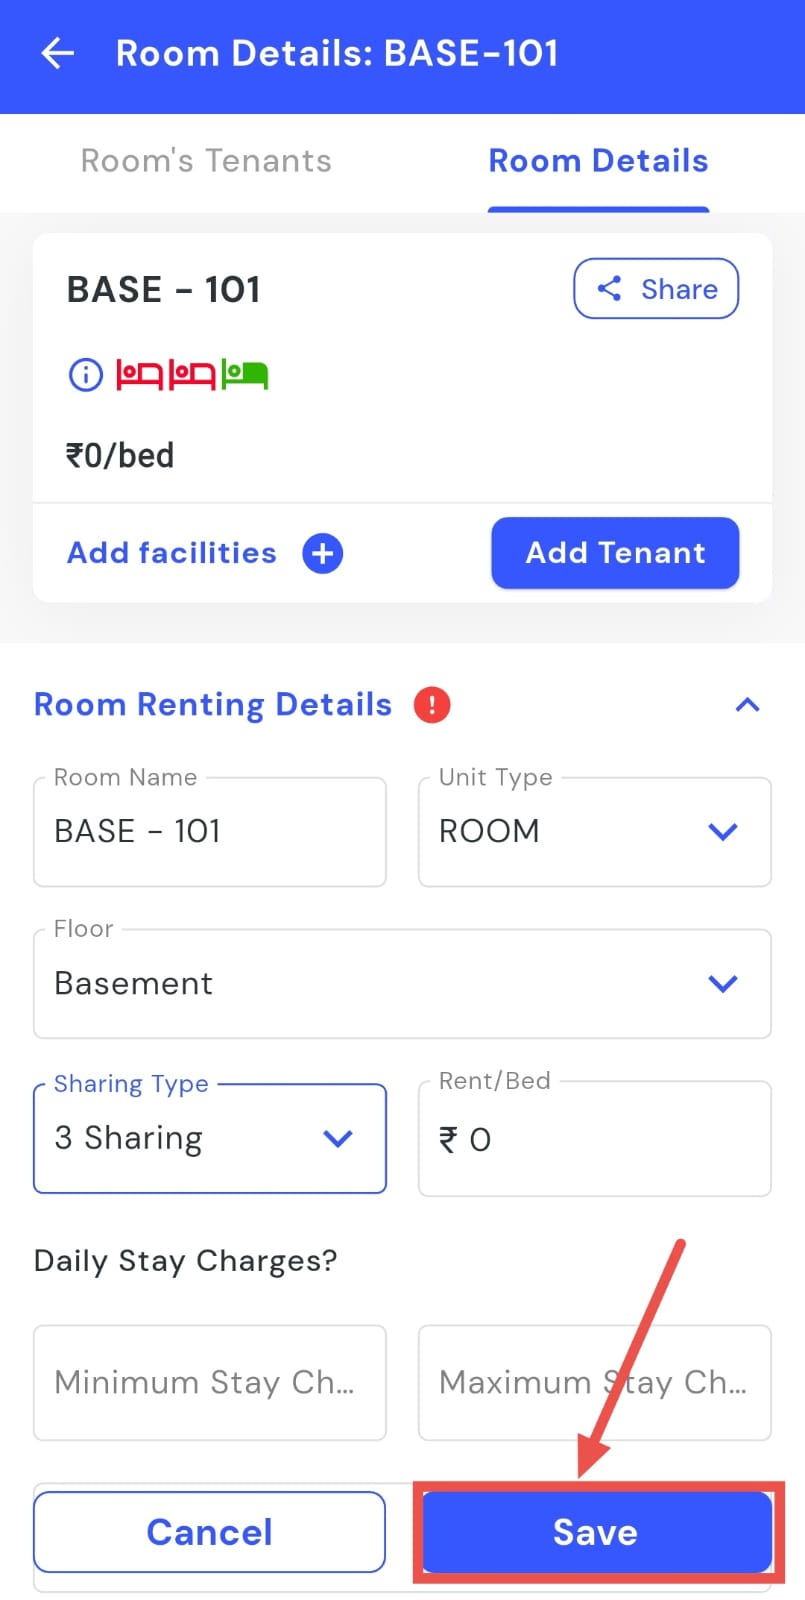
- Step 5: Update sharing type In the Room Renting Details section, click on Sharing Type. A list will appear. select the desired sharing type.
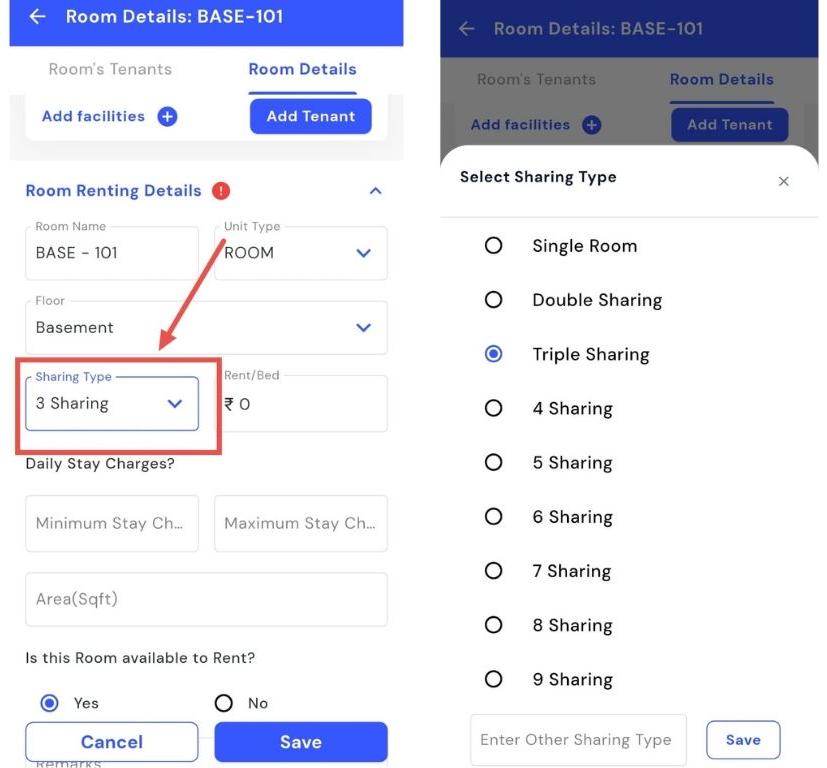
- Step 6: Save changes Tap the Save button to confirm your updates.
How can I add a Room Remark?
You can keep track of important updates by adding room remarks directly in the app. The Room Remark option allows you to enter notes or comments under each room’s renting details, helping you stay organized. Whether it’s for maintenance updates, tenant preferences, or special instructions, this feature ensures all essential information about a room is clearly documented and easy to access when needed.
Follow these steps to add a room remark:
- Step 1: Open Rooms Tap the Property icon in the bottom navigation menu and select the Room option to view all rooms.
- Step 2: Locate the room Scroll or search to find the specific room where you want to add a remark.
- Step 3: Open Room Details Click on the room card and select Room Renting Details to view the detailed information.
- Step 4: Enable edit mode Tap the Edit button to activate edit mode.
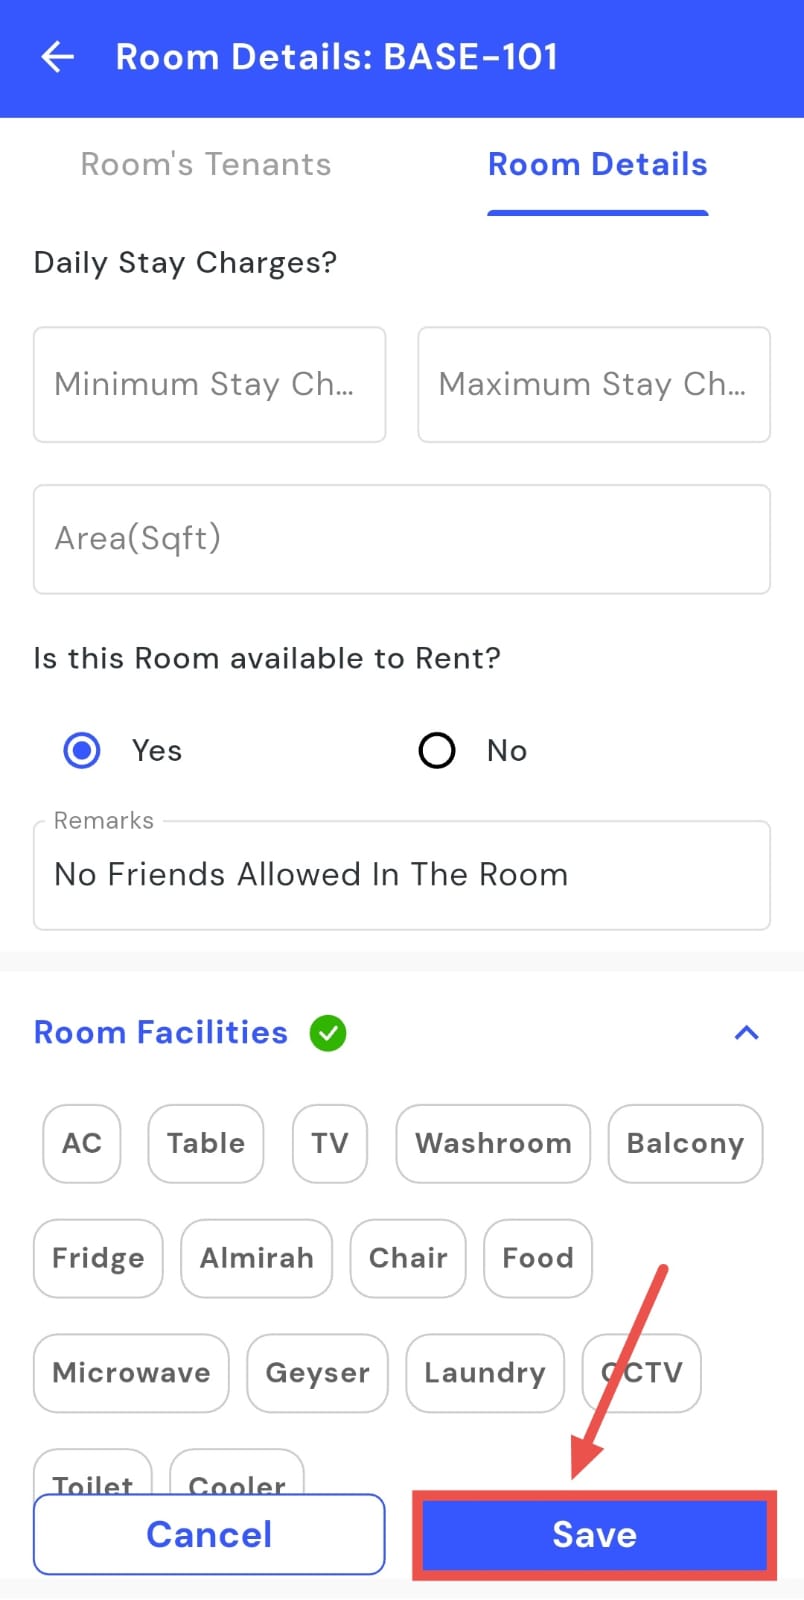
- Step 5: Add remark In the Remark box, type your room remark or note clearly.
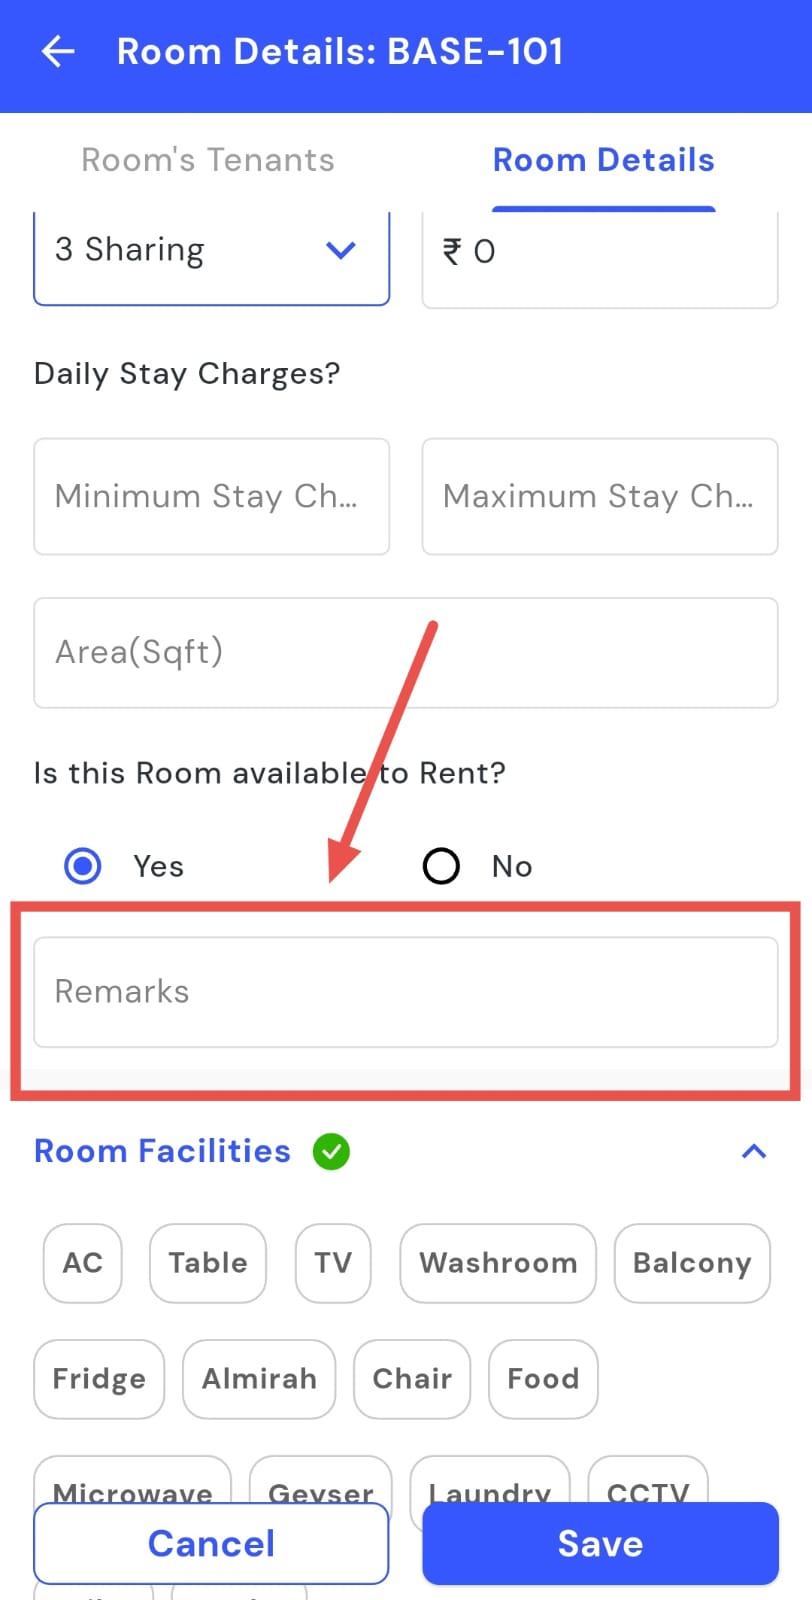
- Step 6: Save changes Tap the Save button to confirm and record your remark.
How can I add room facilities?
You can ensure tenants always have accurate information by keeping the facilities list for each room up to date. The app makes it easy to add or edit room amenities directly from the Room Details section in just a few taps. This helps you maintain clear and transparent records, ensuring that every room listing accurately reflects the amenities provided and supports better tenant communication.
Follow these steps to update room facilities:
- Step 1: Open Rooms Tap the Property icon in the bottom navigation menu and select the Room option to view all rooms.
- Step 2: Locate the room Scroll or search to find the specific room you want to update.
- Step 3: Access Room Details Click on the room card and select Room Details to open its information.
- Step 4: Enable edit mode Tap the Edit button to activate edit mode.
- Step 5: Add facilities Scroll down the page and click on Room Facilities. Select the facilities you want to add.

- Step 6: Save changes Tap the Save button to confirm and update the room facilities.
How can I add room photos from the app?
You can showcase your property more effectively by adding room photos directly from the app. Clear and updated images make your listings stand out and give potential tenants a better idea of what to expect. By uploading or updating photos regularly, you ensure that each listing accurately represents the space, builds tenant trust, and provides a clear visual overview of the room’s condition and facilities.
Here's how you can do it:
- Step 1: Open Rooms Tap the Property icon in the bottom navigation menu and select the Room option.
- Step 2: Locate the room Scroll or search to find the specific room you want to add photos for.
- Step 3: Access Room Details Tap on the room card to open its Room Details page.
- Step 4: Enable edit mode Tap the Edit button to activate edit mode.
- Step 5: Open Room Photos Scroll down and click on "New Upload" in the the Room Photos section.
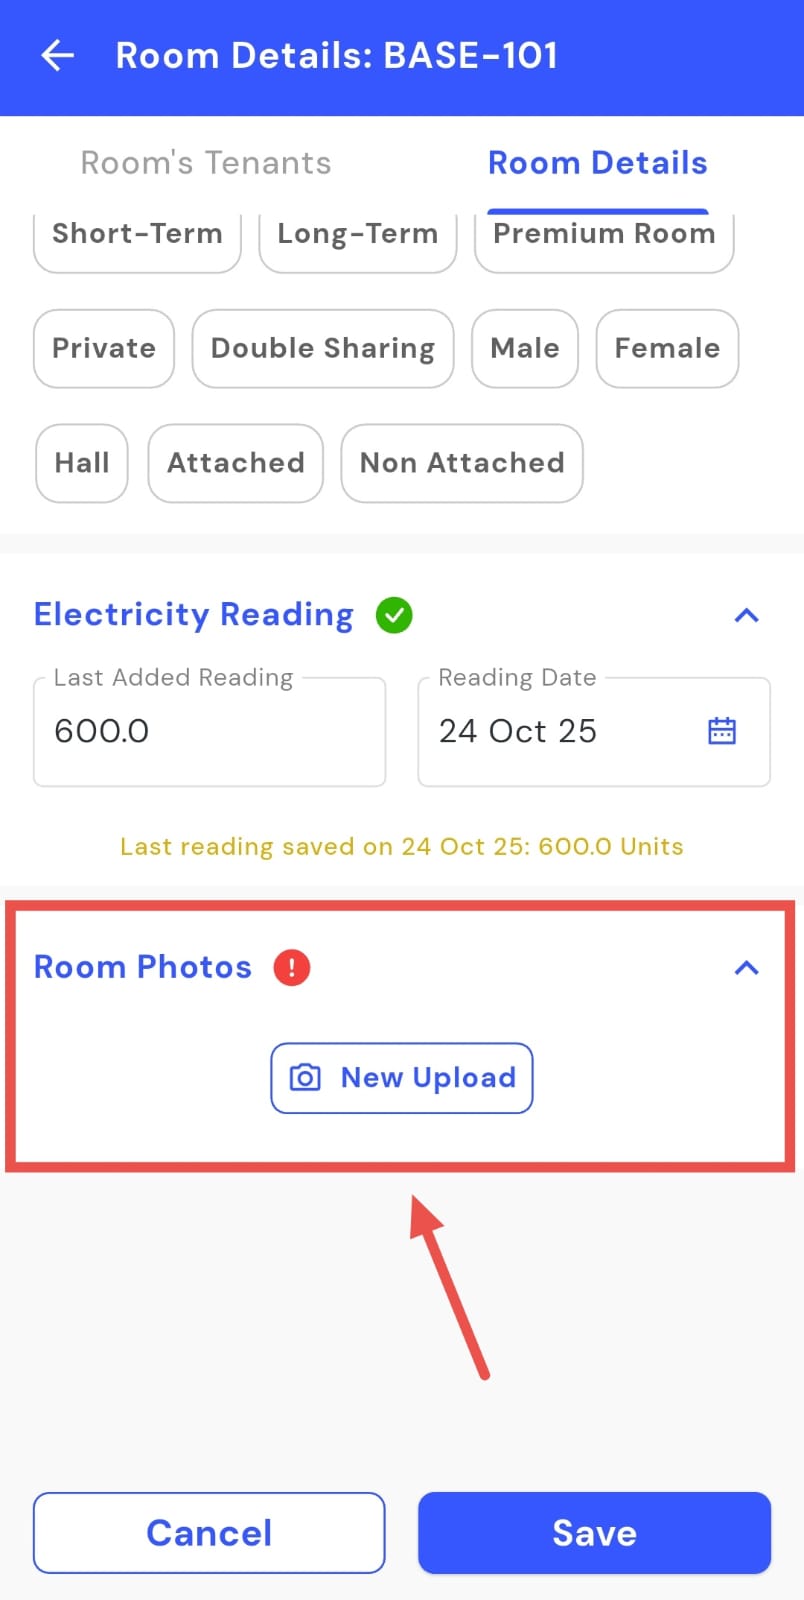
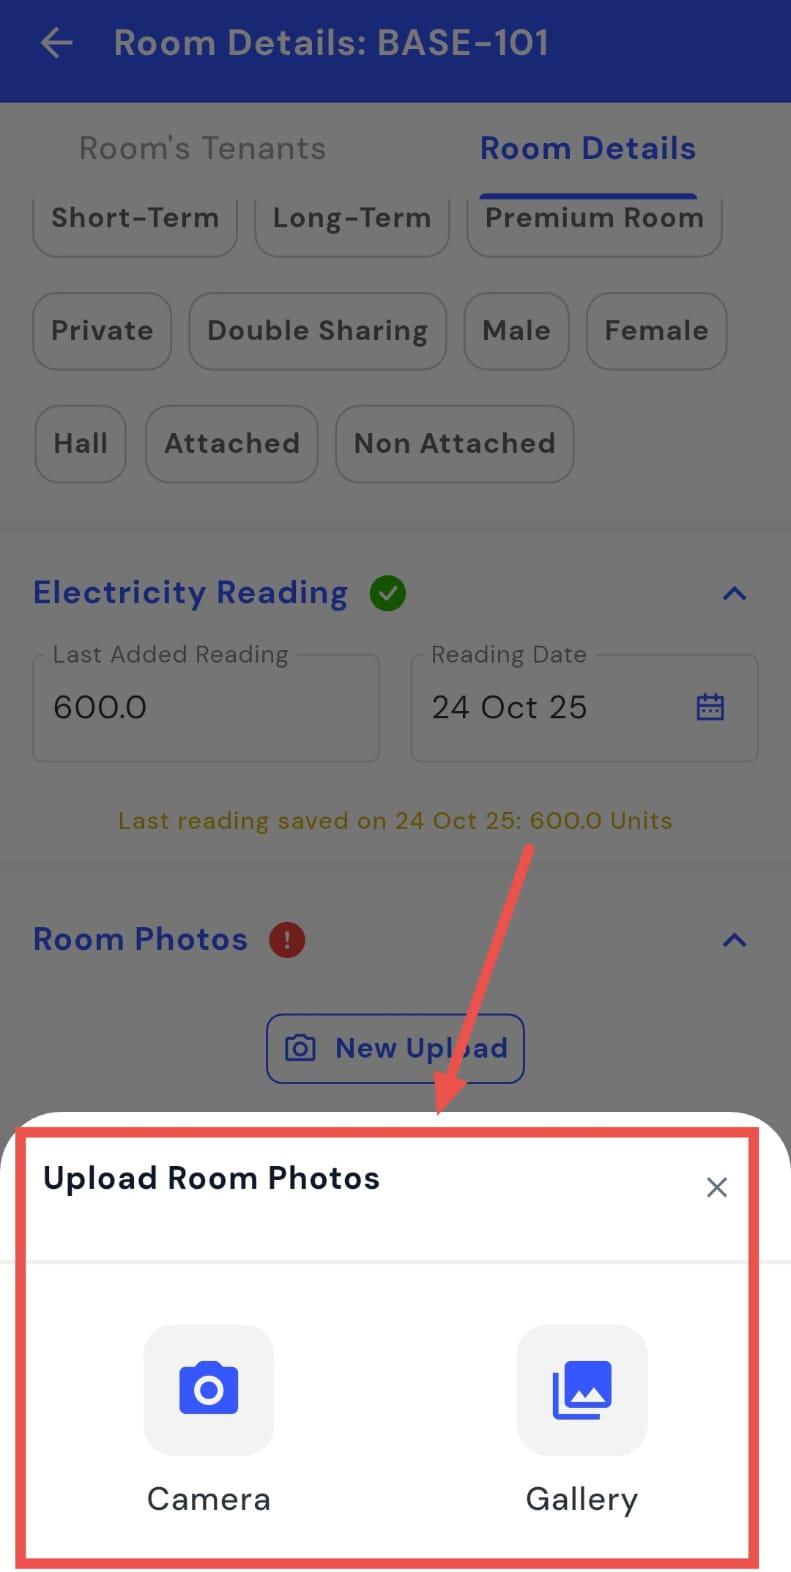
- Step 6: Choose upload method A window will appear with two options; Camera and Gallery.
-
To upload using your Camera:
-
Select Camera to activate your device’s camera.
-
Capture the photo by tapping the Camera button.
-
Click Save to store the image.
-
Tap Upload to complete the process.
-
To upload from your Gallery:
-
Select Gallery to open your phone’s image library.
-
Choose the desired photo and tap Done.
-
Click Upload to finish the upload.
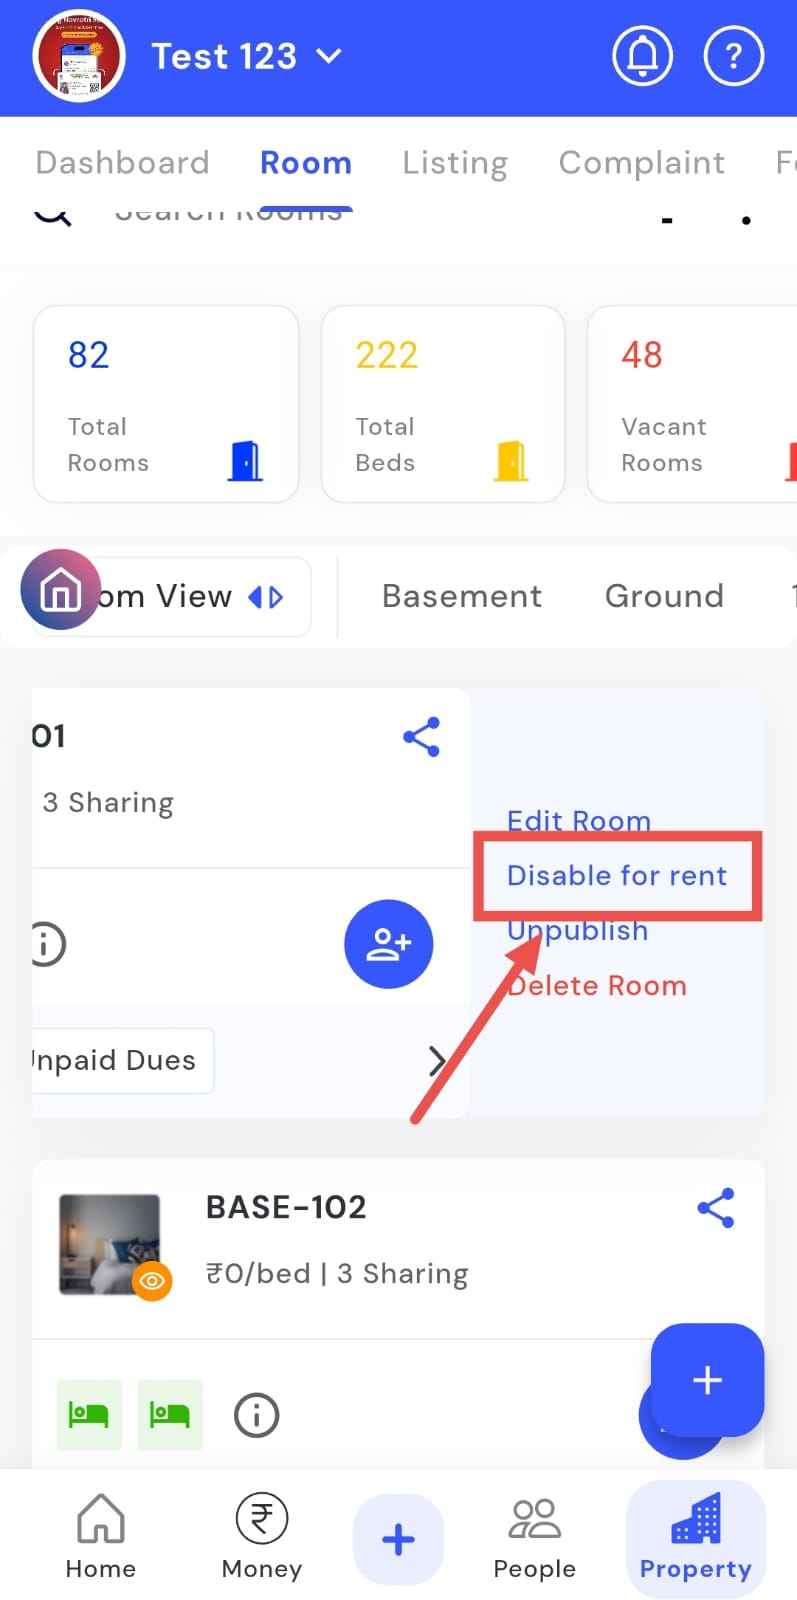
How can I disable a room for the rent?
Need to stop new tenants from booking a room? The app makes it easy to disable a room for rent. Whether a room is under maintenance, renovation, or temporarily unavailable, you can quickly mark it as unavailable, preventing new bookings. This ensures that only rooms ready for occupancy are available to tenants.
Follow these steps to disable a room for rent:
- Step 1: Open Rooms Tap the Property icon in the bottom navigation menu and select the Room option.
- Step 2: Locate the room Scroll down or search to find the specific room you wish to disable.
- Step 3: Swipe left on the room card On the room list, swipe left on the specific room card to reveal more options.
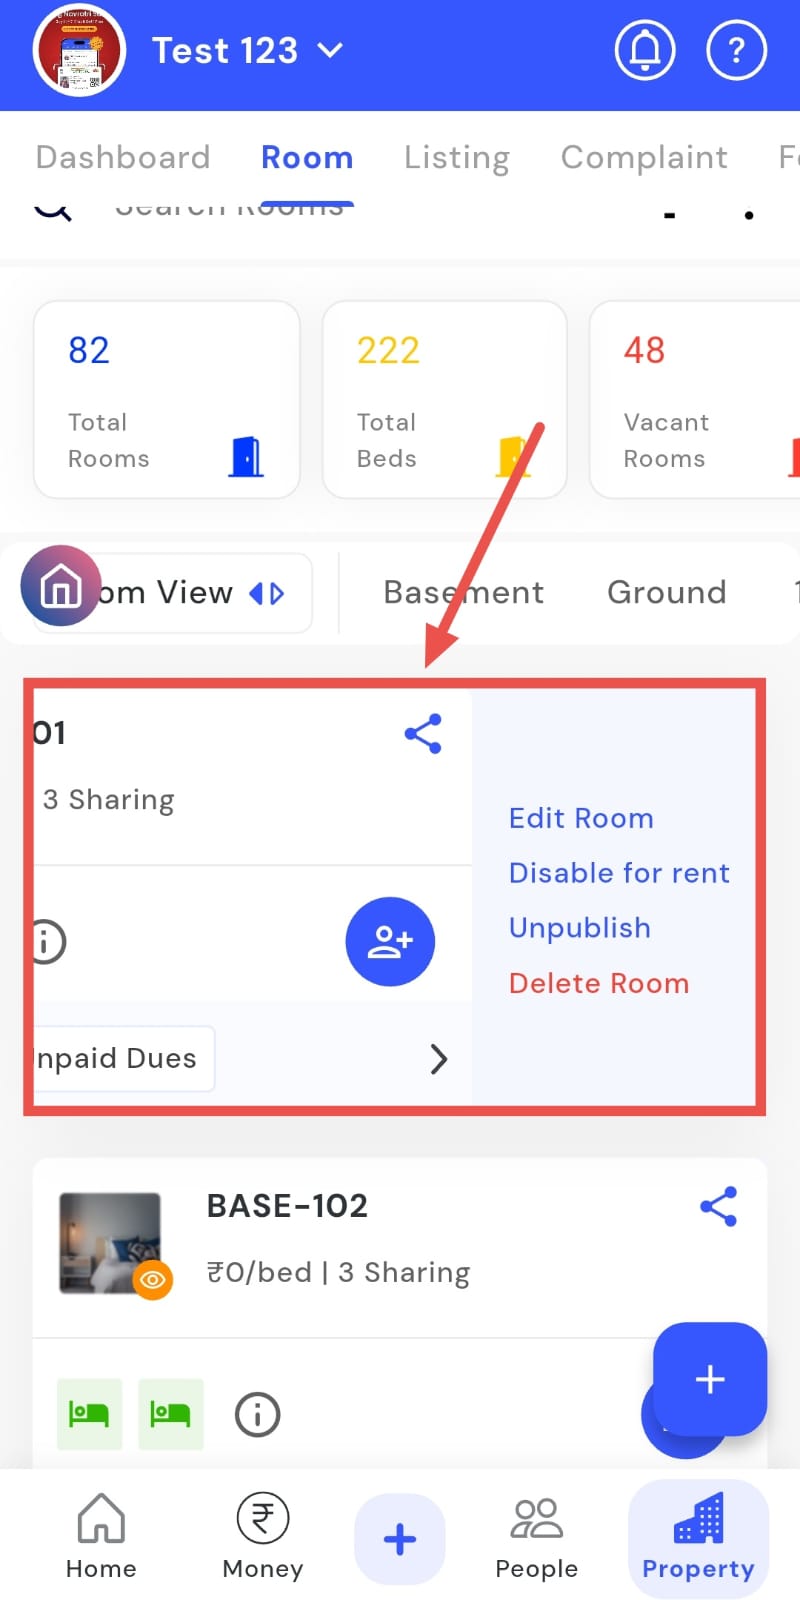
- Step 4: Tap “Disable for Rent” Click on the Disable for Rent option to mark the room as unavailable for tenants.
How do I delete a room?
Need to remove a room from your listings? The app allows you to delete a room quickly and safely. In just a few taps, you can remove any room that is no longer part of your property or needs to be taken off your listings. This helps ensure your room records remain accurate and up to date.
Follow these steps to delete a room:
- Step 1: Open Rooms Tap the Property icon in the bottom navigation menu and select the Room option.
- Step 2: Locate the room Scroll or search to find the specific room you want to delete.
- Step 3: Swipe left on the room card Swipe left on the desired room card to reveal additional options.
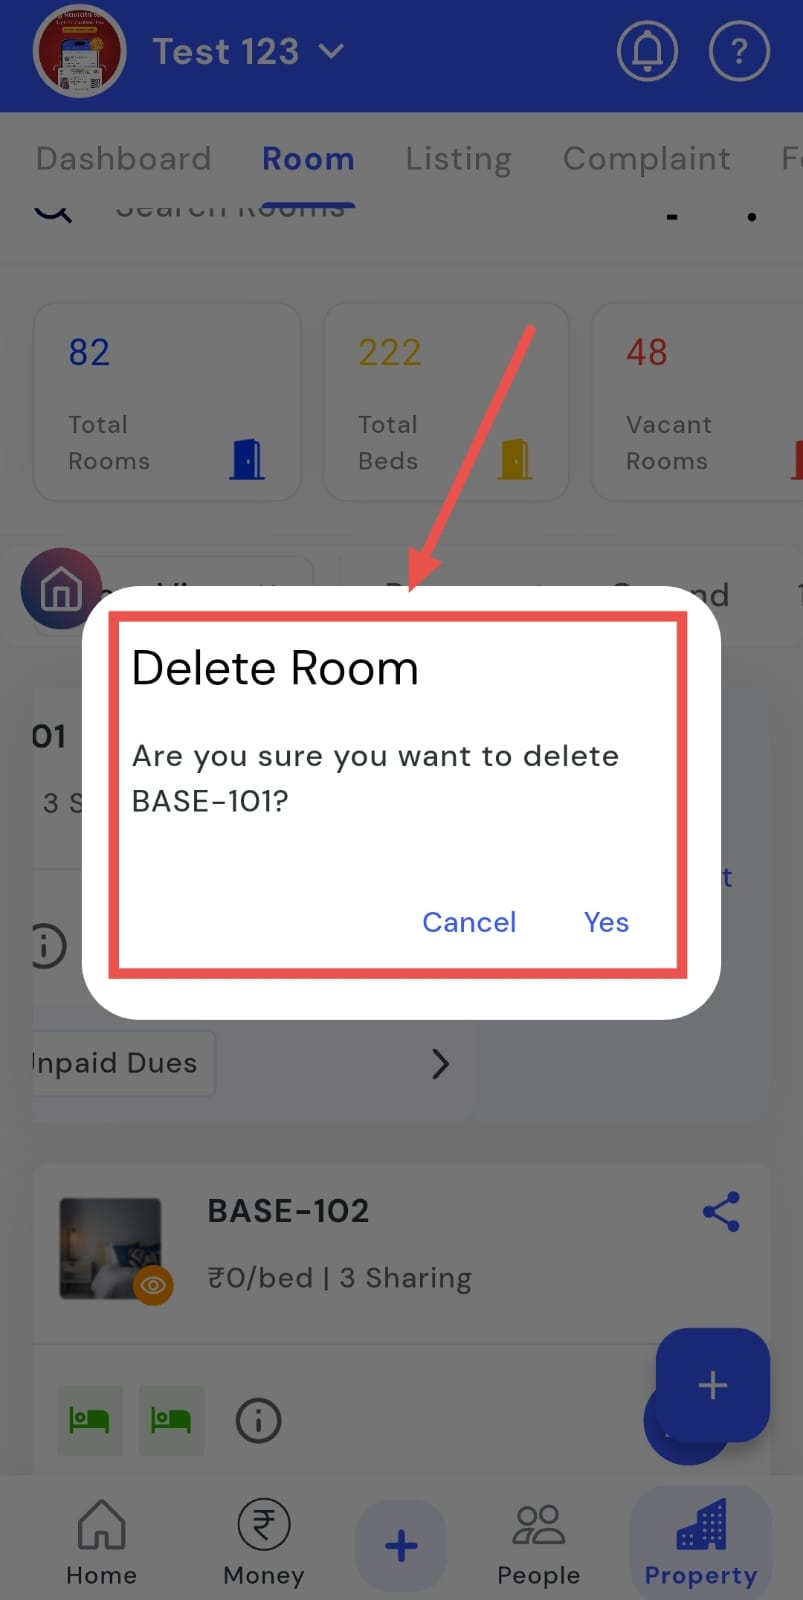
- Step 4: Delete the room Tap the Delete Room option to remove the room from the property.
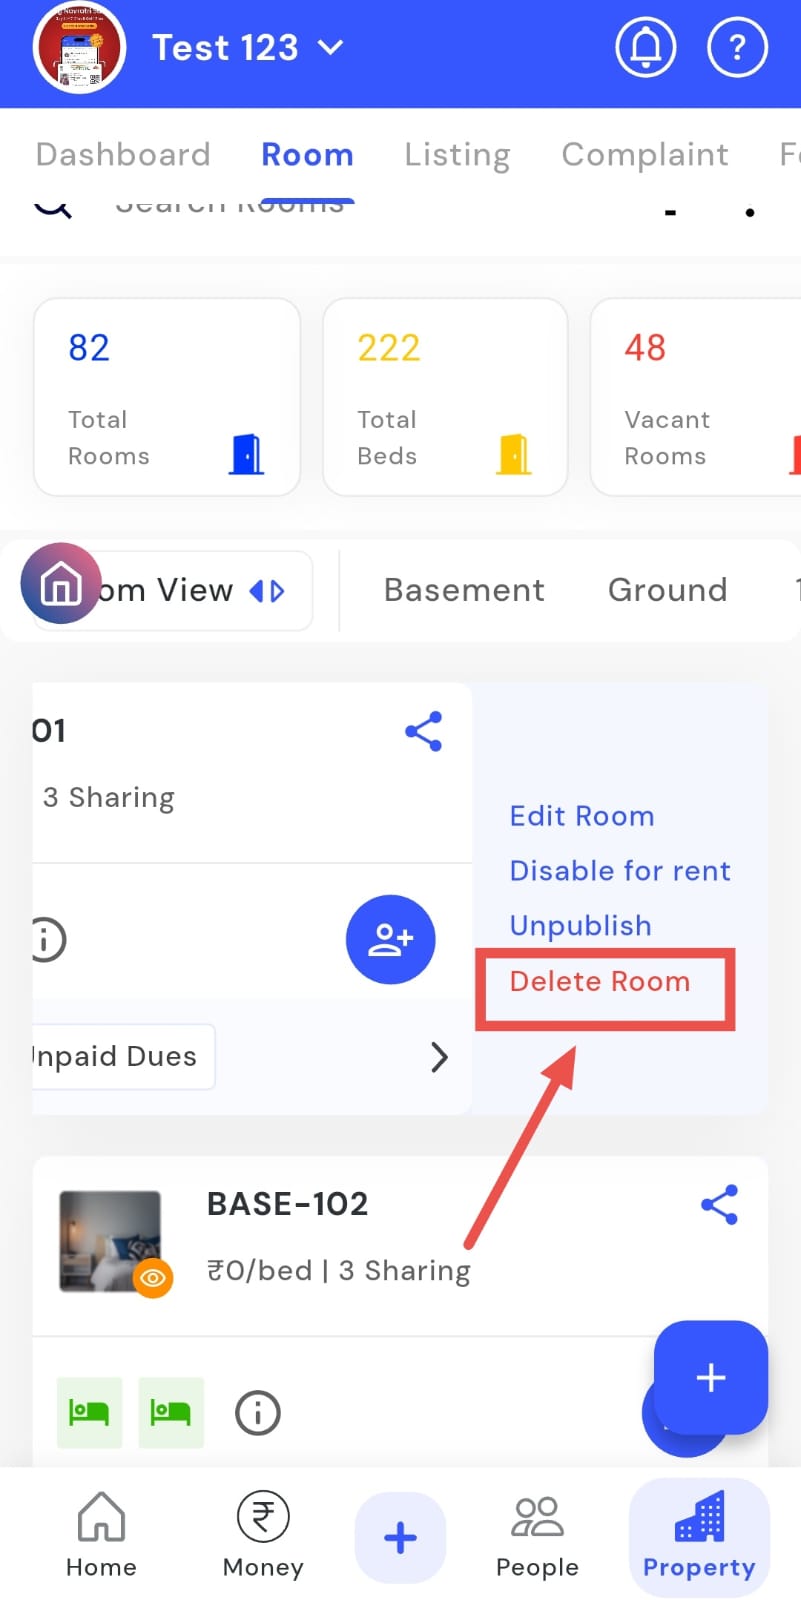
- Step 5: Confirm deletion A confirmation window will appear, tap YES to permanently delete the room.
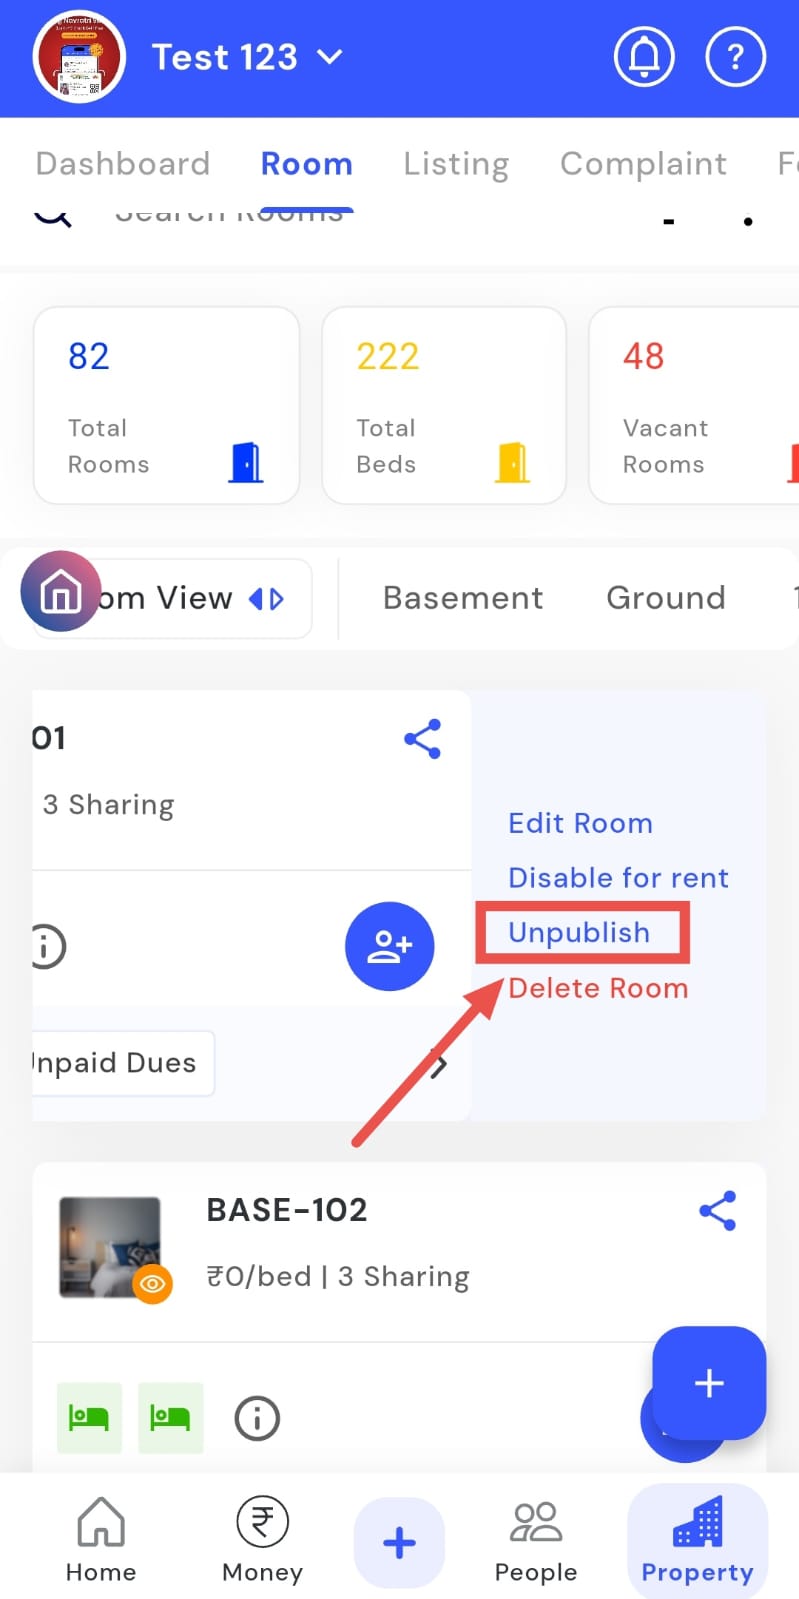
How can I unpublish a room from the website?
If a room is temporarily unavailable, you can use the Unpublish option to hide it from your site. This makes it easy to manage your listings by keeping rooms that are not currently available for rent out of view. By doing so, you ensure that tenants only see rooms ready for booking, maintaining clear and accurate listings.
Follow these steps to unpublish a room:
- Step 1: Open Rooms Tap the Property icon in the bottom navigation menu and select the Room option.
- Step 2: Locate the room Scroll or search to find the specific room you want to unpublish.
- Step 3: Swipe left on the room card Swipe left on the room card to reveal additional options.
- Step 4: Unpublish the room Tap the Unpublish option to hide the room from the website.
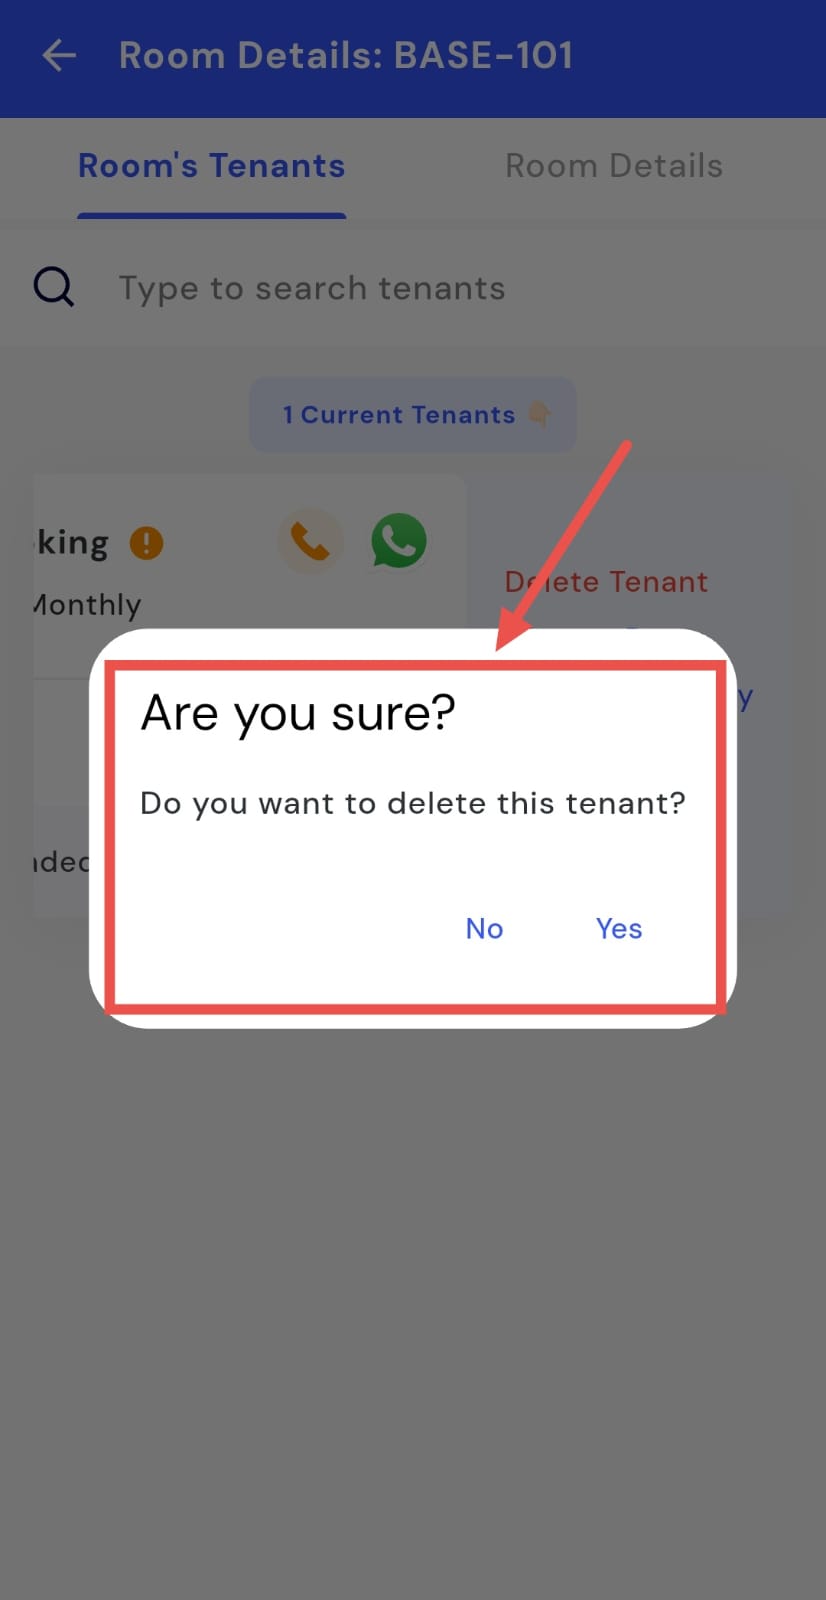
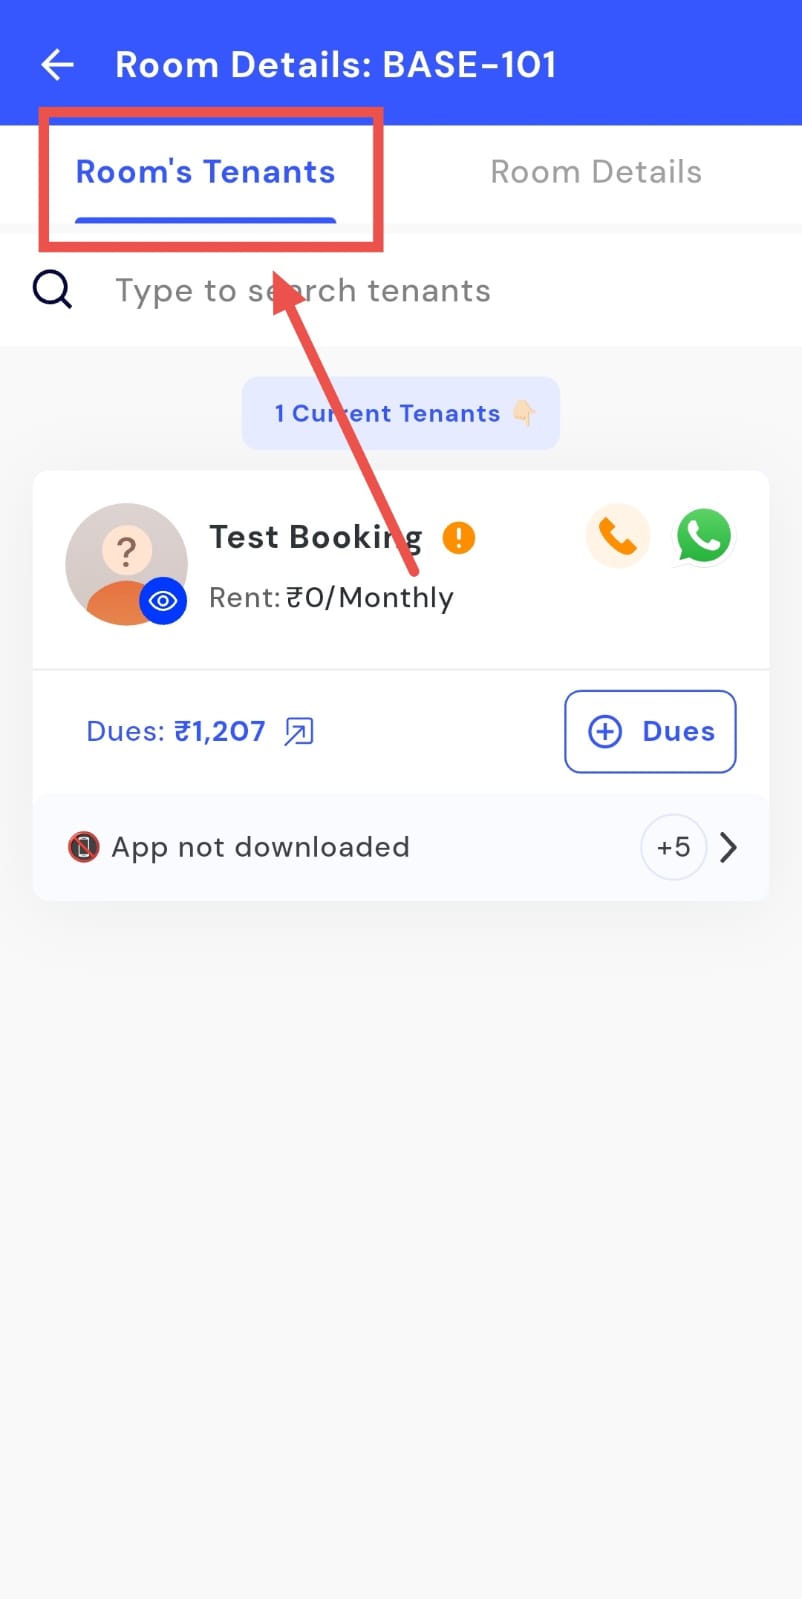
How can I delete a tenant from the room?
You can keep your room occupancy accurate by deleting tenant entries when needed. The app allows you to remove a tenant quickly and safely with just a few taps from the tenant card. Whether a tenant has moved out or you need to update occupancy, this ensures your room records remain accurate and up to date.
Follow these steps to delete a tenant from a room:
- Step 1: Open Rooms Tap the Property icon in the bottom navigation menu and select the Room option.
- Step 2: Locate the room Scroll or search to find the specific room containing the tenant.
- Step 3: Open Room Details Click on the room card to open the Room Details screen.
- Step 4: Access Room Tenants Swipe left and select the Room Tenants screen.
- Step 5: Locate the tenant Scroll and find the concerned tenant card.

- Step 6: Access Delete Option Swipe left on the tenant card and tap the Delete Tenant option.
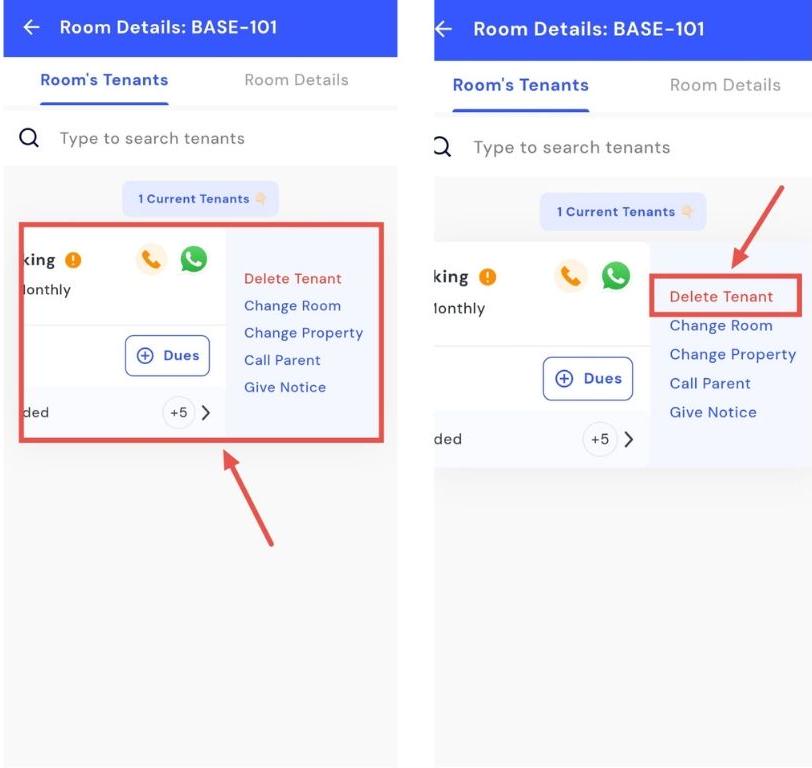
- Step 7: Confirm deletion A confirmation window will appear. Tap YES to remove the tenant permanently.