Property Food
Property>Food
- Property>Food
1.1 **How can we activate the FOOD menu **
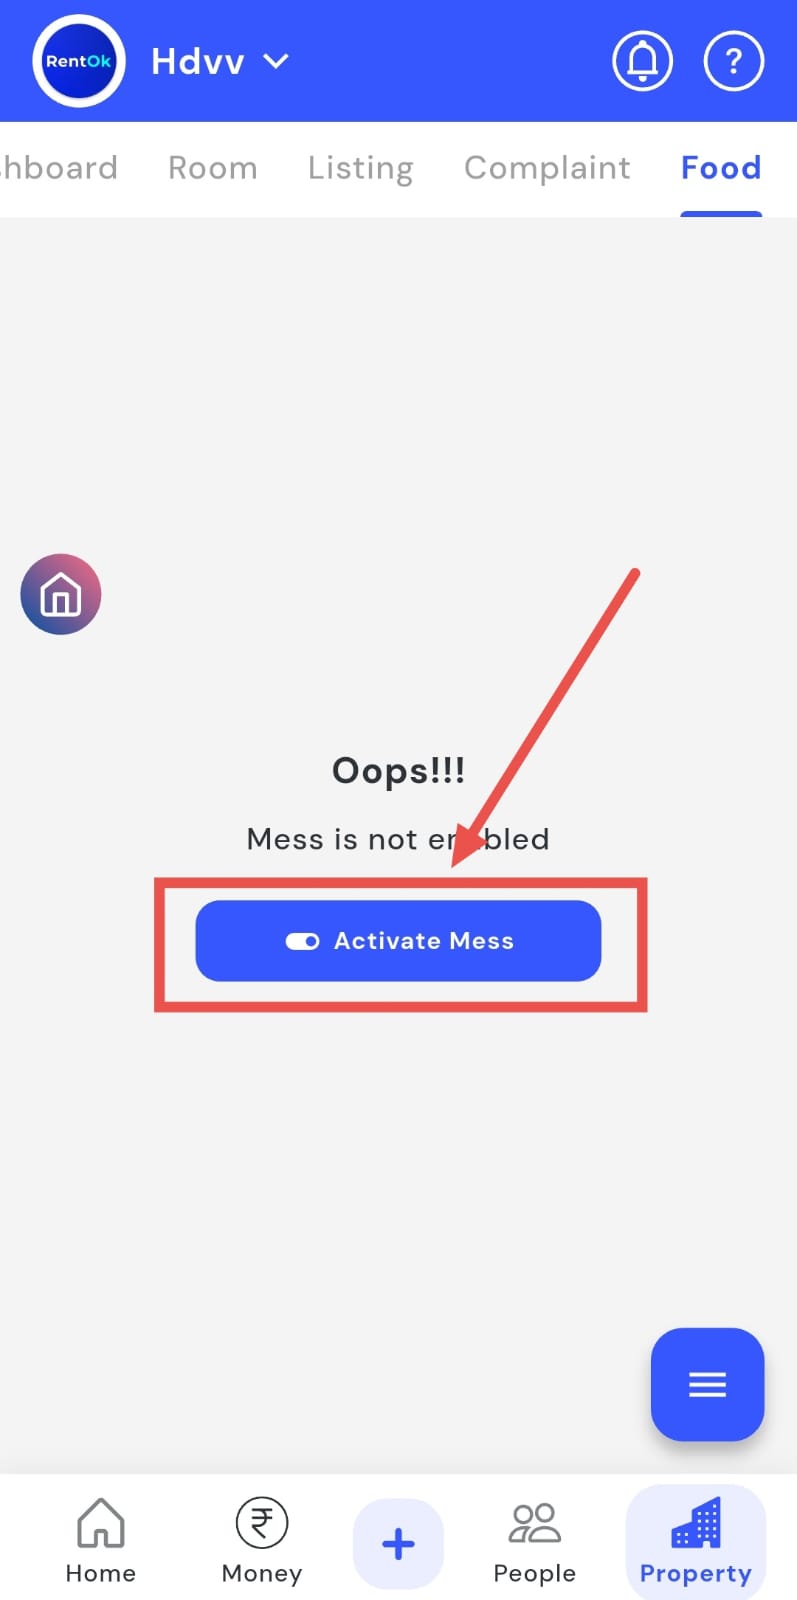
Want to activate the Food menu for your property? The app makes it easy to turn on the Food menu feature and keep your property’s food service active. Once enabled from the backend, you can manage meal types and timings for tenants directly from the app. This ensures your food service is organized and runs efficiently for everyone.
Follow these steps to activate the Food menu:
- Step 1: Open Food Menu Tap the Property icon in the bottom navigation menu and select the Food option.
- Step 2: Activate Menu Click Activate Now to enable the Food menu for your property.
- Step 3: Fill in Required Details Enter the necessary information under Meal Settings, Enable/Disable Meal, Attendance Cut-off Time, Meal Timings, and other related options. Once all the settings are configured, you can proceed to customize your food menu as per your property’s needs.
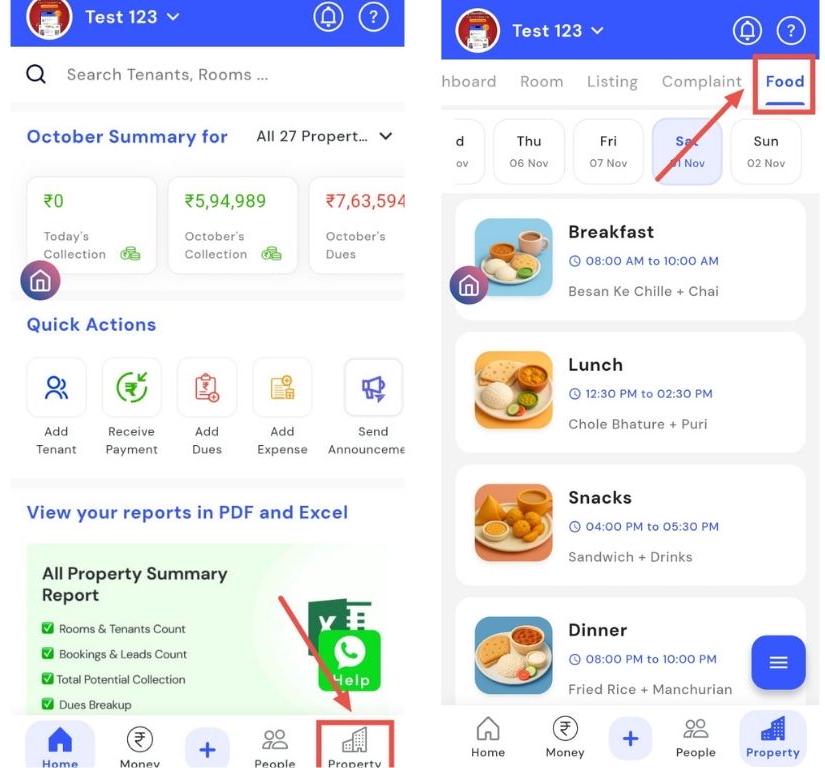
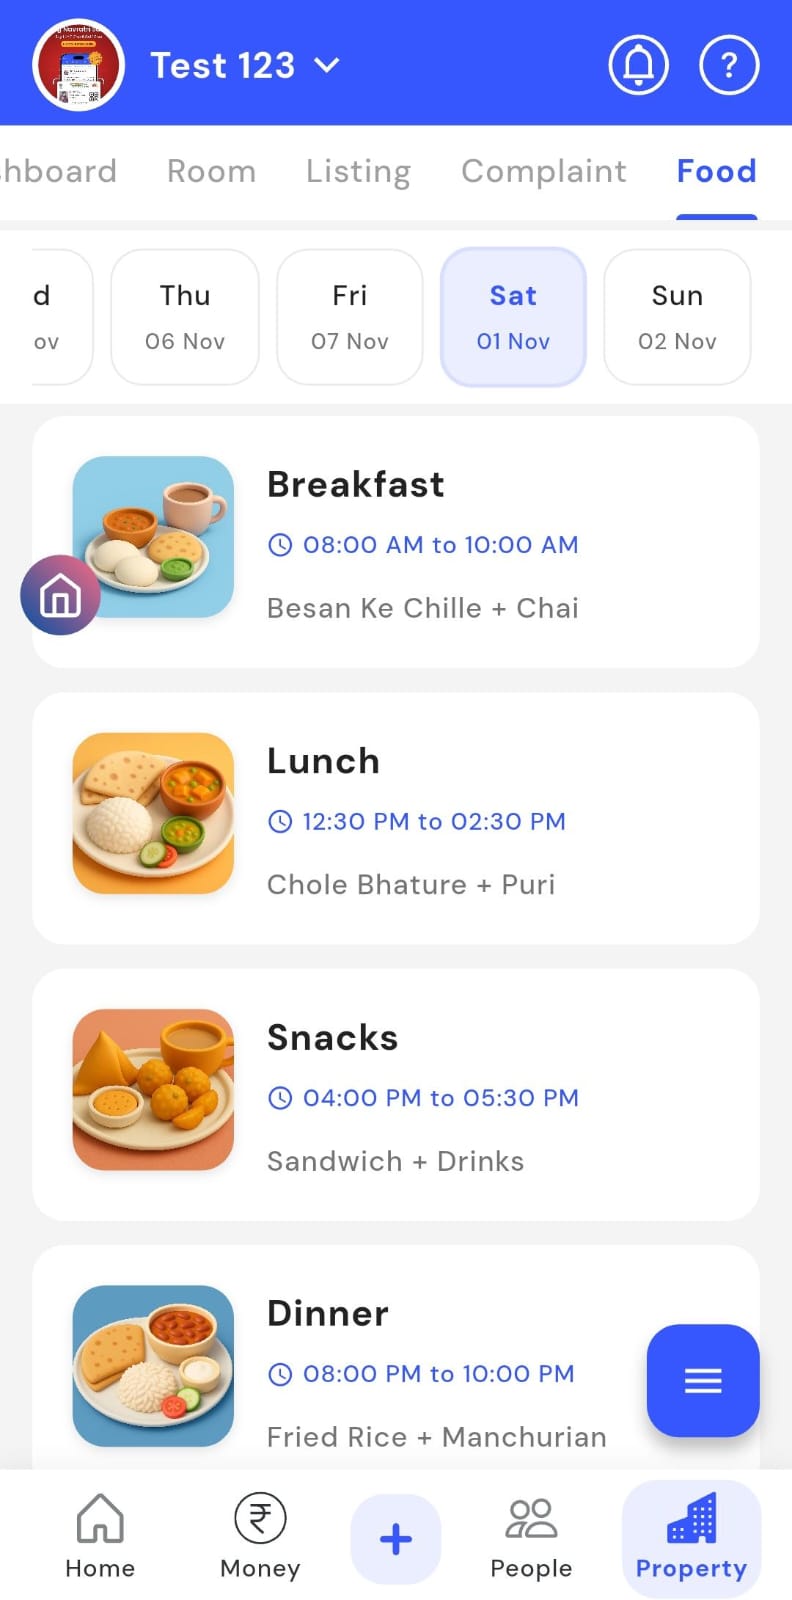
How can I view the food menu?
You can check your property’s Food menu to see what’s being served today or later in the week. The app makes it easy to access the daily food schedule and view meals available on any specific day. This feature allows you to navigate through the week, ensuring tenants and staff are always aware of the menu in advance.
Follow these steps to view the Food menu:
- Step 1: Open Food Menu Tap the Property icon in the bottom navigation menu, then select the Food option.
- Step 2: View Menu by Date You can see the Food menu for the selected date. At the top of the screen, use the day selector to switch between days and check the menu for each day of the week.
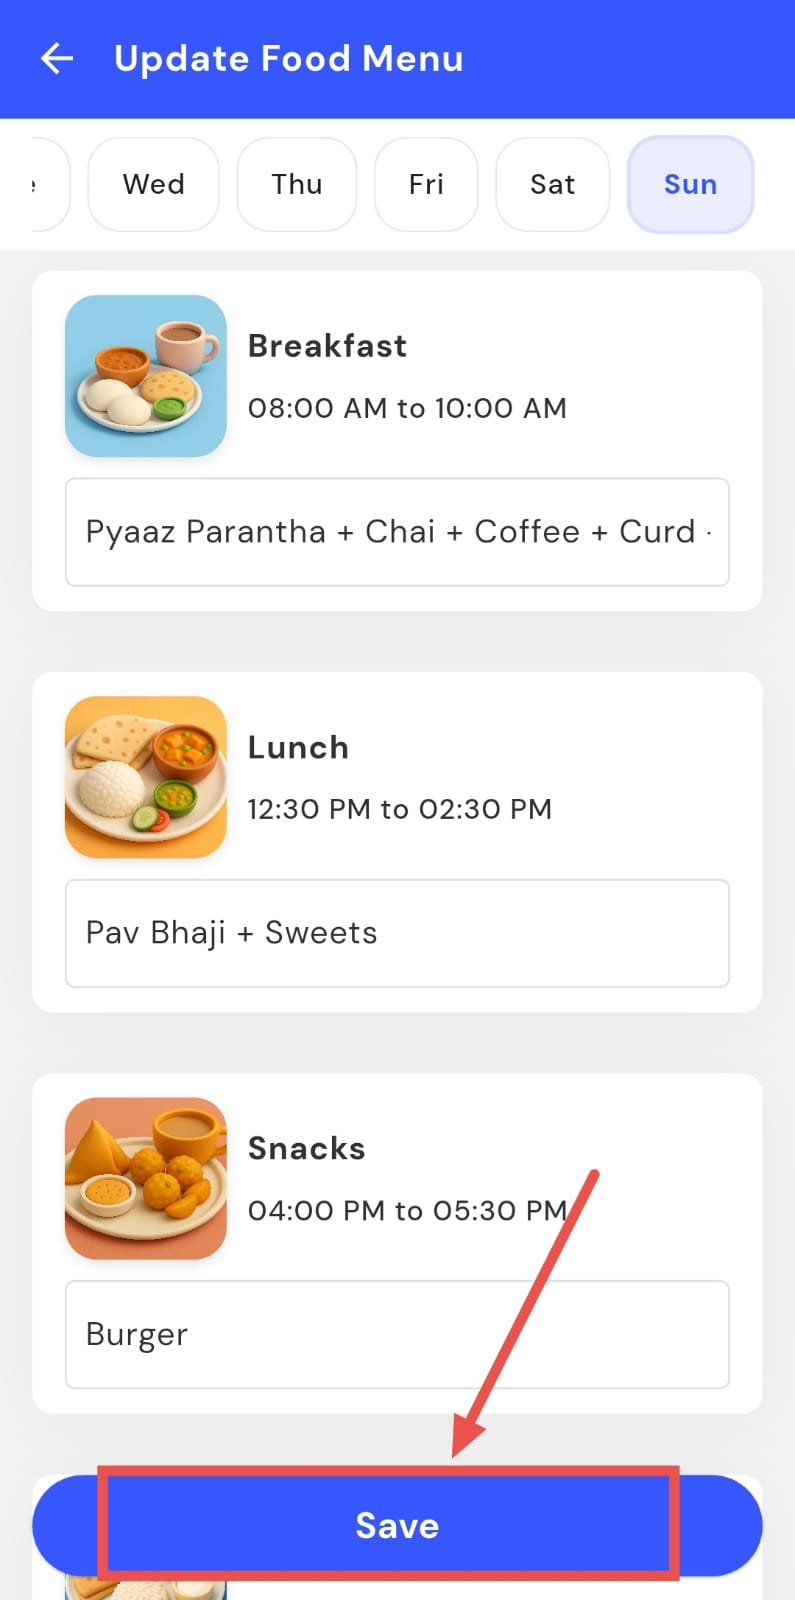
How can I edit the food menu?
You can quickly make changes to the Food menu for any day or meal type, ensuring your menu is always accurate. The app allows you to update or modify the Food menu directly, making it easy to adjust meals day-wise. This ensures that tenants always have access to the latest menu, keeping your food service organized and up to date.
Follow these steps to edit the Food menu:
- Step 1: Open Food Menu Tap the Property icon in the bottom navigation menu and select the Food option.
- Step 2: Access Menu Options Click on the three dots on the right-hand side of the screen.
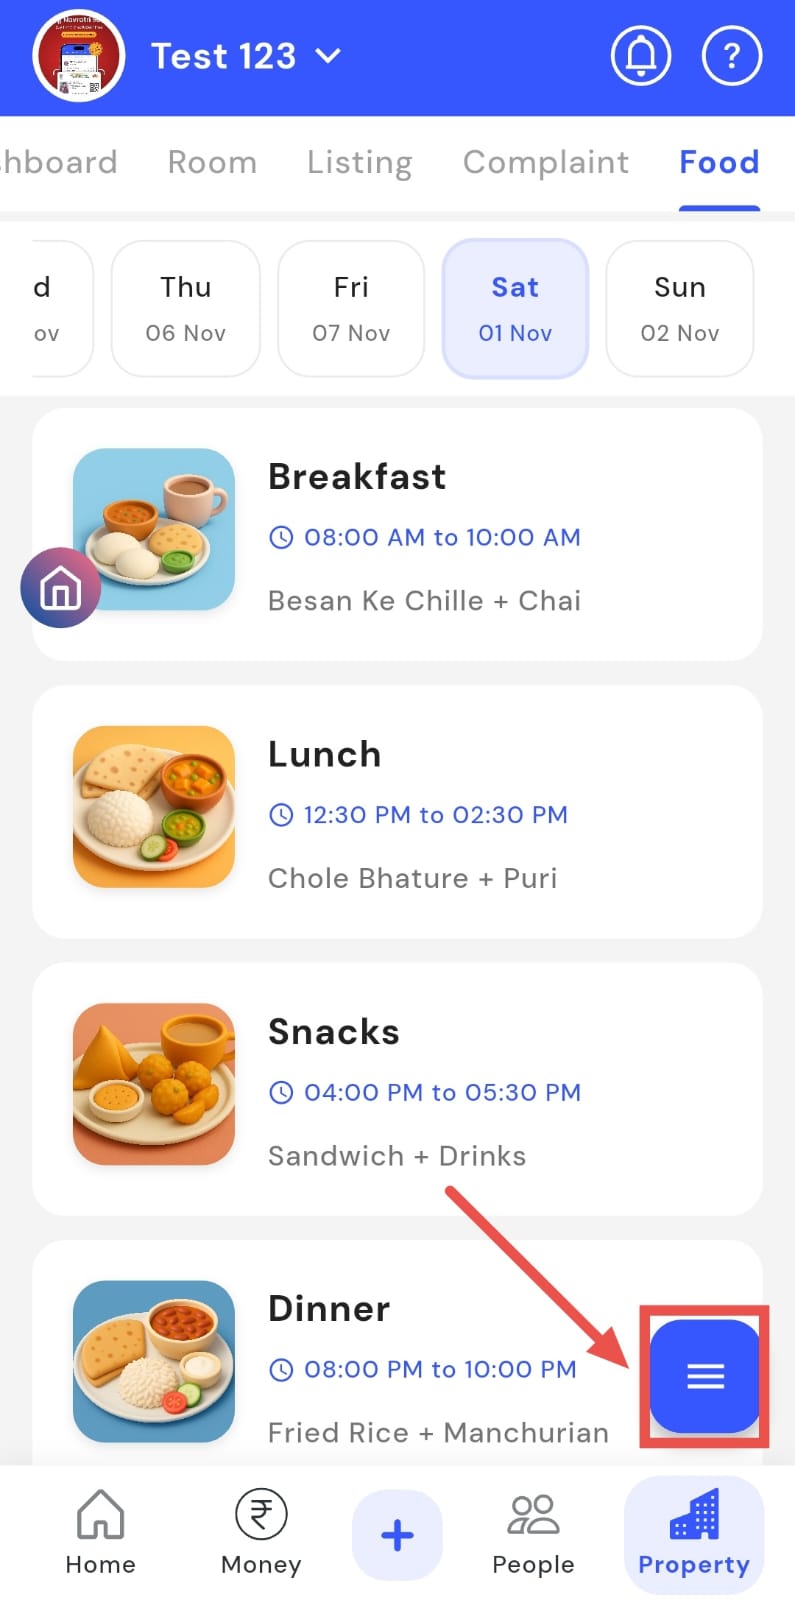
- Step 3: Select Edit Food Menu A window will appear. Tap Edit Food Menu to open the editing screen.
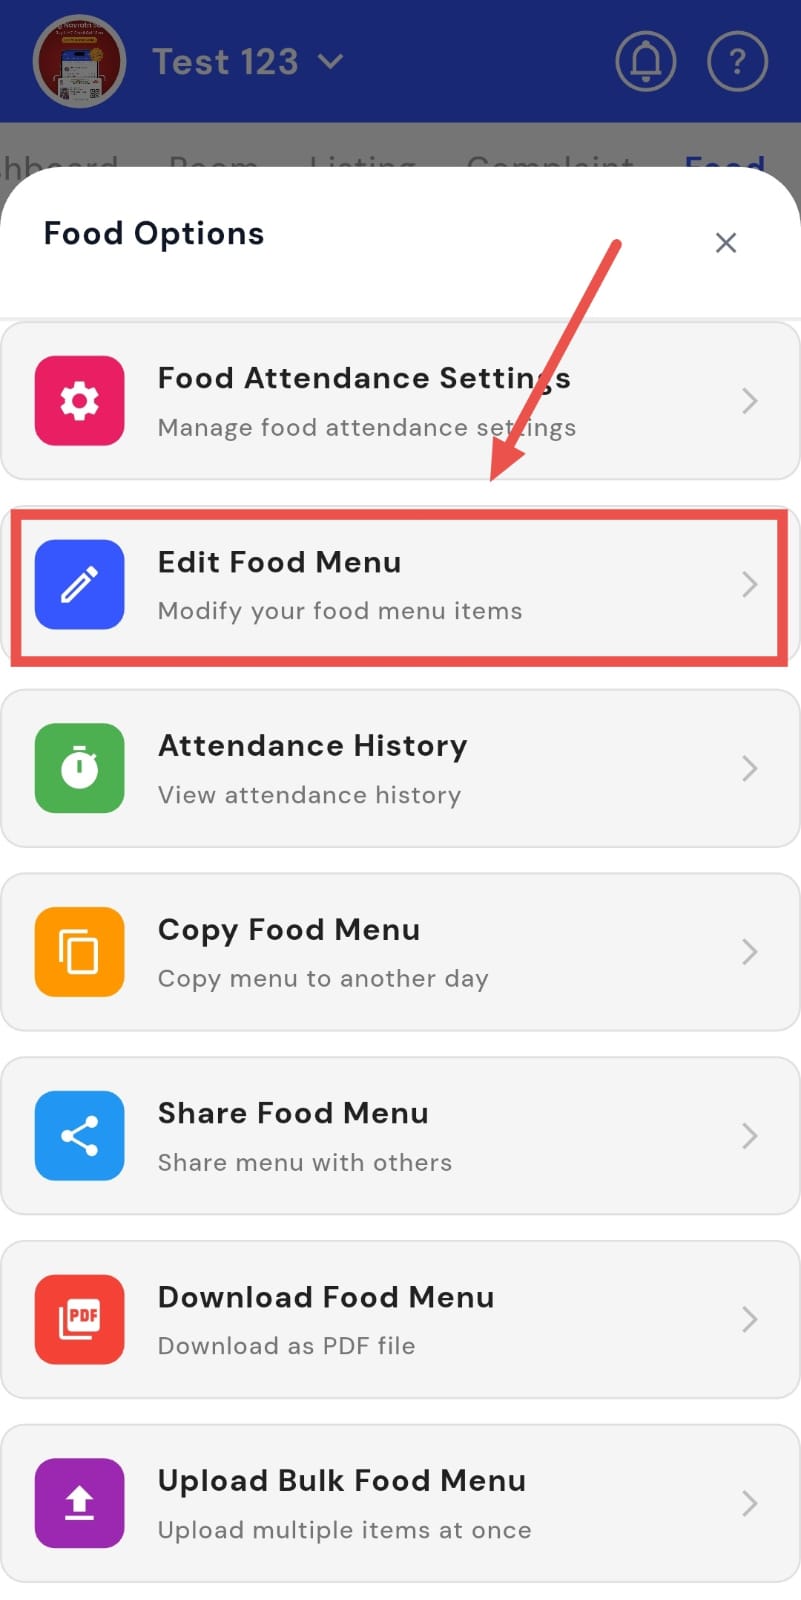
- Step 4: Update Menu The Update Food Menu screen will appear, allowing you to make changes day-wise.
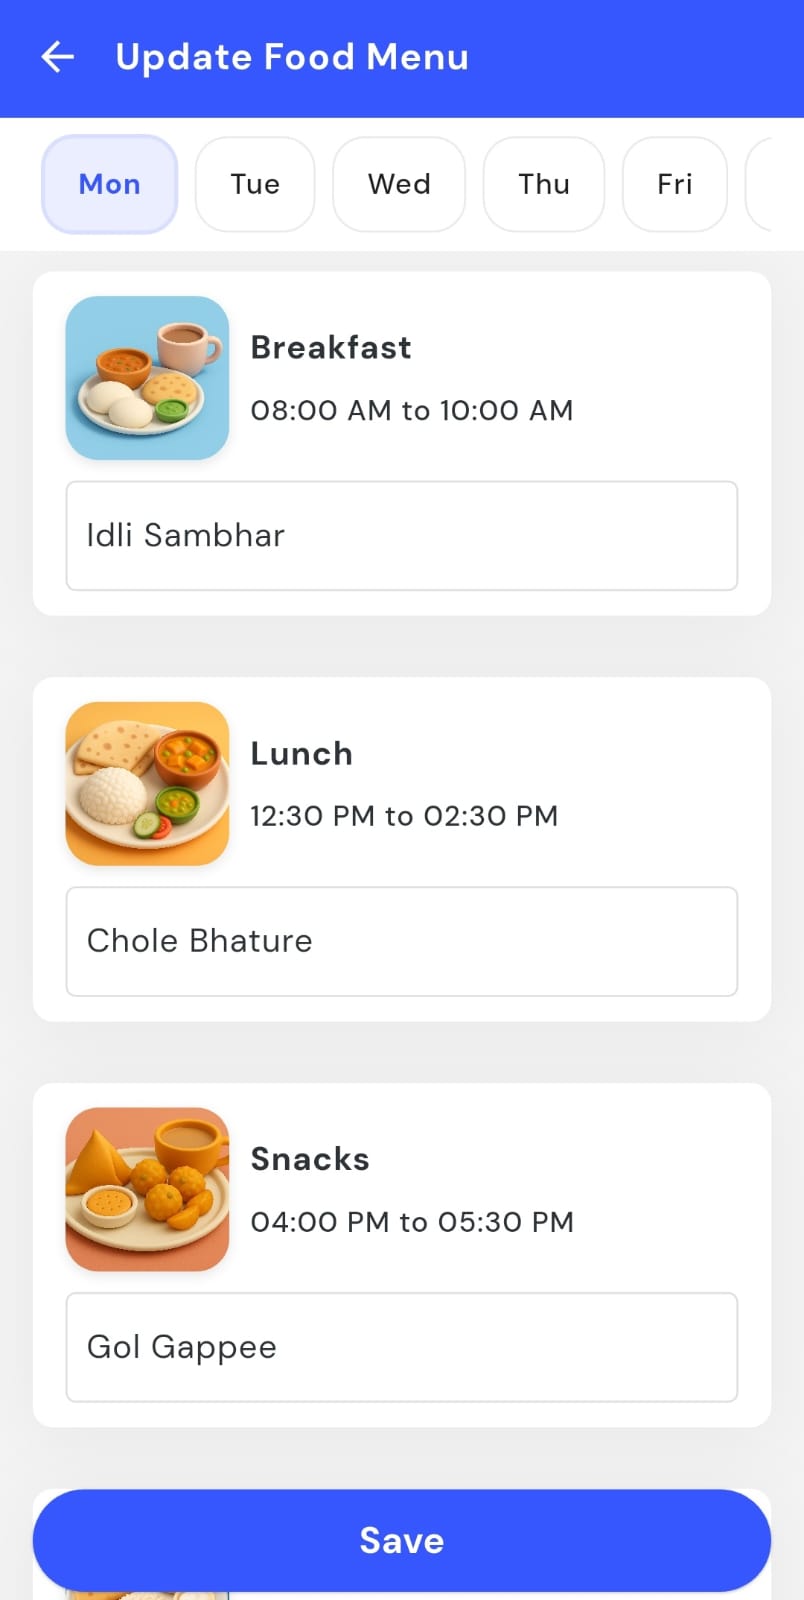
- Step 5: Save Changes After editing the meals, tap the Save button to confirm and update the menu.
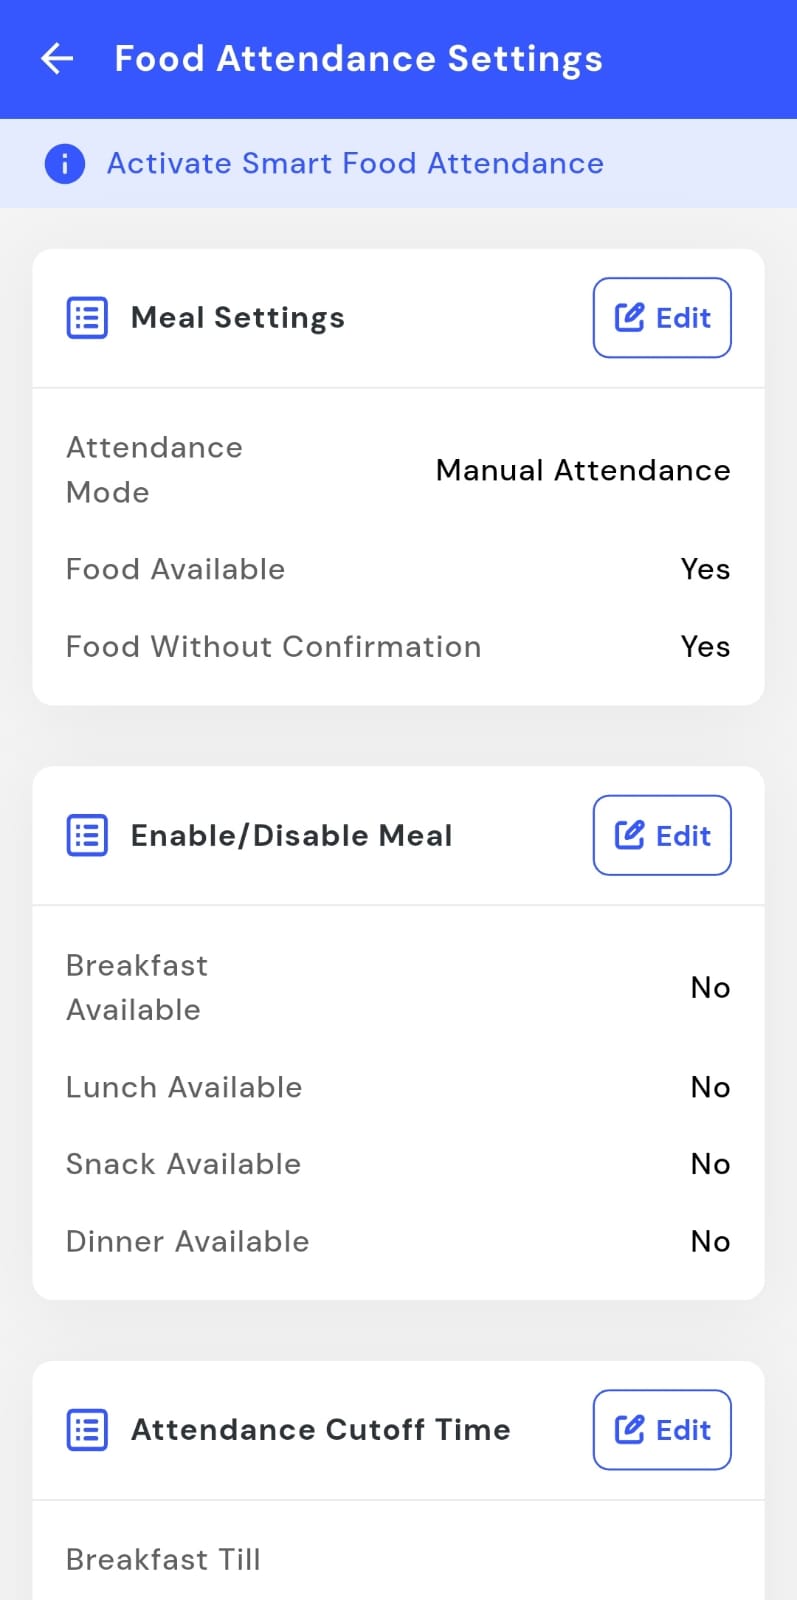
How can I manage meal settings?
Want to manage meal settings for your property? The Food section in the app makes it easy to control all meal-related settings. You can adjust features such as smart food attendance, food confirmations, and whether meals are served automatically without tenant approval. This ensures smooth and efficient management of your property’s food services.
Follow these steps to manage meal settings:
- Step 1: Open Food Section Tap the Property icon in the bottom navigation menu and select the Food option.
- Step 2: Access Food Attendance Tap the box with three lines in the bottom-right corner, then select Food Attendance.
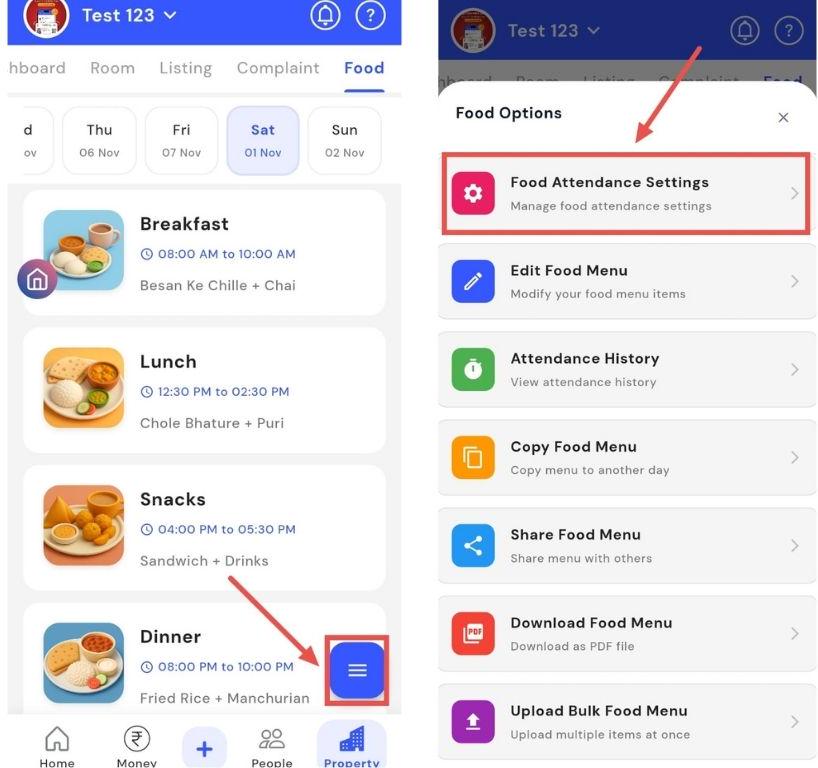
- Step 3: Open Meal Settings Scroll to find the Meal Settings box and tap Edit.
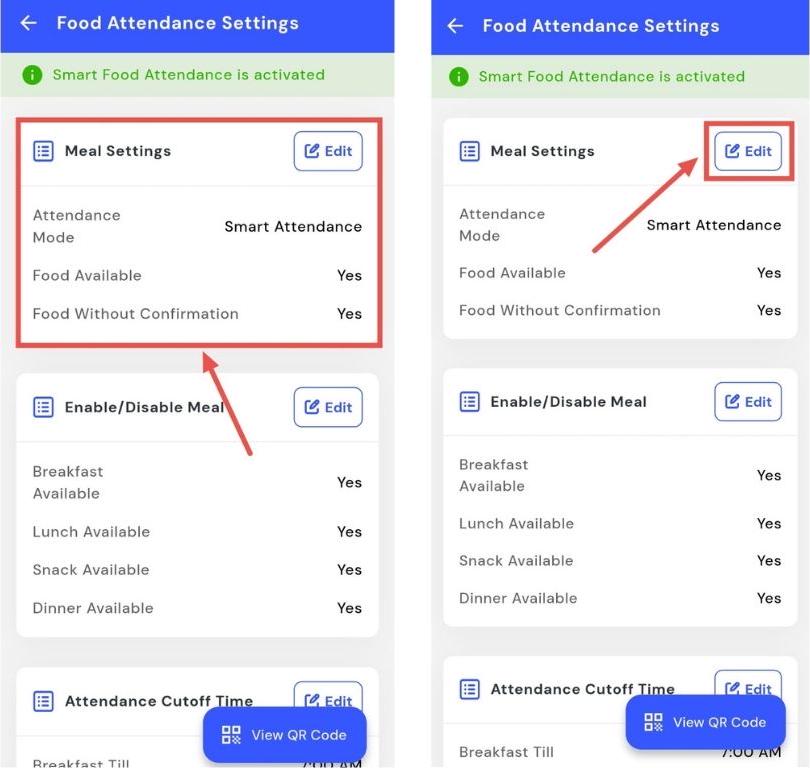
-
Step 4: Update Settings A window will appear. From here, you can:
-
Turn on Smart Food Attendance
-
Enable or disable the Food Menu
-
Choose whether to serve tenants without confirmation
-
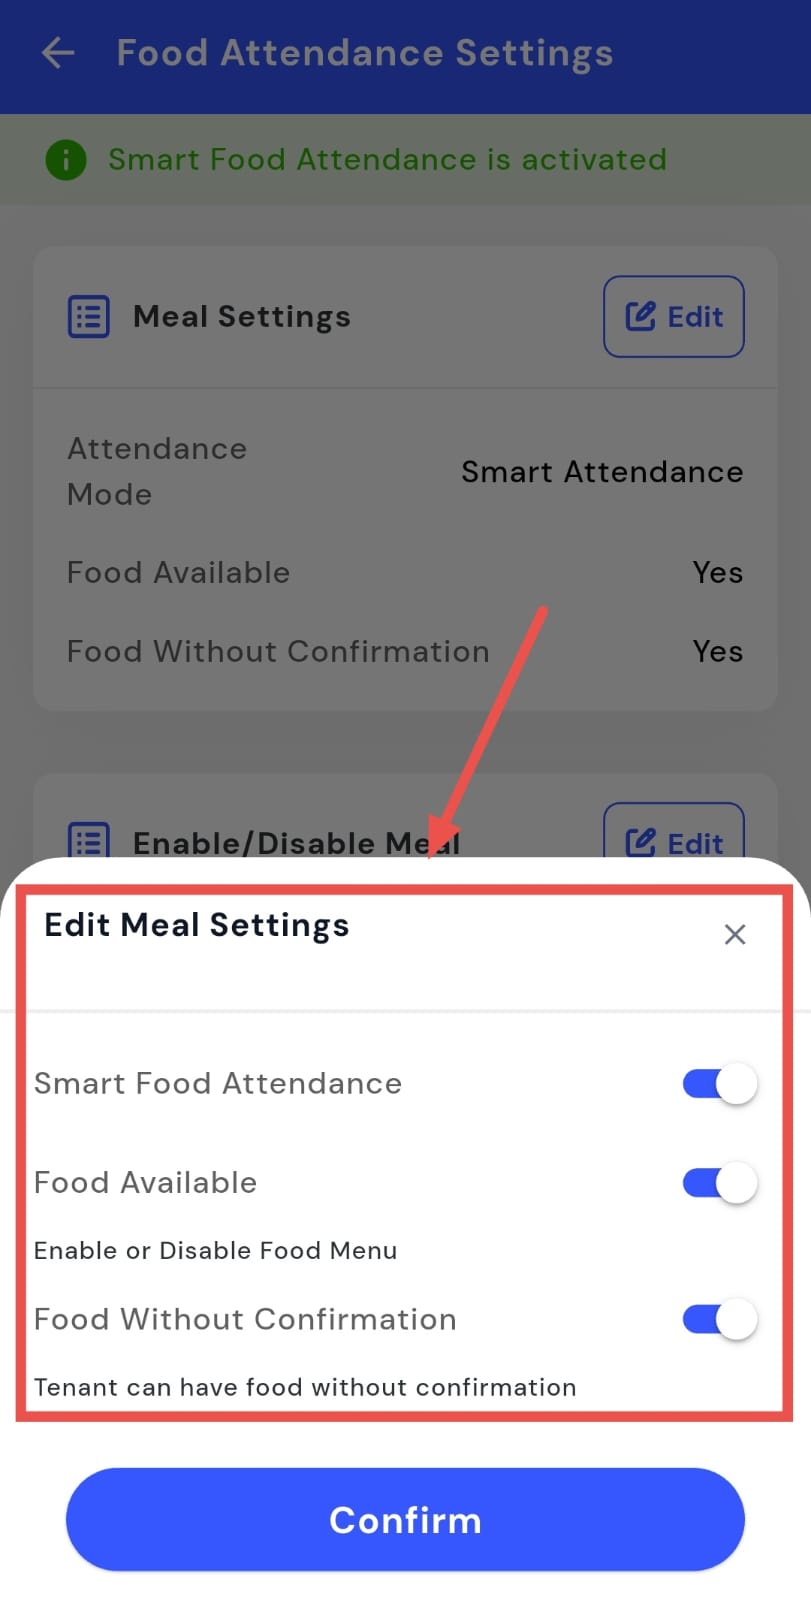
- Step 5: Confirm Changes After making your desired changes, tap Confirm to save and apply the new meal settings.

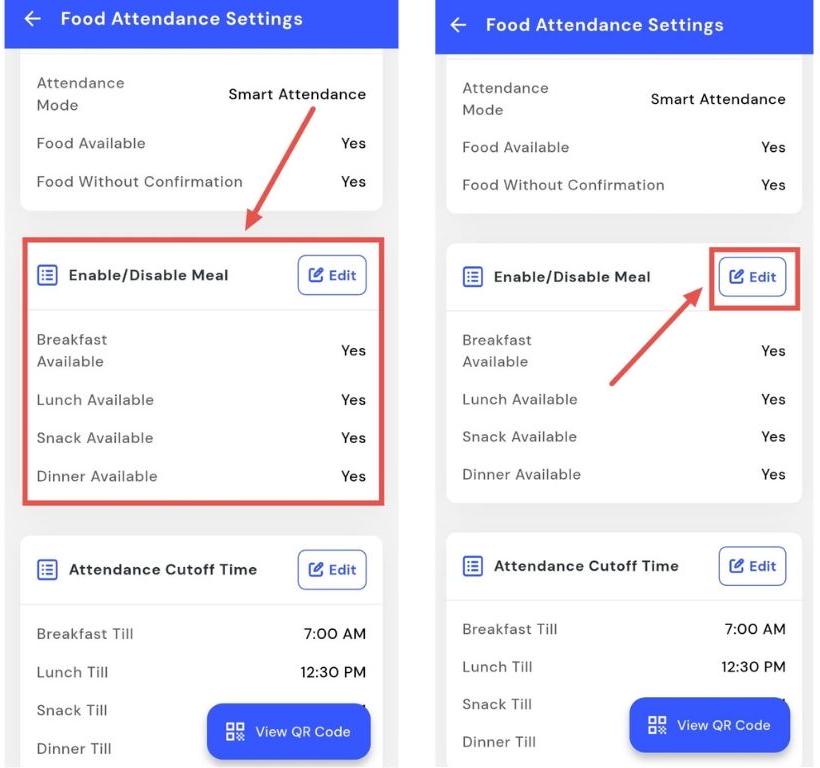
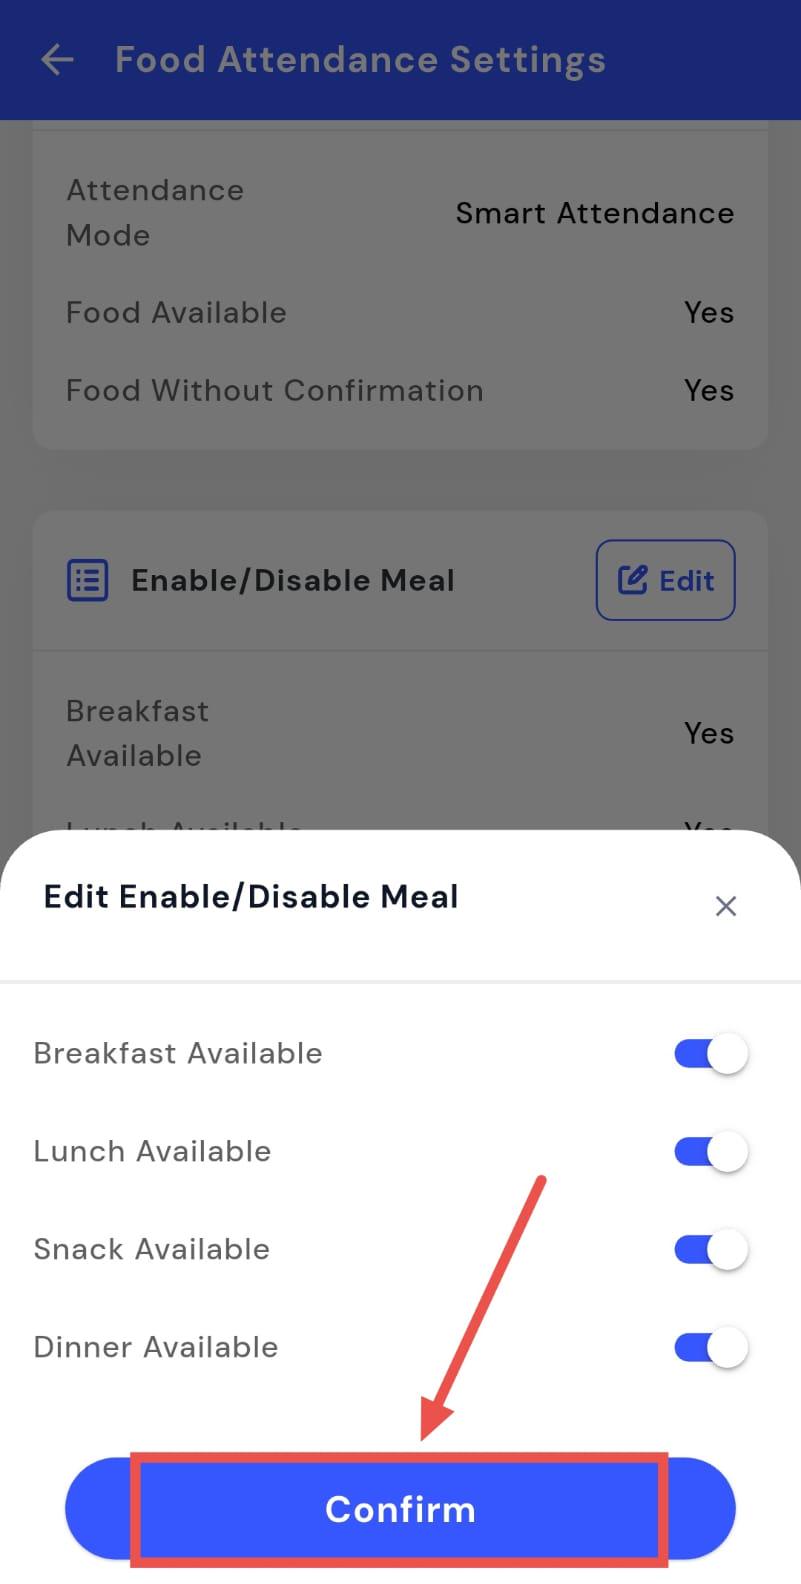
How can I enable or disable meals?
You can quickly update meal options to control which meals are served to tenants. The app allows you to edit the meal schedule directly from the Food section, making food management simple and efficient. This lets you enable or disable meals such as breakfast, lunch, snacks, or dinner, according to the services you wish to provide, ensuring tenants always receive the right meals at the right times.
Follow these steps to update meal options:
- Step 1: Open Food Section Tap the Property icon in the bottom navigation menu and select the Food option.
- Step 2: Access Food Attendance Tap the box with three lines in the bottom-right corner, then select Food Attendance.
- Step 3: Open Meal Settings Scroll to the Enable/Disable Meal box and tap Edit.
-
Step 4: Update Meal Options A window will appear. From here, you can choose which meals you want to provide in your property:
-
Breakfast
-
Lunch
-
Snacks
-
Dinner
-
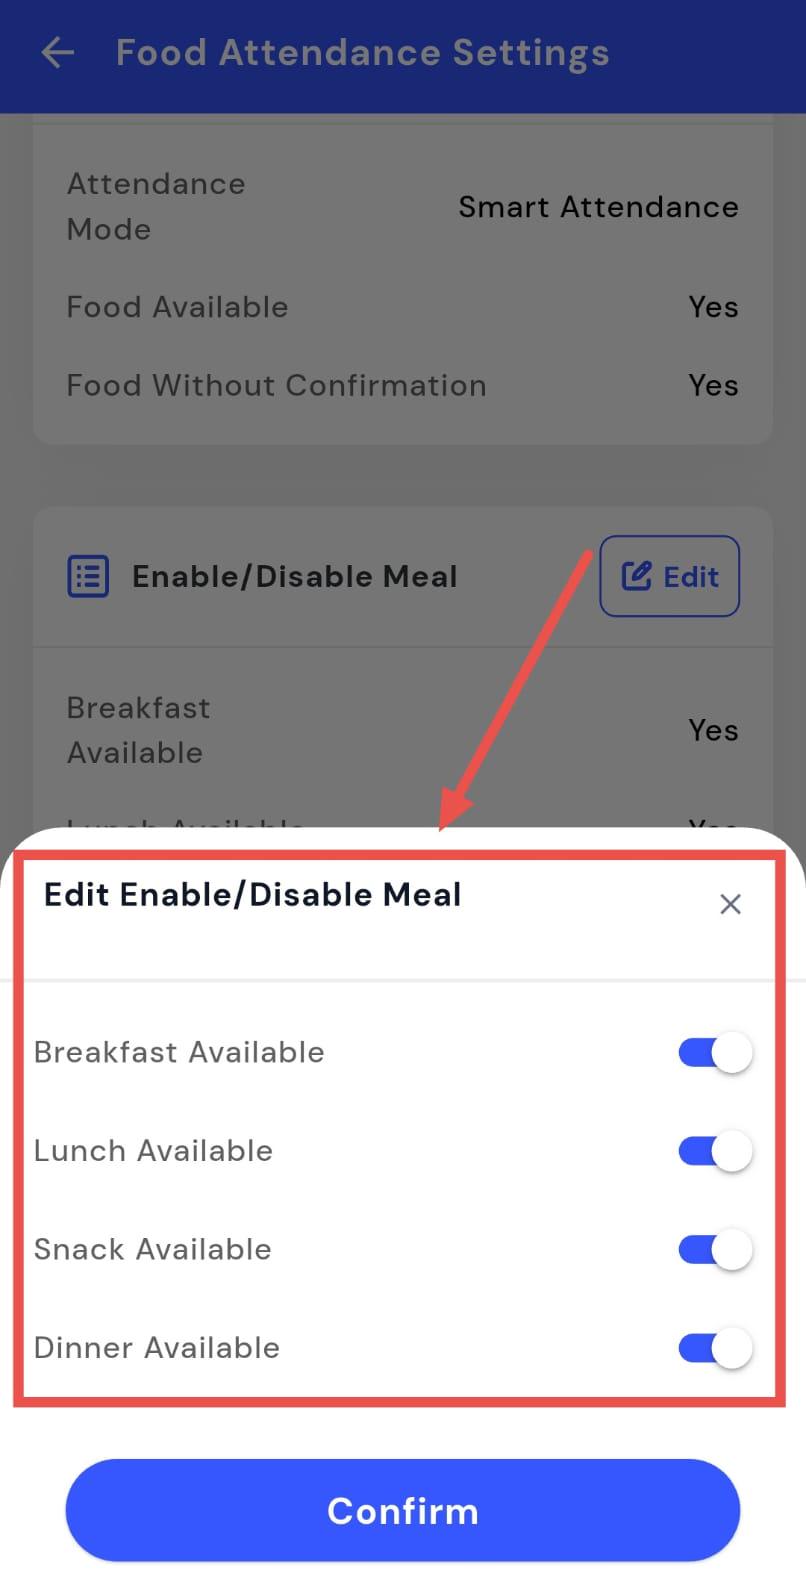
- Step 5: Confirm Changes After selecting your desired meals, tap Confirm to save and apply the changes.
How can I update food timing?
You can keep your property’s food service accurate by modifying meal timings whenever needed. The Food attendance option allows you to update or correct meal schedules quickly, ensuring that breakfast, lunch, and dinner are served as planned. This makes it easy to maintain a reliable food service schedule for all tenants.
Follow these steps to update meal timings:
- Step 1: Open Food Section Tap the Property icon in the bottom navigation menu and select the Food option.
- Step 2: Access Food Attendance Tap the box with three lines in the bottom-right corner of the screen, then select Food Attendance.
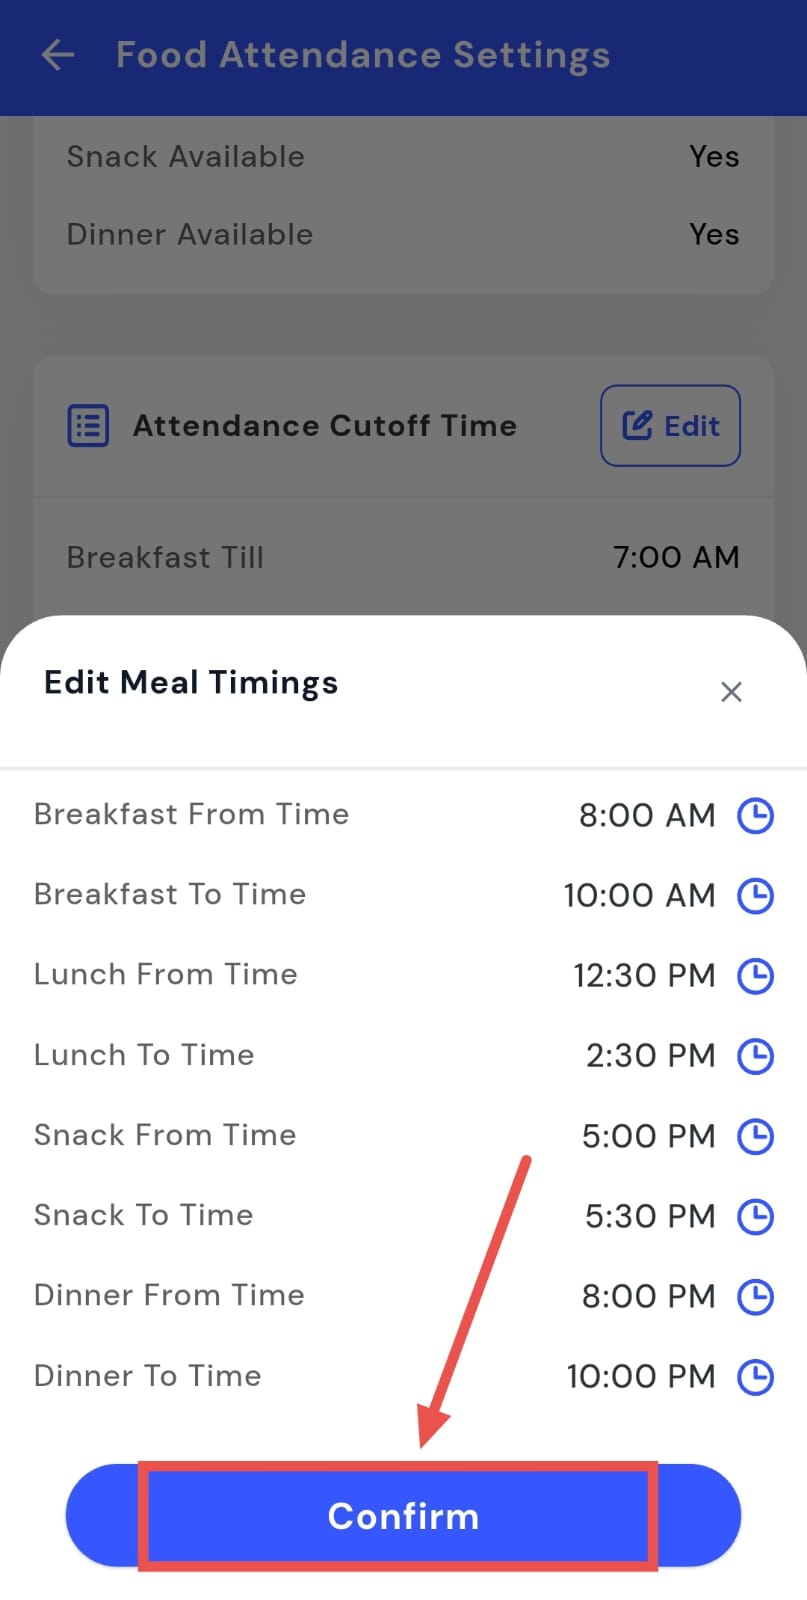
- Step 3: Select Meal Timings Scroll down to find the meal timings section.
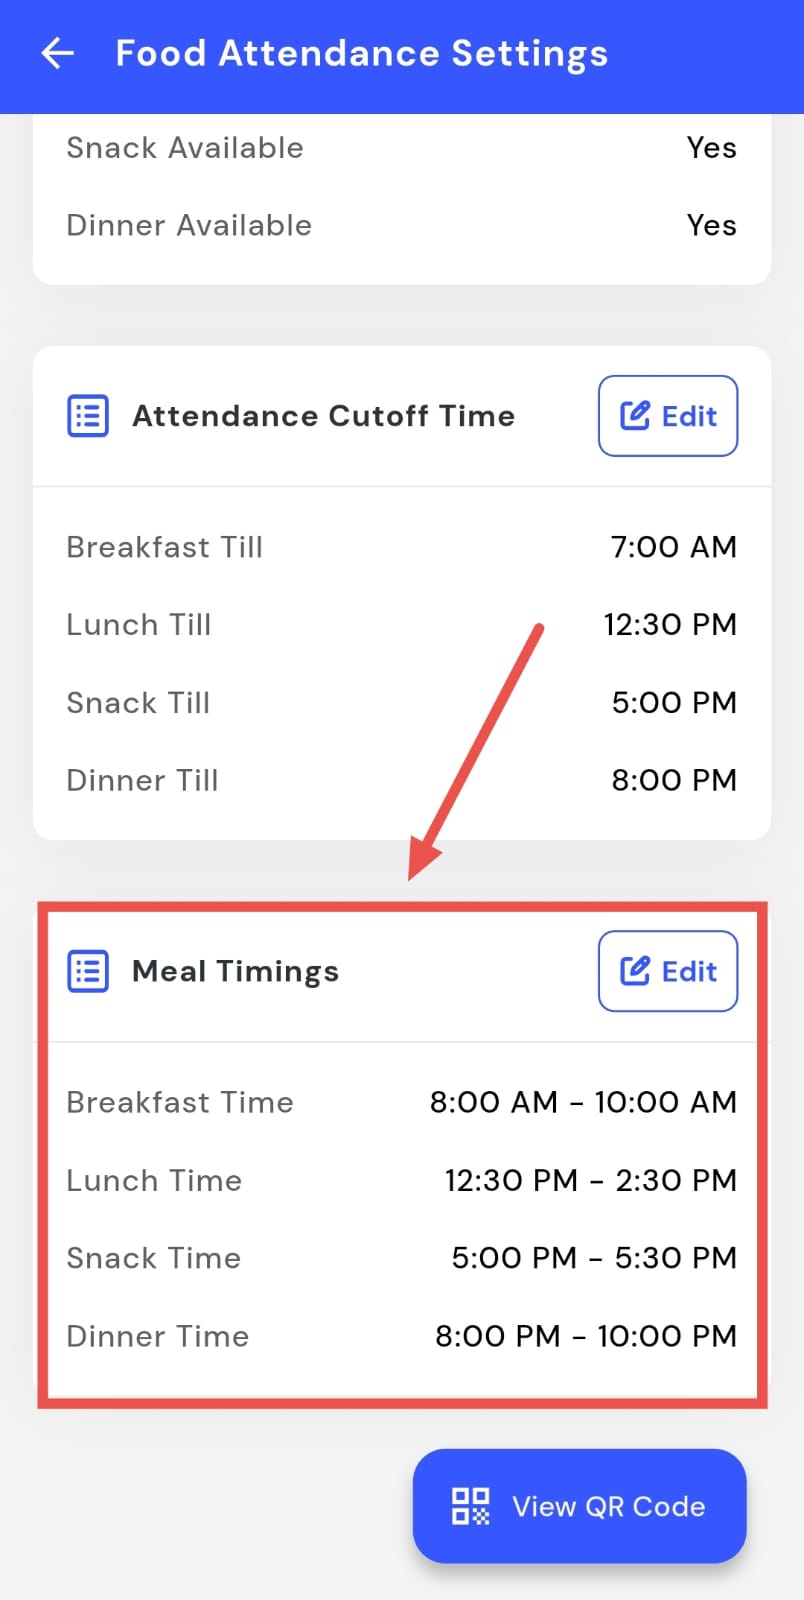
- Step 4: Edit Timings Tap Edit, and a timing screen will appear. Update the timings for each meal as needed.
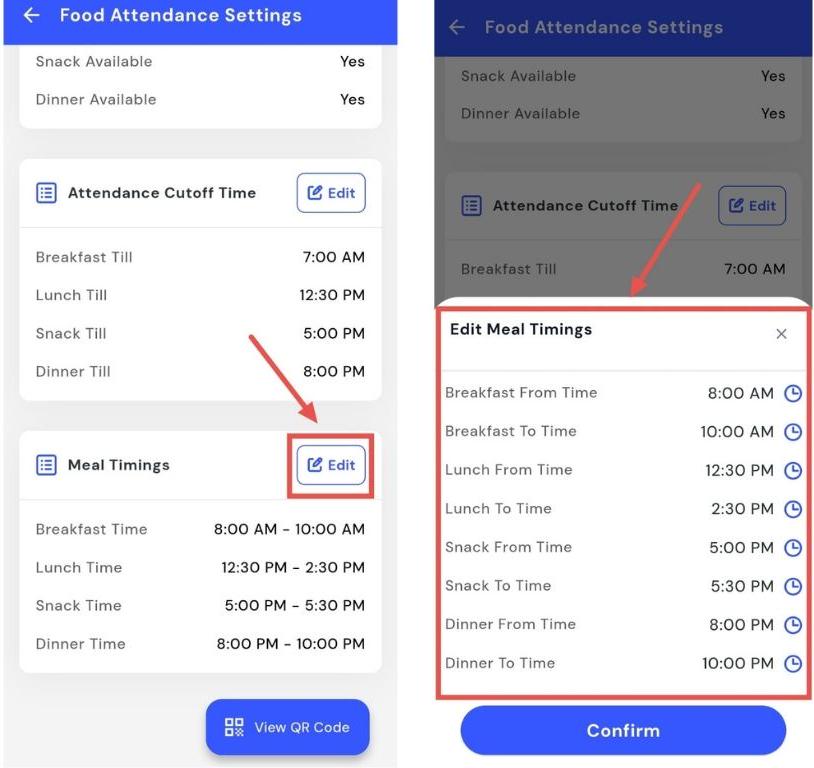
- Step 5: Confirm Changes Tap Confirm to save and apply the updated meal timings.
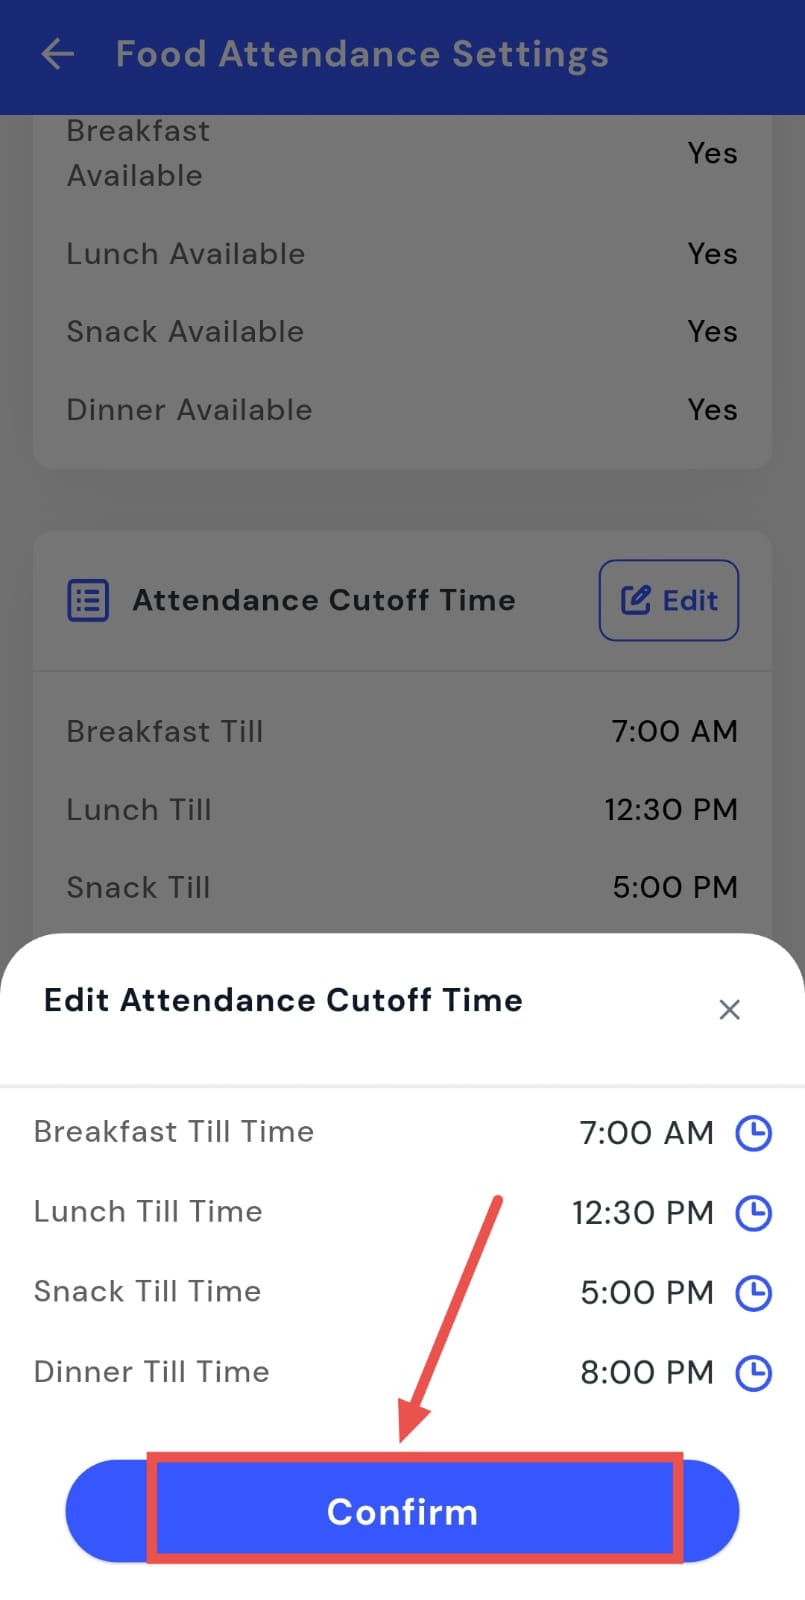
How can I update the attendance cutoff timing?
You can manage meal attendance efficiently by editing the cutoff timing in the app. Adjusting the cutoff ensures that meal attendance is accurate and tenants are counted correctly. This helps in planning meals properly and ensures that food preparation matches actual attendance, keeping your property’s food service organized and efficient.
Follow these steps to adjust meal attendance cutoff timing:
- Step 1: Open Food Section Tap the Property icon in the bottom navigation menu and select the Food option.
- Step 2: Access Food Attendance Tap the box with three lines in the bottom-right corner of the screen, then select Food Attendance.
- Step 3: Select Attendance Cutoff Time Scroll down to find the Attendance Cutoff Time section.
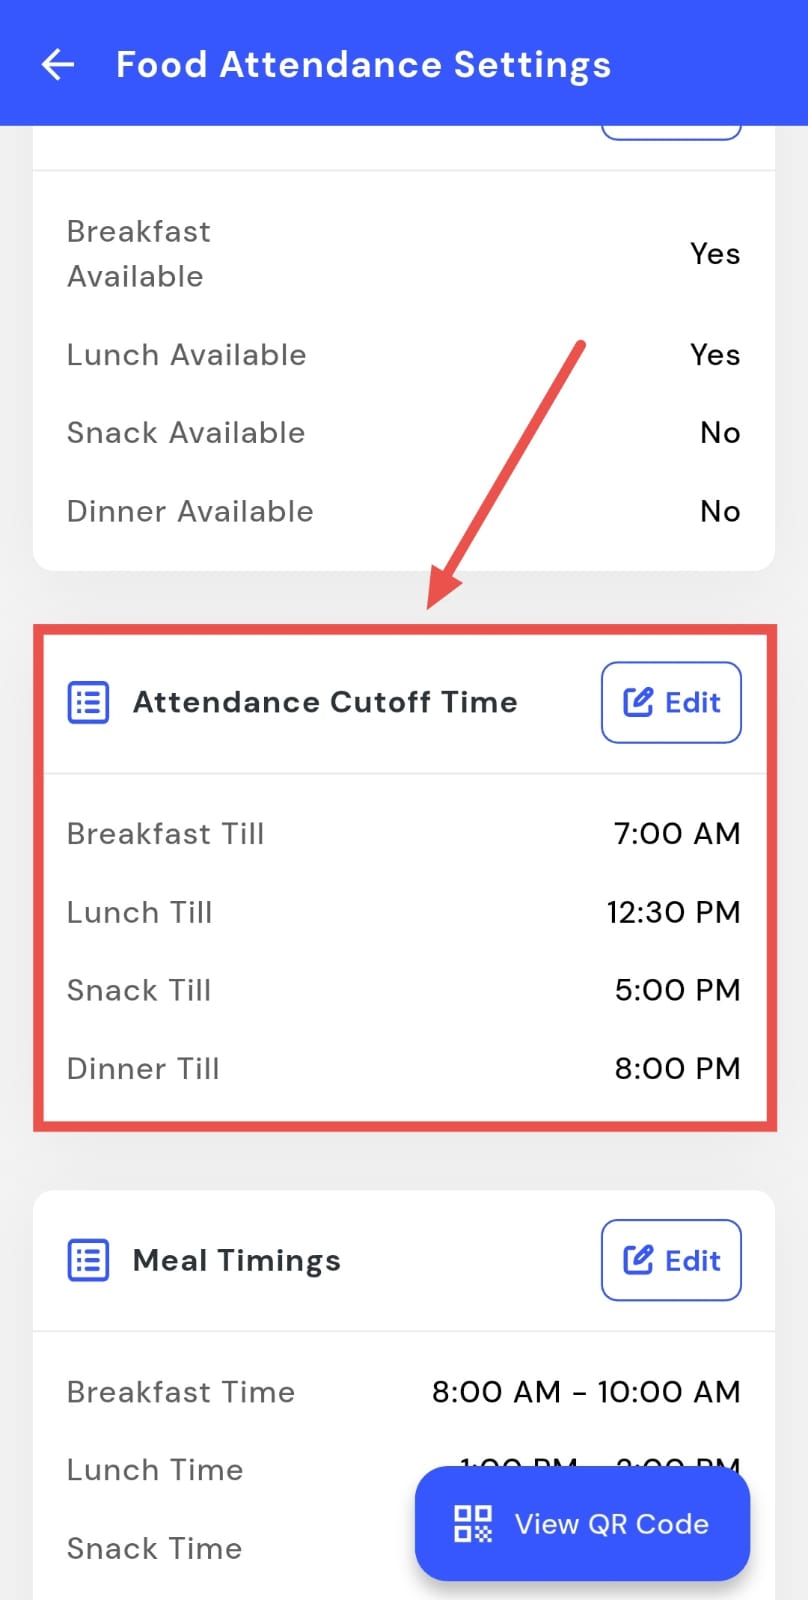
- Step 4: Edit Timing Tap Edit, and a timing screen will appear. Update the cutoff time as needed.
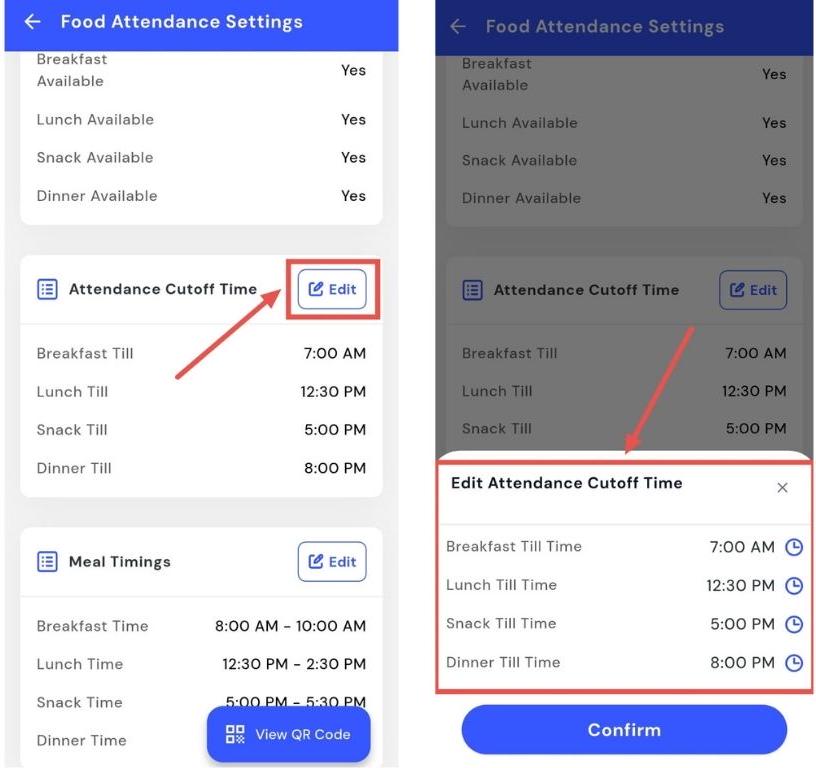
- Step 5: Confirm Changes Tap Confirm to save and apply the updated attendance cutoff timing.
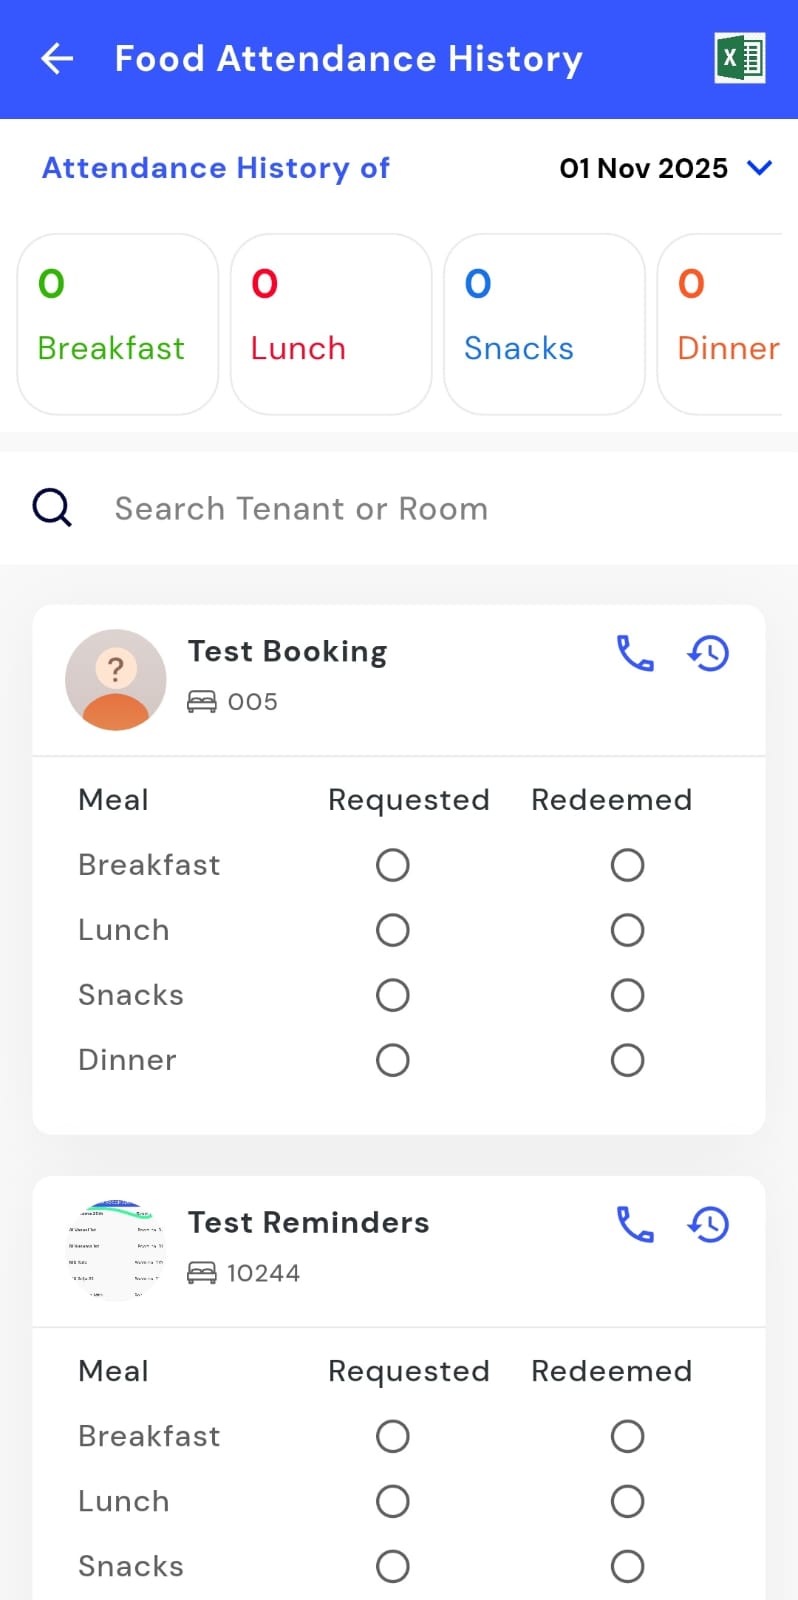
How can I check the food attendance history?
You can see which tenants marked their meals by accessing the food attendance history in the app. This makes it easy to track and monitor attendance for all tenants. Additionally, you can download these records for reporting, audits, or record-keeping, ensuring that your food service management stays organized and accurate.
Follow these steps to view and download food attendance records:
- Step 1: Open Food Section Tap the Property icon in the bottom navigation menu and select Food.
- Step 2: Access Menu Tap the box with three lines in the bottom-right corner.
- Step 3: Open Attendance History Select Attendance History from the options.
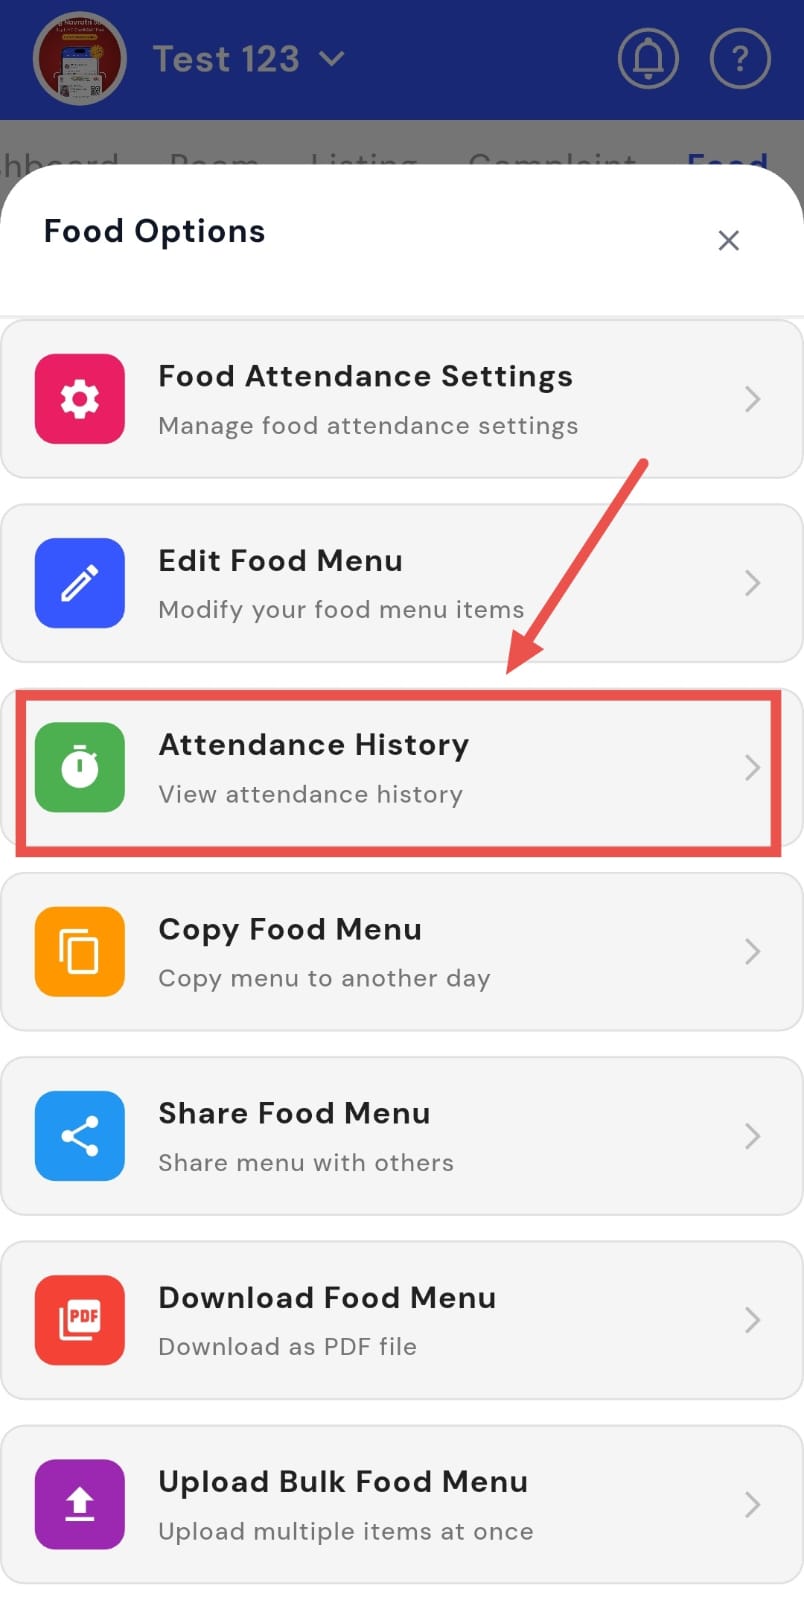
- Step 4: View and Download Records The screen will display the attendance history marked by tenants. To save a copy, click the Excel icon in the top-right corner to download the records.
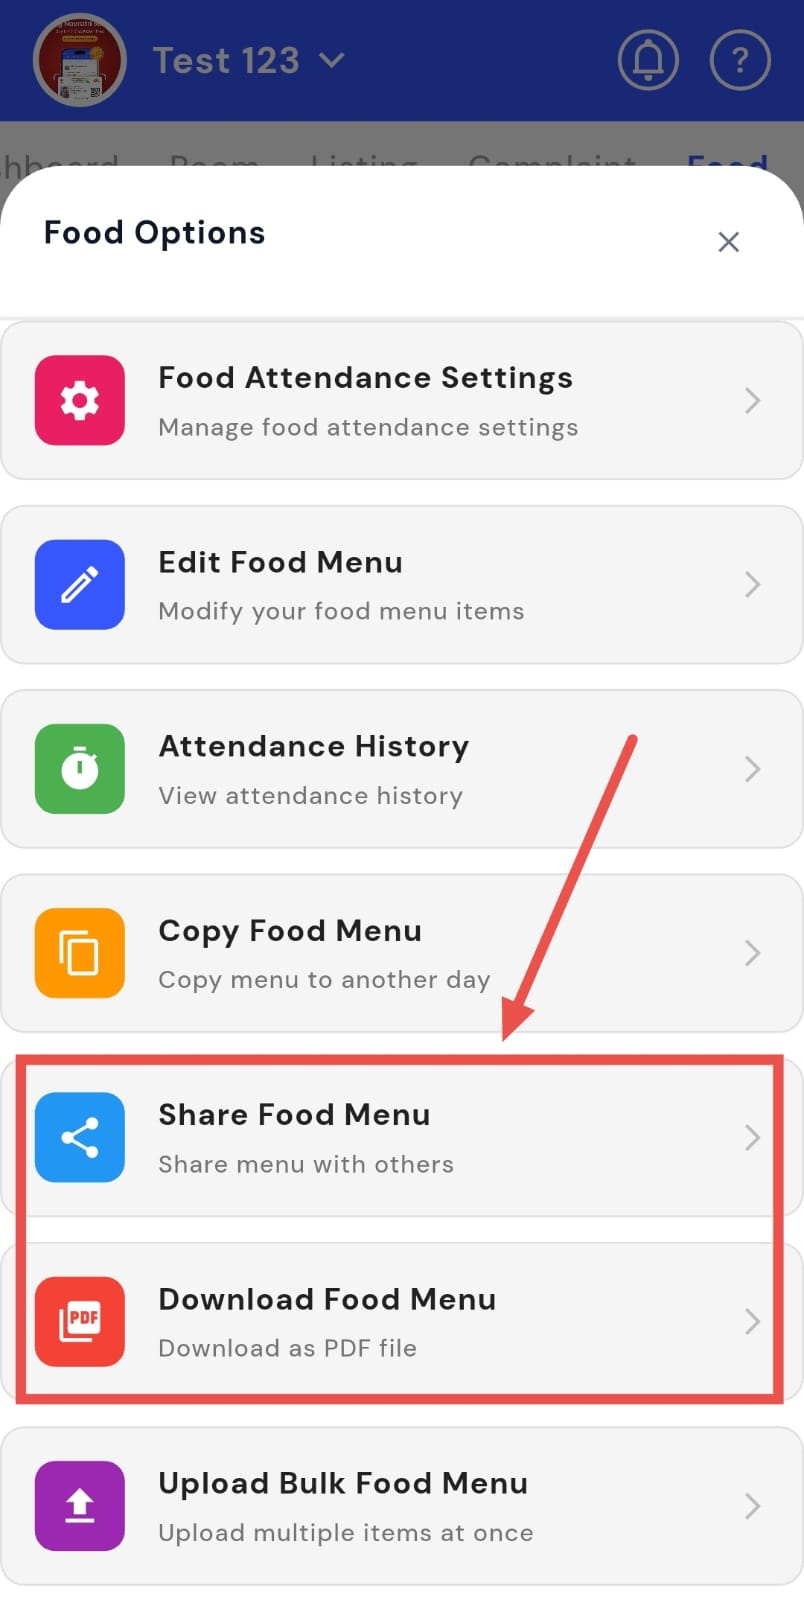
How can I share/ download a food menu?
You can easily share the food menu with tenants or download a copy for your records. The app allows you to keep tenants informed by sharing the menu digitally, while also maintaining an offline copy for your own reference. This ensures tenants always have access to the latest menu and helps you keep accurate records for planning and reporting.
Follow these steps to share or download the food menu:
- Step 1: Open Food Section Tap the Property icon in the bottom navigation menu and select the Food option.
- Step 2: Access Sharing Options Tap the box with three lines in the bottom-right corner.
-
Step 3: Share or Download Select either:
-
Share Food Menu
-
Download Food Menu.
-
Using these options, you can share the menu with tenants or download it to your device for reference.
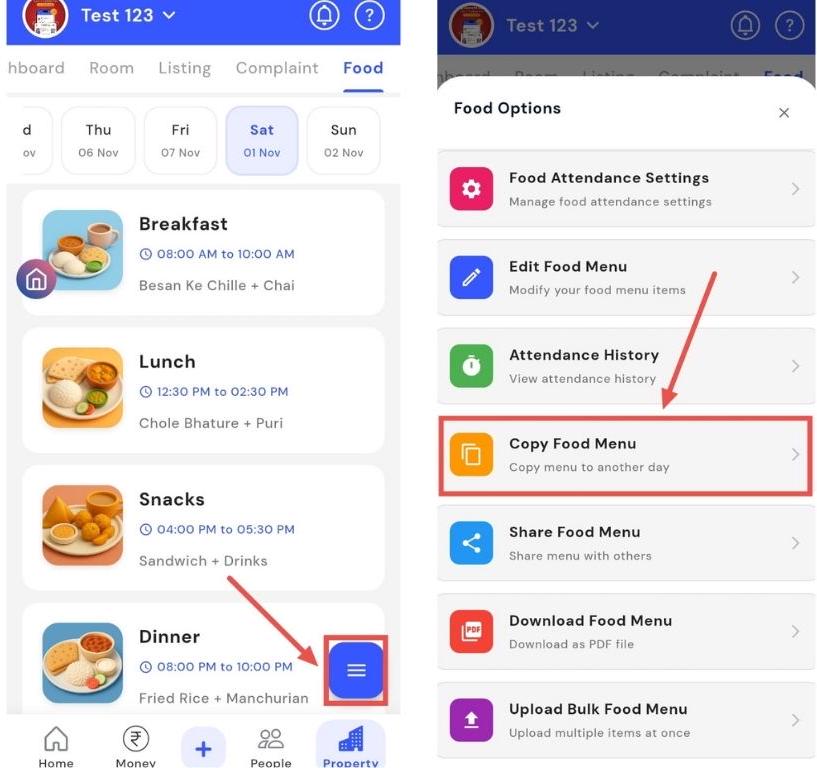
How can I copy the food menu?
You can quickly duplicate your food menu across multiple properties using the app. This allows you to save time and effort by copying an existing menu from one property to another. The feature lets you either import a menu from another property or share your menu with other properties, ensuring consistency and efficiency in your food service management.
Follow these steps to copy a food menu between properties:
- Step 1: Open Food Section Tap the Property icon in the bottom navigation menu and select the Food option.
- Step 2: Access Copy Menu Options Tap the box with three lines in the bottom-right corner, then select Copy Food Menu.
-
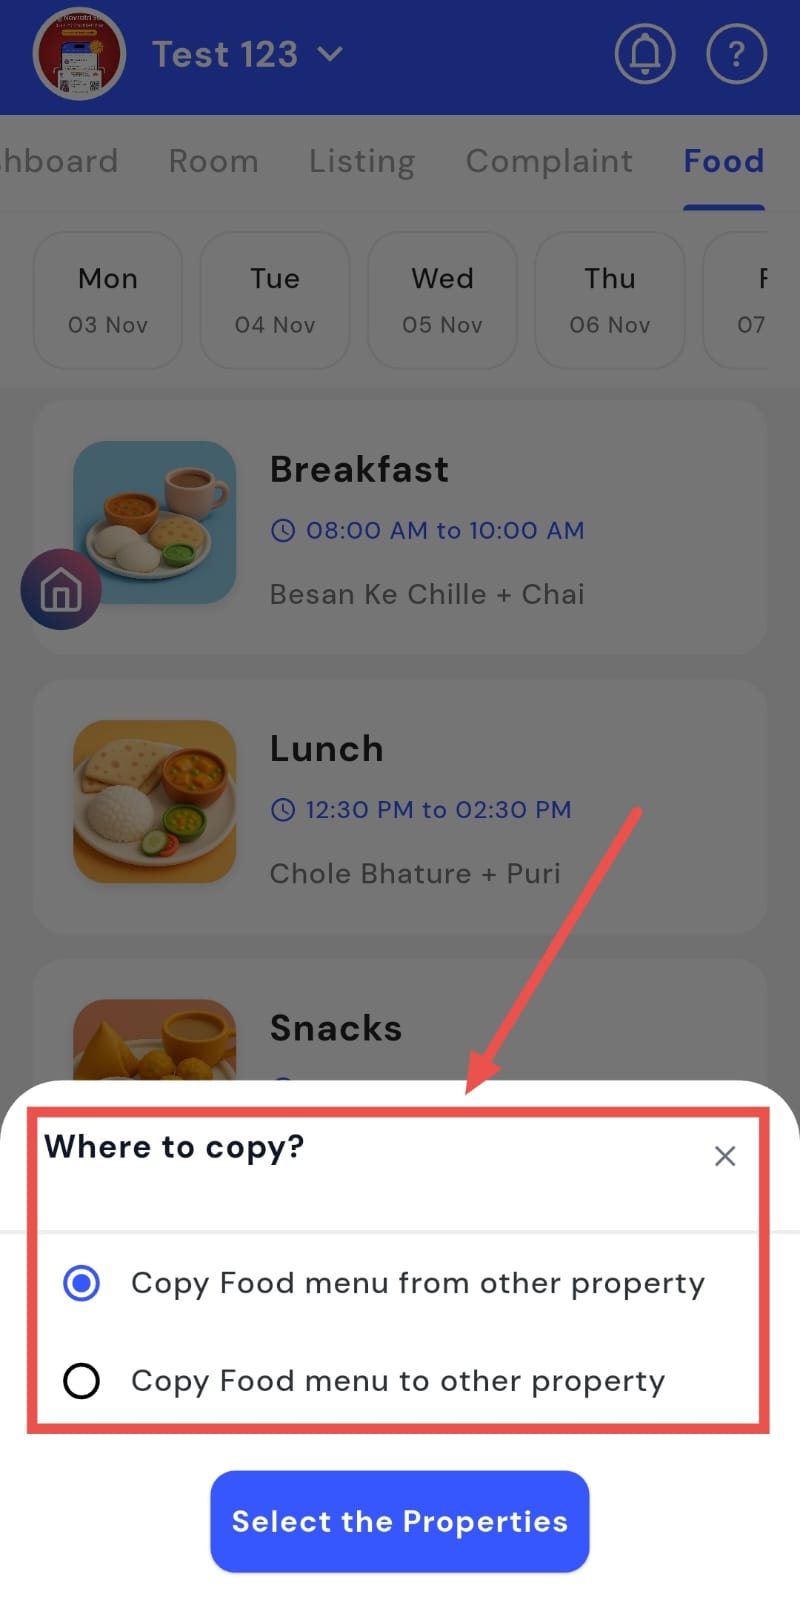
Step 3: Choose Copy Type You will see two options:
-
Copy Food Menu from Other Property - to import a menu from another property
-
Copy Food Menu to Other Property – to send the current menu to another property
-
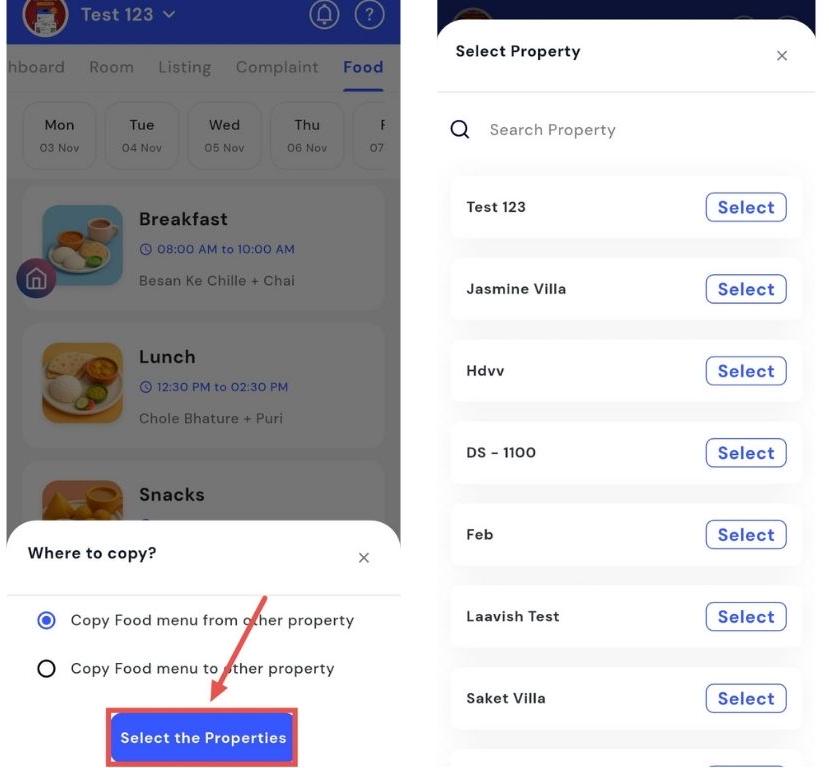
- Step 4: Select Properties After choosing an option, tap Select Properties. Pick the property from which you want to copy the menu, then tap Select to complete the process.
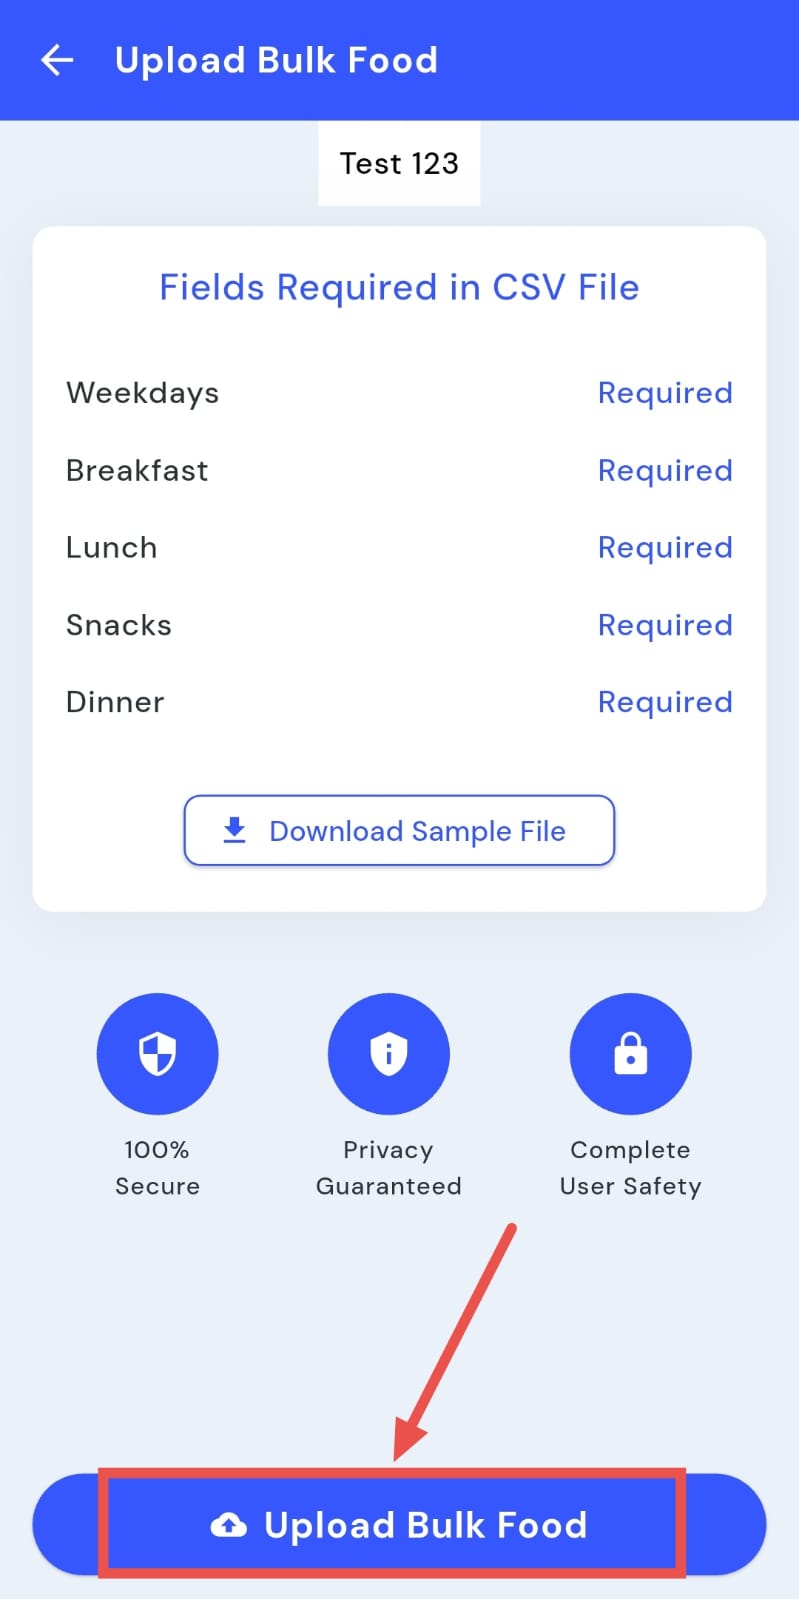
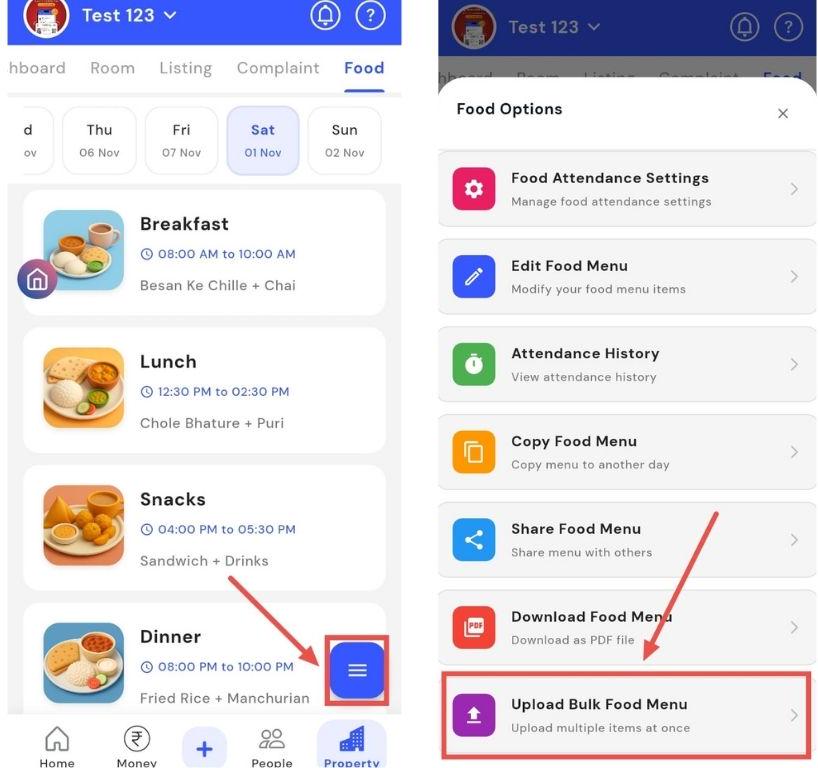
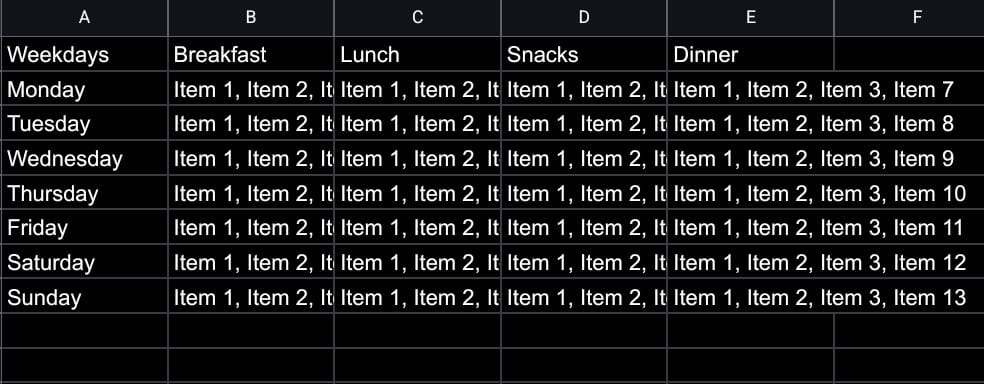
How can I upload bulk Food menu?
You can easily add multiple menu items at once by uploading a bulk food menu. This saves time compared to entering each item individually and ensures consistency across your listings. The app supports CSV file format for bulk uploads, allowing you to quickly add all menu items in one go and streamline your food management process.
Follow these steps to upload a bulk food menu:
- Step 1: Open Food Section Tap the Property icon in the bottom navigation menu and select the Food option.
- Step 2: Access Bulk Upload Tap the box with three lines in the bottom-right corner, then select Upload Bulk Food Menu.
- Step 3: Download Sample CSV Download the sample CSV file provided. This file shows the required format for uploading the menu. Use it as a reference and edit it according to your menu items.
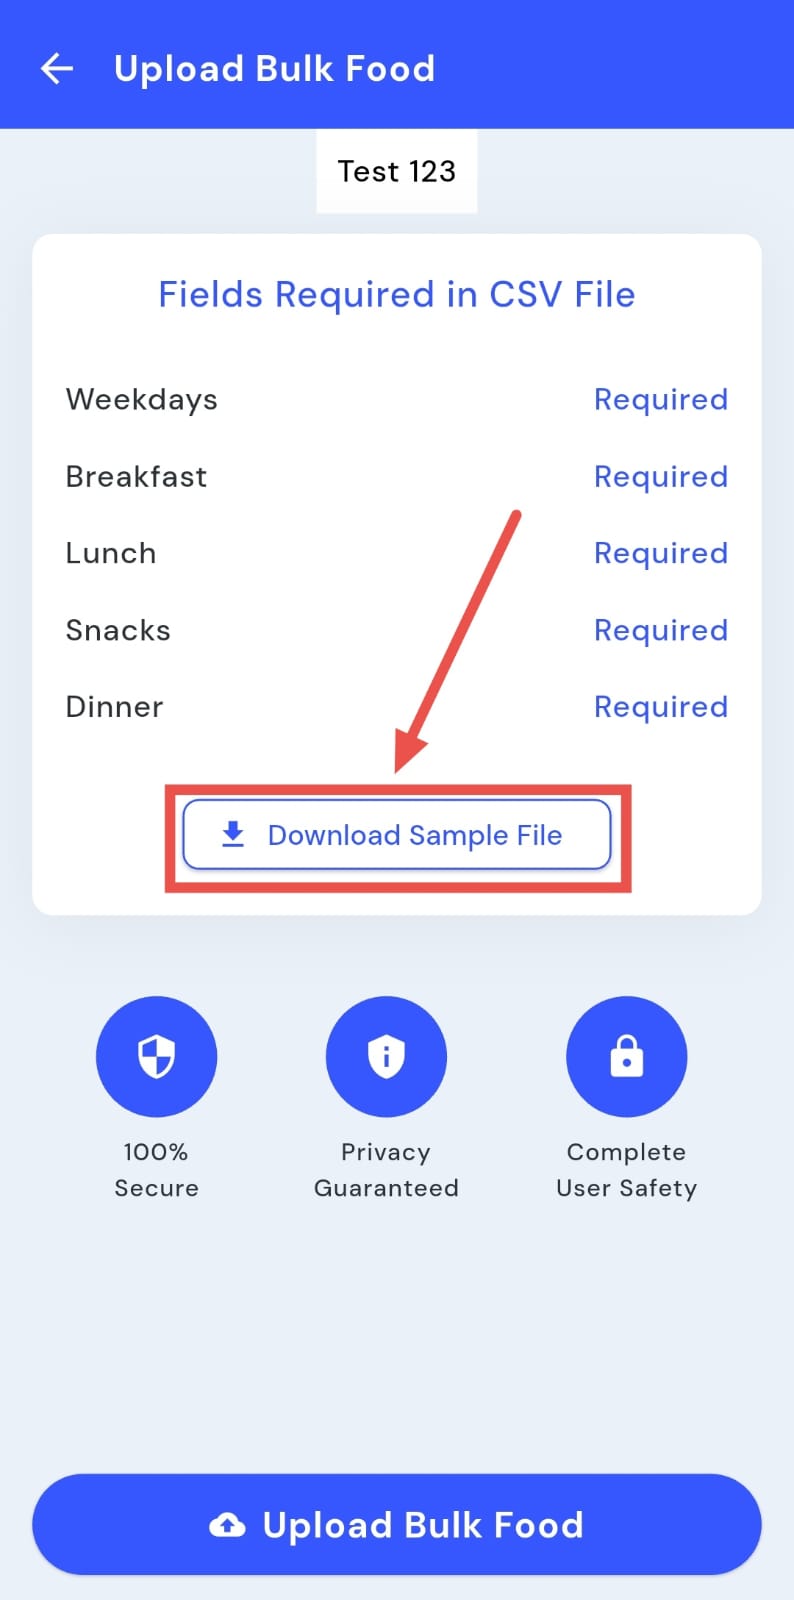
- Step 4: Upload Bulk Menu Click Upload Bulk Menu, select your edited CSV file, and the system will upload all menu items.