July 15, 2026
Hello!
This release brings the long-awaited features, such as the multi-property view, the occupancy calendar, custom report downloads with filters, reviews & surveys, and a completely redesigned tasks experience.
What is new in this release:
Multi-Property View (Web & Mobile) : See all your properties together, or grouped by area, on one screen - no more switching one by one.
Download Custom Reports with Filters (Web) : Filter to exactly the data you need - like one property's dues or KYC-pending tenants - and download just that in one click.
Occupancy Calendar (Web) : Your whole property's occupancy in one glance: who's staying, who's leaving, who's under notice, and when each bed frees up.
Reviews & Surveys : Collect tenant feedback on WhatsApp and see every response and insight in one place.
Tasks – All-New Experience (Web) : Set up staff checklists once; your team fills them from a WhatsApp link; you get a clear record of what's done.
Multi-Property View (Web & Mobile)
If you run more than one property, you no longer need to switch between them one by one to see your data. Multi-Property View lets you see your entire business - tenants, dues, collections, complaints, everything - across all your properties, together, in one place.
Earlier, the app could load only one property's data at a time. That limitation is now gone RentOk can load data for all your properties, or for selected properties, areas, or groups, at once.
Highlights
See tenants, dues, collections, and complaints for all your properties together – no need to switch to a property first.
- Your properties are neatly organised city-wise and area-wise (by locality, with PIN code as a fallback) in the property selector, so large portfolios stay easy to navigate.
- Select any combination of properties – one city, one area, or everything. The name of your selection stays visible at the top.
- By default, all the properties you have access to are selected, so you start with the full picture.
- A search bar in the property selector lets you find any property by name.
- On mobile, you'll feel a gentle vibration as you scroll from one property's data into the next, with the property name shown on screen.
- Team members see data as per their access: the property selector at the top is common, but each section shows only the properties they have permission for in that section.
How To Try
Step 1: Log in to the Web App
Open the web version of the app and enter your login credentials. Once logged in, you will be taken to the Dashboard.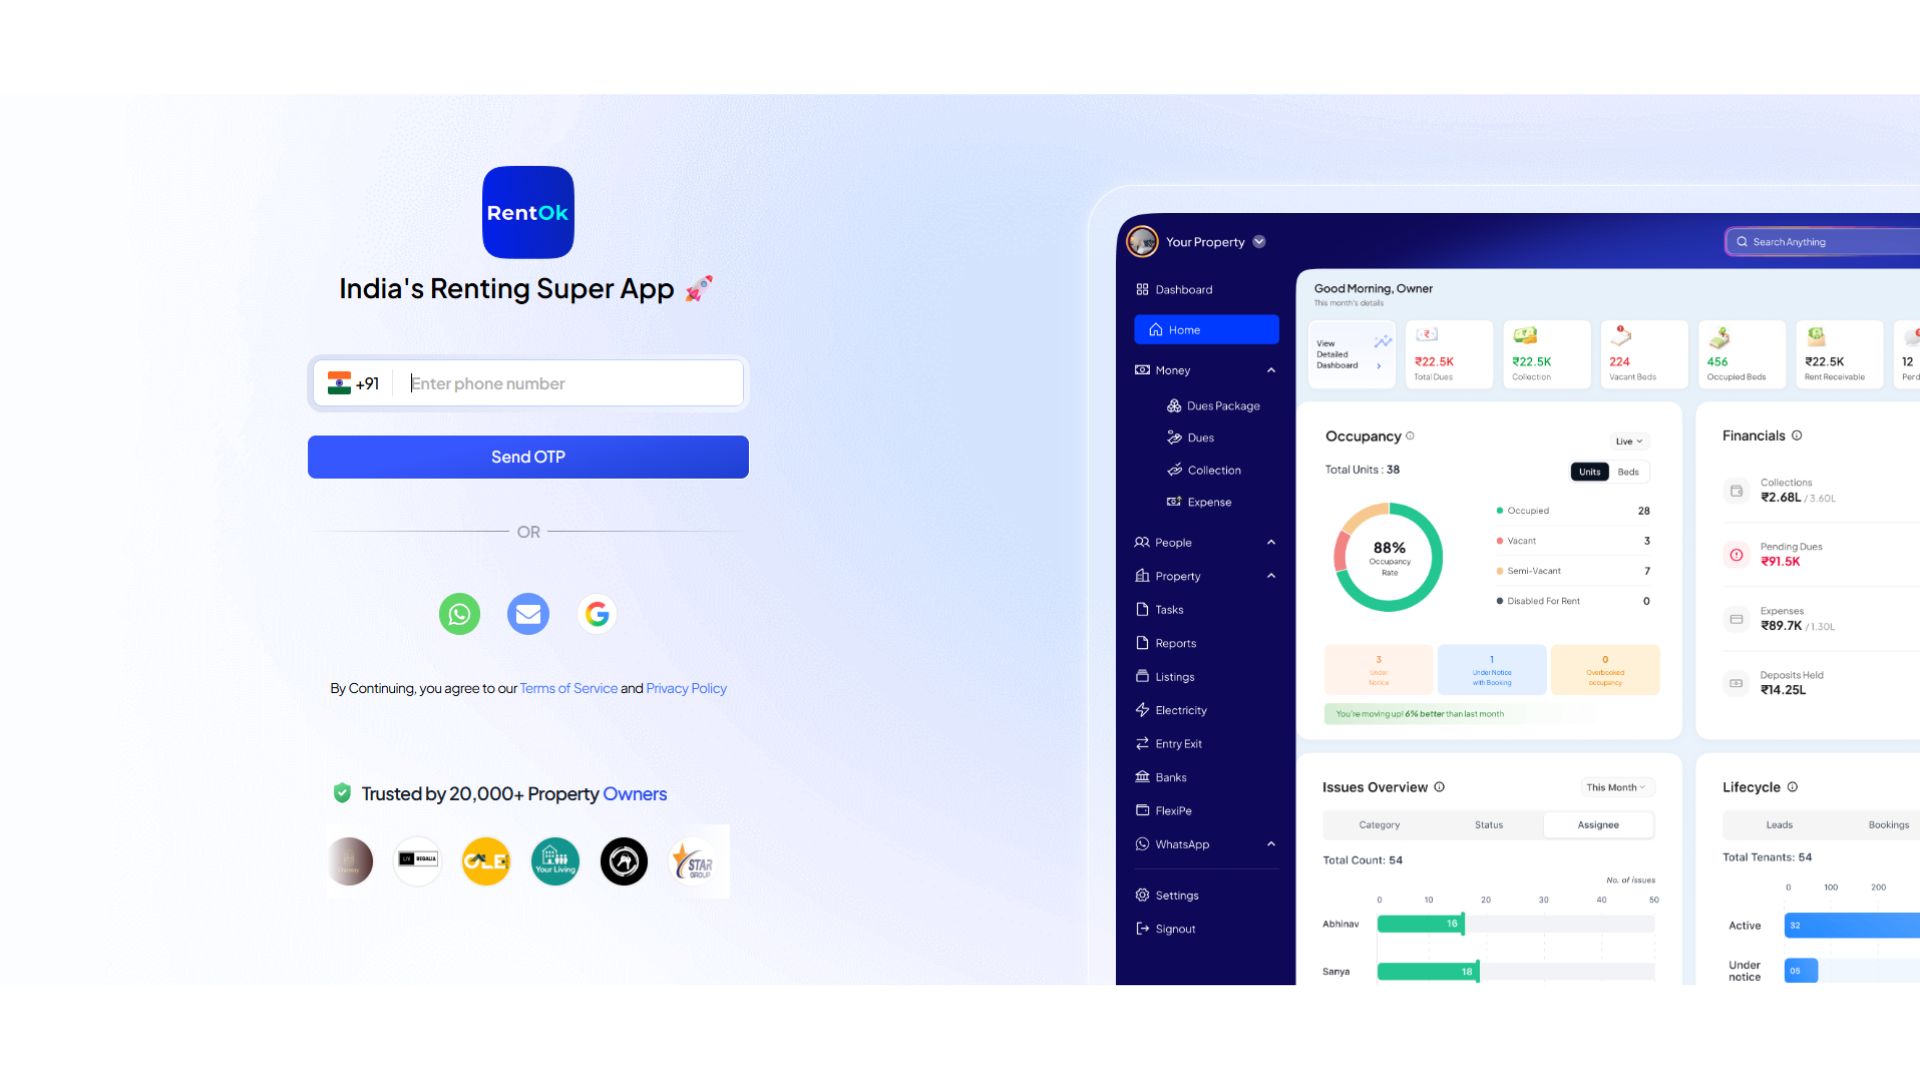
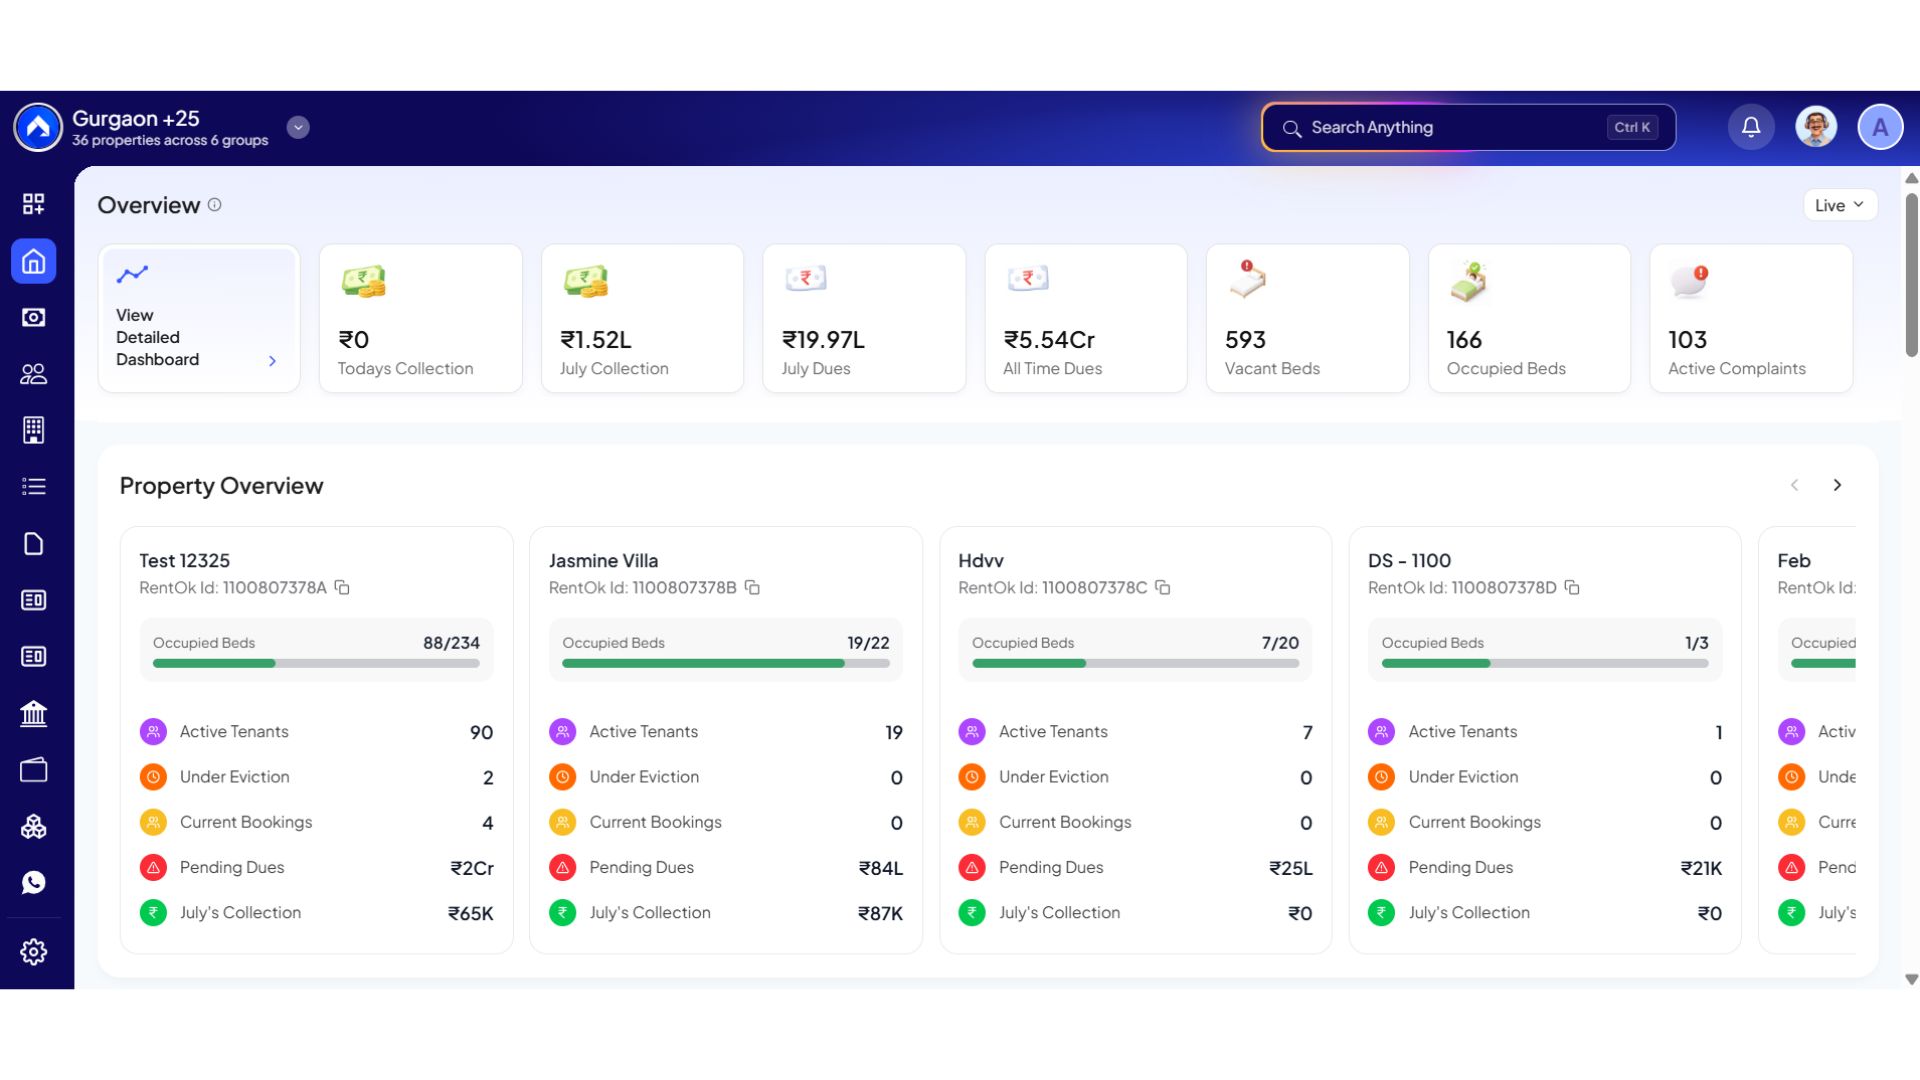
Step 2: Open the Property Selection Screen
On the Dashboard, click on the property name shown in the top-left corner of the screen.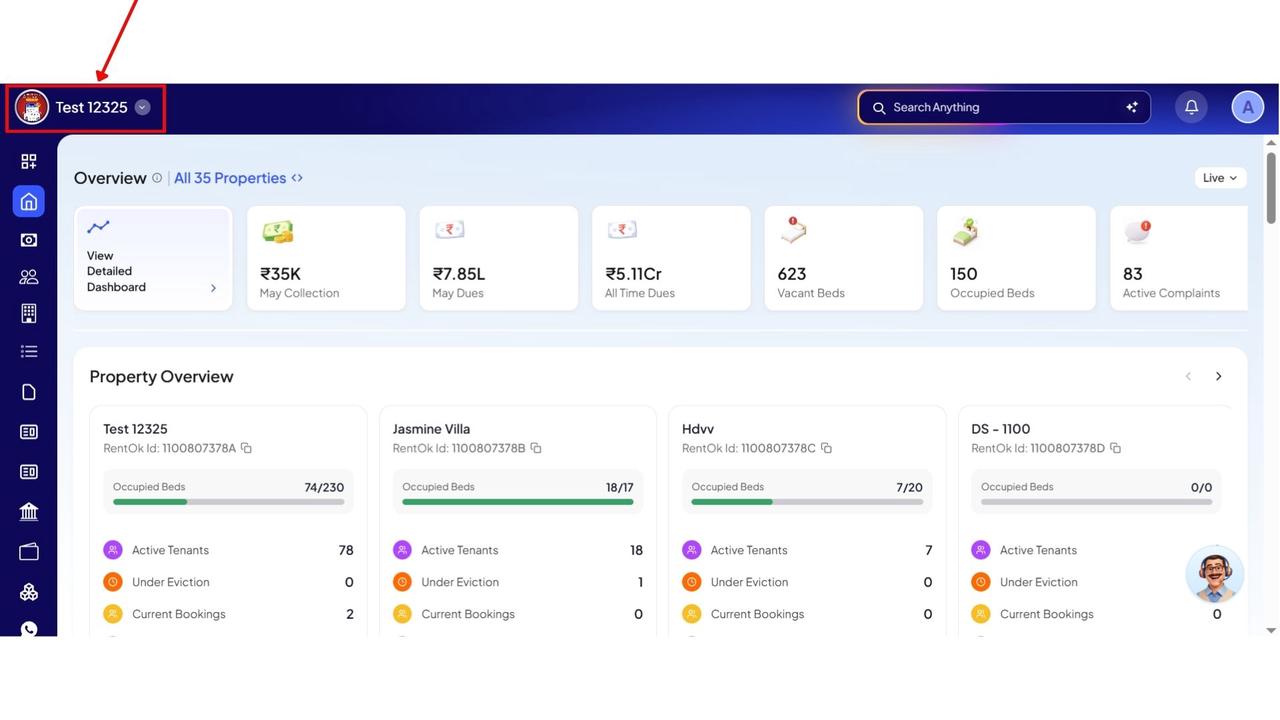
Step 3: View Different Classification Options
A new screen will open where you can organize and view your properties under different categories such as:
- Property
- Area
- Groups-7dea6c07ee1d456eb33e29ac3a4bef2d.jpg)
Step 4: Select Properties Individually
In the Property section, you can view all your properties listed individually. Select the property (or properties) you want to view, or use Select All to choose every property at once.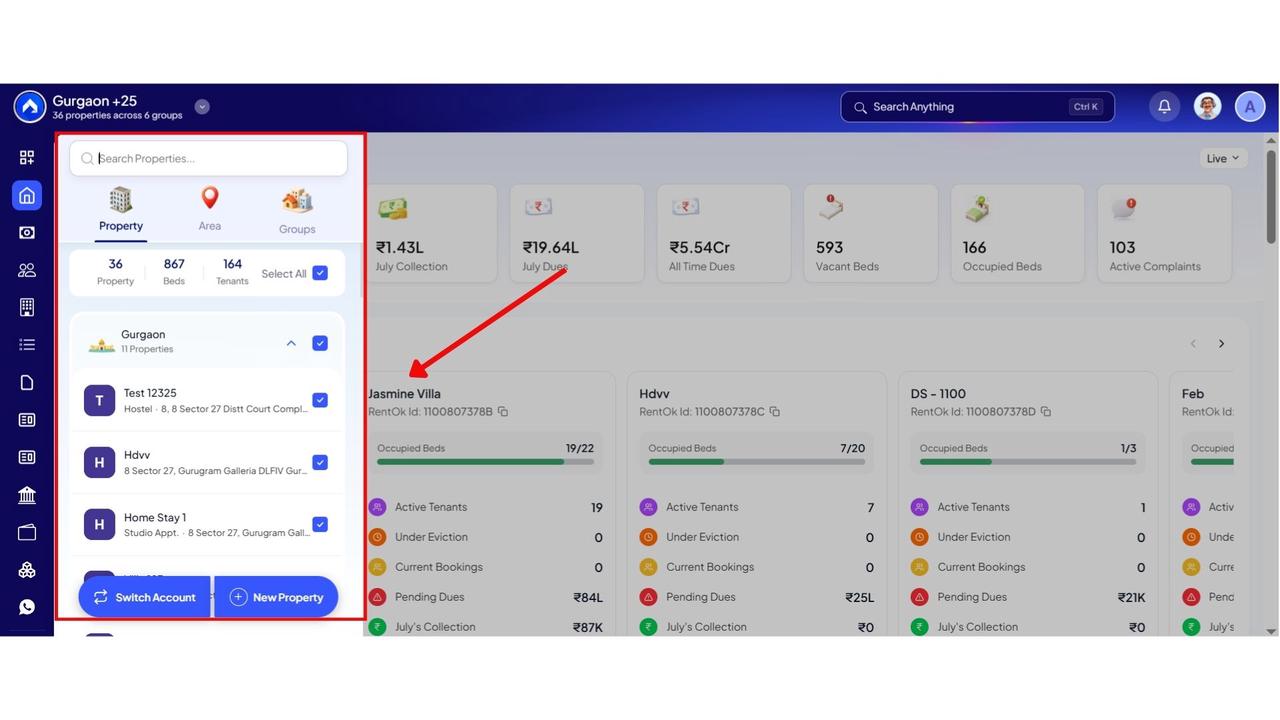
Step 5: Select Properties Area-wise
In the Area section, properties are grouped based on their location or area. You can select a specific area to view all properties within it, or use Select All to include every area.
Step 6: Select Properties Group-wise
In the Groups section, properties are categorized based on property type, such as:
- PG
- Rooms
- Hostel
- Coworking
- Other categories
Select the group(s) you want to view, or use Select All to include every group. Once you've made your selection, click Apply to view the overview for all the selected properties in your chosen classification.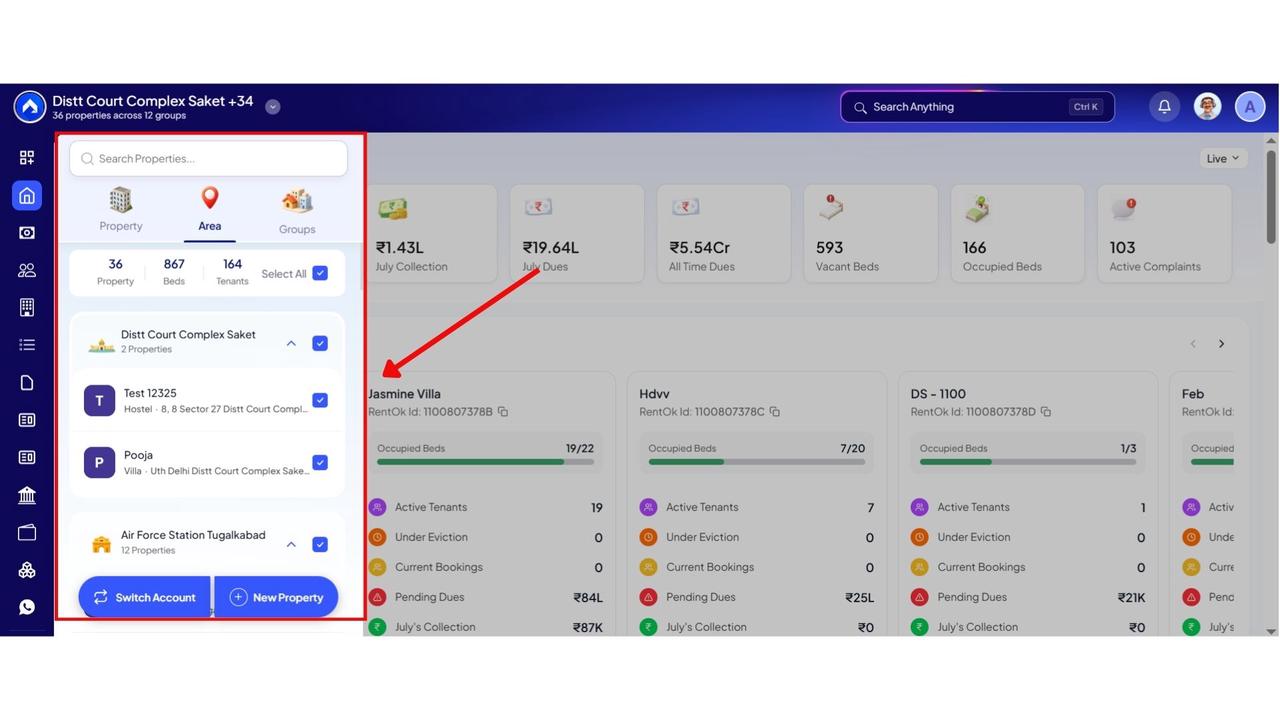
Note: This lets owners delegate property groups to specific cluster managers while also allowing them to review data across selected properties, areas, or groups, or all properties at once, with a single click.
💡Why this helps you: Earlier, checking your whole business meant opening each property one by one - slow and easy to lose track of. Now you open RentOk once and instantly see where money is pending, who's moving in or out, and which complaints are open across every building you run. See all the information you need conveniently on one screen.
Note: Settings and Dues Packages still work one property at a time, just like before - you simply pick the property first.
Download Custom Reports with Filters (Web)
Stop downloading the full report and cleaning it up in Excel. Now, filter your data to exactly what you need and download just that.
Highlights
- Apply any filters on any section - Tenants, Collections, Complaints, etc. and download an Excel report of exactly the filtered data you see.
- Tenant filters include stay status, app status, KYC status, and payment status - for example, only Veg tenants, only Aadhaar-verified tenants, only tenants with a signed rent agreement, or tenants moving in within the next 15 or 30 days.
- Filter Collections by payment mode (e.g. Online), or Complaints by category, assigned staff member, or stage (e.g. "Team is working") - and download that view.
- No search text needed - just apply the filter and download.
How to try
Step 1: Log in to the Web App
Open the web version of the app and enter your login credentials. Once logged in, you will be taken to the Dashboard.
Step 2: Go to the Tenant Section
Click on the Search Anything bar at the top of the screen and select Tenant. This will open the complete list of tenants.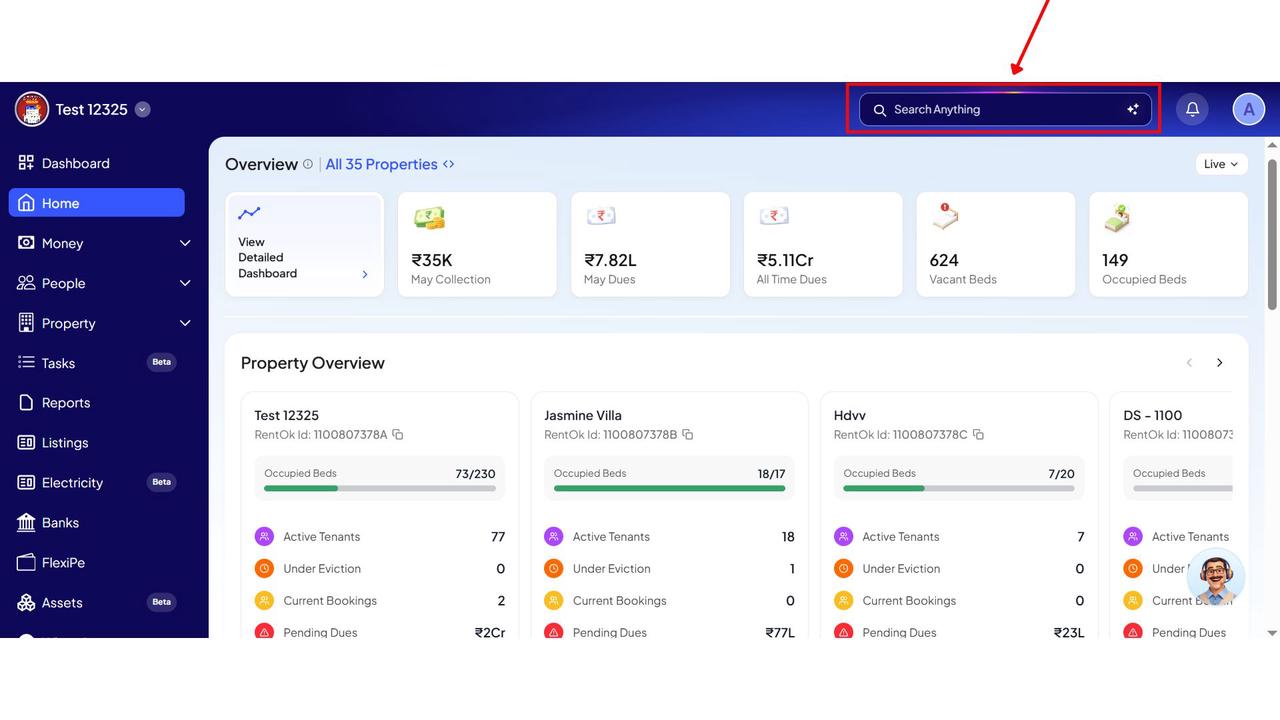
Step 3: Open the Filter Options
On the Tenant page, click the Filter icon (three horizontal lines) located on the right side of the search bar. This will open the available filtering options.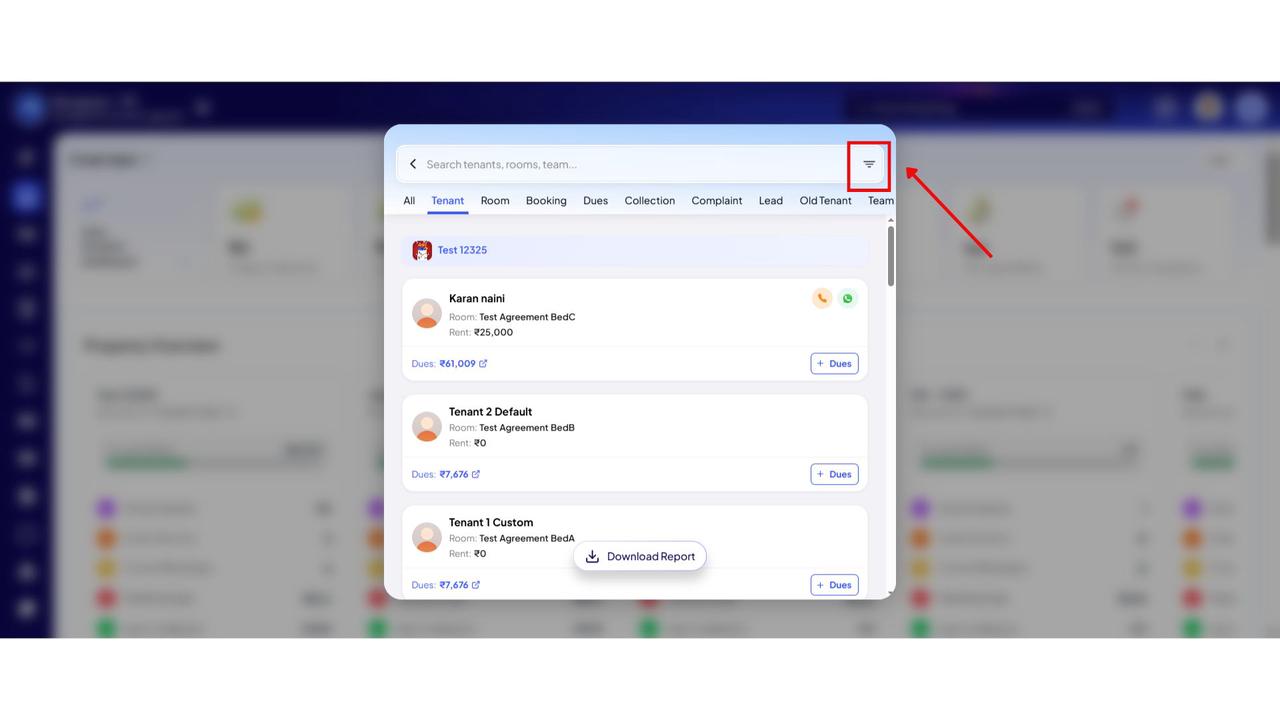
Step 4: Apply the Required Filters
Select the filters based on your requirement. You can filter the tenant list using options such as Property, App Status, Gender, Food Preference, and other available criteria.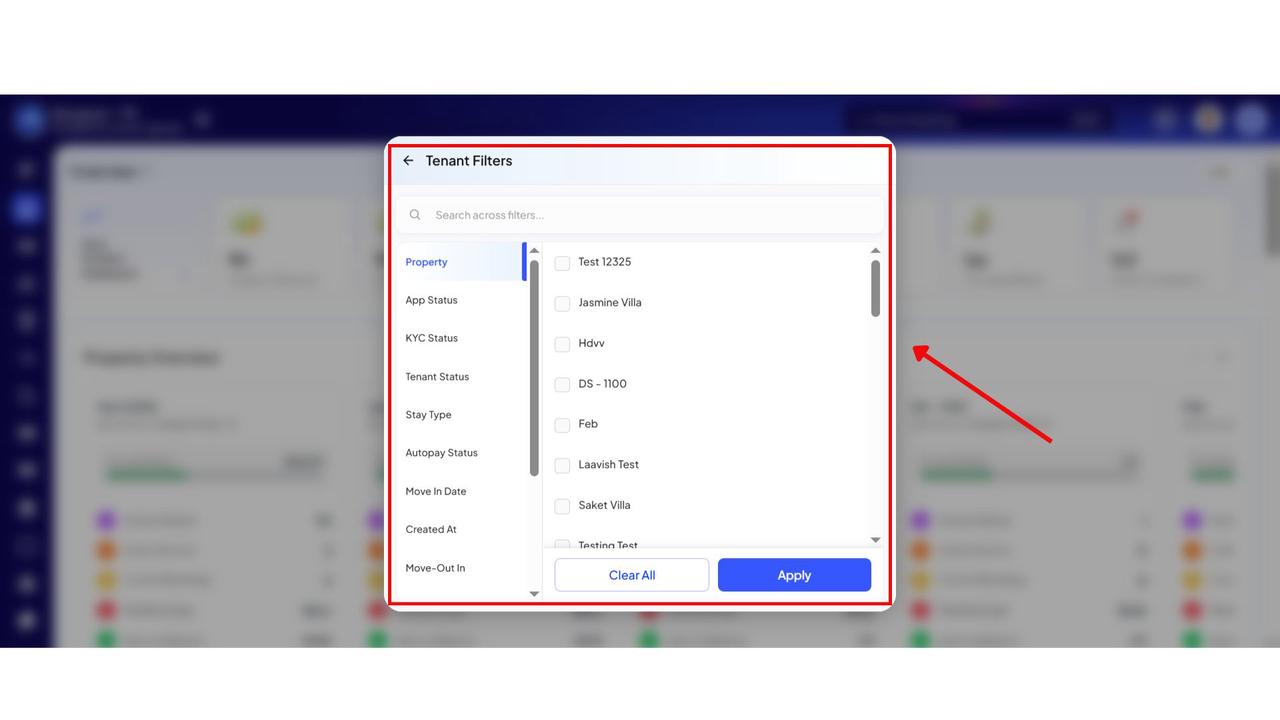
Step 5: View the Filtered Results
Once you have selected the required filters, click Apply. The tenant list will refresh and display only the records that match your selected filters.-84c53a2337120bda5a2d29a3d1840692.jpg)
Step 6: Download the Report
After reviewing the filtered results, click Download Report to export the report with the applied filters.-26a5d7ae726cefc59a28bbce2bf3298d.jpg)
Which one should you use?
If you want your full tenant details, download the Tenant Detail Report from the Reports section as usual. But if you just need a quick answer to one question like "who has moved in but not finished their Aadhaar verification?", filter it here and download only that.
💡 Why this helps you: No more downloading everything and cleaning it up in Excel. Decide what you want to see, look at it on screen, and download exactly that - in seconds.
Occupancy Calendar (Web)
A single picture that shows you which beds are full, which are empty, and which are booked for the future, across every room in your property.
Highlights
- See at a glance which beds are occupied, which are empty, which are booked for later, and which tenants are about to leave (under notice) – all in a single visual timeline.
- Hover over any room to see room details and over any tenant to see tenant details, including how long they've been staying.
- The summary chips at the top – Booked (occupied), Future Bookings, Under Notice, Overbooked, Old Tenants – work as filters. Click one to see just those beds.
- Switch between day, week, month, and year views – the year view lets you read your whole year's occupancy at a glance.
- Apply a custom date range - for example, just the 1st to the 15th of a month - and check every status in that window, floor by floor. Especially useful if you run short-term or hotel-style stays.
How to try
Step 1: Log in to the Web App
Open the web version of the app and enter your login credentials. Once logged in, you will be taken to the Dashboard.
Step 2: Open the Timeline
From the Dashboard, go to the Property section and open the Timeline tab. This will take you to the Occupancy Calendar, where you can view the occupancy status of your property.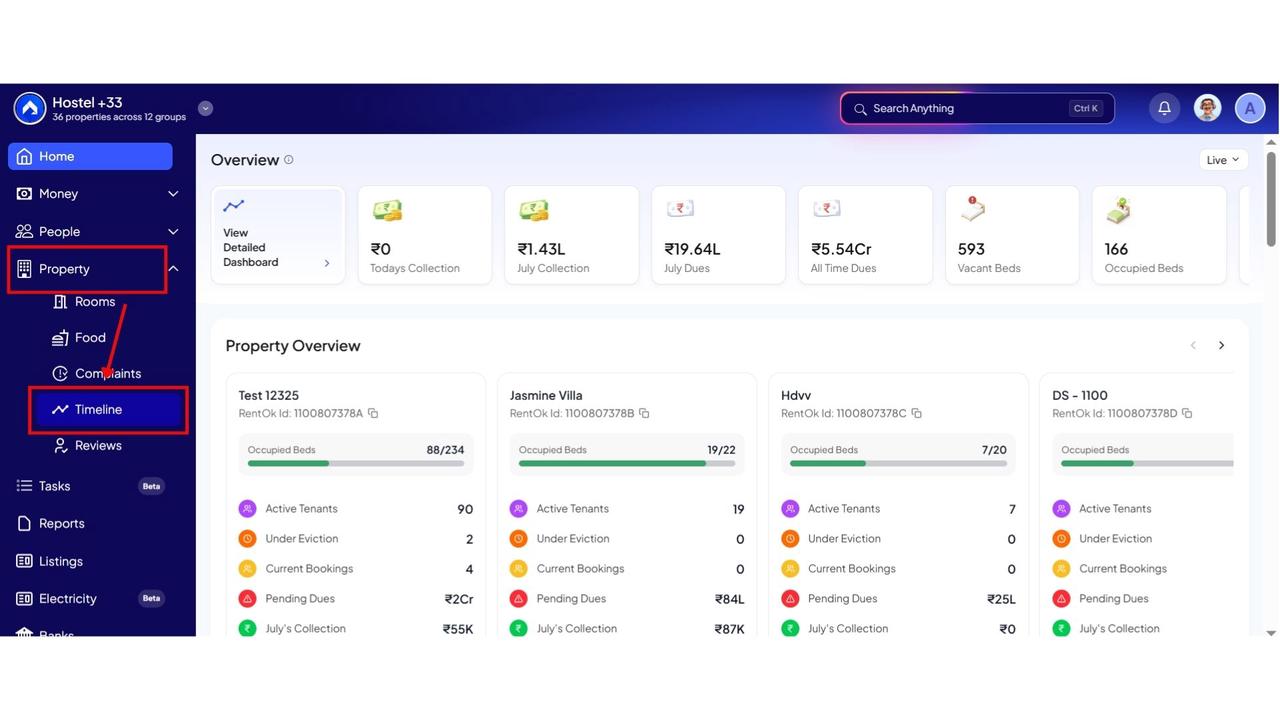
Step 3: View Occupancy Details
The calendar displays the occupancy of all beds in a visual format. You can see which tenant is occupying a particular bed along with their basic occupancy information.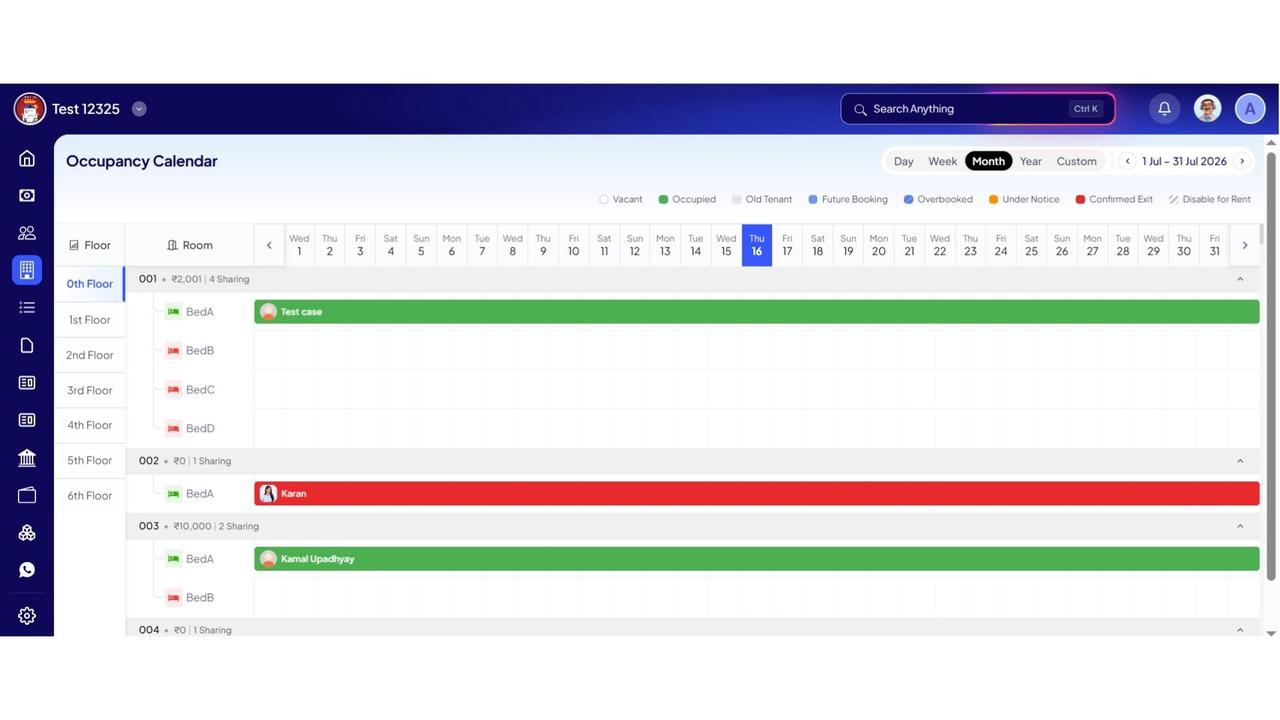
Step 4: Explore Different Views
You can click to view the occupancy date-wise or floor-wise, depending on the information you want to check. This makes it easier to monitor occupancy from different perspectives.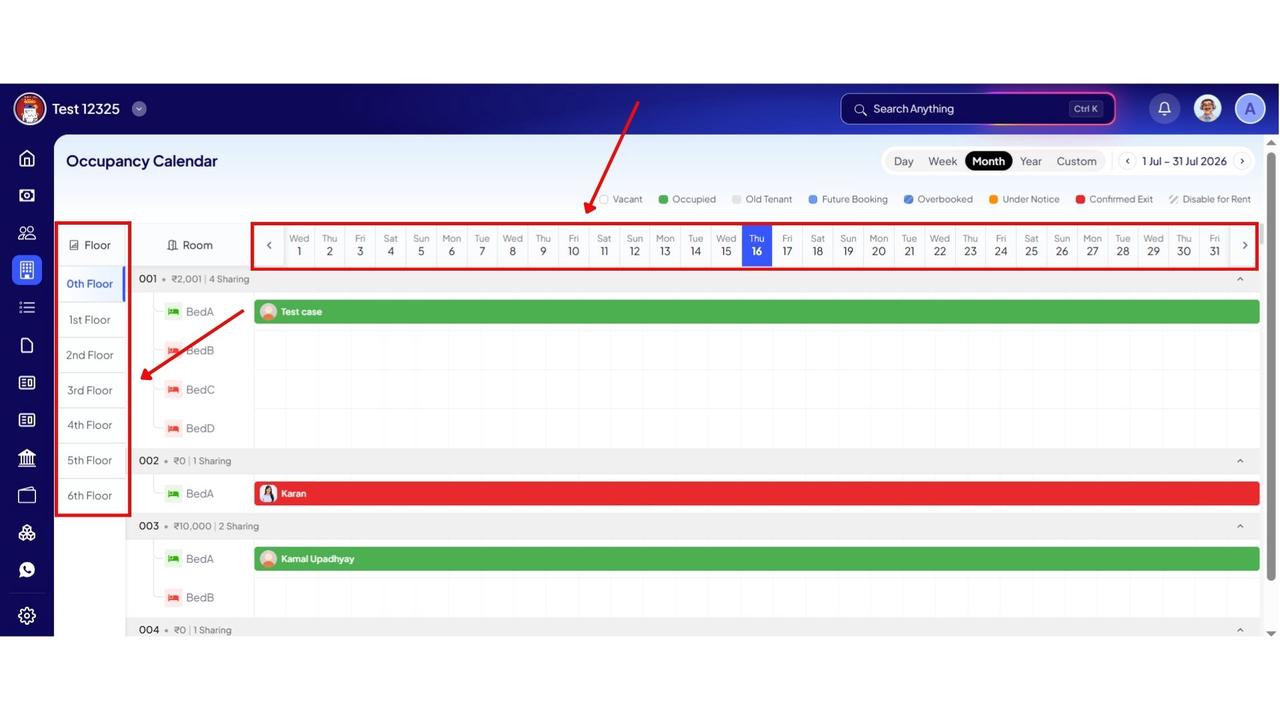
Step 5: Check Tenant Information
Move your cursor over any tenant or occupied bed to view additional details. You can also refer to the colour indicators shown above the calendar to understand the occupancy status of each bed.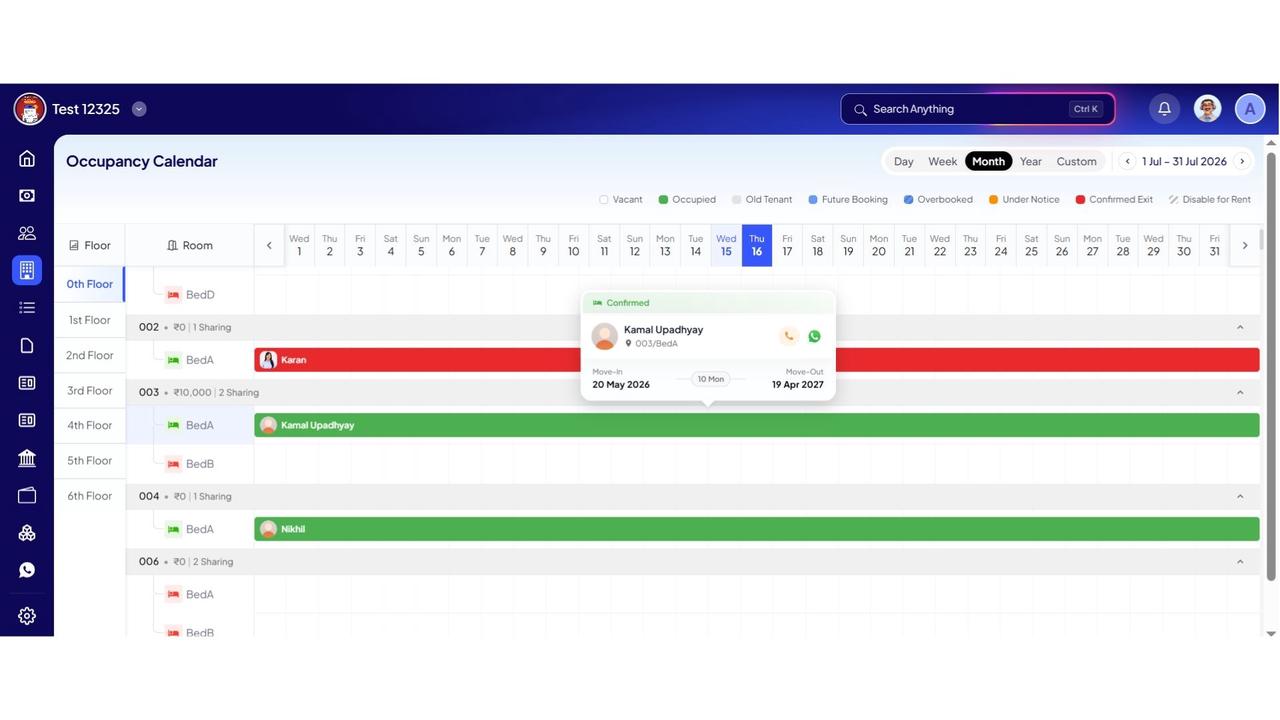
Step 6: Change the Timeline
Use the timeline options to switch between Day, Week, or Month views. This allows you to review occupancy based on the time period that is most relevant to you.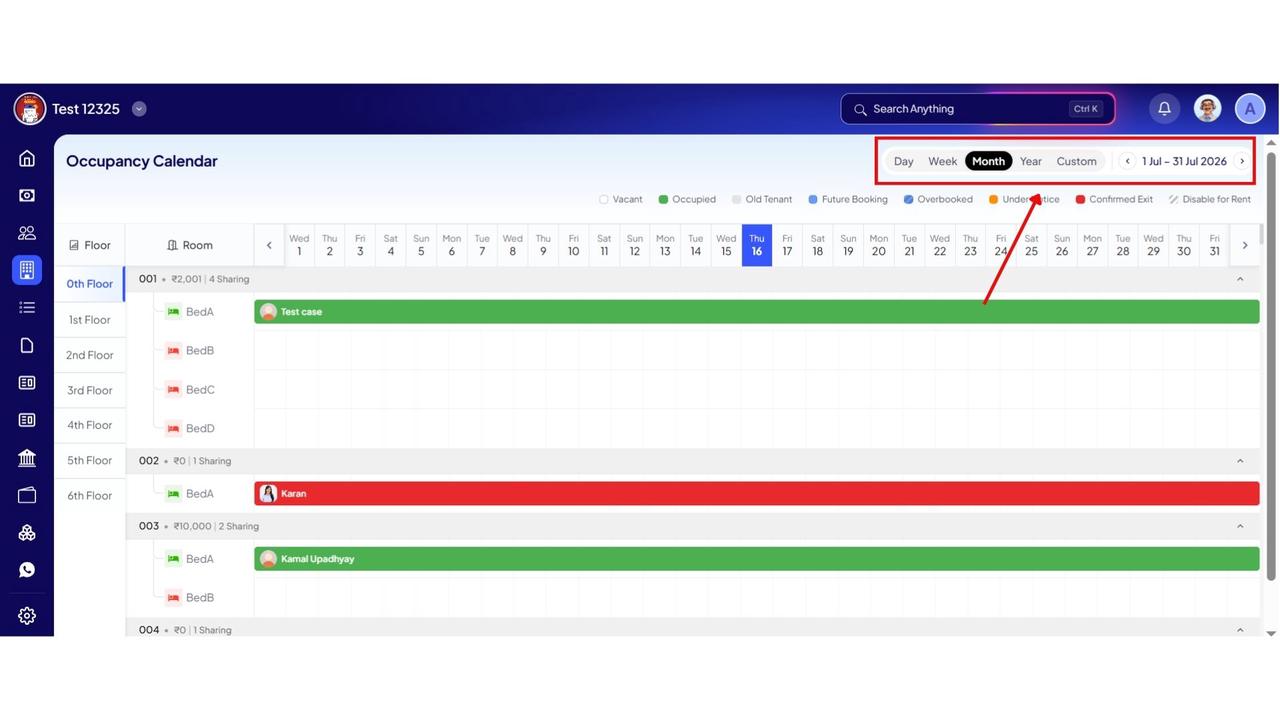
💡 Why it matters: When a tenant gives notice, you can instantly see whether someone new is already booked for that bed - or whether you need to find a replacement. For long-stay properties, you can see exactly when each tenant leaves and book the bed for the next person in advance. It's the health of your whole property, in one clear picture.
Reviews & Surveys
Think Google Forms - but built into RentOk, sent automatically to your tenants on WhatsApp, with results shown visually.
Highlights
- Create a review or survey from ready-made templates - stay experience, hygiene, check-in, check-out, move-in & move-out - or build your own with up to 25 questions.
- Question types include star rating, 0–10 score, and pick-one (multiple choice). Reorder or delete questions anytime, and preview exactly how it will look to your tenant.
- Automate it: choose the audience (All Tenants, All Active Tenants, or Has Pending Dues); the schedule - every Monday, the 10th of every month, or the 5th to everyone who hasn't paid rent; and the time of day, and it sends on its own.
- WhatsApp delivery is being enabled by default for everyone, so surveys reach tenants where they actually respond.
- See results as they come in: your recommended score, average rating, and a question-by-question breakdown - for example, cleanliness was rated 3.8 on average by 237 tenants, with 80 giving 5 stars. Read every individual response in detail, across all time, the last 7 days, or the last 30 days.
How to try
Step 1: Log in to the Web App
Open the web version of the app and enter your login credentials. Once logged in, you will be taken to the Dashboard.
Step 2: Open the Reviews Module
From the Dashboard, go to the Property section and click on Reviews. This will open the Review Overview, where you can view existing surveys, responses, and insights, or create a new survey.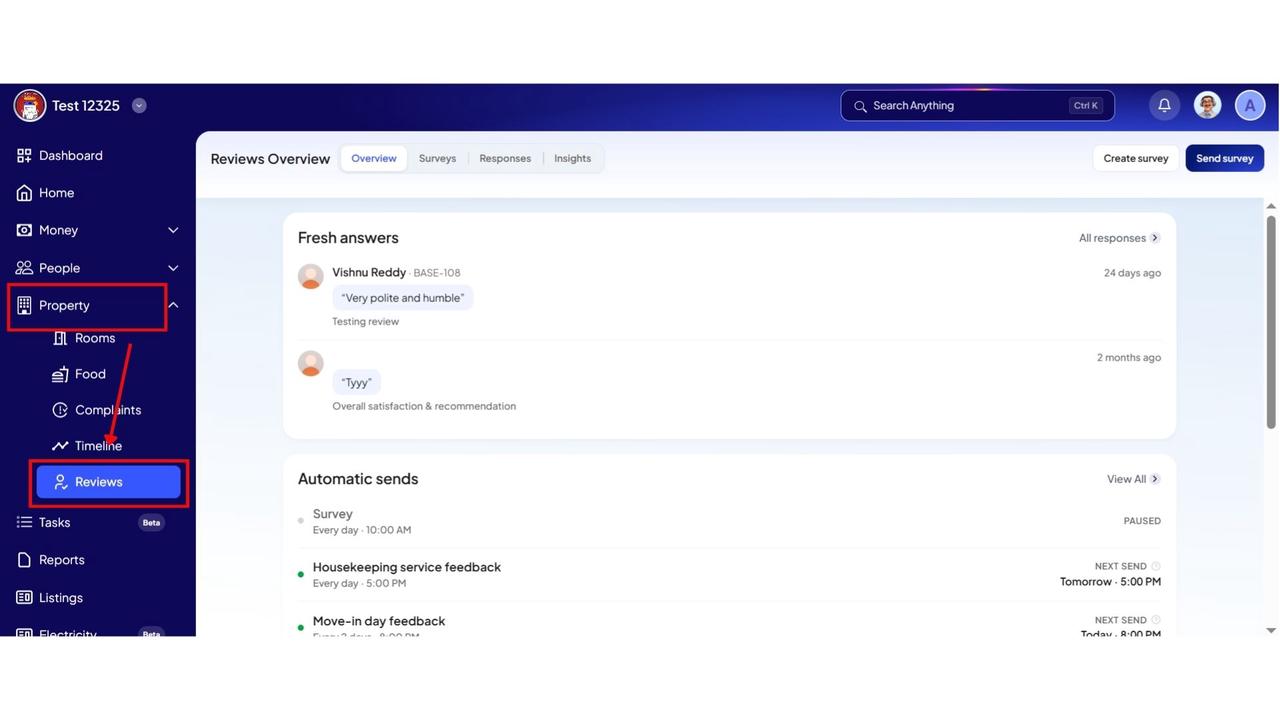
Step 3: Create a New Survey
Click on Create Survey to begin. Enter a Survey Name and add a short description to let tenants know what the survey is about. As you create the survey, you can use the Preview panel on the right to see how it will appear to tenants.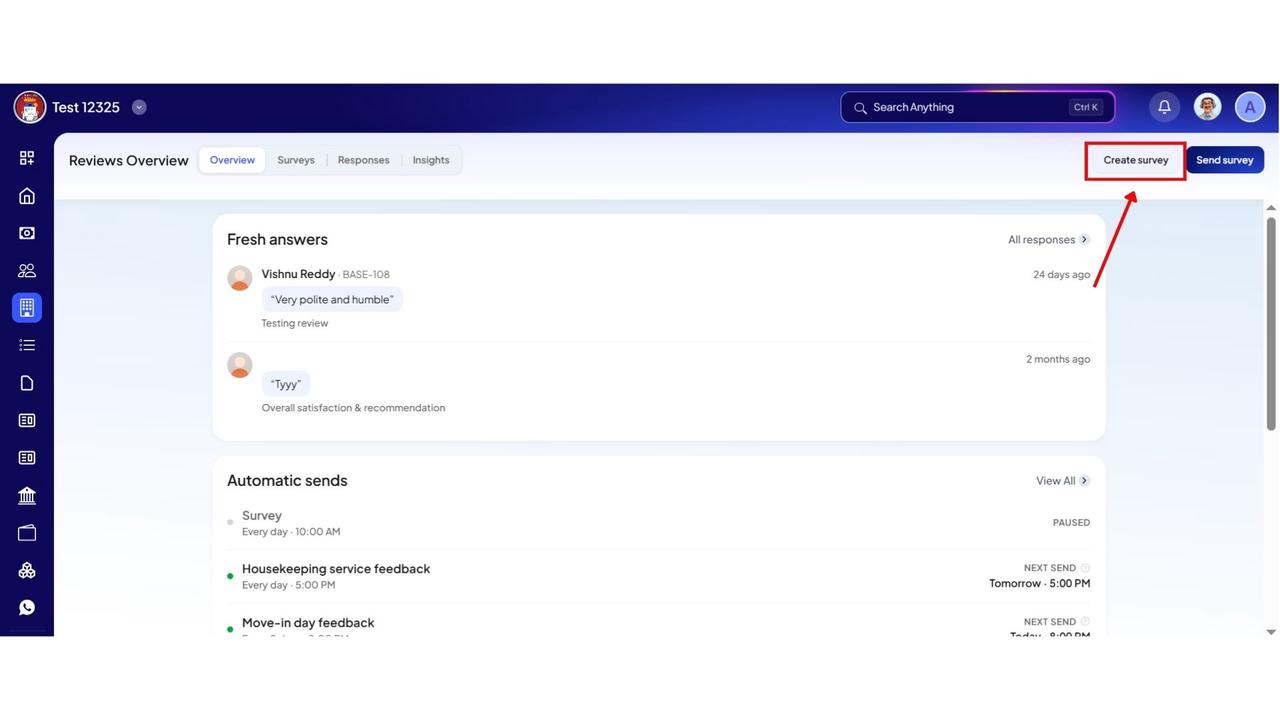
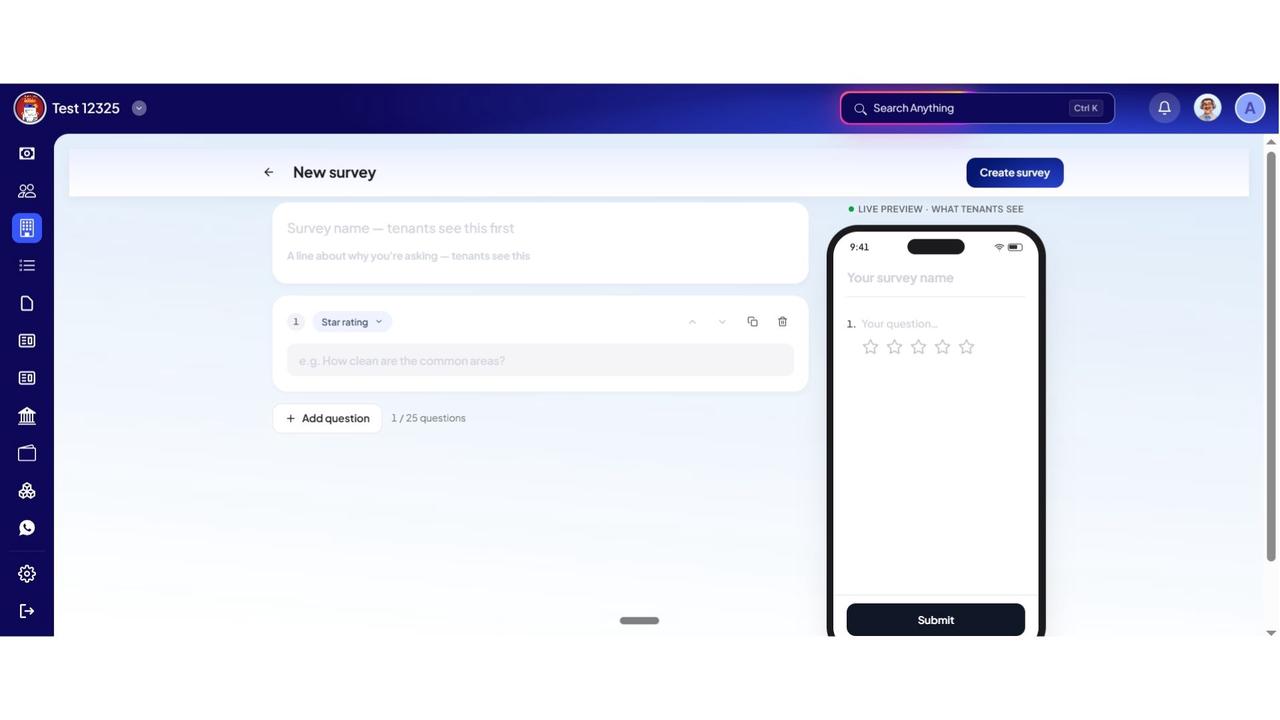
Step 4: Add Your Questions
Click on Make Questions and start adding the questions you want to include. You can choose from different response types, such as Star Rating, Single Choice, Multiple Choice, or In Their Words for open-ended responses. Use Add Question to include as many questions as required.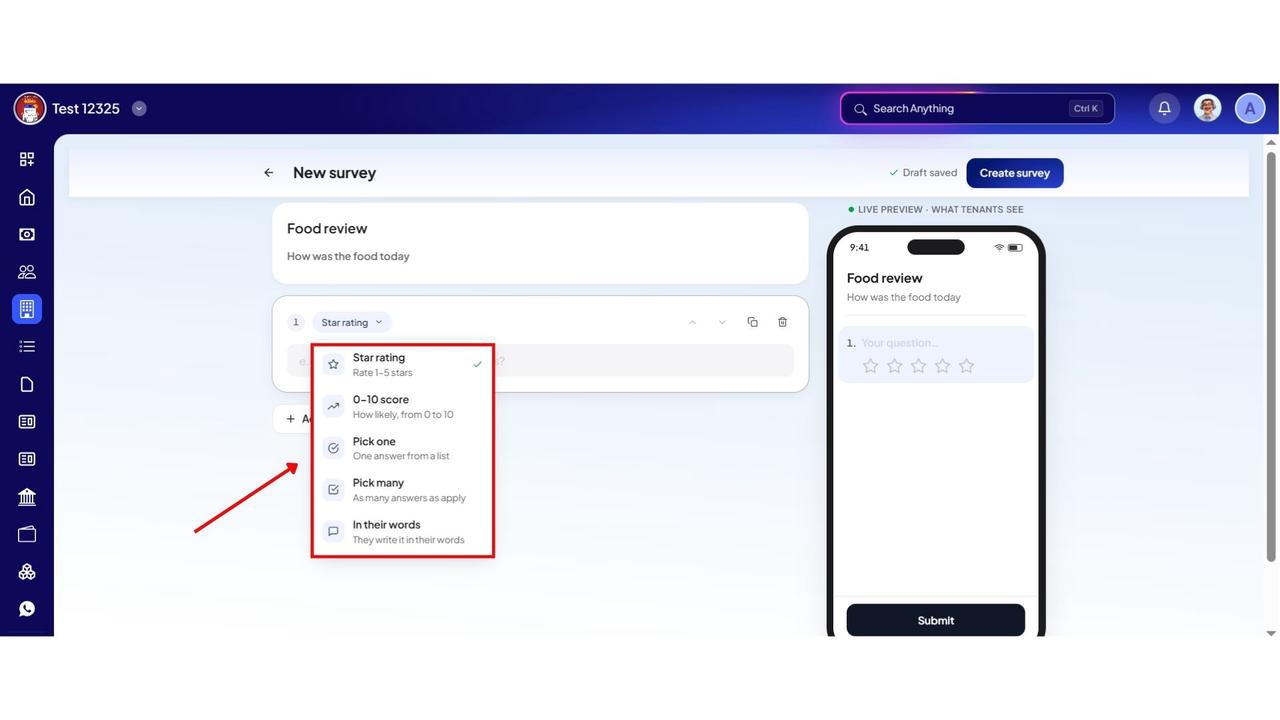
Step 5: Create the Survey
After adding all the required questions, review the survey and click Create Survey. Your survey will now be saved and will be ready to send.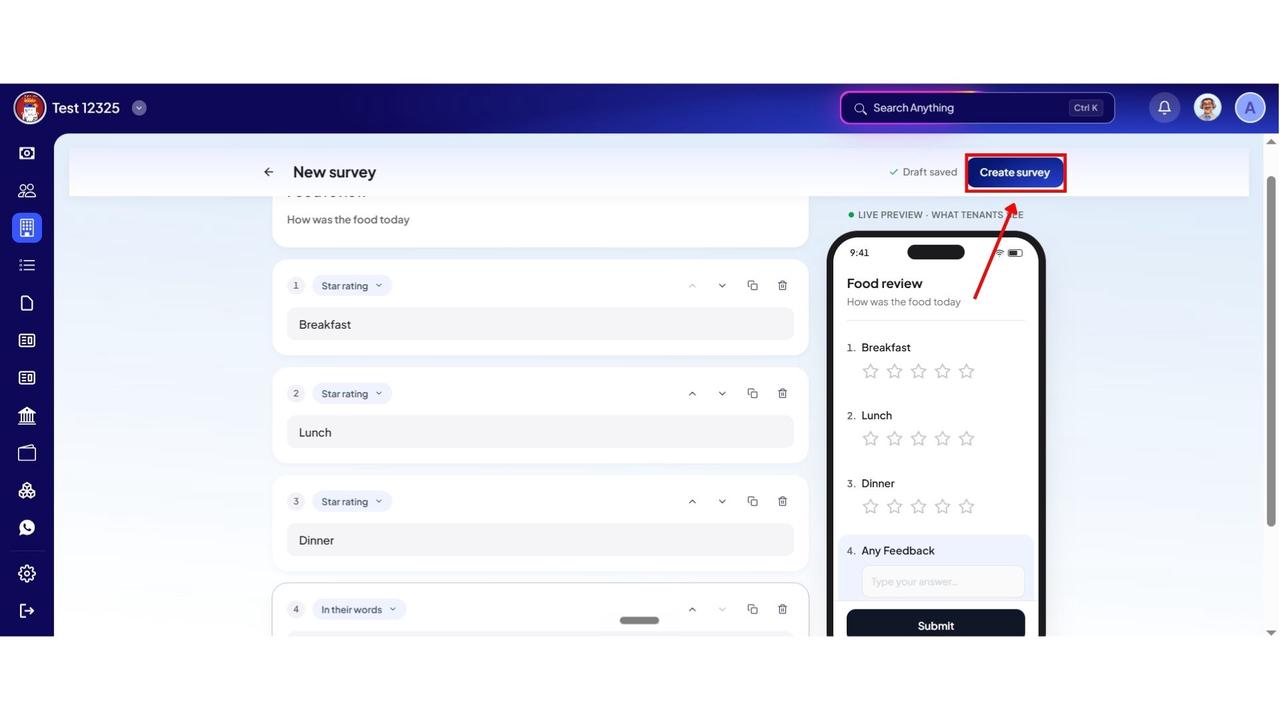
Step 6: Choose the Recipients
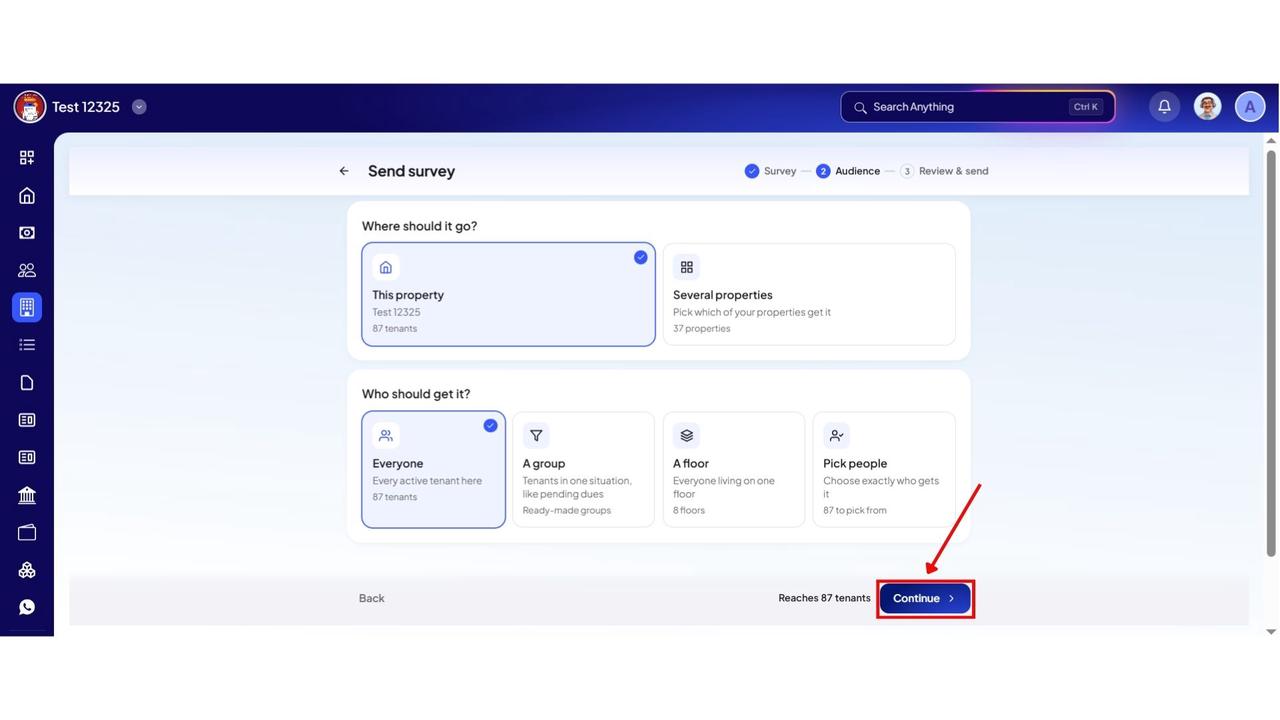
Click on Send to start sharing the survey. Select the Property or Properties where you want to send it, choose the tenants who should receive it, and decide whether the survey should be sent to everyone or only a specific group.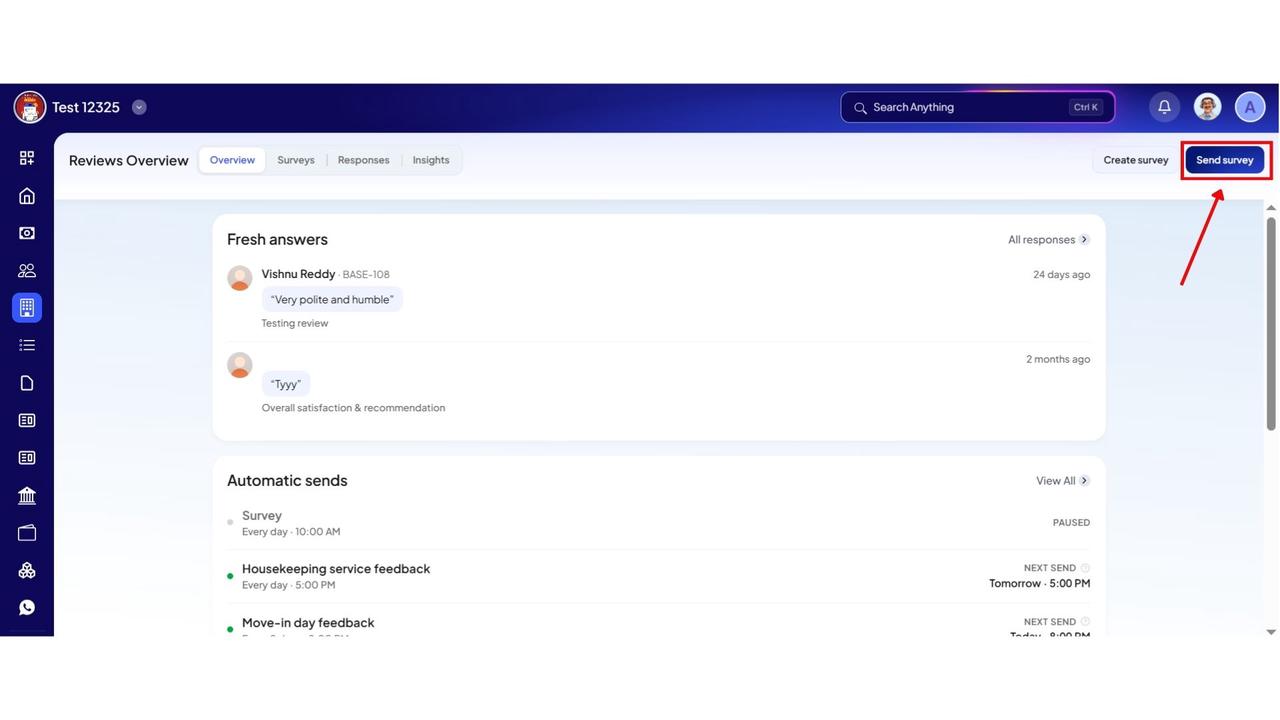
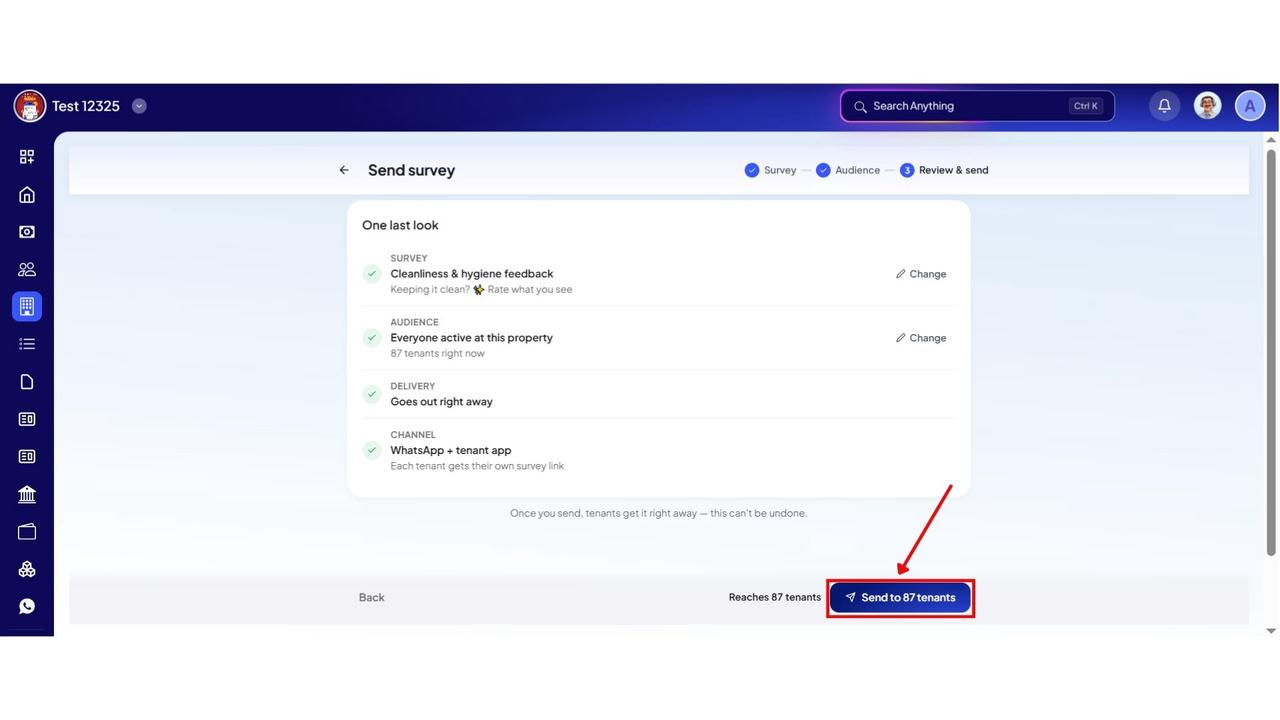
Step 7: Review and Send
Click Continue to review the selected recipients and survey details. Once everything looks correct, click Send to share the survey with the selected tenants.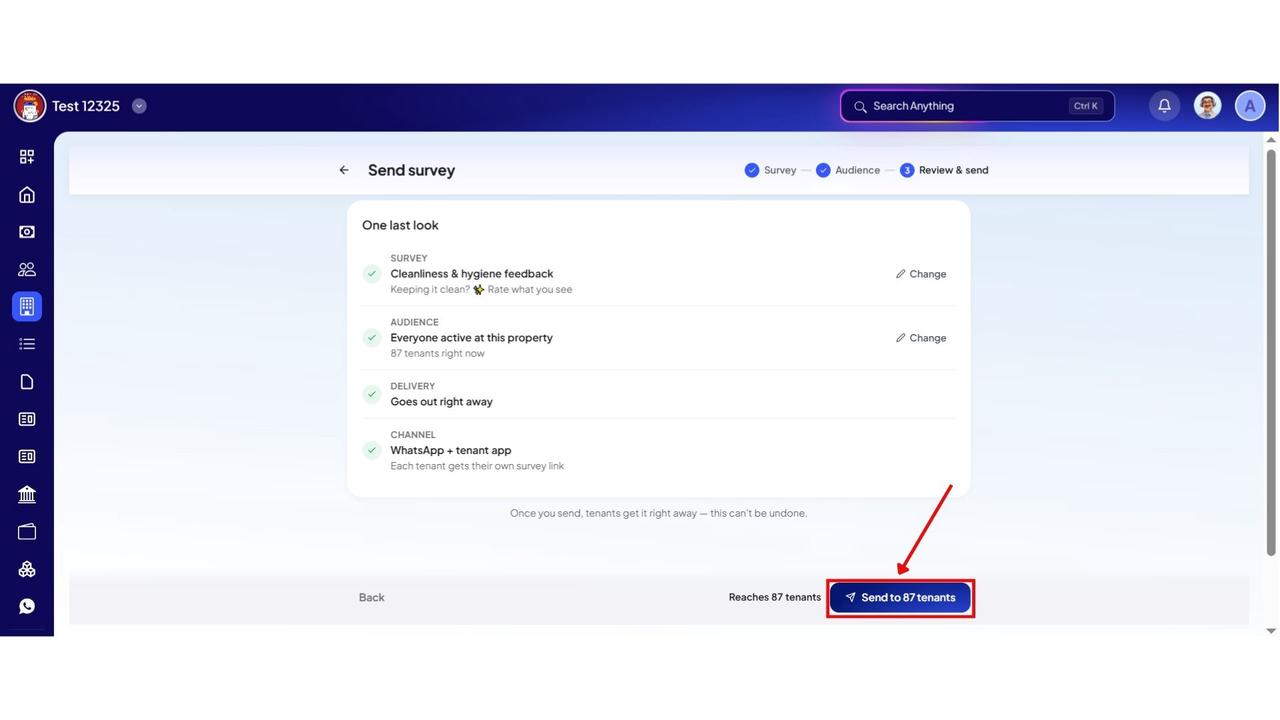
💡 Why it matters: Tenants who leave rarely tell you why - and you have no record of it. With regular feedback, you know exactly which direction needs work, you can see where your staff is falling short, and you can compare which of your properties performs better and why. Fix what tenants flag, and retention, occupancy, and referrals all improve.
Tasks - All-New Experience (Web)
The Tasks module works the same as before, but the UI and the flow are all new - organised into three simple sections: Track, Checklist, and Review.
Highlights
- Track shows every active task in your property, along with its history - who it was assigned to and what they filled - with tabs to switch between To Do and To Review.
- Checklist shows all your checklists - your own custom ones and ready-made defaults from the Sample Library - with their schedules. Edit any checklist and see exactly which one runs when.
- Review shows every submission, with filters by checklist, team member, and date.
- Question types include a new 1–10 scale, along with five-star rating, dropdown, text answer, photo, and yes/no.
- Your staff doesn't need to learn anything new: they receive the task as a WhatsApp link, fill it in, submit - and it appears in your app.
How To Try
Step 1: Log in to the Web App
Open the web version of the app and enter your login credentials. Once logged in, you will be taken to the Dashboard.
Step 2: Open the Tasks Module
From the Dashboard, click on Tasks to open the task management section. Here, you'll find the Task Templates page, where all your existing templates are listed.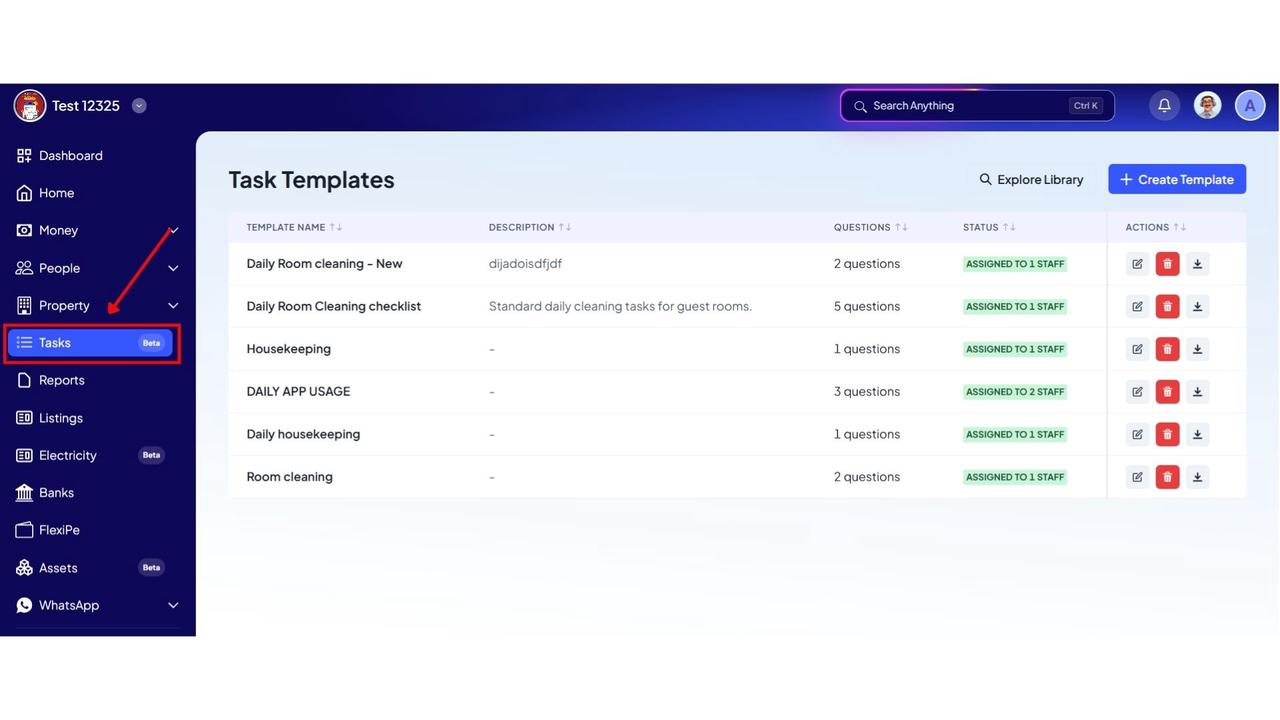
Step 3: Review Existing Templates
On the Task Templates page, you can view all the templates you've created. You also have the option to Edit, Download, or Delete any existing template whenever required.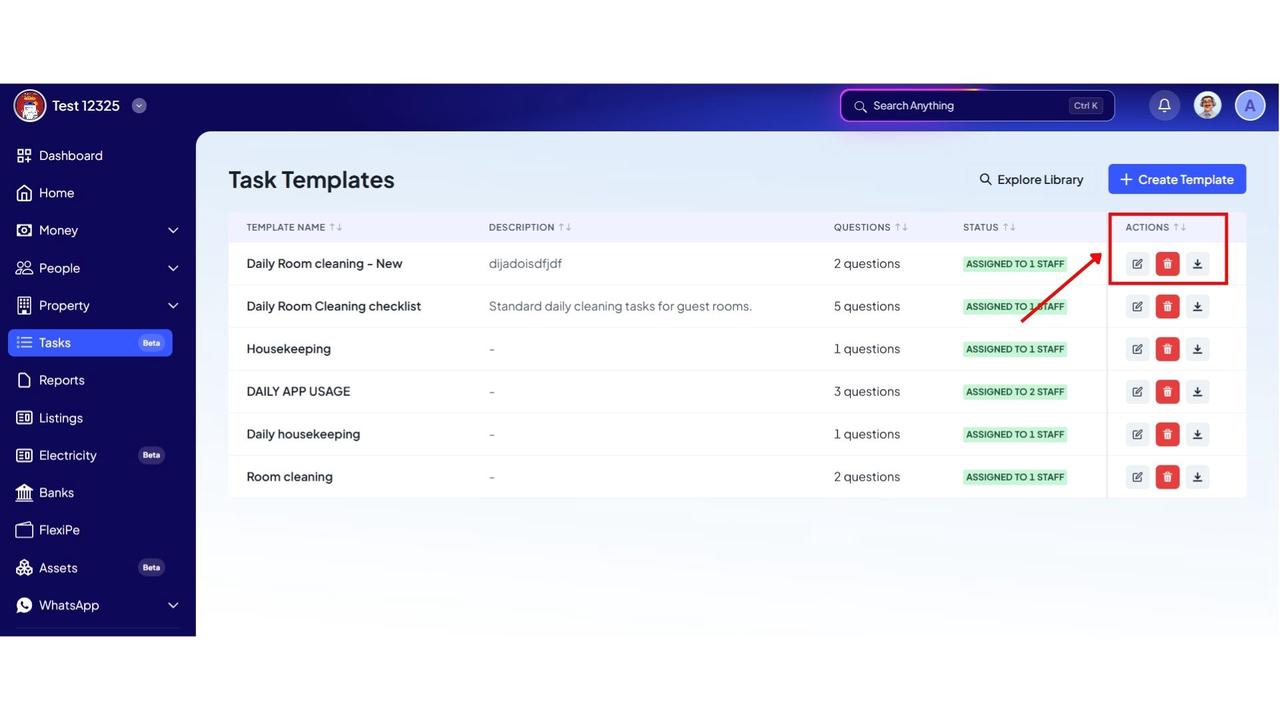
Step 4: Create a New Template
Click on Create Template to create a new task. Enter a Template Name (for example, Daily Housekeeping), add a short Description, and then start adding the questions you want your staff to complete.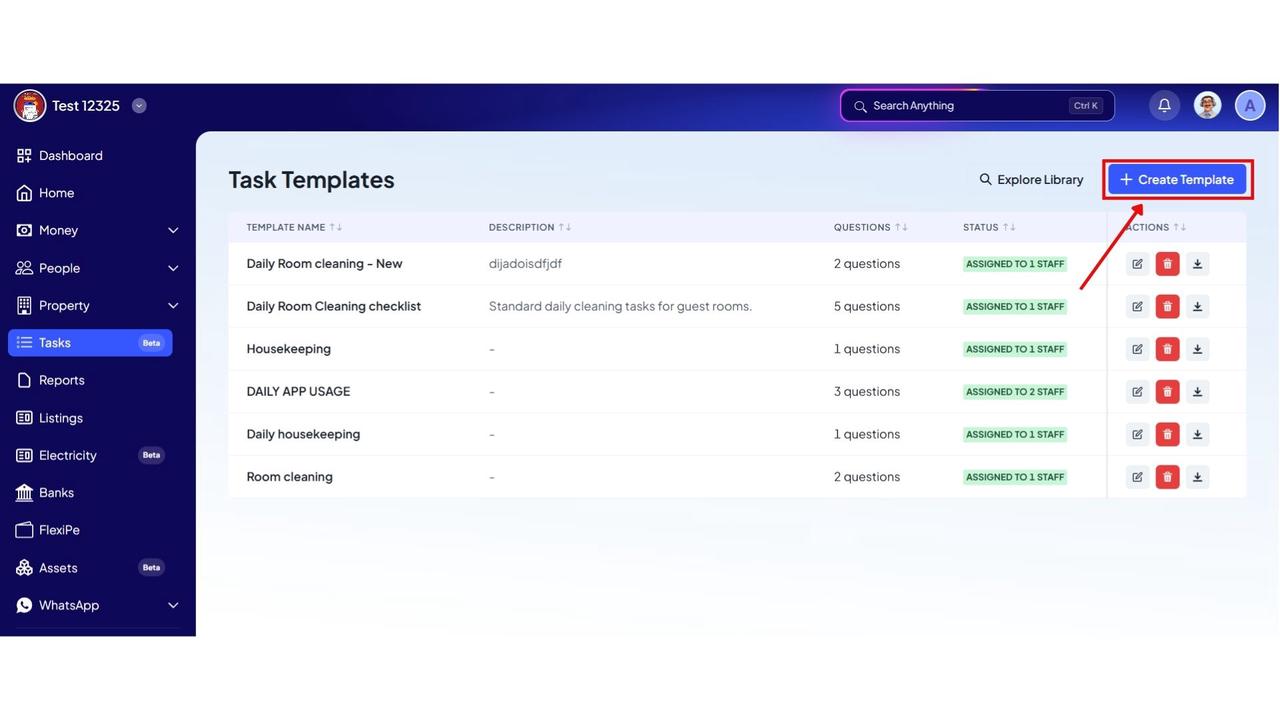
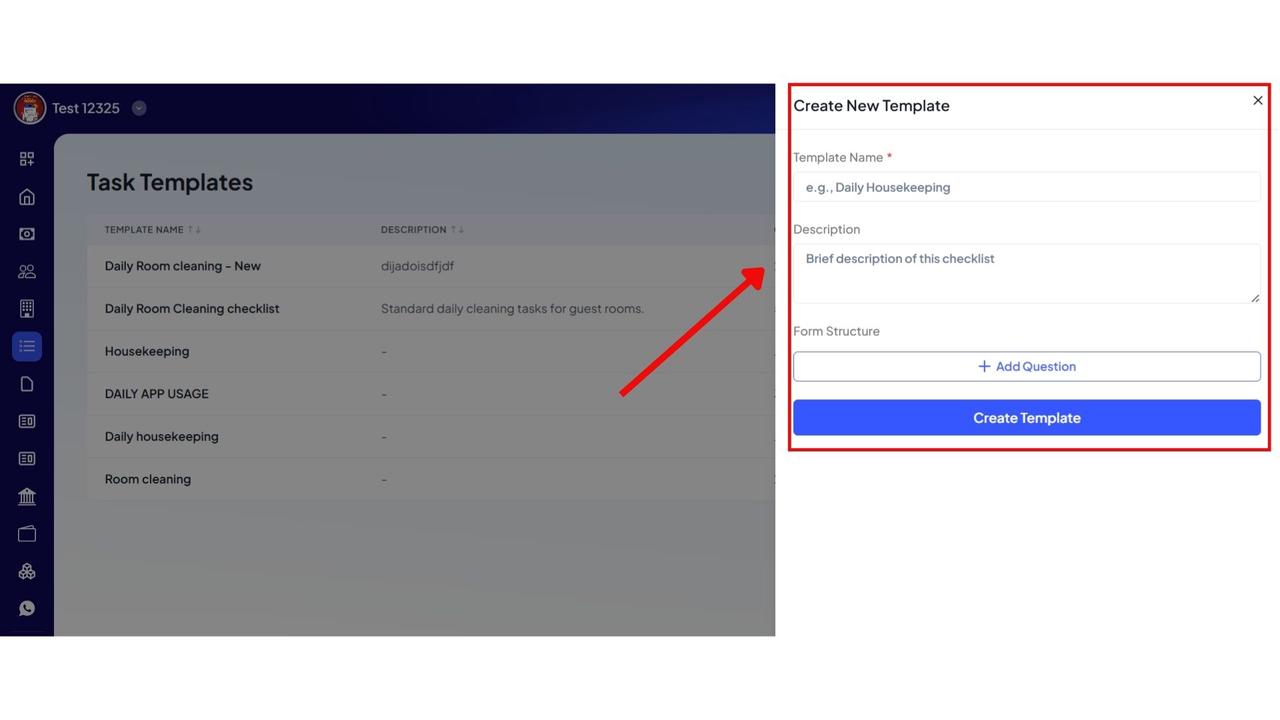
Step 5: Add Questions
Choose the most suitable response type for each question. You can use options such as Text Input, Yes/No, Photo Upload, Dropdown Selection, 5-Star Rating, or a 1–10 Scale. Add as many questions as needed before creating the template.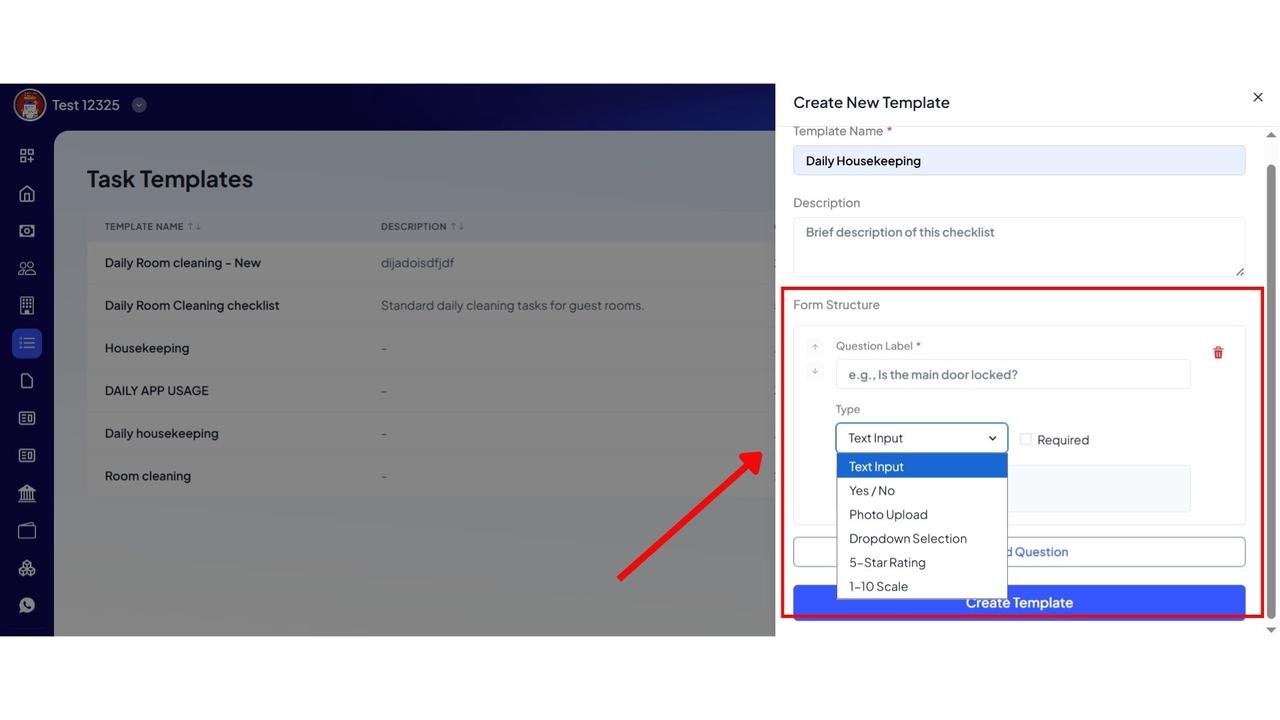
Step 6: Save the Template
Once you've added all the required questions, review the template and click Create Template to save it.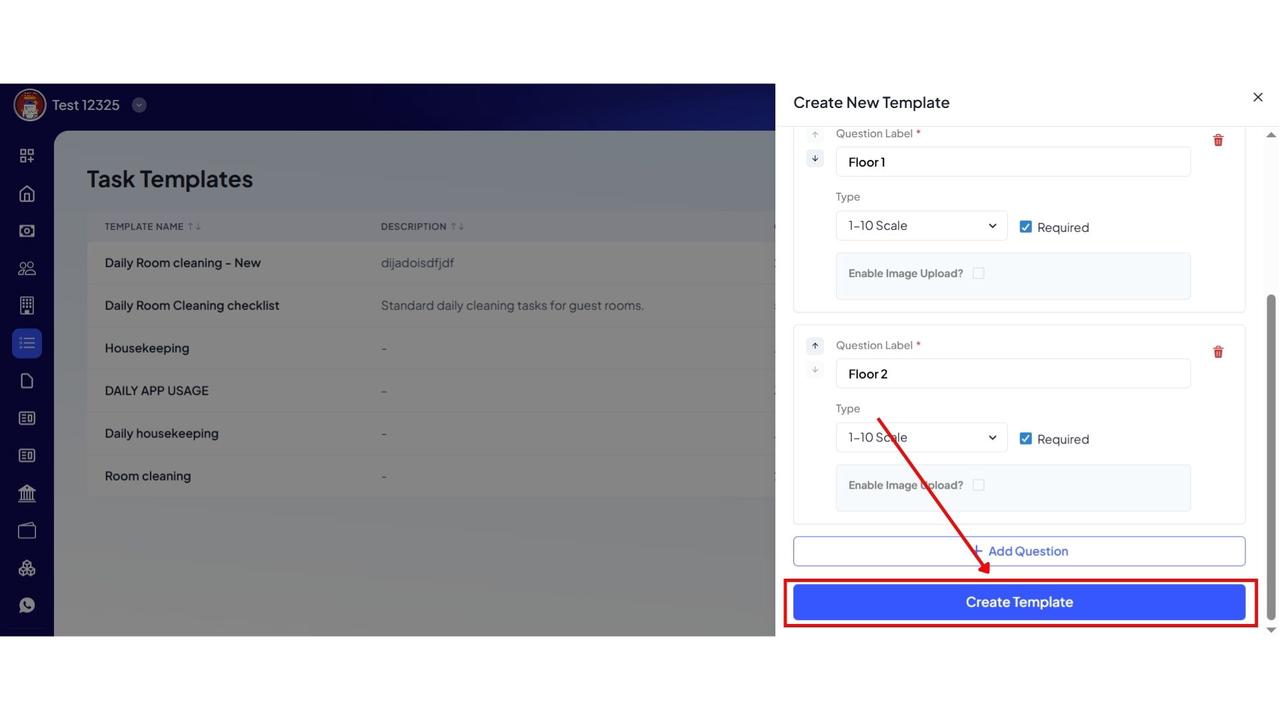
Step 7: Assign the Template
To assign the template, go to Actions and click Edit. Open the Assignment section and select the team members you want to assign the task to.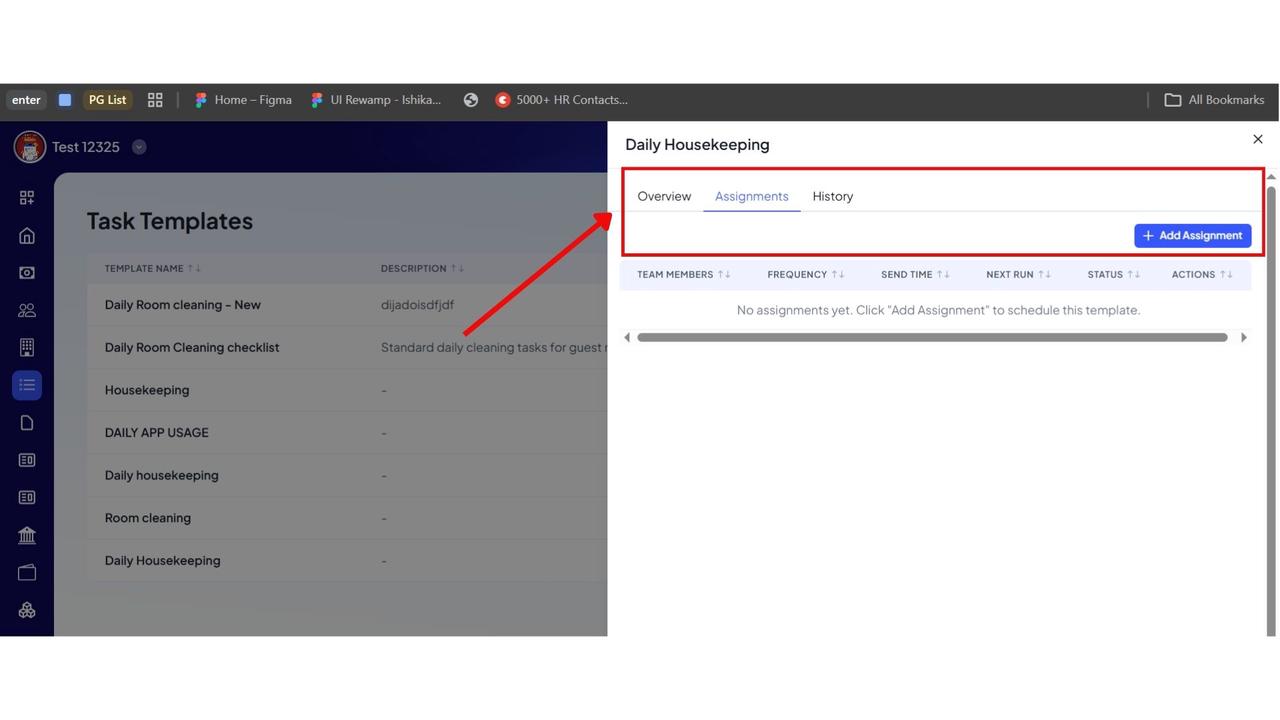
Step 8: Set the Schedule
Choose how often the task should be assigned by selecting the Frequency and Time. Once the schedule is configured, save your changes.
The assigned task will be sent automatically to the selected team members according to the schedule you've set.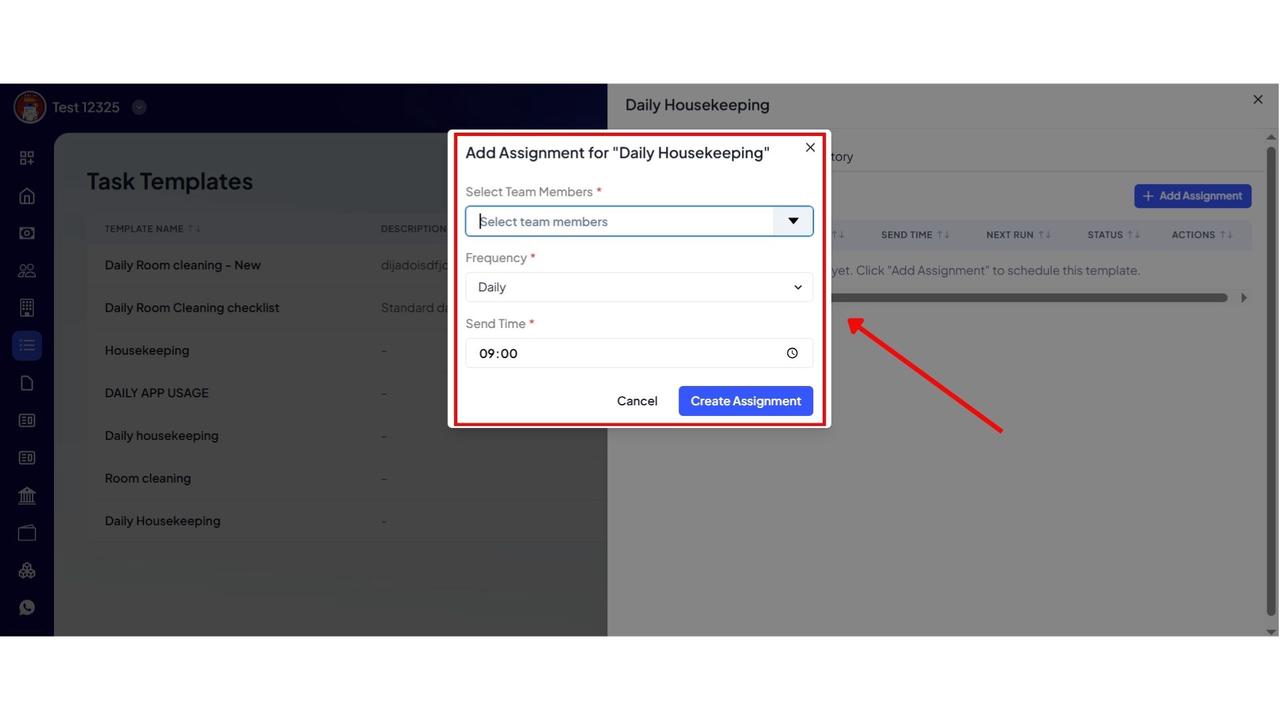
💡 Why it matters: Daily operations - room cleaning, washroom cleaning, facility audits, daily reporting - run on their own. You set it up once; your staff just taps a WhatsApp link; and you get a clear record of what was done, by whom, and when.
Fixes & Polish
- Smoother scrolling on the web – Section pages now have a single scroll. The top widgets no longer scroll separately from the list.
- Search bar comes back faster on mobile – A slight downward scroll brings it back; no more scrolling all the way to the top.
- Result counts on filters (mobile) - Filter chips now show the number of results.
- Compact widgets (mobile) - Dashboard widgets are smaller, so you see more of your data on screen.
- Settings, reorganised (mobile) - Settings are now grouped into clear categories (Property, Management, Renting Rules, Payments, KYC, Checklist, Agreement, Notifications, Website, Attendance, Food, Team, Services, and Security) instead of one long list.
- A fresh look for complaints on your phone.
- Property name on every action - Add Tenant, Add Complaint, Add Expense, and Add Lead now show the property name at the top, so you're never confused about which property you're acting on.
- Activity Log with property filters – Including an "All Properties" option on the web and property selection on mobile.
- New Announcements UI on the web.
- Fixed: The multi-property Download Report on the web now includes data from all selected properties.
- WhatsApp message notifications (shipped earlier this cycle) – You now get a notification whenever a message arrives on your white-label WhatsApp number, so your team can respond right away.
Availability & Rollout
- Multi-Property View is live on the Web App and the mobile app.
- The Occupancy Calendar, custom report downloads, Reviews & Surveys, and the new Tasks experience are live on the Web App.
- Custom report downloads are coming to mobile soon.
Thank You!
Have doubts or any feedback? Chat with us in-app (Help → send us a message).
We’re building for you, and every suggestion counts.