Money Add Dues
MONEY>ADD DUES
How can I add a dues package?
Whether fixed or flexible, you can add a dues package that fits your billing needs. Creating a dues package helps you manage tenant billing more efficiently by setting up recurring charges in advance. You can choose whether the amount should remain the same for everyone or vary based on each tenant or room. This ensures accurate billing, reduces manual effort, and saves valuable time during monthly collections. Follow these steps to add your dues package with ease:
- Step 1: Open Dues Package Section Tap the Money icon in the bottom navigation menu, then select Dues Package to access package settings.
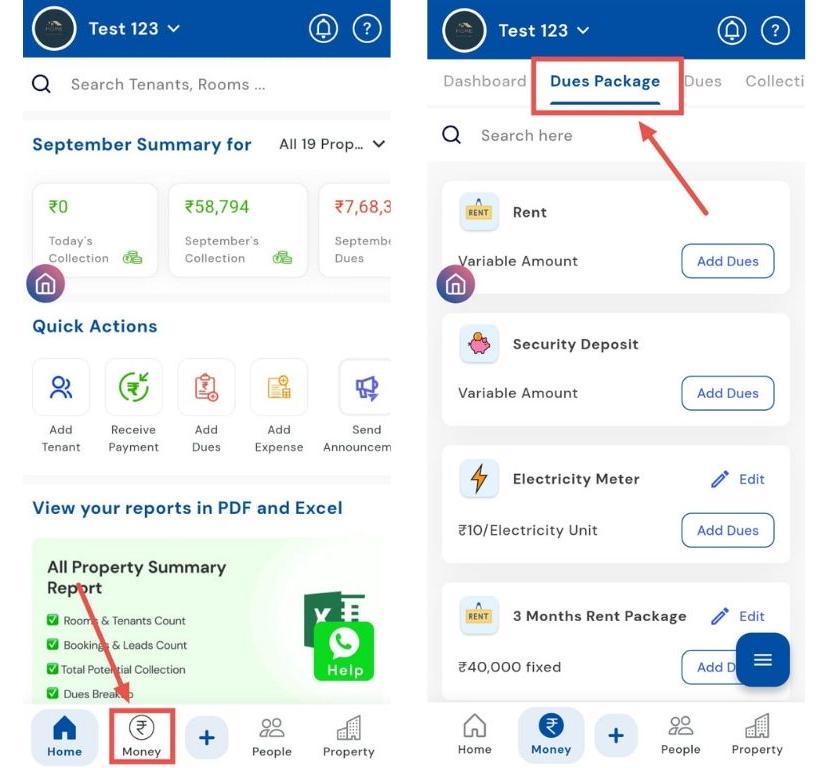
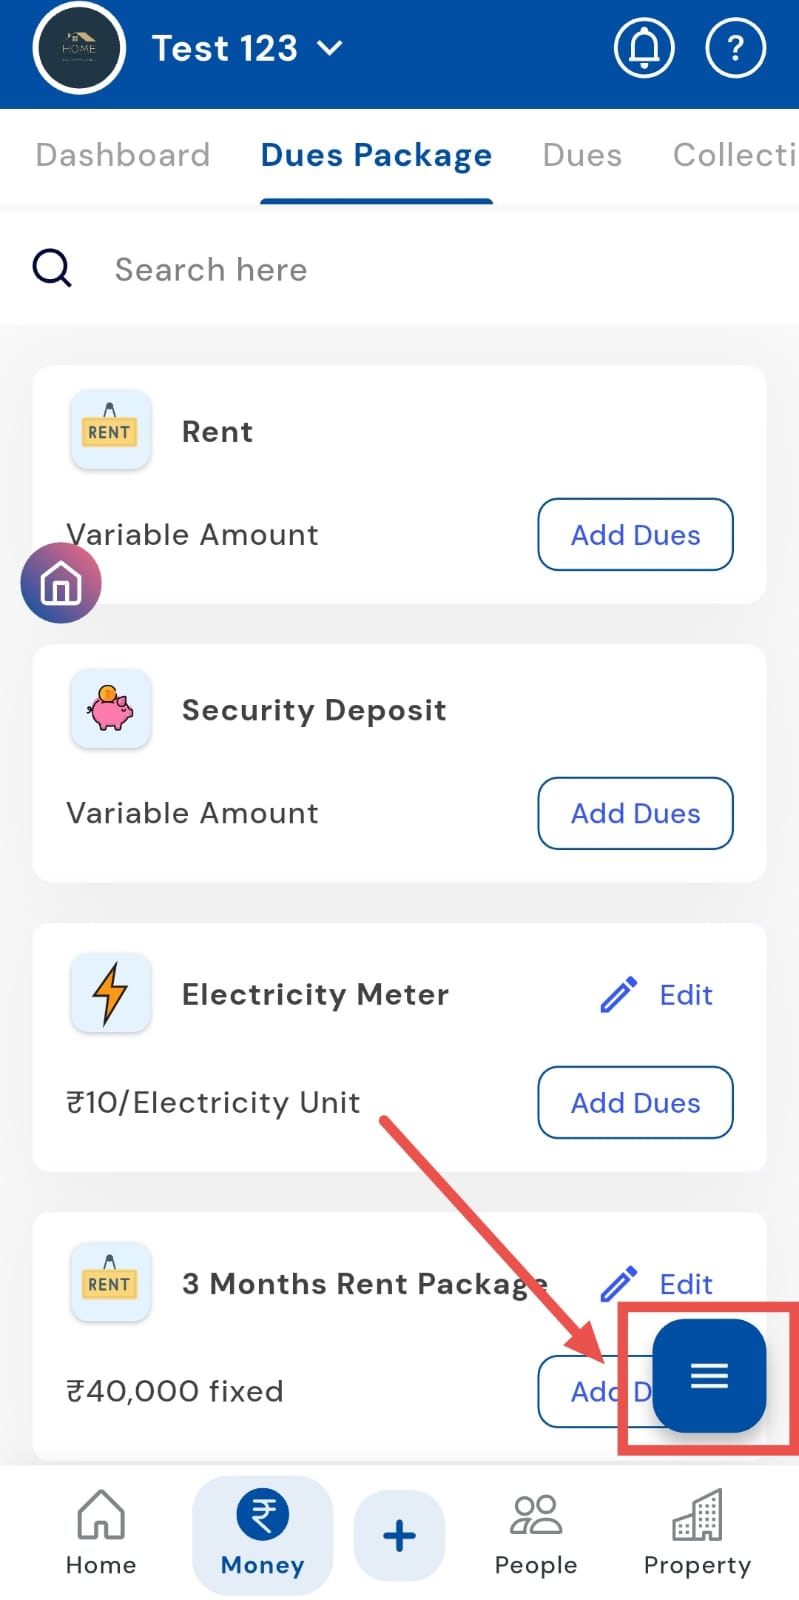
- Step 2: Open Options Menu On the dues package page, you’ll see a box with three lines in the bottom-right corner. Tap on it to open the options.
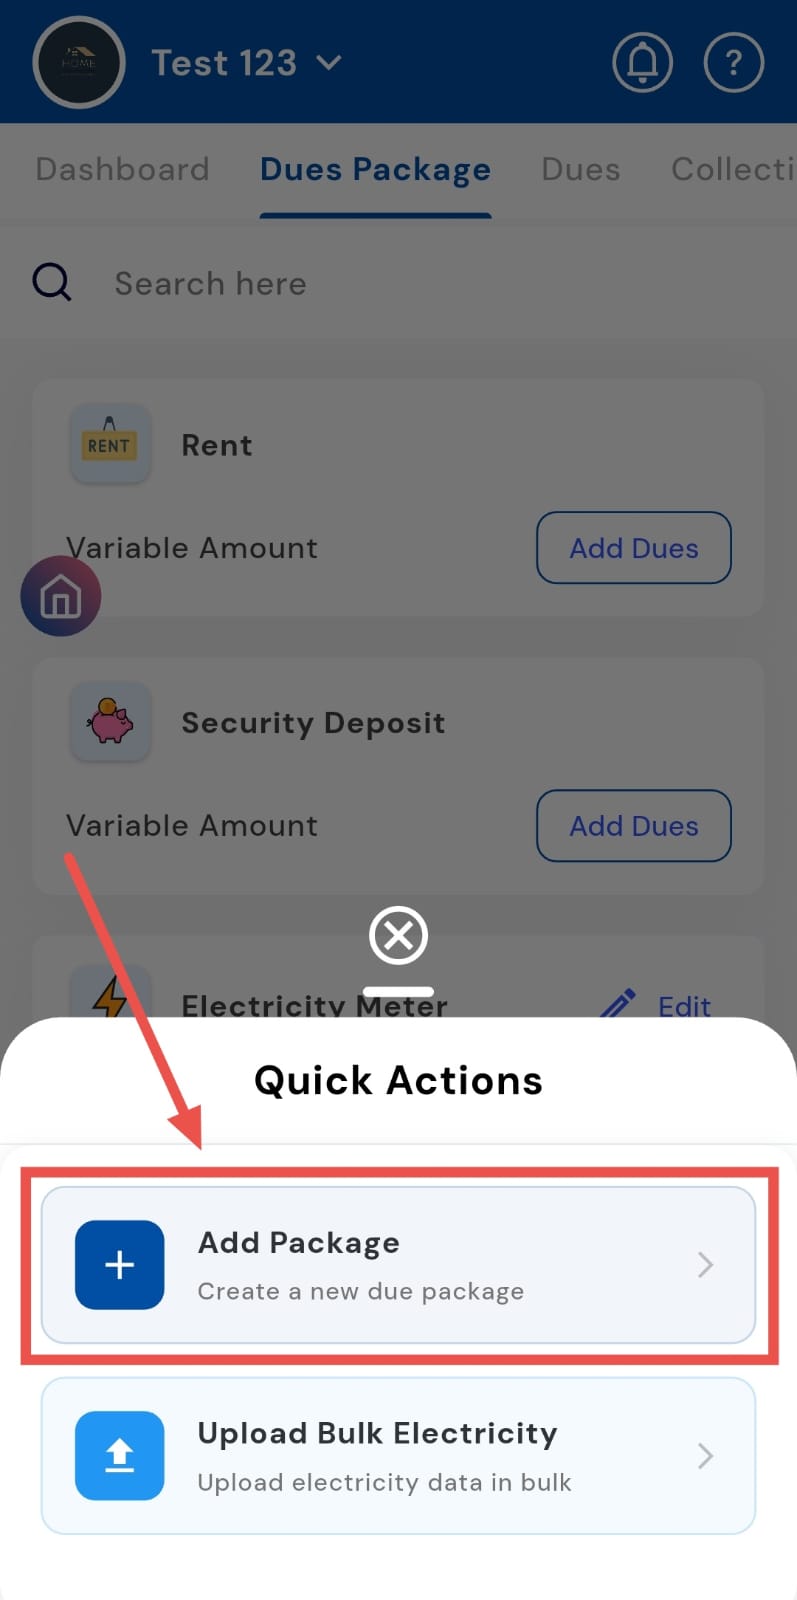
- Step 3: Add New Package Select Add Package to begin creating a new dues package.
-
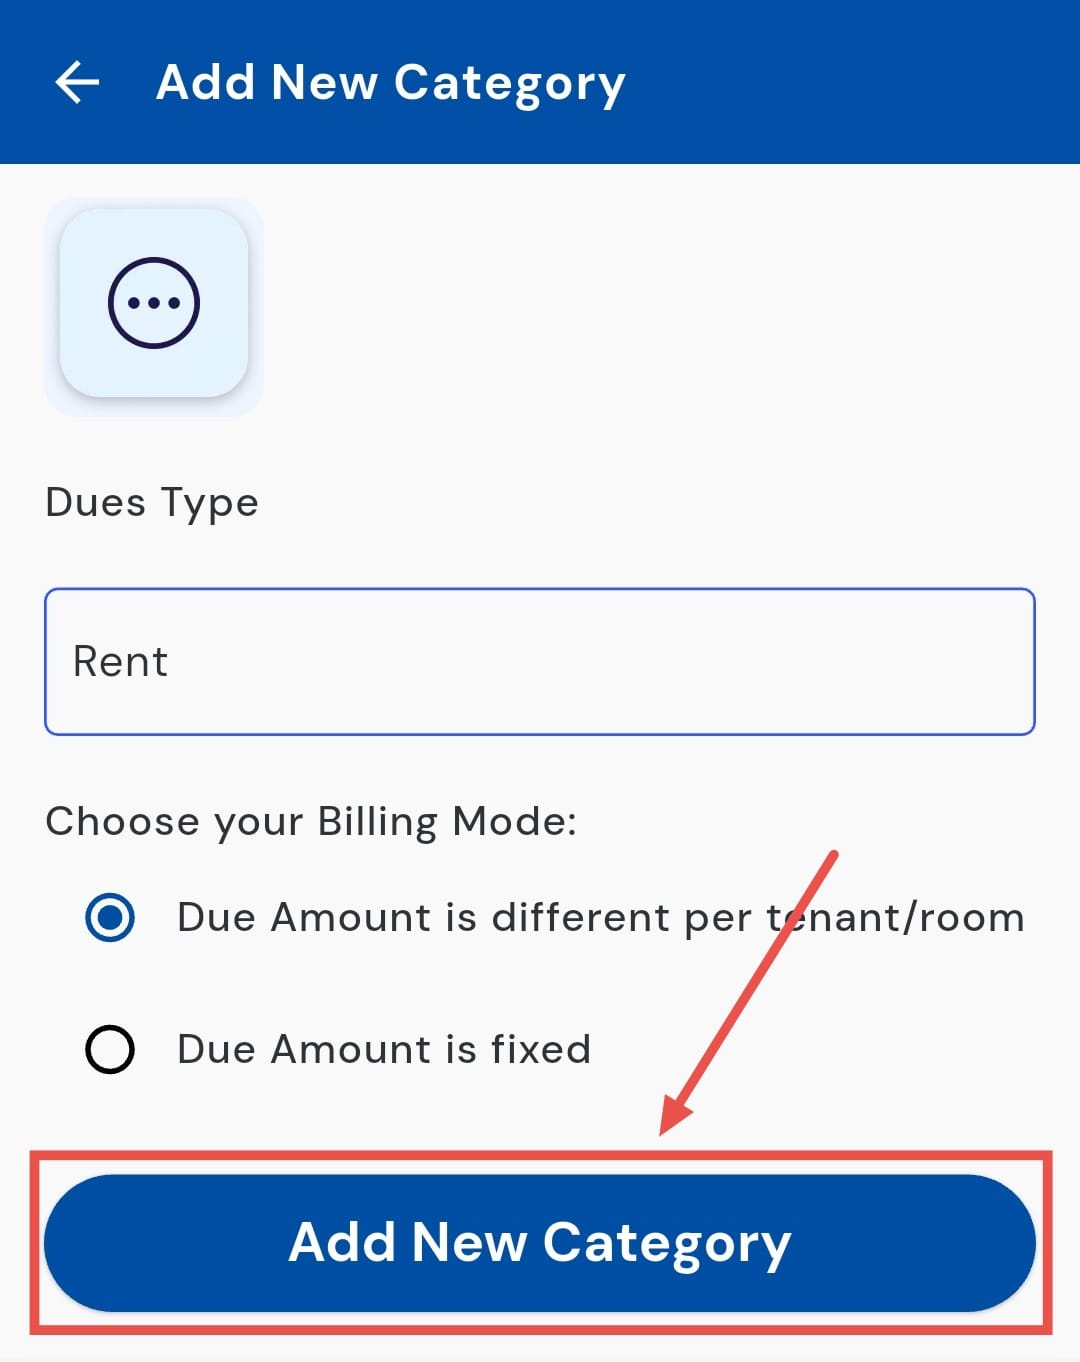
Step 4: Enter Package Details A screen will appear where you need to:
-
Enter the Dues Type (e.g., rent, maintenance, utilities).
-
Choose the Billing Mode:
-
Due amount is fixed – use this if the same amount applies to everyone.
-
Due amount is different per tenant/room – select this if amounts will vary across tenants or rooms.
-
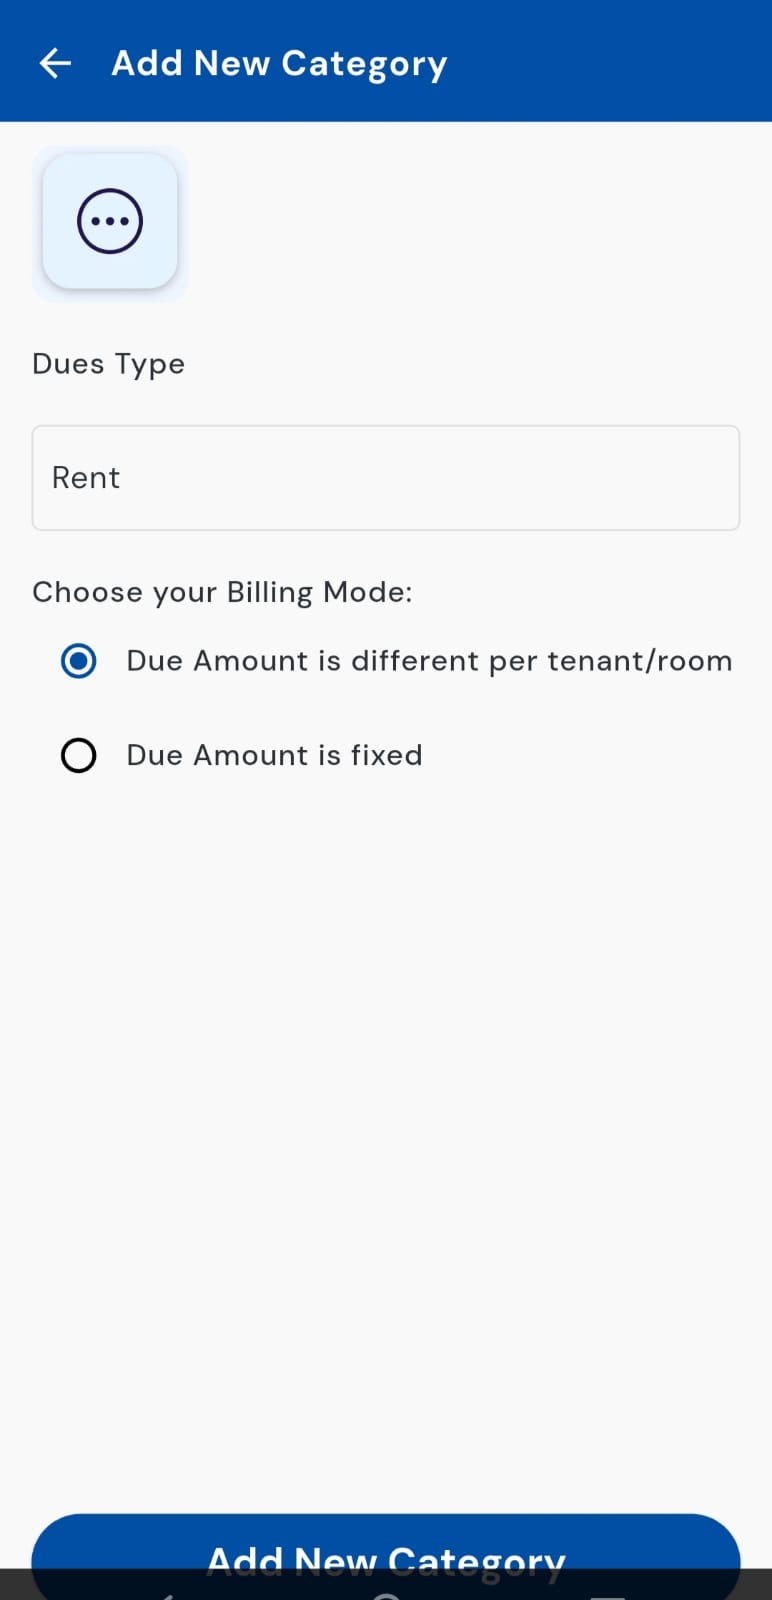
- Step 5: Add Category Once the details are filled, tap on Add New Category to save the package.
| Tip: Clearly define the dues type and billing mode when creating packages to avoid confusion later while collecting payments. |
|---|
- **How can I upload a bulk electricity bill? **
Instead of entering charges one by one, you can use the bulk upload feature to add electricity details for multiple tenants or rooms at once. This saves you from entering amounts manually and makes the process far more efficient. Simply upload a single file with all the required details, and let the system handle the rest
Here’s how you can use the bulk upload feature to manage electricity charges seamlessly:
- Step 1: Open Dues Package Section Tap the Money icon in the bottom navigation menu, then select Dues Package.
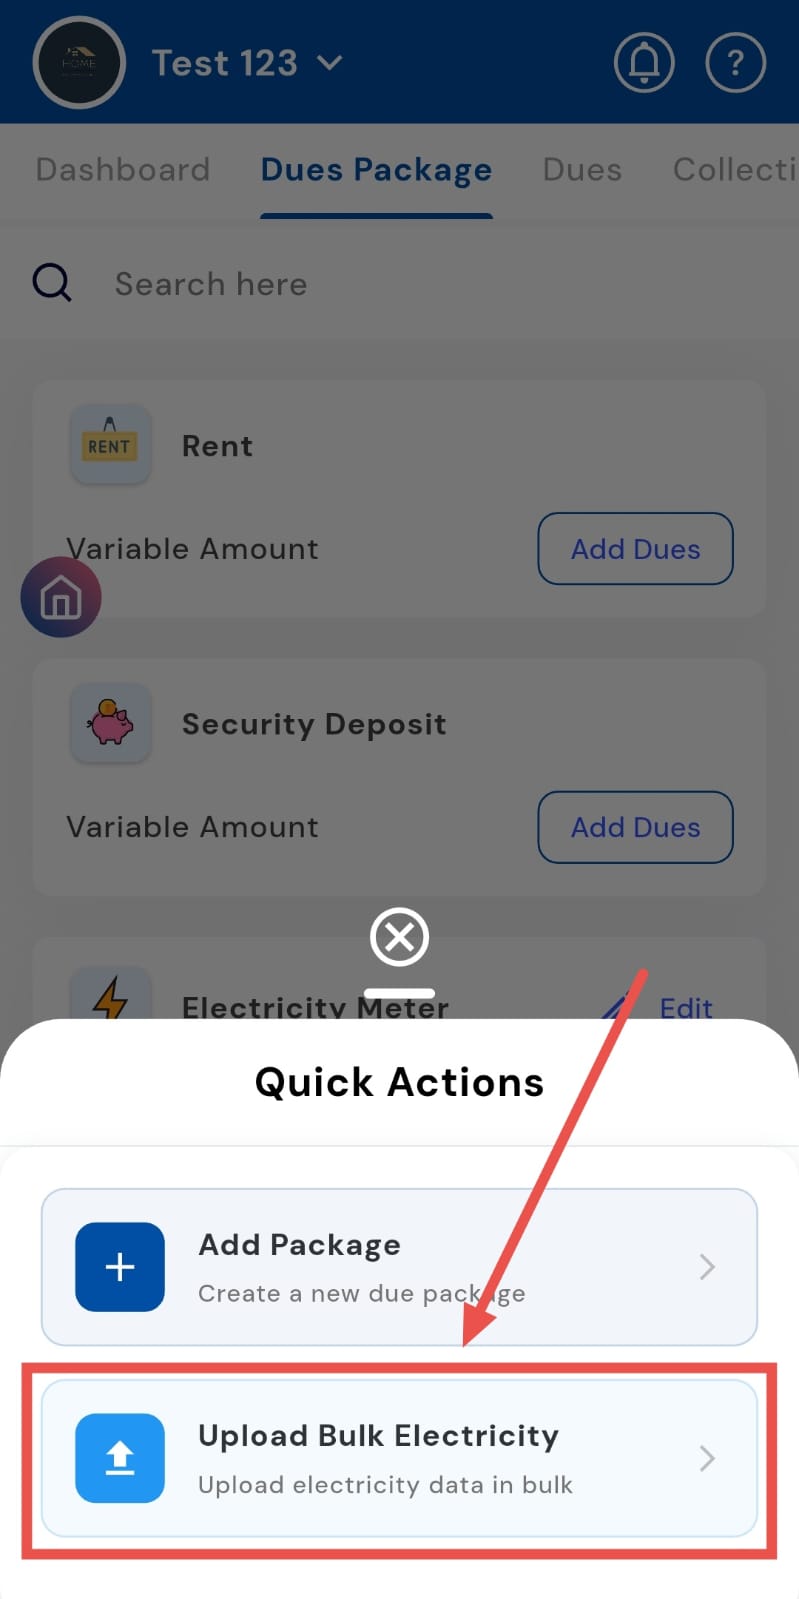
- Step 2: Open Options Menu On the dues package page, look for the box with three lines in the bottom-right corner. Tap it to open the options menu.
- Step 3: Select Upload Bulk Electricity From the available options, tap on Upload Bulk Electricity.
- Step 4: Upload the File A new screen will appear where you can select the document containing electricity charges. Once you upload it, the system will process the file and show the results.
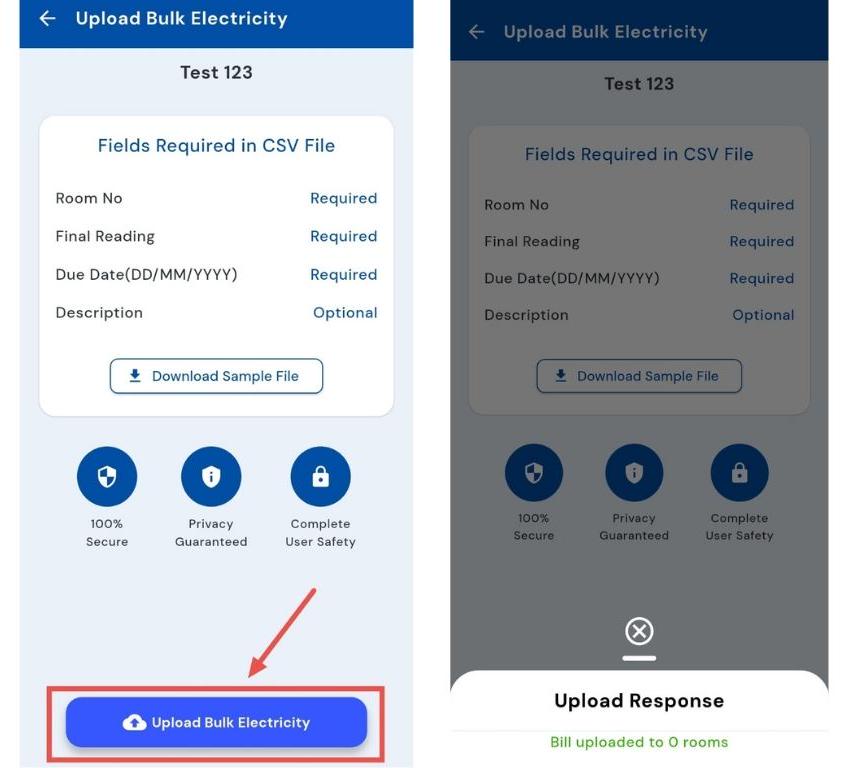
Note: The app only accepts CSV files; other formats will not be accepted (refer to the sample file).
| Tip: Before uploading, download the Sample File provided in the app. It shows the correct format for entering tenant and billing details, ensuring your file uploads smoothly without errors. |
|---|
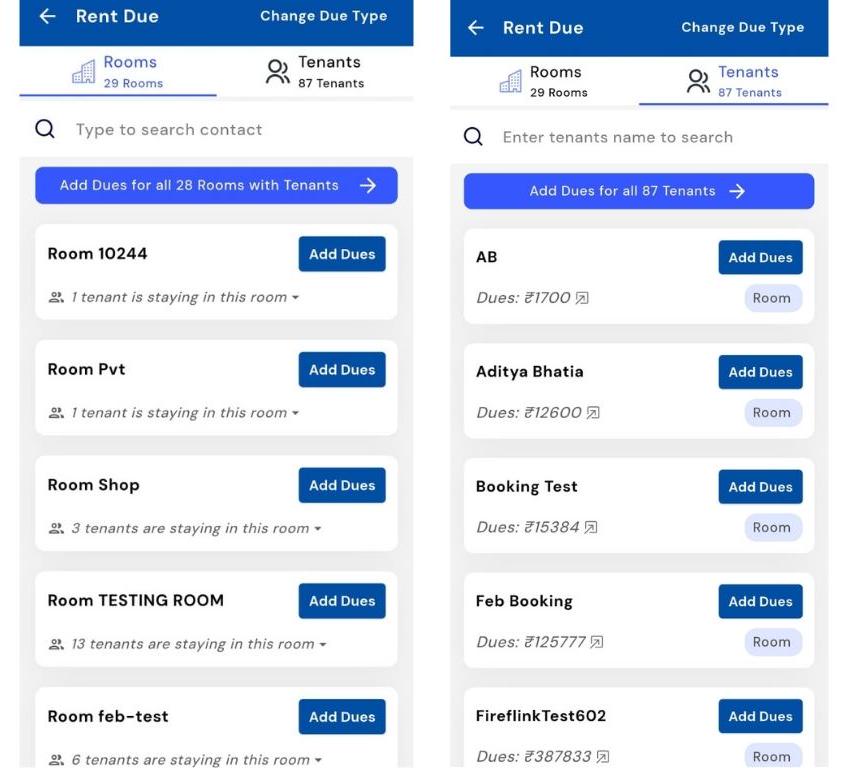
How can I incorporate rental dues for single rooms or individual tenants?
Need to apply dues to an individual tenant or room without affecting others? You can add charges directly to the selected tenant or room, ensuring precise billing. This allows you to apply rent or other fees accurately while keeping all other tenants’ records unchanged.
Follow these steps to apply dues individually and maintain error-free billing:
- Step 1: Open the Money Section Tap the Money icon in the bottom navigation menu, then select Dues Package (for individual tenants).
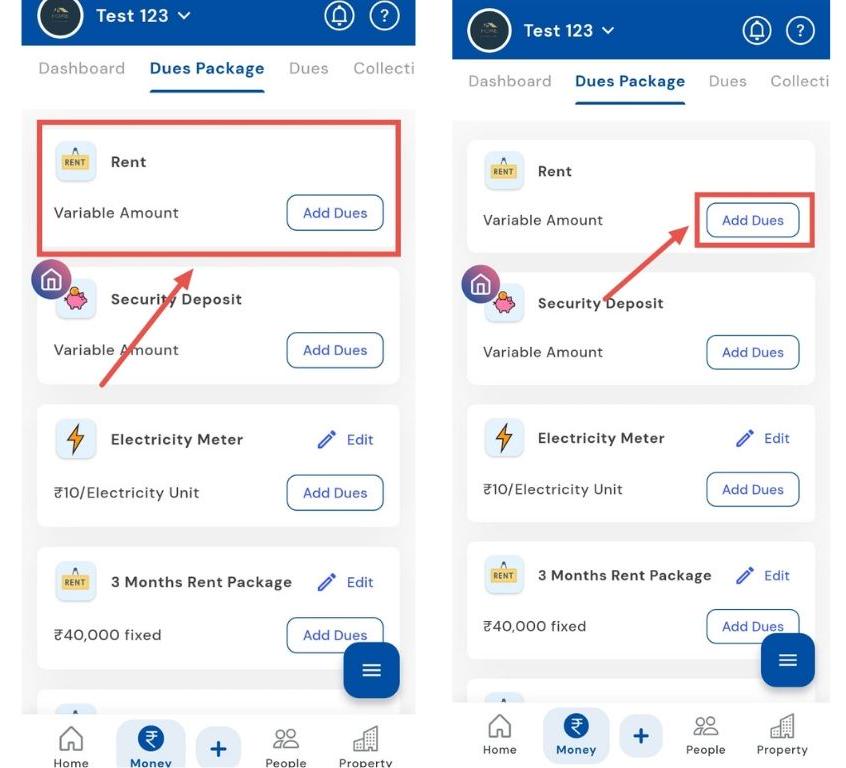
- Step 2: Select Rent Card On the Rent Card, tap the Add Dues button to begin.
-
Step 3: Choose Room or Tenant
-
For single rooms: select the room you want to add dues for.
-
For individual tenants: tap Tenants, then select the tenant for whom you want to add dues.
-
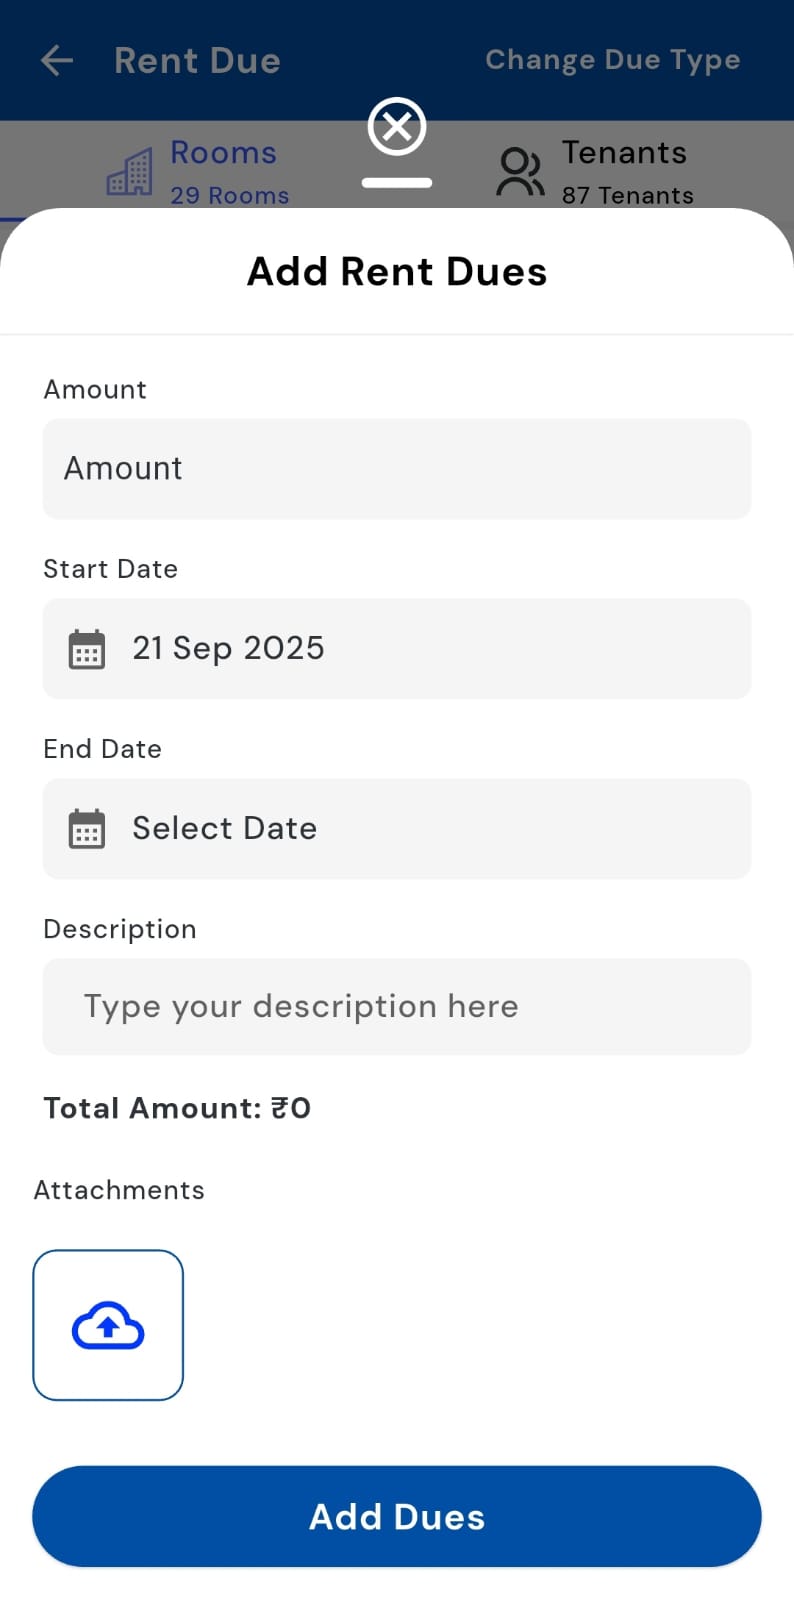
- Step 4: Enter Details A screen or window will appear. Fill in the necessary dues details, including amount, due date, and any other required information.
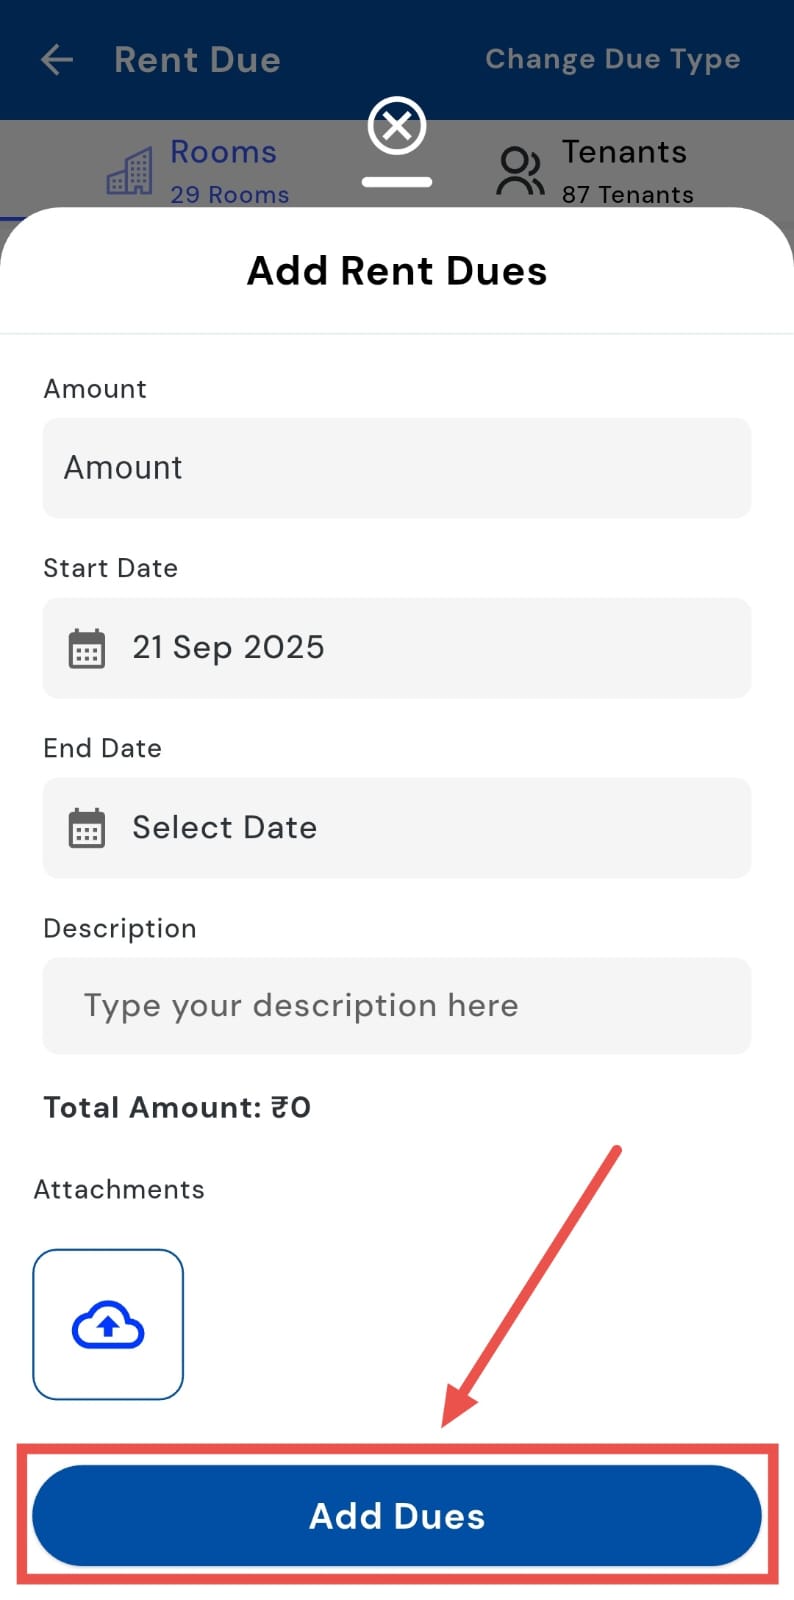
- Step 5: Confirm Tap Add Dues to save the entry. The system will now apply the charges to the selected room or tenant only.
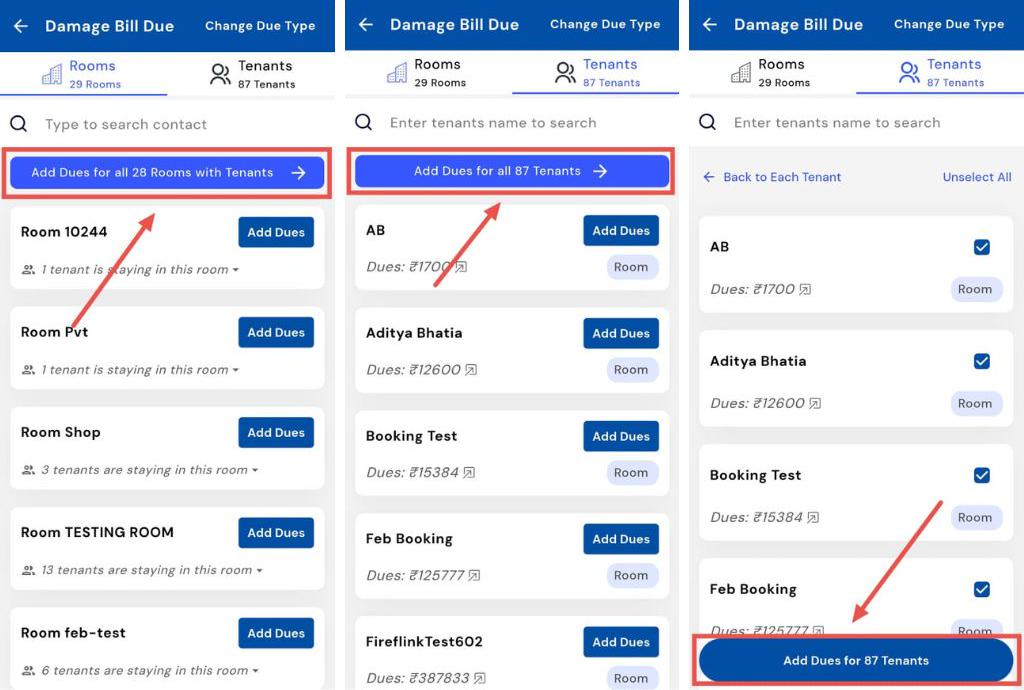
How can I add due bills for all the tenants/rooms at one go?
If you want to apply the same **dues, **such as rent, maintenance, or utilities, to all tenants or rooms at once, you can use the bulk add dues feature. This ensures consistent billing across the board and saves time, eliminating the need to enter dues individually for each tenant or room.
Here’s how you can quickly apply dues in bulk for all tenants or rooms:
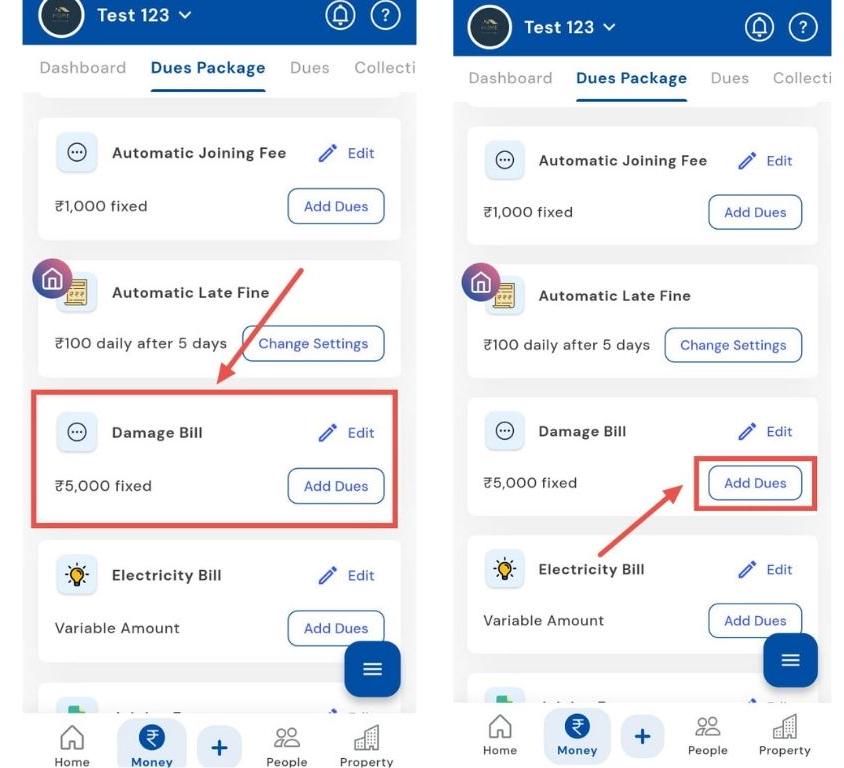
- Step 1: Open the Money Section Tap the Money icon in the bottom navigation menu, then select Dues Package to view your existing packages.
- Step 2: Locate the Category Scroll down and find the category you want to add dues to. Then tap on Add dues.
-
Step 3: Choose Tenants or Rooms
-
To add dues for all tenants: tap Tenants, then select Add Dues to All Tenants.
-
To add dues for all rooms: tap Rooms, then select Add Dues to All Rooms.
-
-
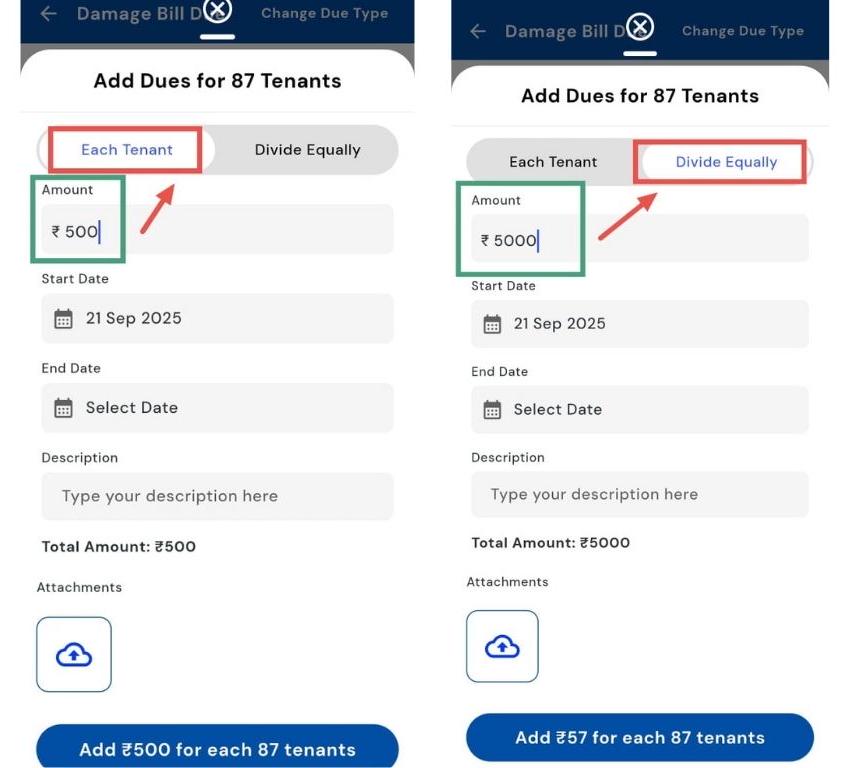
Step 4: Enter Details
-
Tap Add Dues to open the window and fill in all required details such as amount, due date, and any other necessary information.
-
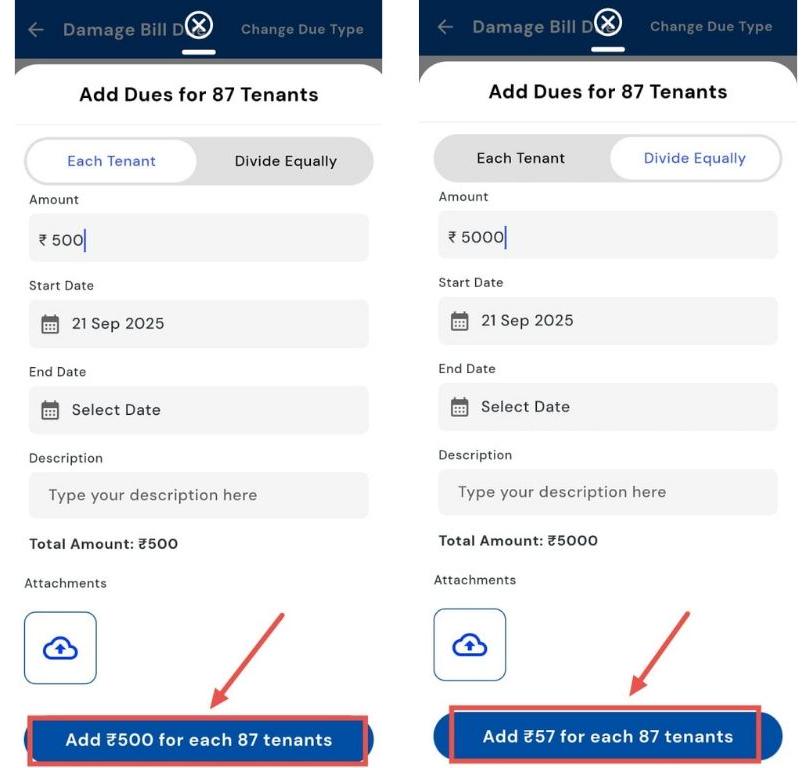
There are two options for specifying amounts:
-
Each Tenant: Enter the individual amount each tenant should pay.
-
Divide Equally: Enter the total amount, which will be divided equally among all tenants.
-
- Step 5: Confirm Tap Add Dues to save and apply the charges to all selected tenants or rooms.
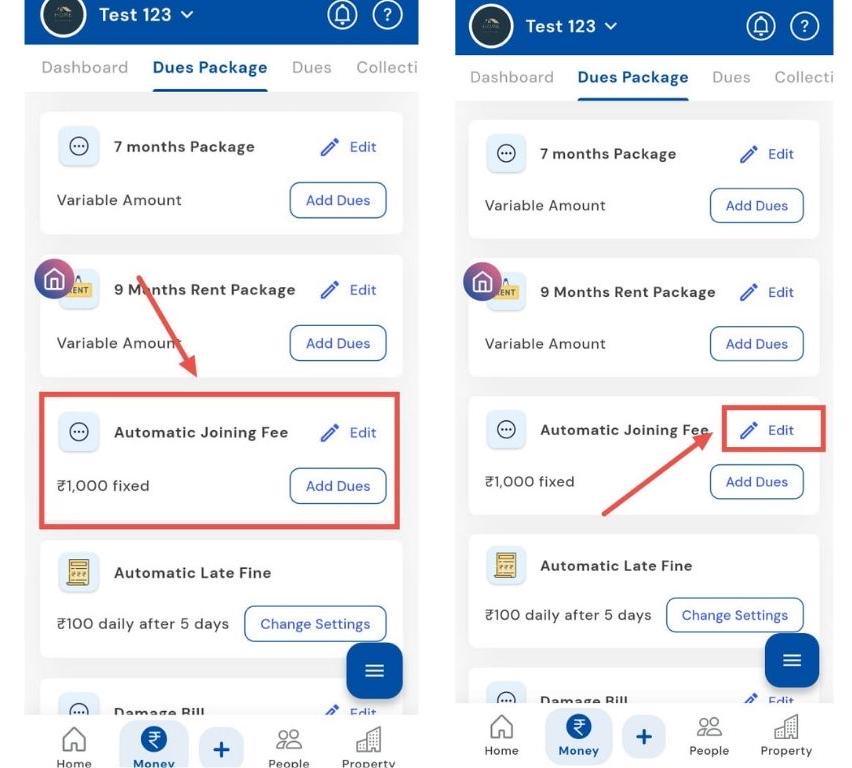
How can I edit the Automatic joining fee?
Need to change the joining fee applied automatically? You can easily edit it in the dues package. By updating the fee, you ensure accurate billing for new tenants, defining both the amount and the billing mode. This ensures the joining fee is applied automatically whenever a new tenant is added, keeping your records consistent and error-free.
Here’s how you can update the joining fee in just a few steps:
- Step 1: Open Dues Package Section Tap the Money icon in the bottom navigation menu, then select Dues Package to access fee settings.
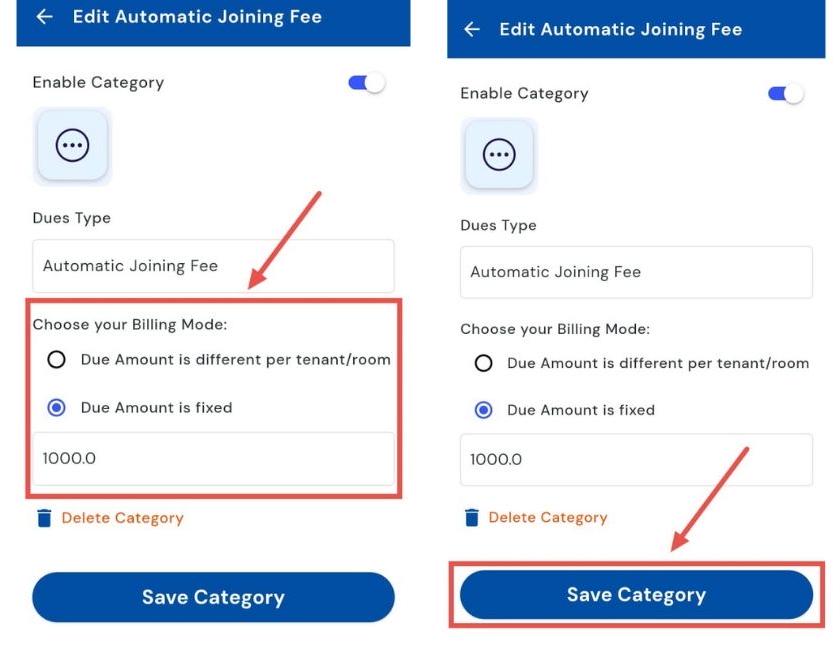
- Step 2: Select Automatic Joining Fee Locate the Automatic Joining Fee card and tap the Edit button to modify the fee.
- Step 3: Enter Joining Fee A screen will open where you can input the new joining fee amount.
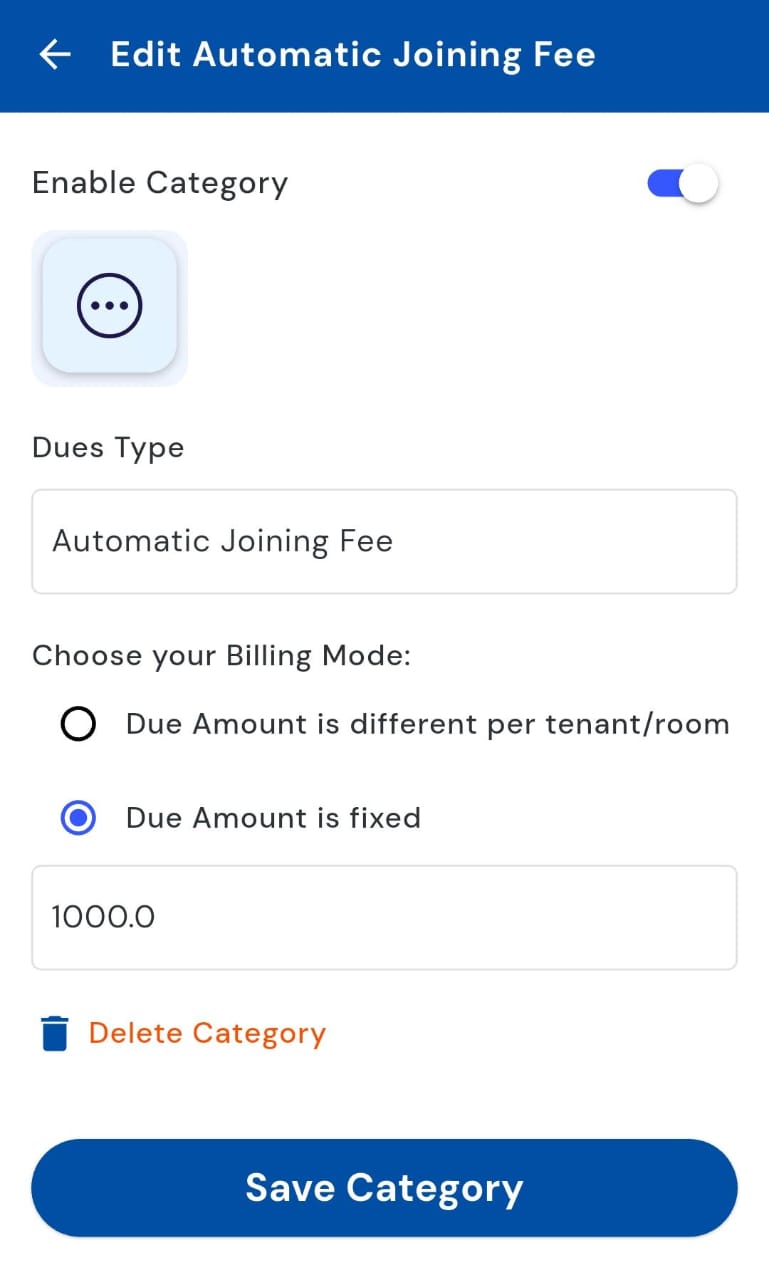
- Step 4: Choose Billing Mode and Save Add your updated amount, and then select the appropriate billing mode (fixed or per tenant/room) and tap Save. The new fee will now apply automatically to all new tenants.
How to update the cost per unit for electricity?
To keep your electricity charges accurate, update the cost per unit whenever rates change. By adjusting the rate in the dues package, you ensure tenants are billed correctly and avoid any discrepancies in their monthly statements. This helps maintain transparent and error-free billing.
Follow these steps to quickly update the electricity cost per unit:
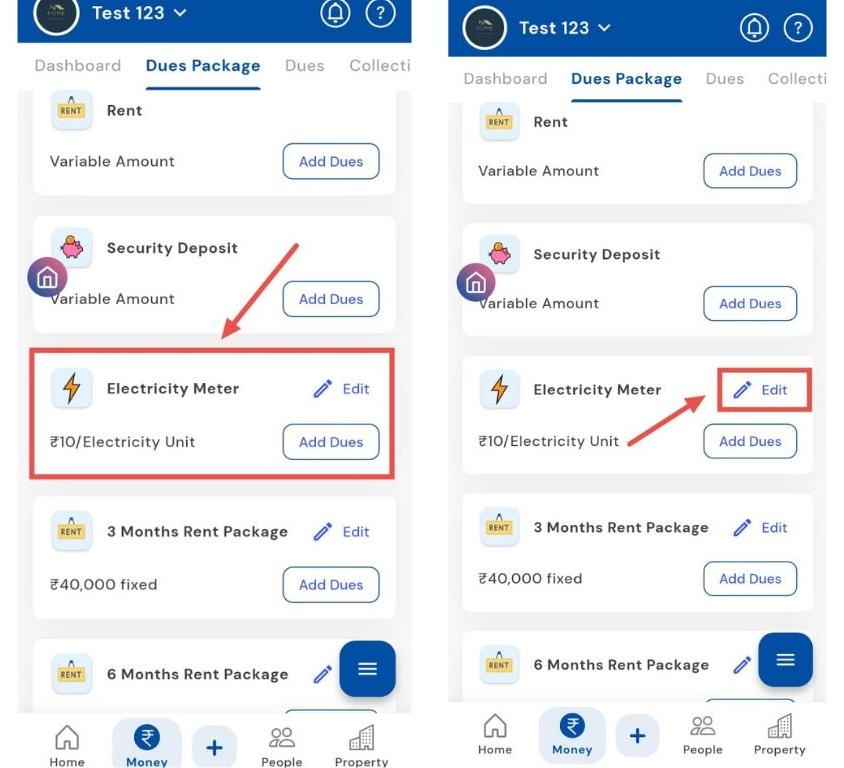
- Step 1: Open Dues Package Section Tap the Money icon in the bottom navigation menu, then select Dues Package to access electricity settings.
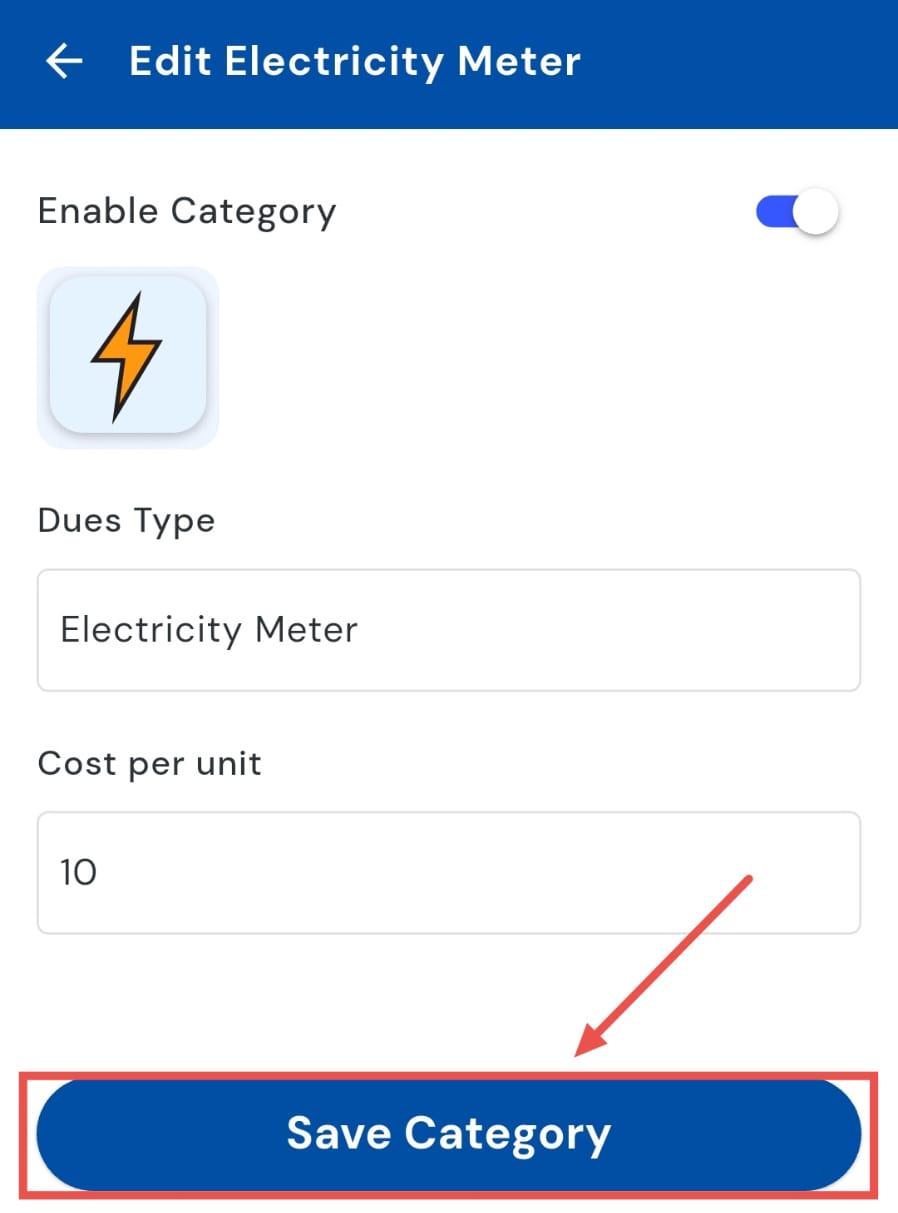
- Step 2: Locate the Electricity Meter Card Find the Electricity Meter card and tap the Edit button to modify the rate.
- Step 3: Enter the Cost per Unit A screen will appear where you can input the updated cost per unit for electricity.
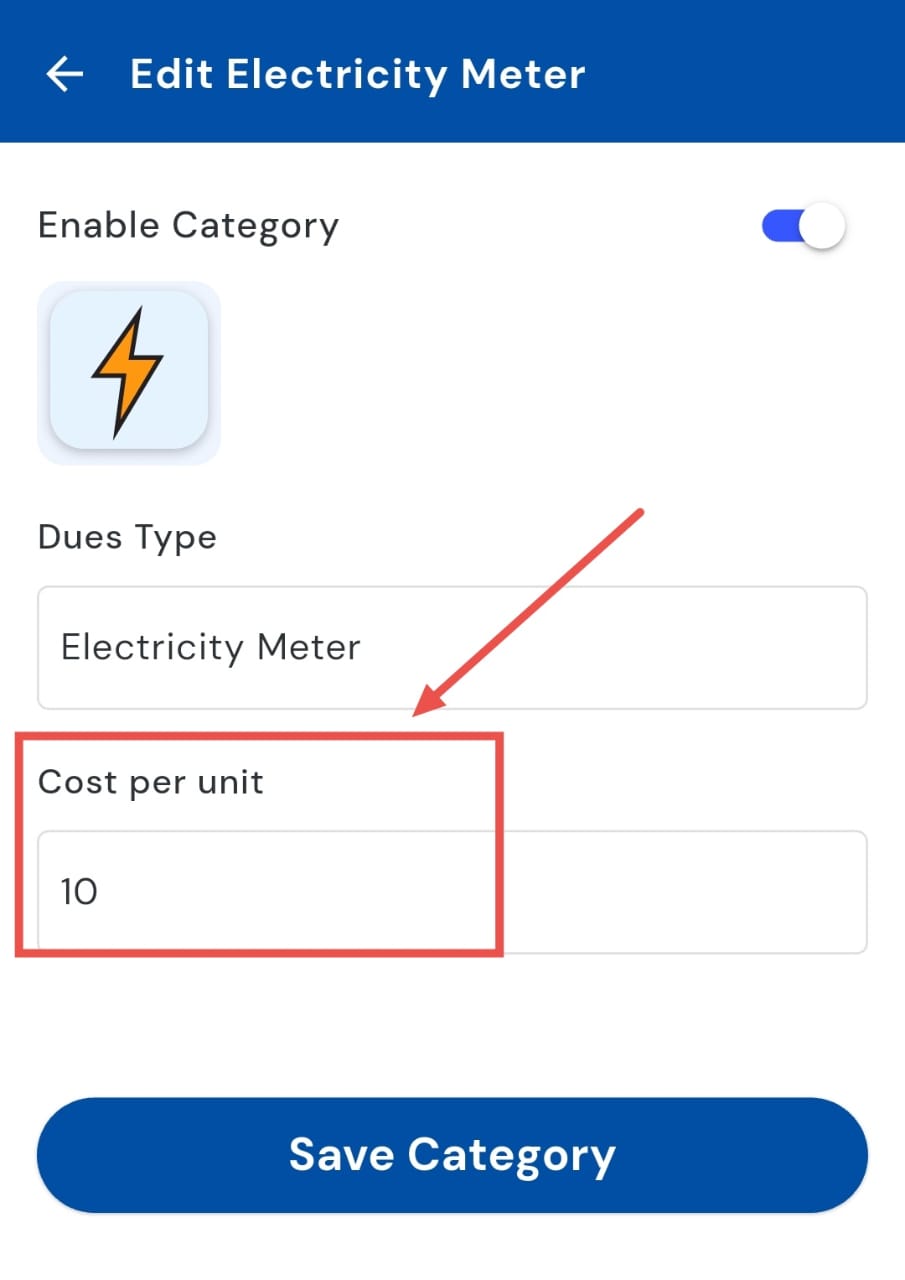
- Step 4: Save the Changes Tap Save Category to apply the new rate. The system will now use this updated cost for all electricity billing calculations.
| Tip: Update the cost per unit at the start of each billing cycle or whenever rates change to maintain accurate charges for tenants. |
|---|
How can I disable the dues category?
Want to stop using a due category temporarily? You can easily disable it instead of deleting it.
If a category is no longer needed or you want to pause charges under it, disabling keeps it stored in the system so you can reactivate it whenever necessary.
Here’s how you can quickly disable and manage your dues categories:
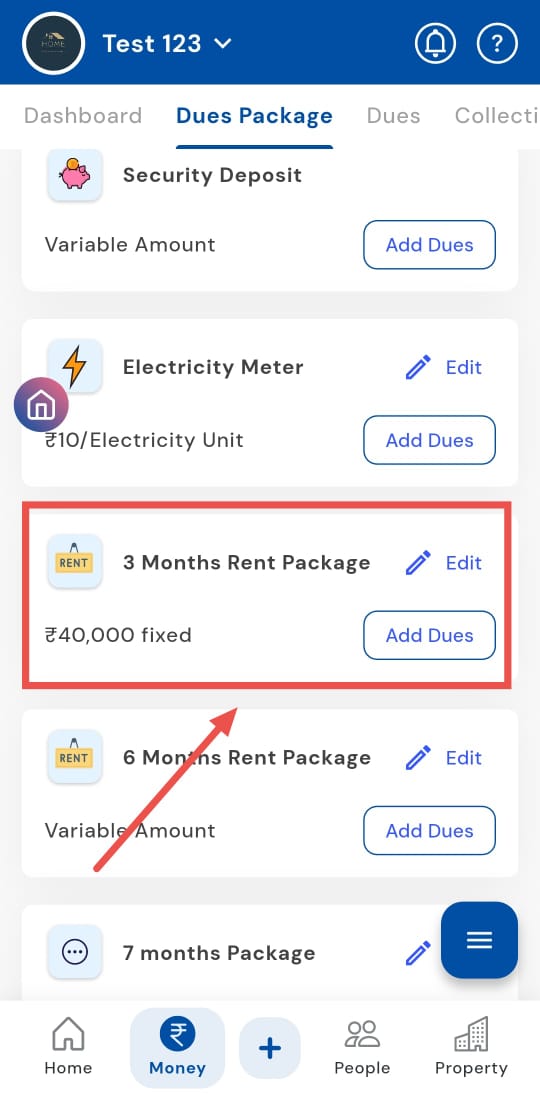
- Step 1: Open Dues Package Section Tap the Money icon in the bottom navigation menu, then select Dues Package to view all your categories.
- Step 2: Locate the Category Scroll down and find the category you want to disable.
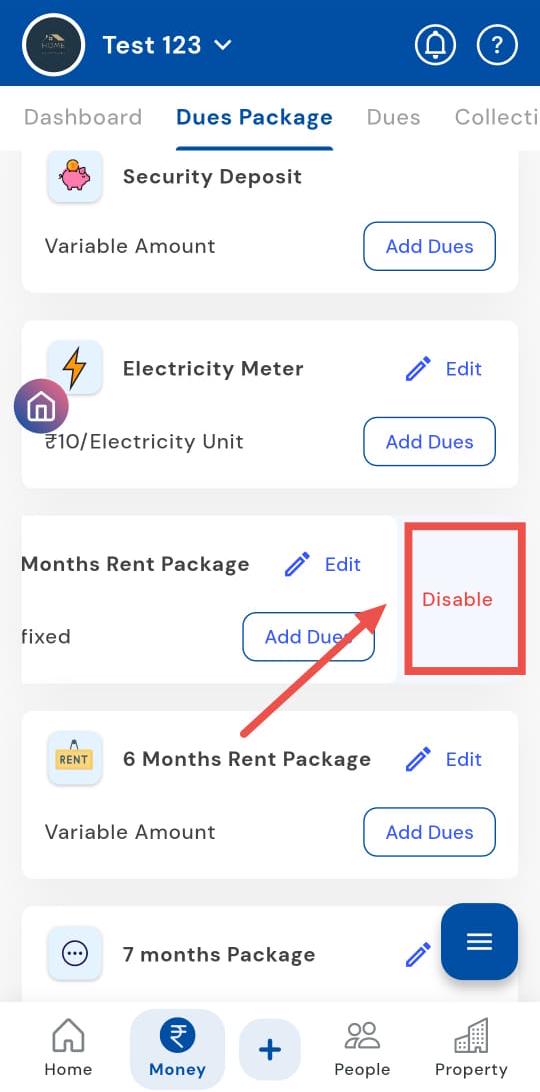
- Step 3: Disable the Category Swipe left on the category card to reveal available actions. Tap on Disable. The system will confirm the action, and the category will no longer be applied for future dues.
| Tip: Disabling a category does not delete historical records. You can re-enable it anytime if the category is needed again. |
|---|
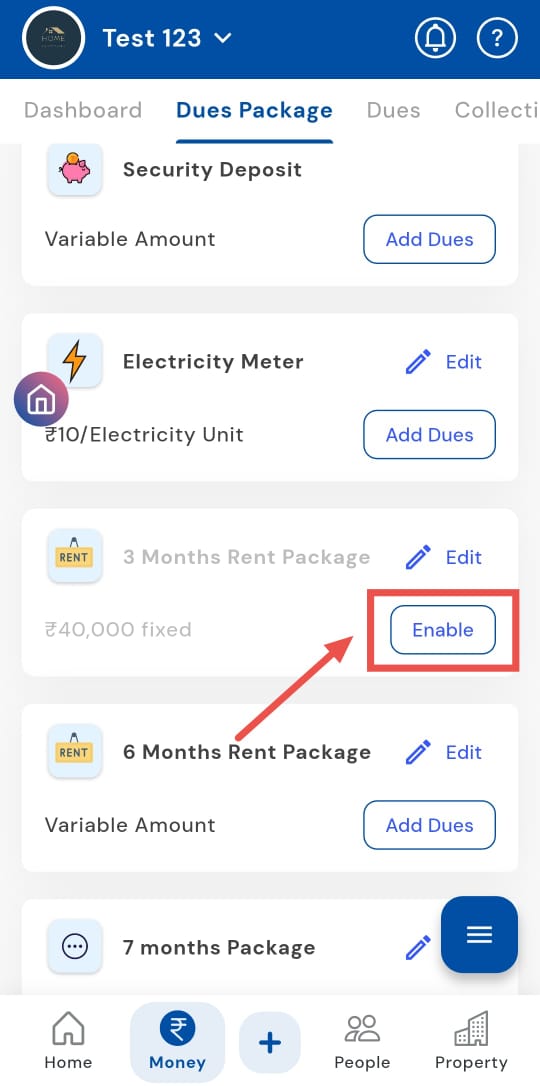
How can I enable the dues category?
To resume charges under a dues category that was previously disabled, simply enable it. Reactivating the category allows you to apply charges for future dues while keeping all historical records intact.
Follow these steps to quickly enable and start using your dues category again:
- Step 1: Open Dues Package Section Tap the Money icon in the bottom navigation menu, then select Dues Package to view all your categories.
- Step 2: Locate the Category Scroll down and find the category you want to enable.
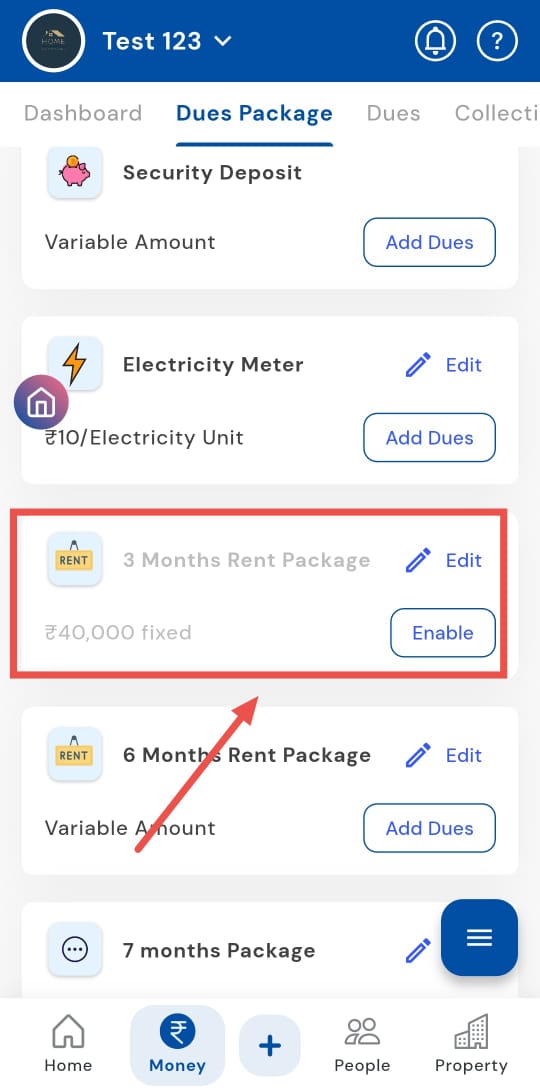
- Step 3: Enable the Category Tap on Enable. The system will confirm the action, and the category will now be active for future dues.
| Tip: Enabling a category does not affect the past records. All historical data remains intact while the category becomes usable again for new billing. |
|---|
How can I delete the dues category?
Need to remove a dues category you no longer use? You can delete it from the dues package to permanently remove it from the system. Once deleted, the category will no longer appear in future billing, reports, or summaries, helping you keep your dues setup clean and organized.
Here’s how you can safely delete a dues category in just a few simple steps:
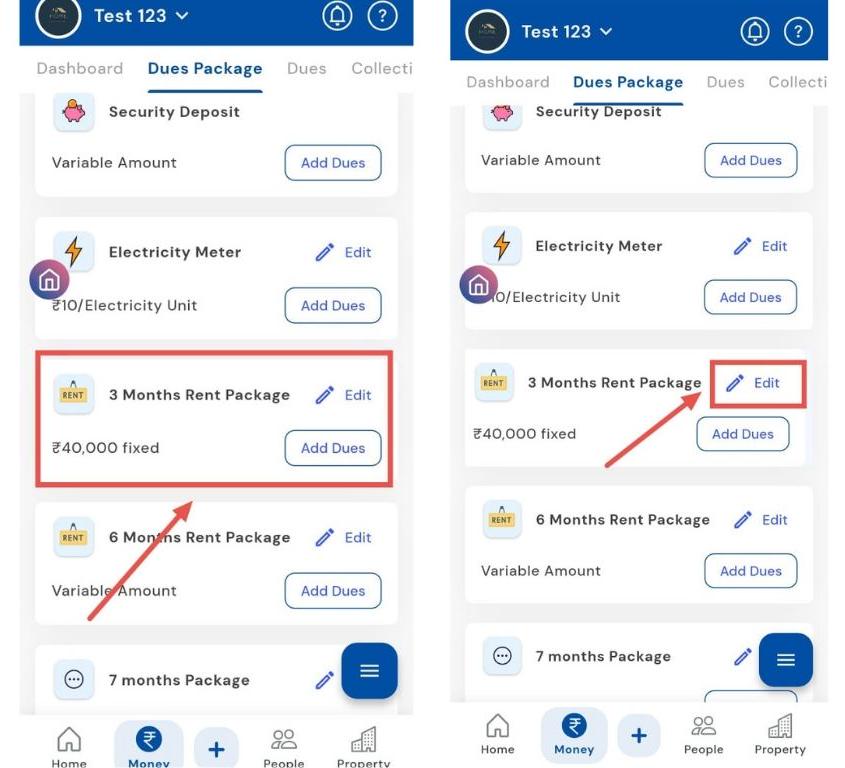
- Step 1: Open Dues Package Section Tap the Money icon in the bottom navigation menu, then select Dues Package to access all categories.
- Step 2: Locate the Category Scroll down and find the category you want to delete. Tap on Edit.
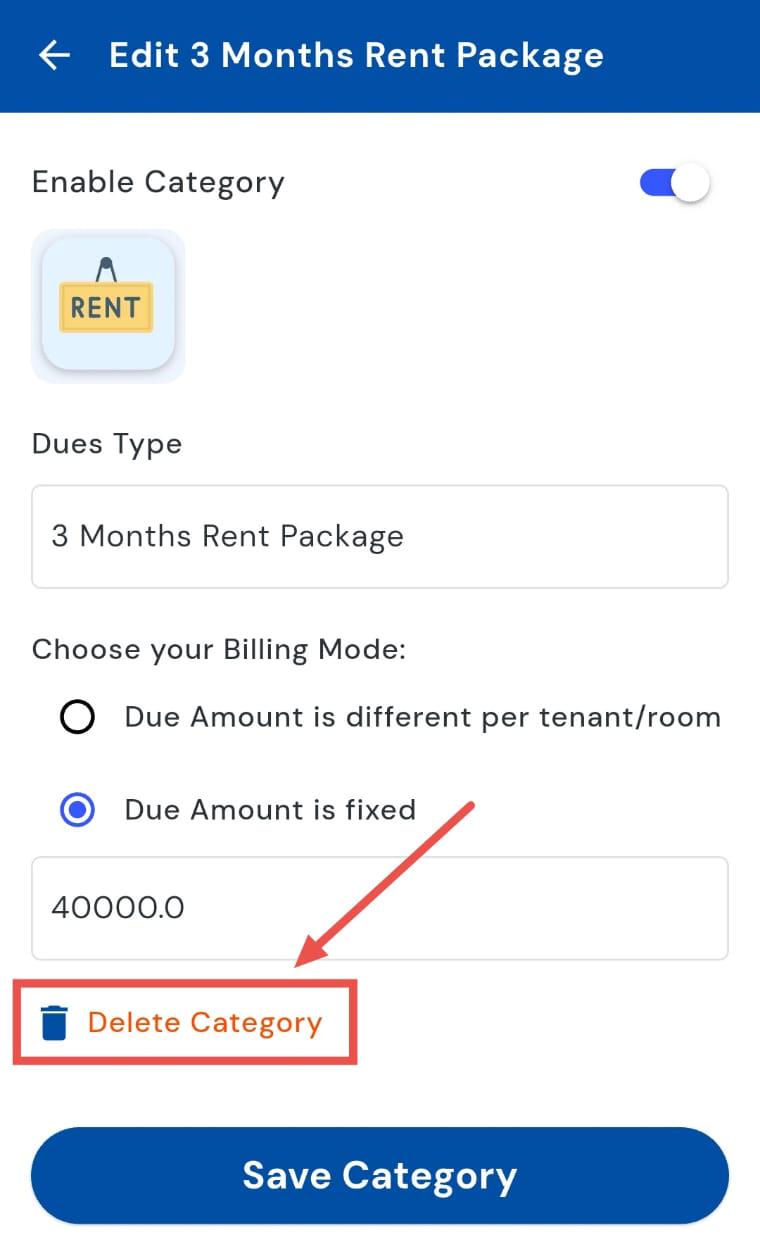
- Step 3: Delete the Category Tap on Delete Category.
- Step 4: Confirm Deletion A confirmation window will appear. Tap Delete again to permanently remove the category from the system.
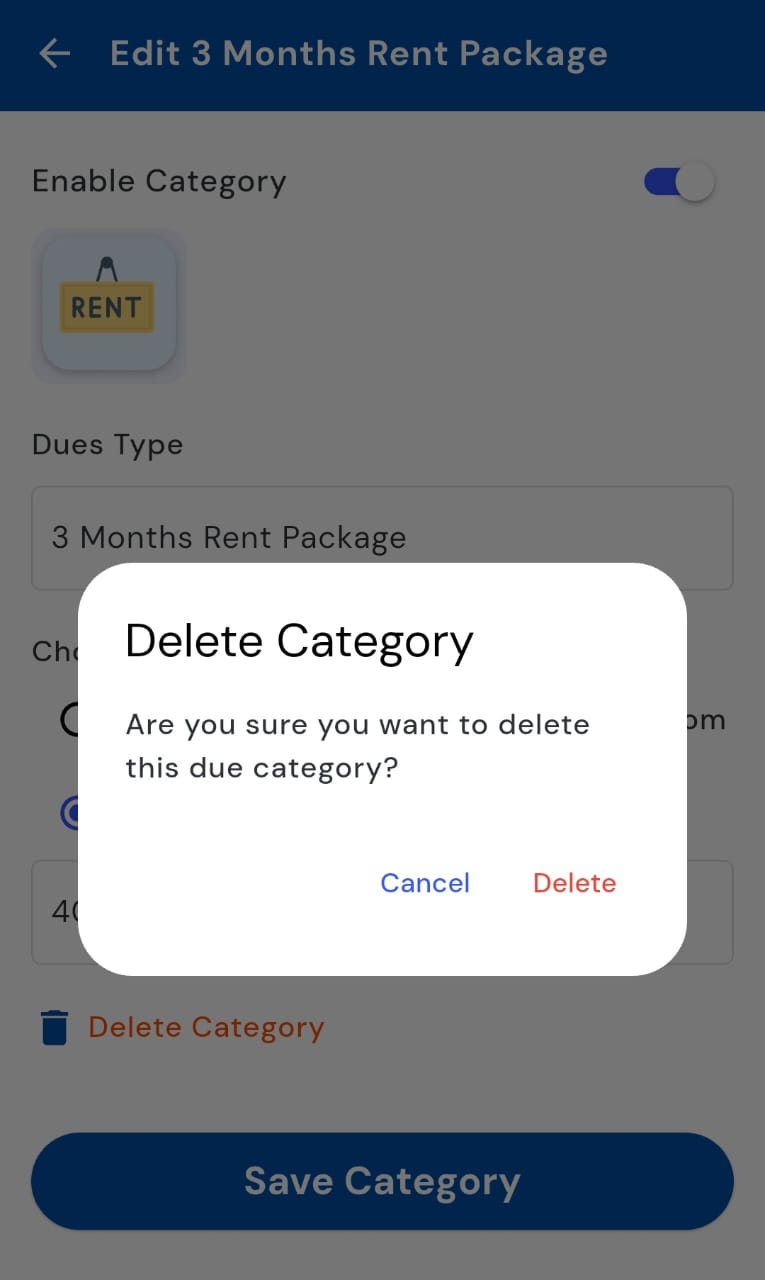
| Tip: Deleting a category removes it completely. Ensure that it is no longer needed for current or future dues before confirming the deletion. |
|---|
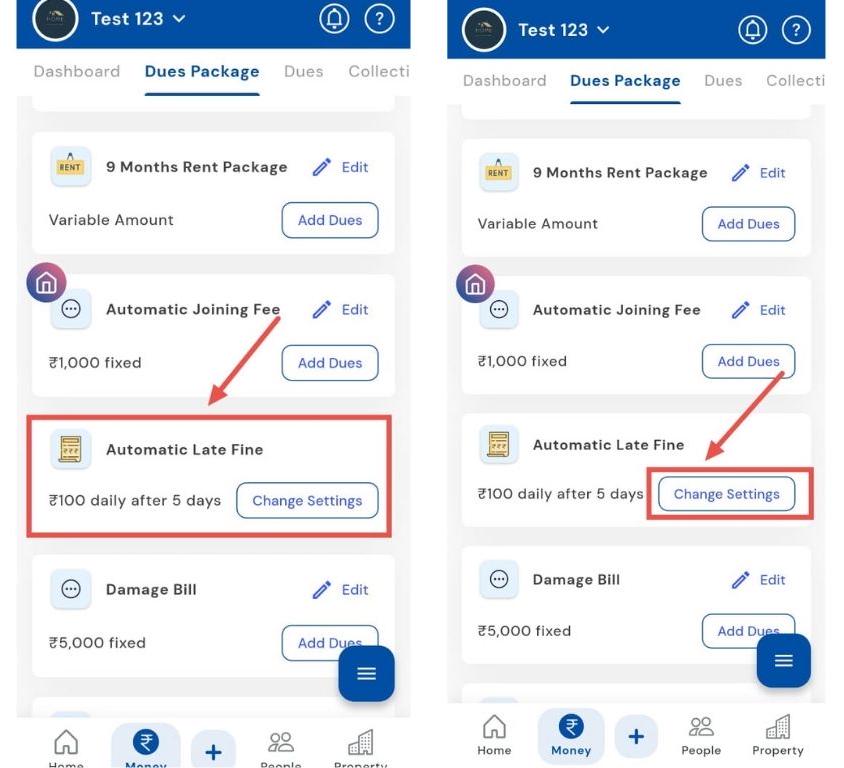
- **How can I change the setting for automatic late fines? **
Control overdue charges by configuring the late fine settings for your dues categories. By setting up late fines, you can automatically apply penalties for overdue payments, ensuring timely collections. You can define whether fines are used daily or monthly, set the fine amount, and even include a grace period, providing flexibility while maintaining accurate and consistent billing.
Here’s how you can configure late fine settings for your dues categories in just a few steps:
- Step 1: Open Dues Package Section Tap the Money icon in the bottom navigation menu, then select Dues Package to access all categories.
- Step 2: Locate the Category Scroll down to find the category for which you want to set late fines, then tap Change Setting.
-
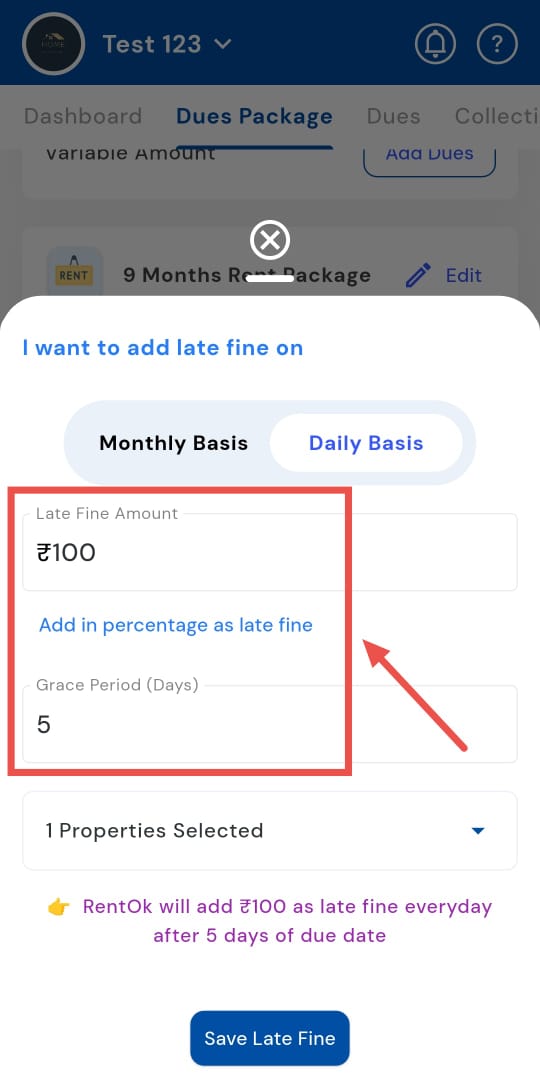
Step 3: Choose Late Fine Frequency A window will appear. Select
-
Monthly Basis - If you want the fine applied once per month.
-
Daily Basis - If you want it applied each day when a payment is overdue.
-

- Step 4: Enter Fine Amount and Grace Period Input the late fine amount and set the grace period during which no fine will be applied.
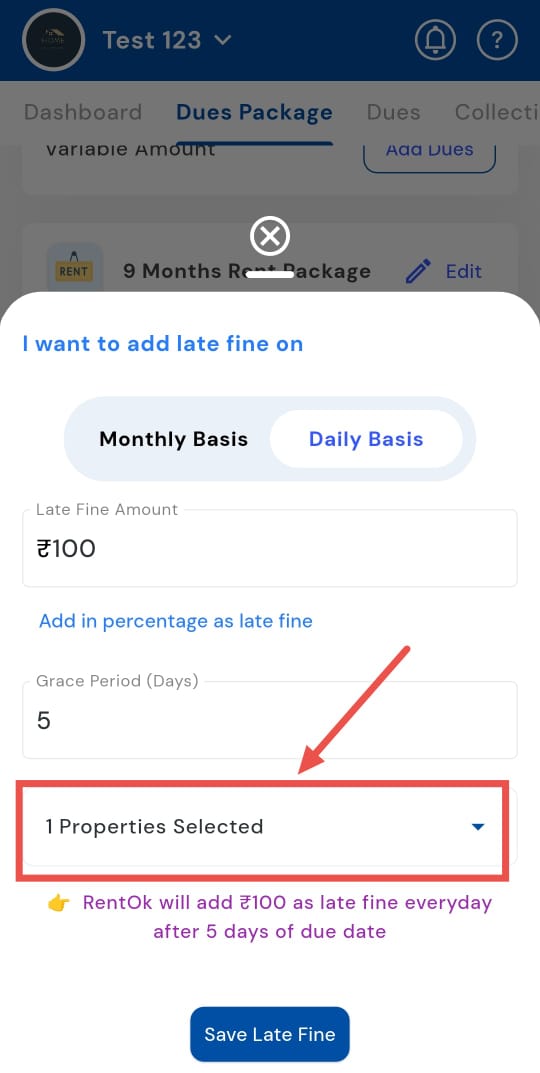
- Step 5: Select Properties Choose the properties where you want this late fine setting to be active.
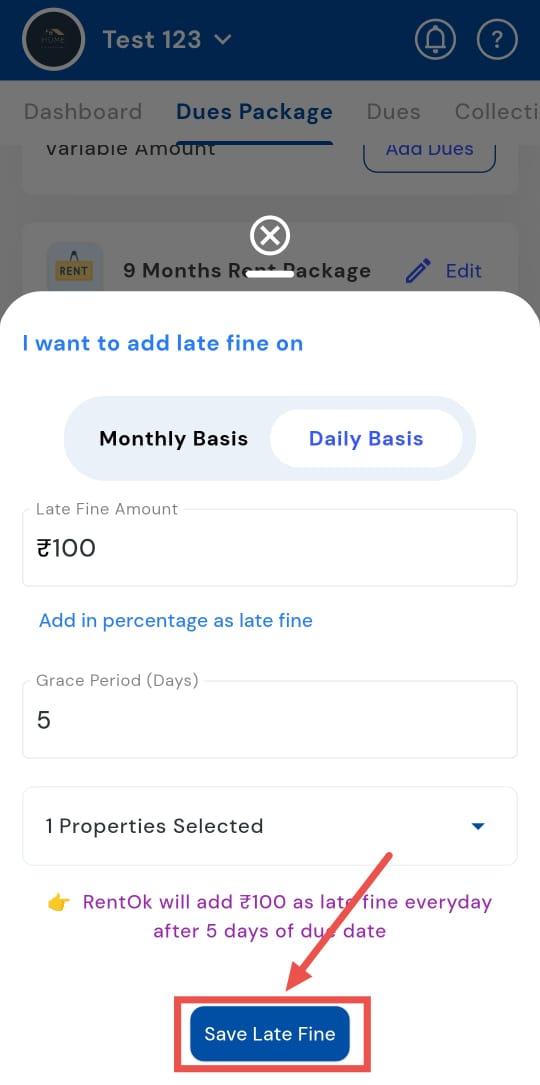
- Step 6: Save Settings Tap Save Late Fine to confirm and apply your settings.
| Tip: Use a reasonable grace period to avoid tenant disputes and ensure the fine amount is clearly communicated to all tenants before activation. |
|---|