Money Dues
Money > DUES
Money Collection
Manage rent collections, track payments, and handle collection-related tasks.
How do I view outstanding and overdue dues of my tenants?
Want to track your tenants’ dues? The Dues feature makes it simple. It gives you a clear summary of all the pending and overdue amounts, whether it’s rent, maintenance, or any other charges, in one place for all the active tenants.
Here’s how you can check them:
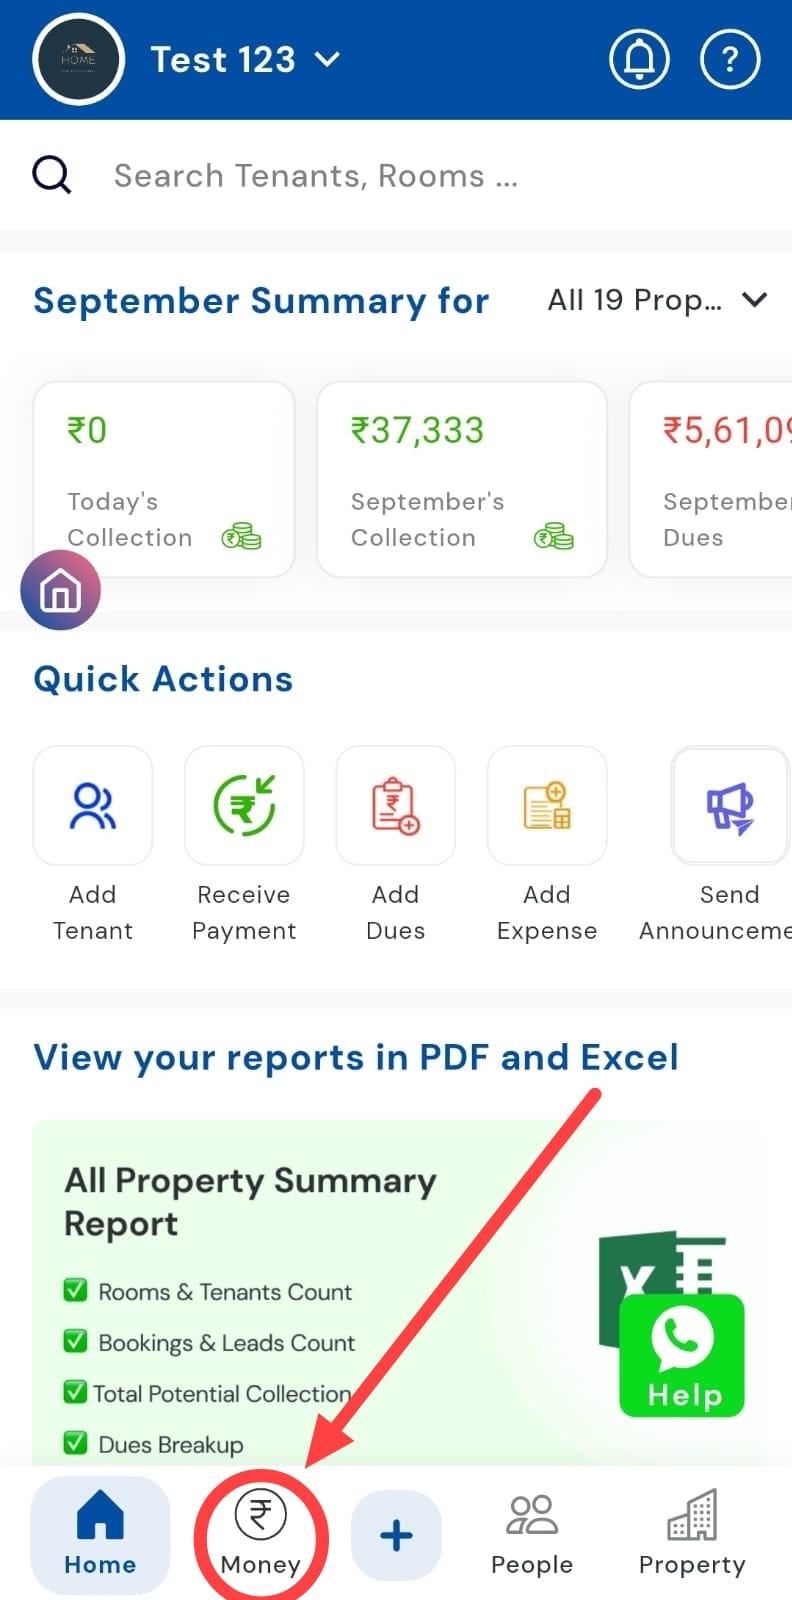
- Step 1: Tap on the Money icon
At the bottom of your app screen, you’ll see the Money icon. Tap on it to open the transactions section, where you can view and manage all tenant-related transactions for all your activated properties.
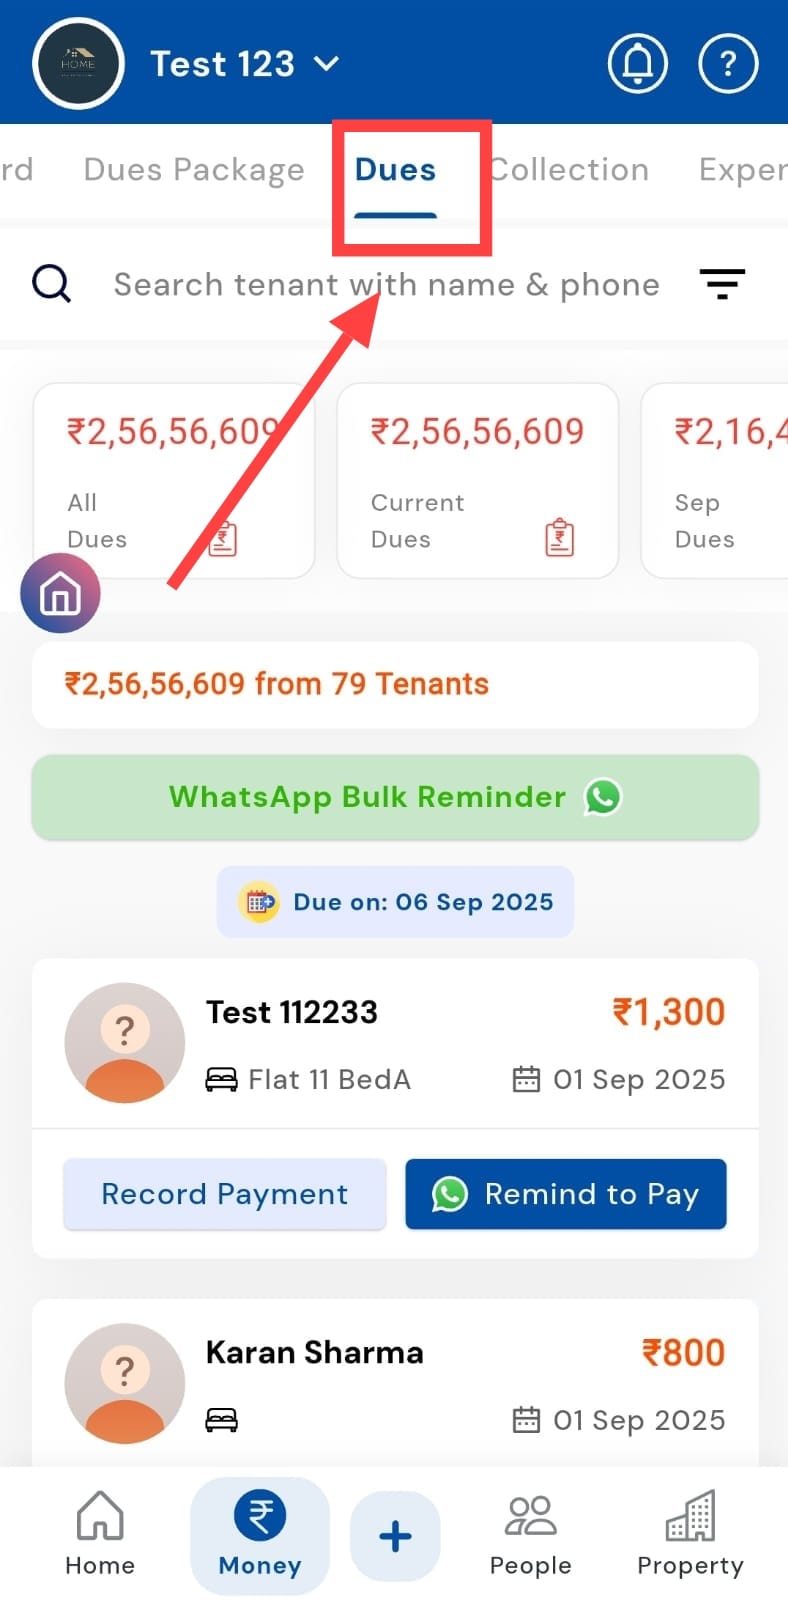
- Step 2: Select the Dues tab Inside the Money section, select the Dues tab. This gives you a quick overview of the total pending dues across all your tenants.
-
Step 3: View total unpaid dues In this section, the app automatically adds unpaid dues from different categories (like rent, maintenance, utilities, or other charges) and shows the total amount clearly in one place.
-
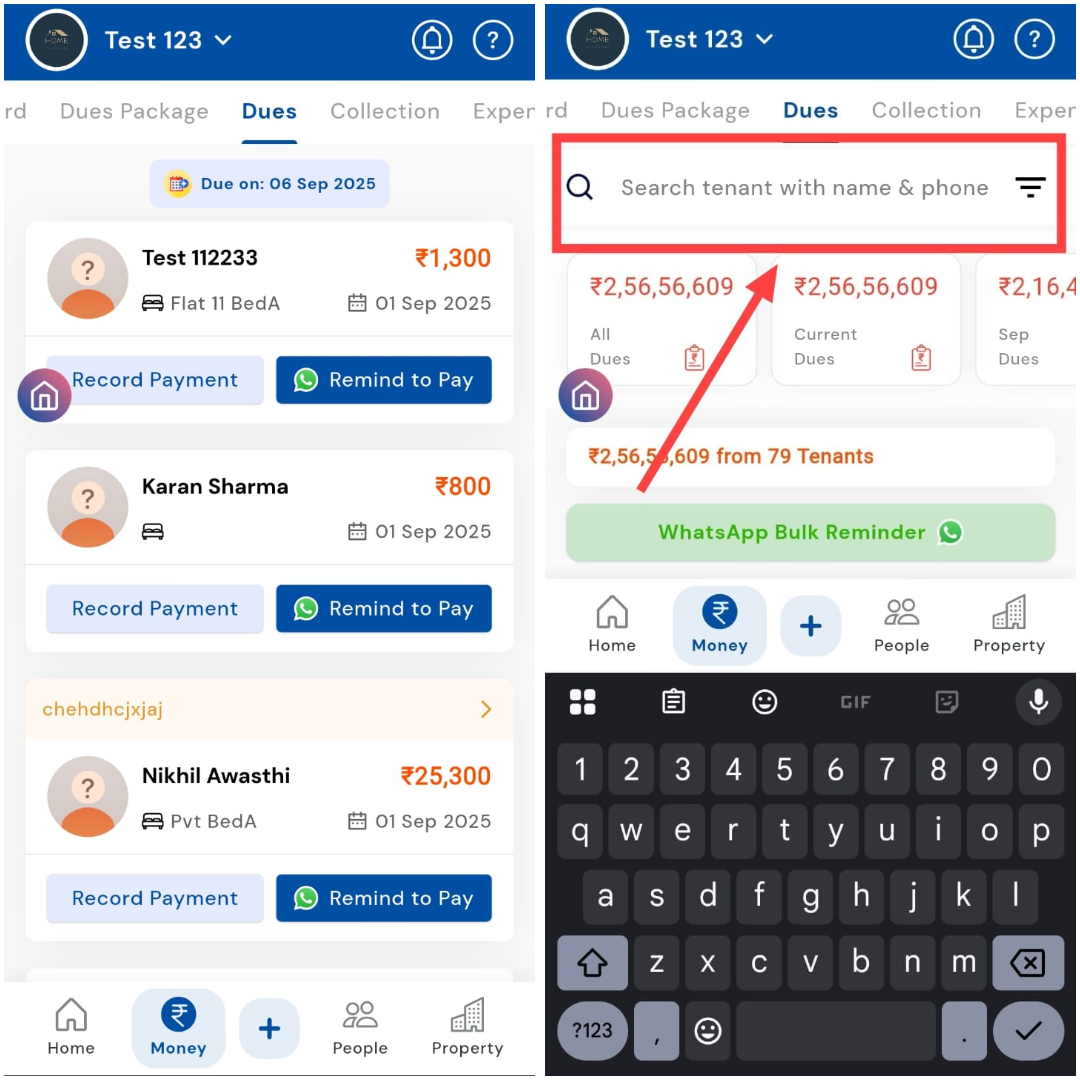
Step 4: Find a specific tenant’s dues Scroll through the list or simply use the search bar to find the tenant’s due card, where each tenant’s dues are shown separately for easy tracking.
| Tip: Tap on a tenant’s due card to view a detailed breakdown of their dues in the Passbook > Tenant’s Ledger. This opens a screen showing all pending and cleared dues for that tenant. |
|---|
How can I check today's dues?
Have collections to manage today? The Dues section makes it easy to stay on top of things by letting you filter payments by date. With just a few taps, you can see exactly which payments are pending for the current day, helping you manage collections more efficiently and avoid any last-minute surprises.
Here’s how you can check today’s dues:
- Step 1: Open the Dues tab Tap the Money icon in the bottom navigation menu, then click on the Dues option. This opens a combined list of all pending dues for your active tenants.
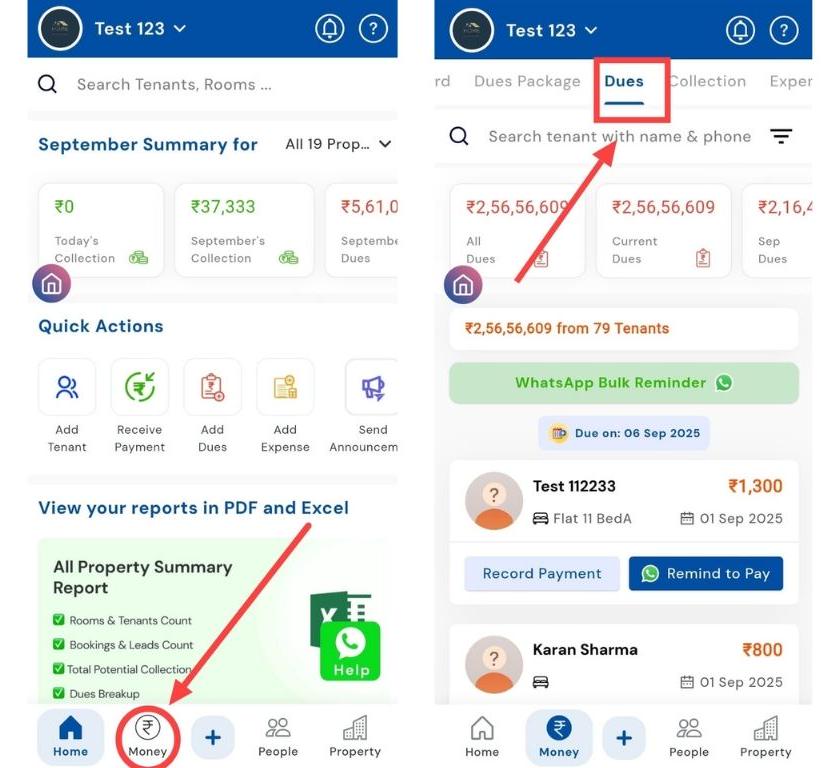
- Step 2: Access the filter option In the search box, tap on the Filter icon. This allows you to narrow down dues based on specific time periods.
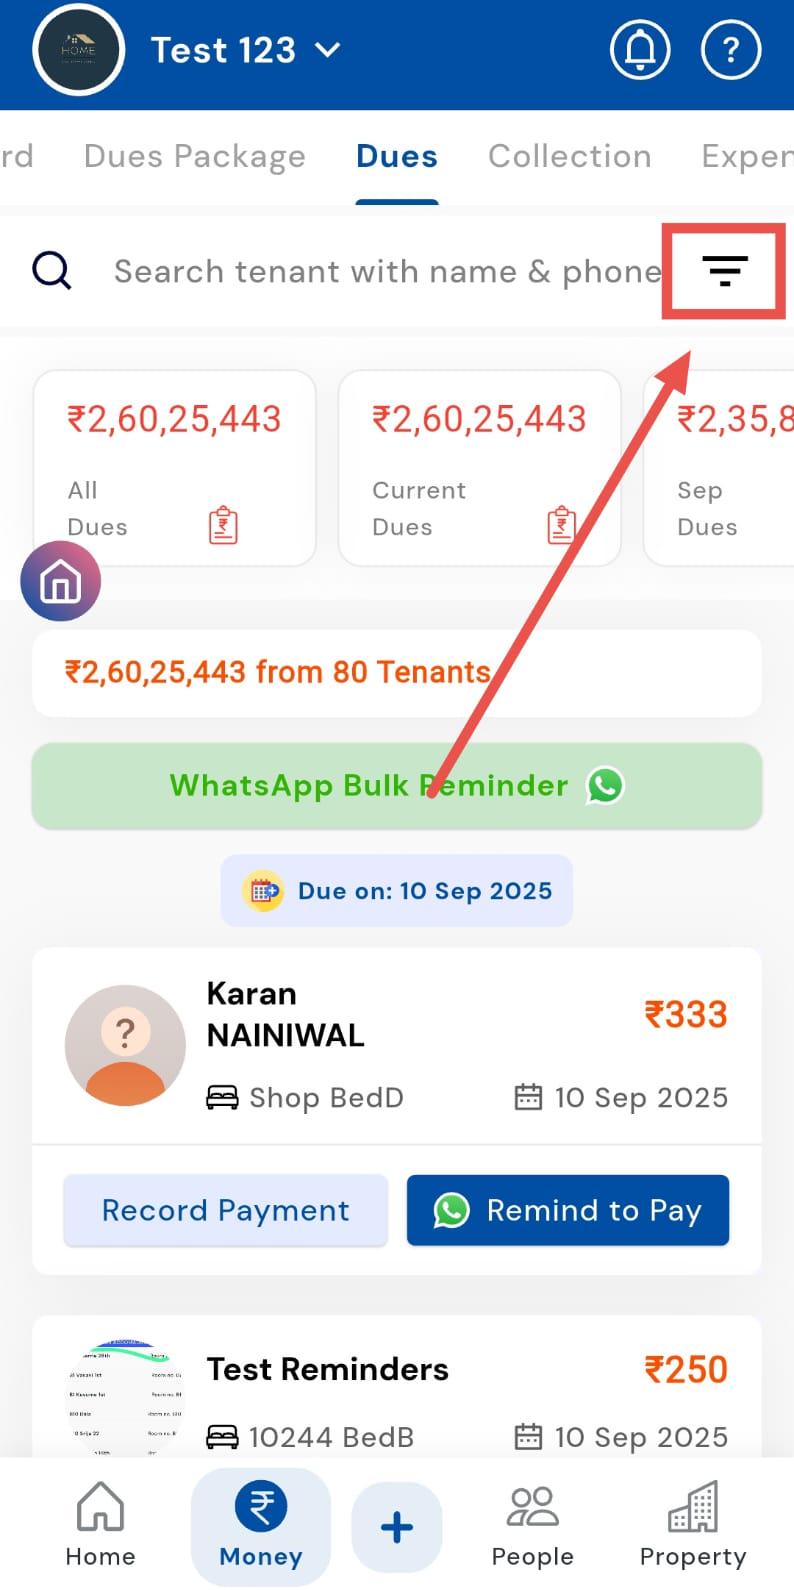
- Step 3: Select “Today” From the available filter options, select Due Dates and choose Today to view only the dues scheduled for the current day.
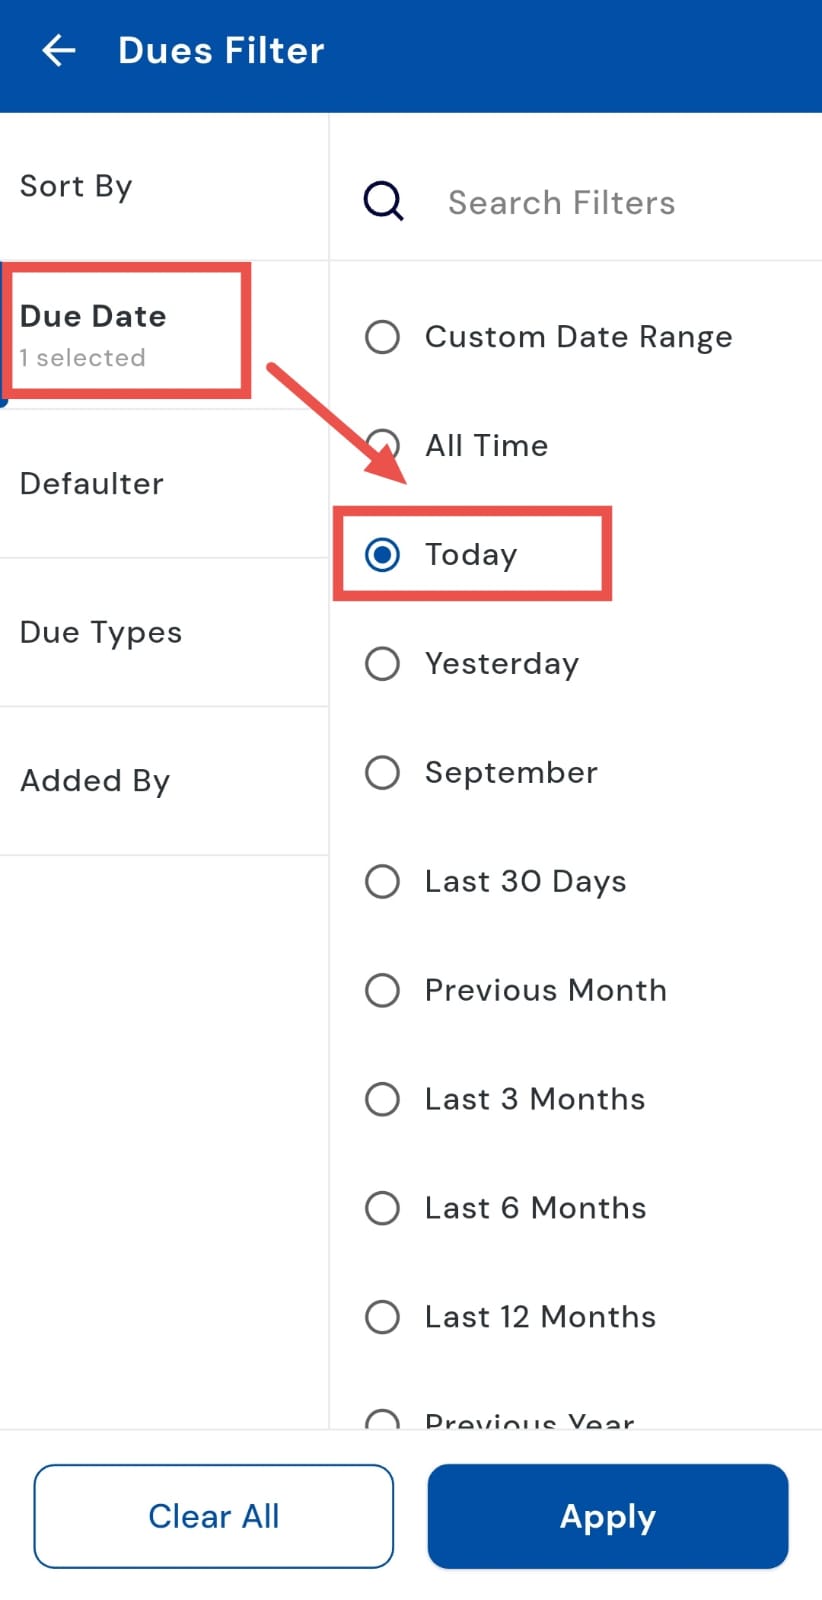
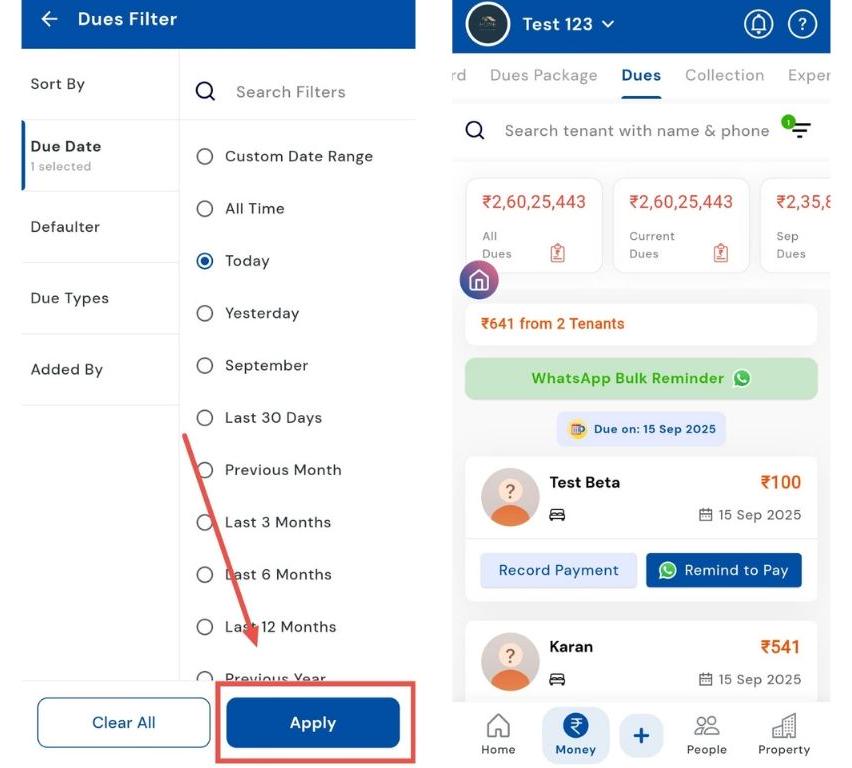
- Step 4: Apply the filter Click Apply, and the app will display the complete list of today’s pending dues, making it easier to follow up or manage collections.
How can I check yesterday's dues?
Even if you forgot to check yesterday, the Dues section makes it easy to catch up. You can filter payments by date and see exactly which payments were pending on the previous day, helping you stay on top of collections and manage dues without any hassle.
Here’s how you can check today’s dues:
- Step 1: Open the Dues tab Tap the Money icon in the bottom navigation menu, then select the Dues option. This opens the combined list of all pending dues for your active tenants.
- Step 2: Access the filter option In the search box, tap on the Filter icon. This allows you to narrow down dues based on specific time periods.
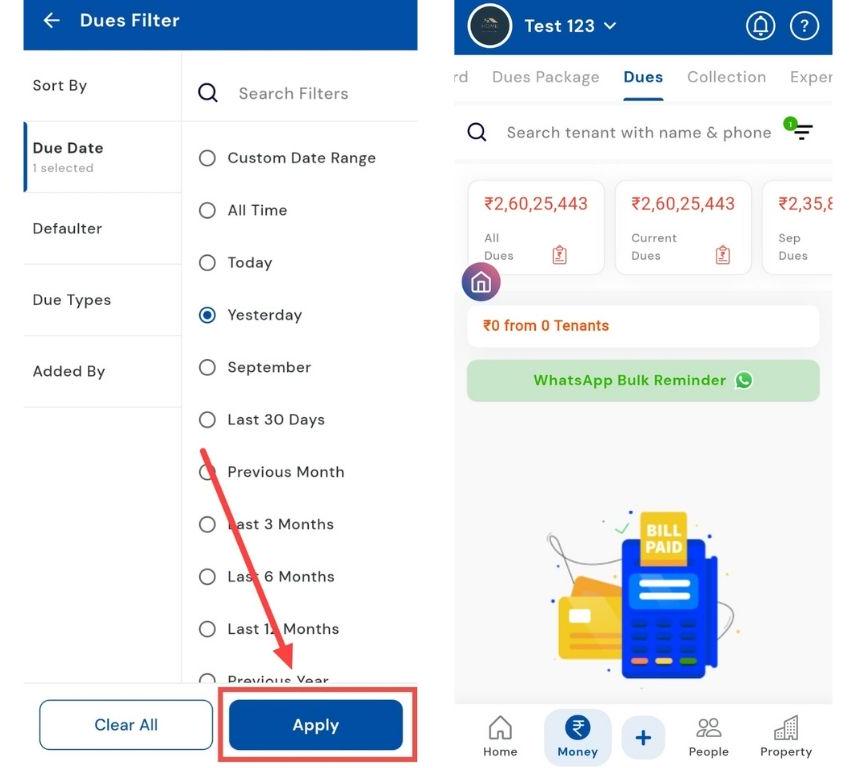
- Step 3: Select “Yesterday” From the available filter options, select Due Dates and choose Yesterday to view only the dues that were scheduled for the previous day.
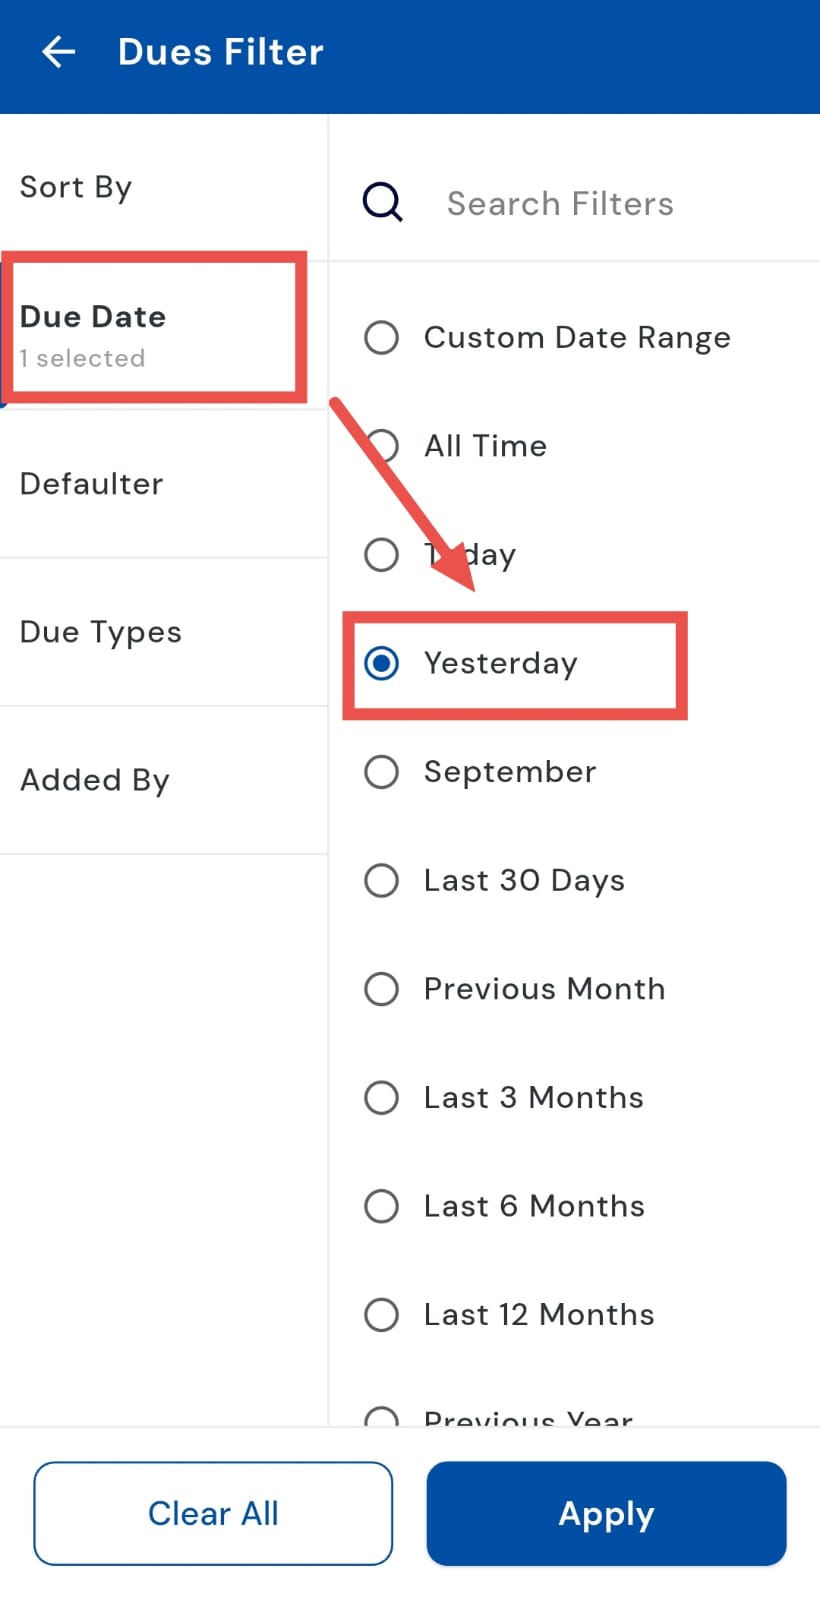
- Step 4: Apply the filter Click Apply, and the app will display the complete list of pending dues from yesterday, making it easier to track or follow up with tenants.
How can I check the last 30 days dues?
Want to review all pending dues for the past month in one go? The Last 30 Days filter in the Dues section makes it simple to track unpaid rent, maintenance, and other charges across all tenants. It provides a complete summary of what’s pending, so you don’t have to check daily dues separately.
The steps to do so are:
- Step 1: Open the Dues tab Tap the Money icon in the bottom navigation menu, then click on the Dues option. This will open a combined list of all pending dues for your active tenants.
- Step 2: Access the filter option In the search box, tap on the Filter icon. This allows you to narrow down dues based on specific time periods.
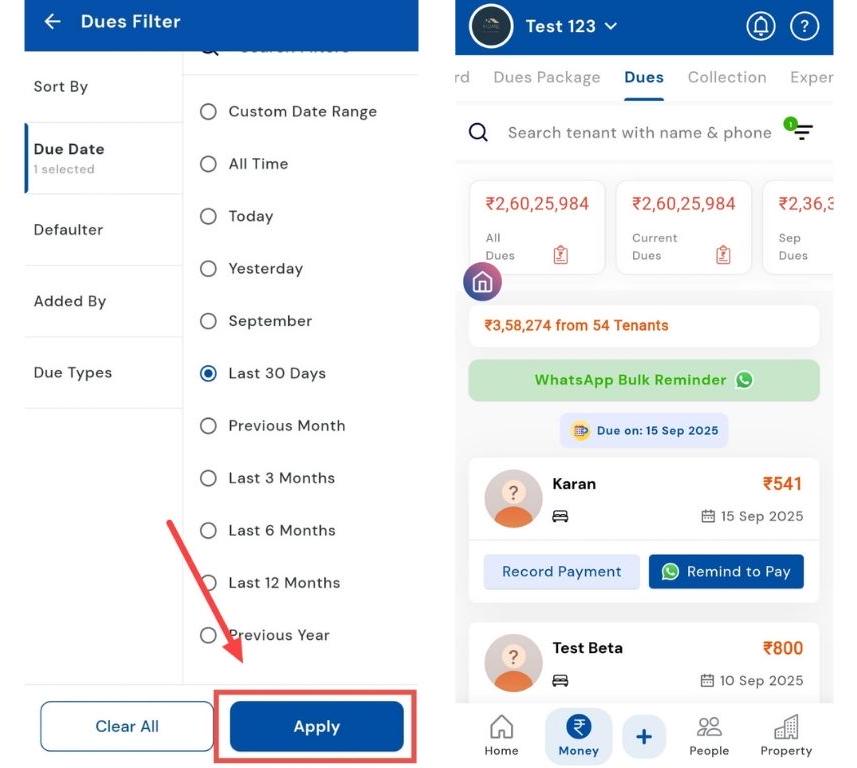
- Step 3: Select “Last 30 Days” From the filter options, select Due Dates and choose Last 30 Days to see all dues that were scheduled or pending in the past month.
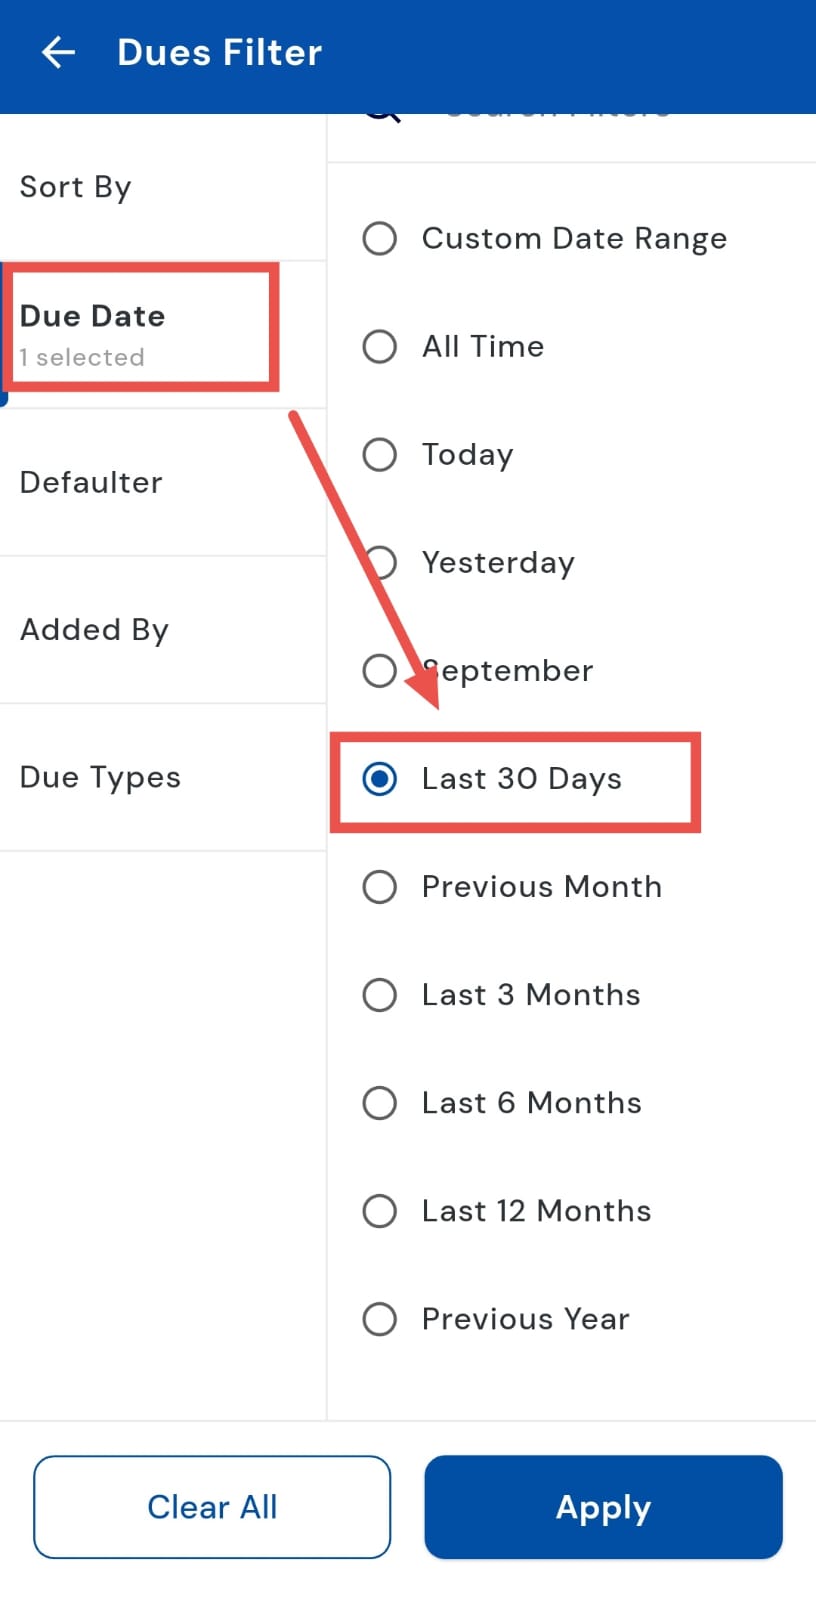
- Step 4: Apply the filter Click Apply, and the app will display the complete list of pending dues from the last 30 days, making it easy to track, follow up, or generate reports if needed.
How can I check the previous month's dues?
Planning monthly follow-ups? The Previous Month filter in the Dues section makes it easy to see all pending payments from last month in one place. It provides a clear overview of unpaid rent, maintenance, and other charges, helping you manage collections efficiently.
Here’s how you can check them:
- Step 1: Open the Dues tab Tap the Money icon in the bottom navigation menu, then click on the Dues option. This opens the combined list of all pending dues for your active tenants.
- Step 2: Access the filter option In the search box, tap on the Filter icon. This allows you to narrow down dues based on specific time periods.
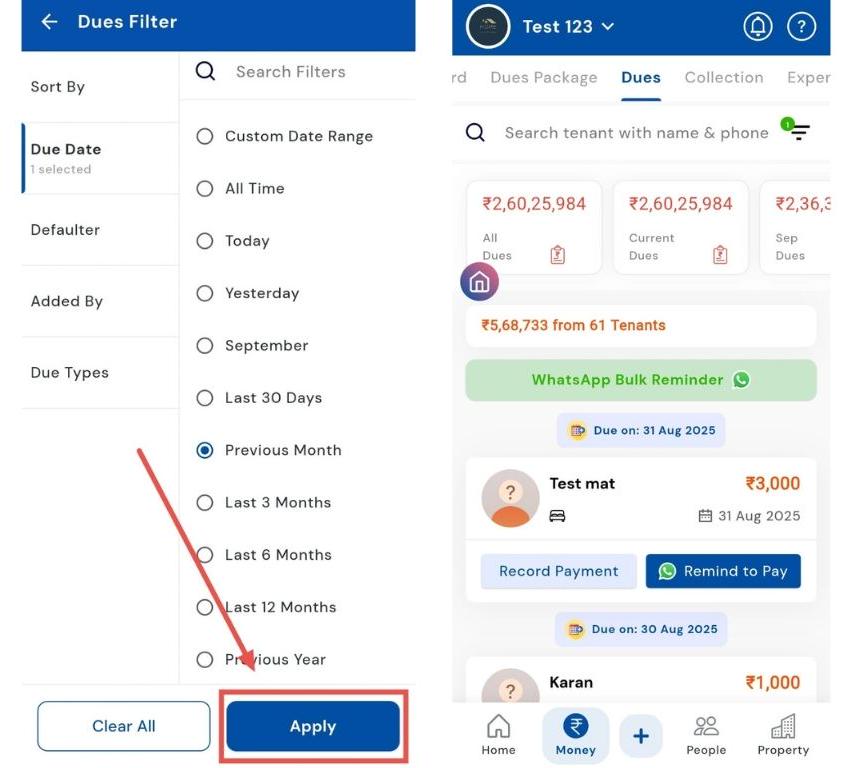
- Step 3: Select “Previous Month” From the filter options, select Due Dates and choose Previous Month to view all dues scheduled for the last month.
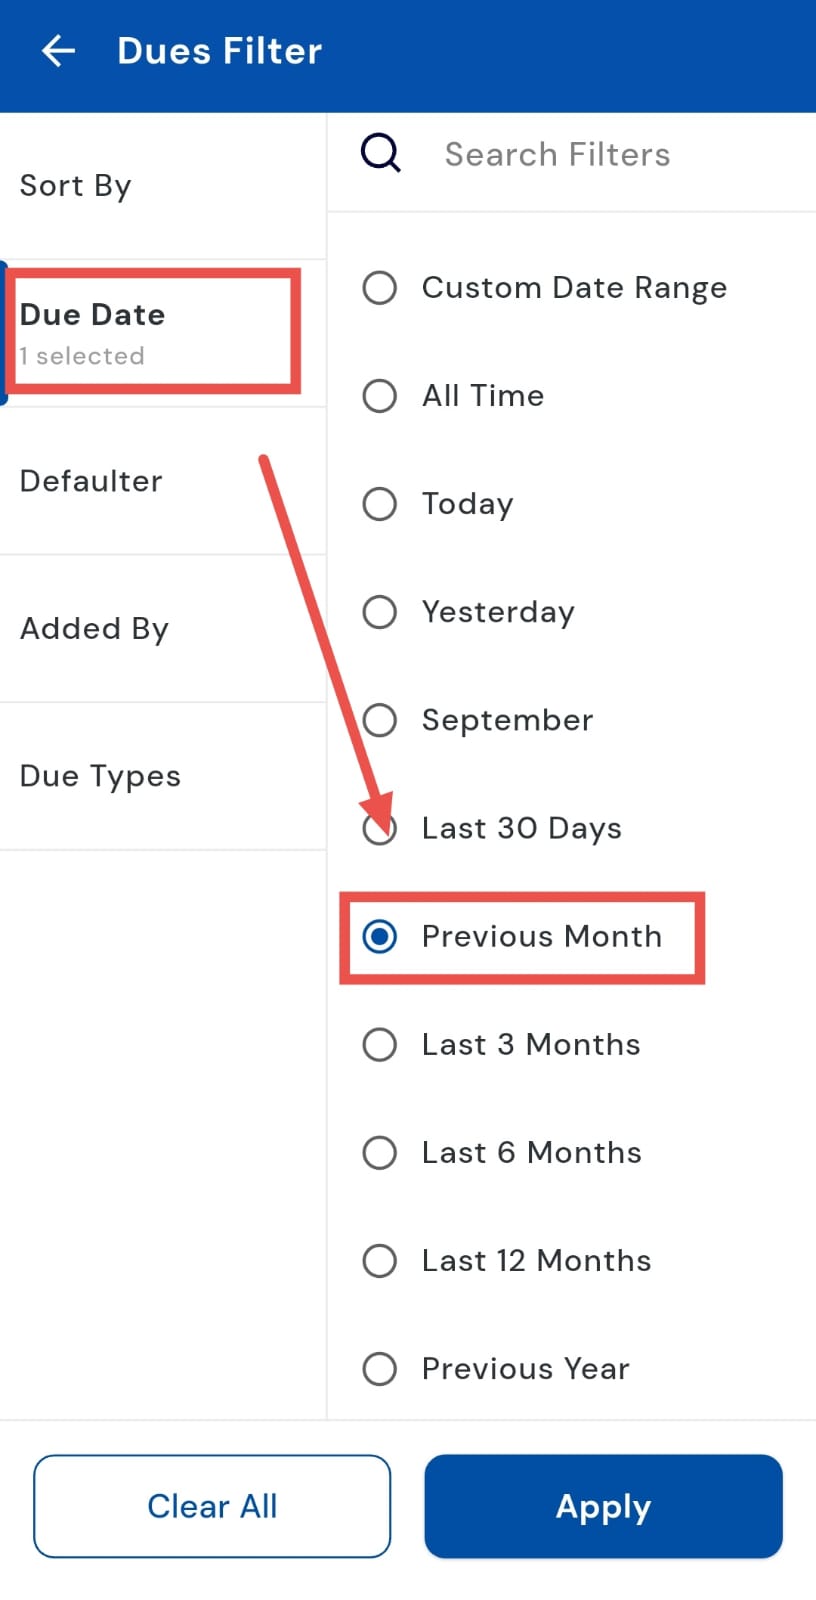
- Step 4: Apply the filter Click Apply, and the app will display the complete list of the previous month’s pending dues, making it easier to track or follow up with tenants.
How can I check the last 3, 6, and 12 months' dues?
Tracking dues over a longer period is simple with the filter option in the Dues section. Whether you want to review pending payments for the last 3, 6, or even 12 months, the Dues filter makes it effortless and gives you a clear overview without any hassle.
Here’s how you can check them:
- Step 1: Open the Dues tab Tap the Money icon in the bottom navigation menu, then select the Dues option. This opens a combined list of all pending dues for your active tenants.
- Step 2: Access the filter option Tap on the Filter icon in the search box. This allows you to refine the dues list based on different time periods.
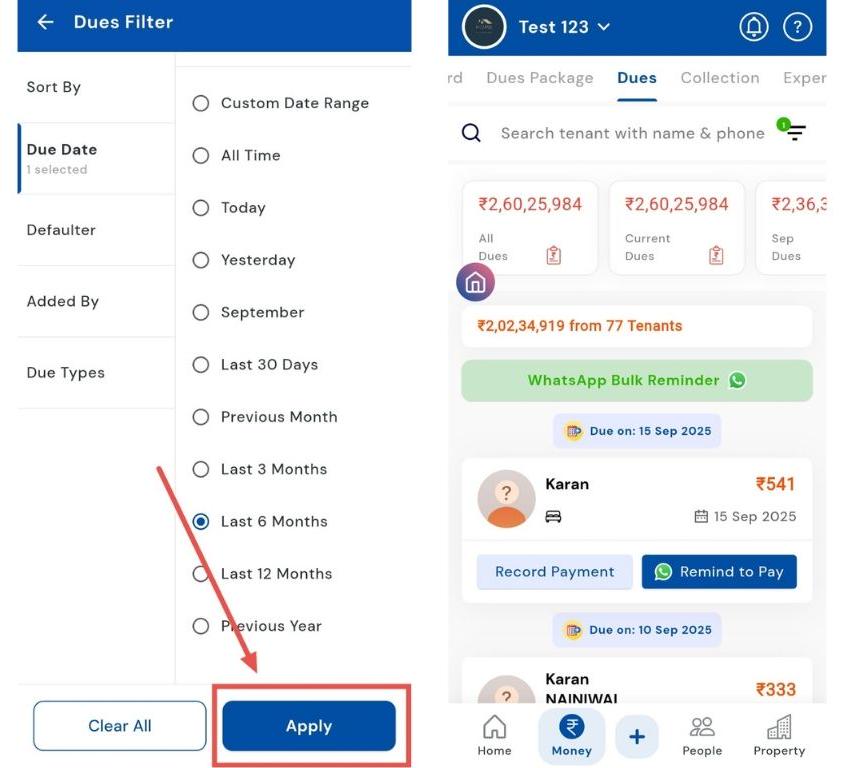
- Step 3: Select “Last 3/6/12 Months” From the filter options, select Due Dates and choose Last 3 Months/6 Months/12 Months to view all dues from the past months.
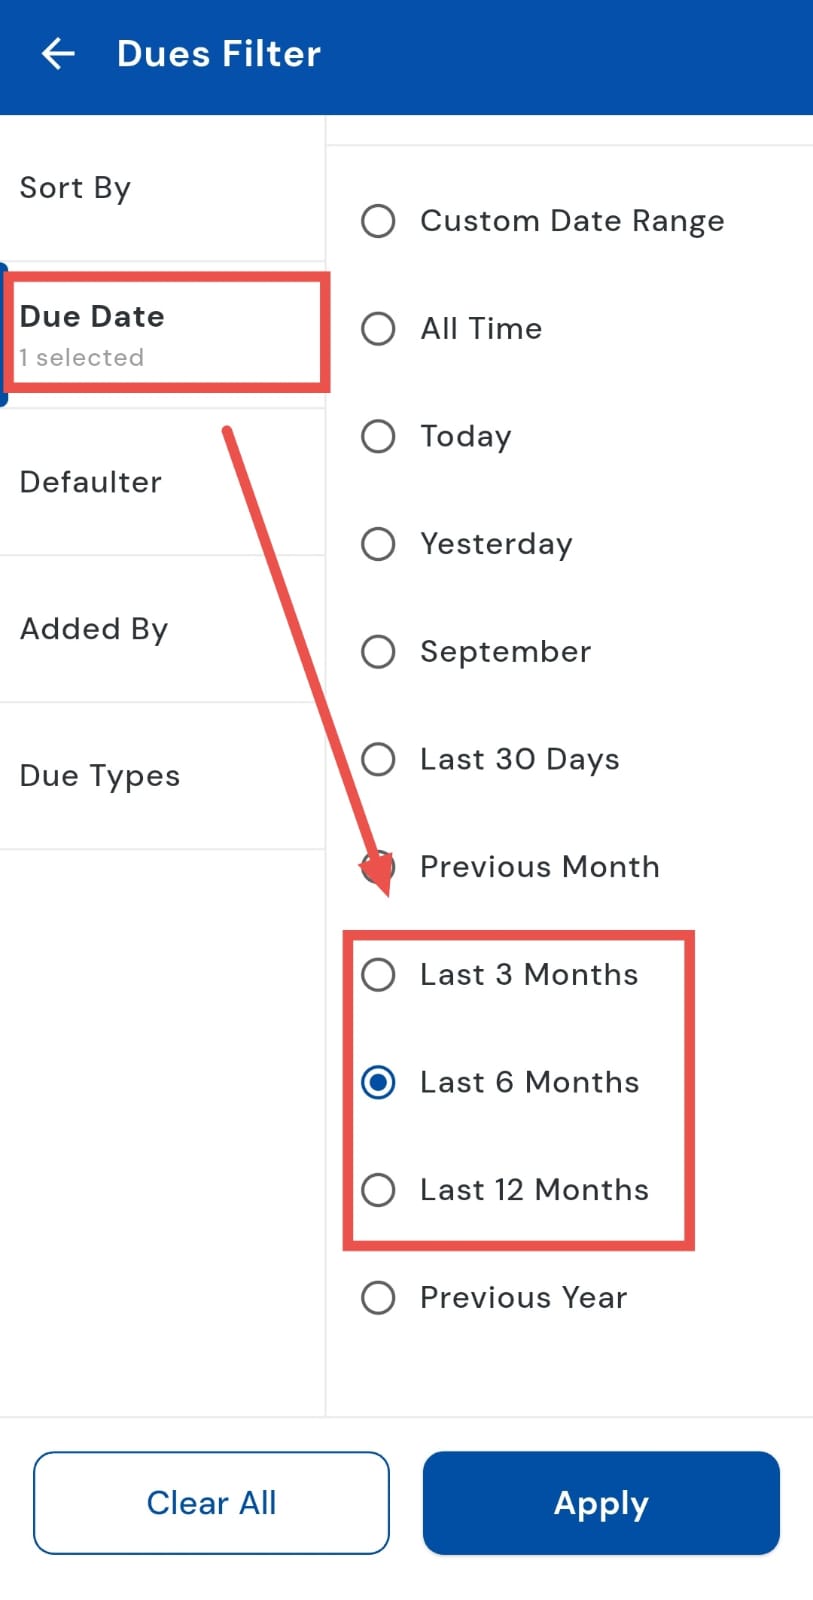
- Step 4: Apply the filter Click Apply, and the app will display a complete list of pending dues for the last three/ six, or twelve months, making it easier to track, follow up, or generate reports if needed.
How can I check the previous year's dues?
Need to review all pending dues from the previous year? The Previous Year filter in the Dues section makes it easy to pull up a complete list of unpaid rent, maintenance, and other charges across all tenants. This consolidated view is especially useful for reconciling accounts, planning annual follow-ups, or preparing for audits.
Here’s how you can check them:
- Step 1: Open the Dues tab Tap the Money icon in the bottom navigation menu, then select Dues. This opens the combined dues list for all your active tenants.
- Step 2: Open the filter options Tap the Filter icon in the search box. This lets you narrow the dues list by different time ranges and criteria.
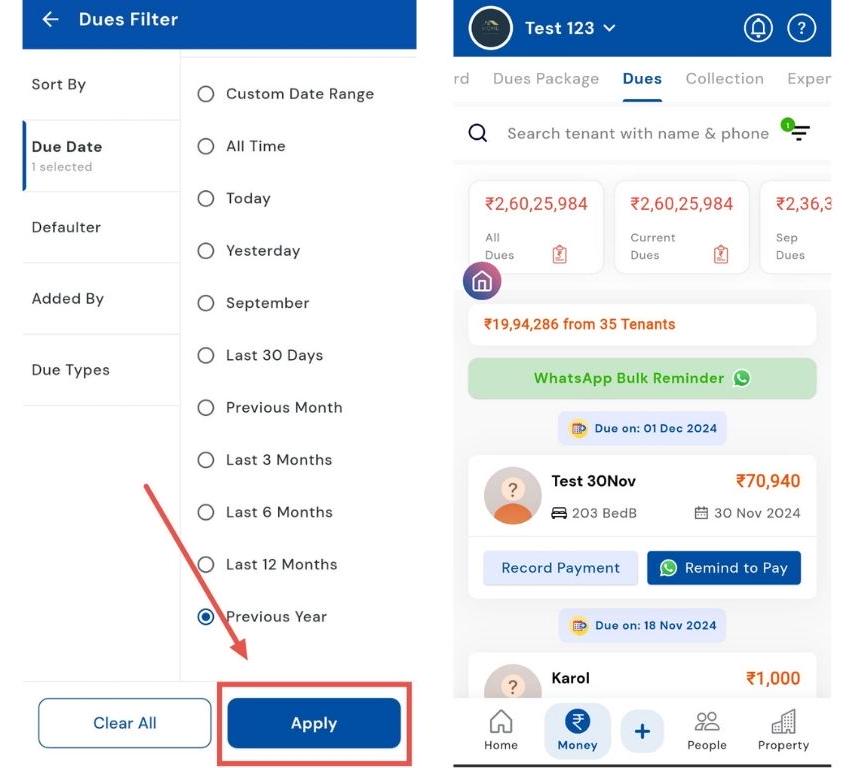
- Step 3: Select “Previous Year” From the filter choices, select Due Dates and choose Previous Year to filter the list of dues scheduled during the last calendar year.
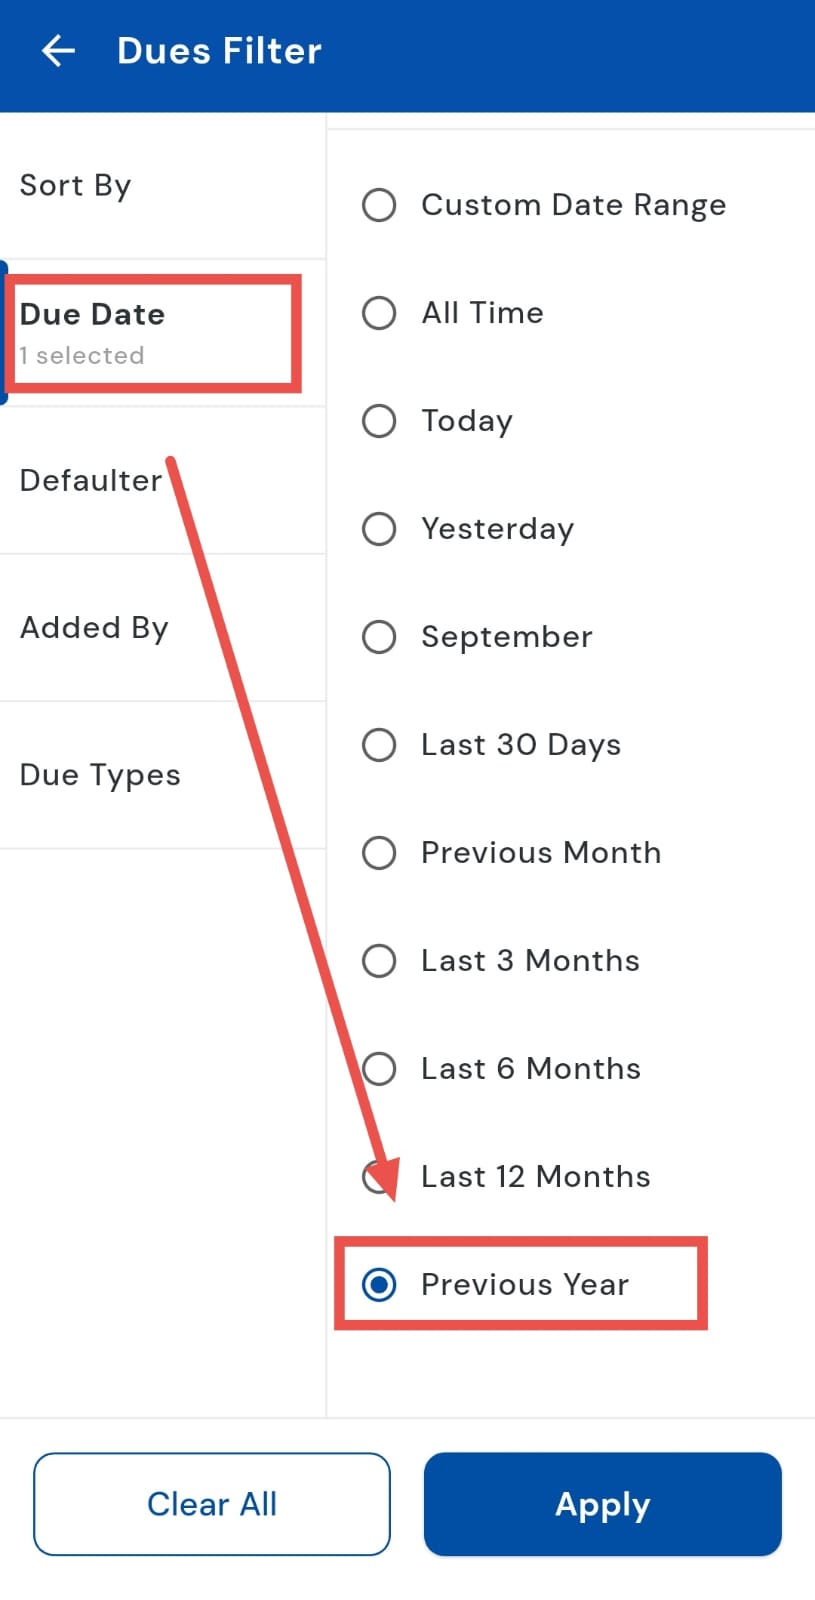
- Step 4: Apply the filter Tap Apply, and the app will display all pending dues from the previous year, making it easy to review, follow up, or export if needed.
| Tip: Use this view when doing annual reconciliations or preparing follow-up lists for long-overdue payments. |
|---|
How can I check dues for a custom date range?
Sometimes you need flexibility beyond the fixed filters, like today, yesterday, or last month. The Custom Filter in RentOK lets you define your own date range, making it easy to track dues for a specific project period, special review cycle, or any timeframe you choose. This feature gives you full control over the data you want to review, ensuring nothing is missed.
Here’s how you can check dues for a custom date range:
- Step 1: Open the Dues tab Tap the Money icon in the bottom navigation menu, then select Dues to view all outstanding payments.
- Step 2: Access filter options In the search box, tap on the Filter icon. This allows you to narrow down dues based on specific time periods.
- Step 3: Select “Custom Date Range” From the options, choose Custom Date Range to set a personalized timeframe.

- Step 4: Define your dates A new page will open where you can select the Start Date and End Date for the period you want to review.
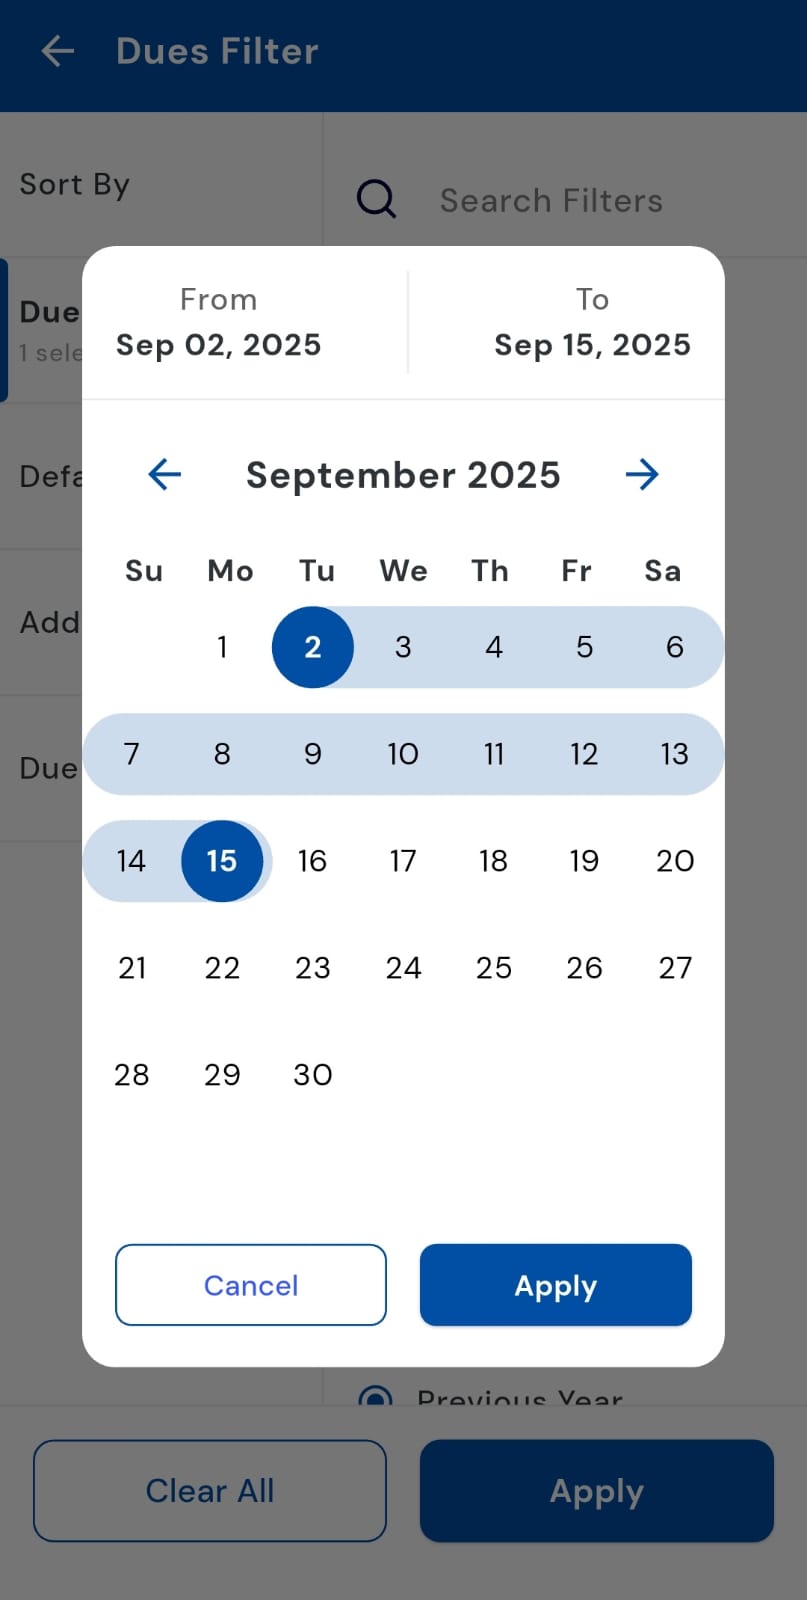
- Step 5: Save your selection After choosing the dates, tap Apply to confirm your custom range.
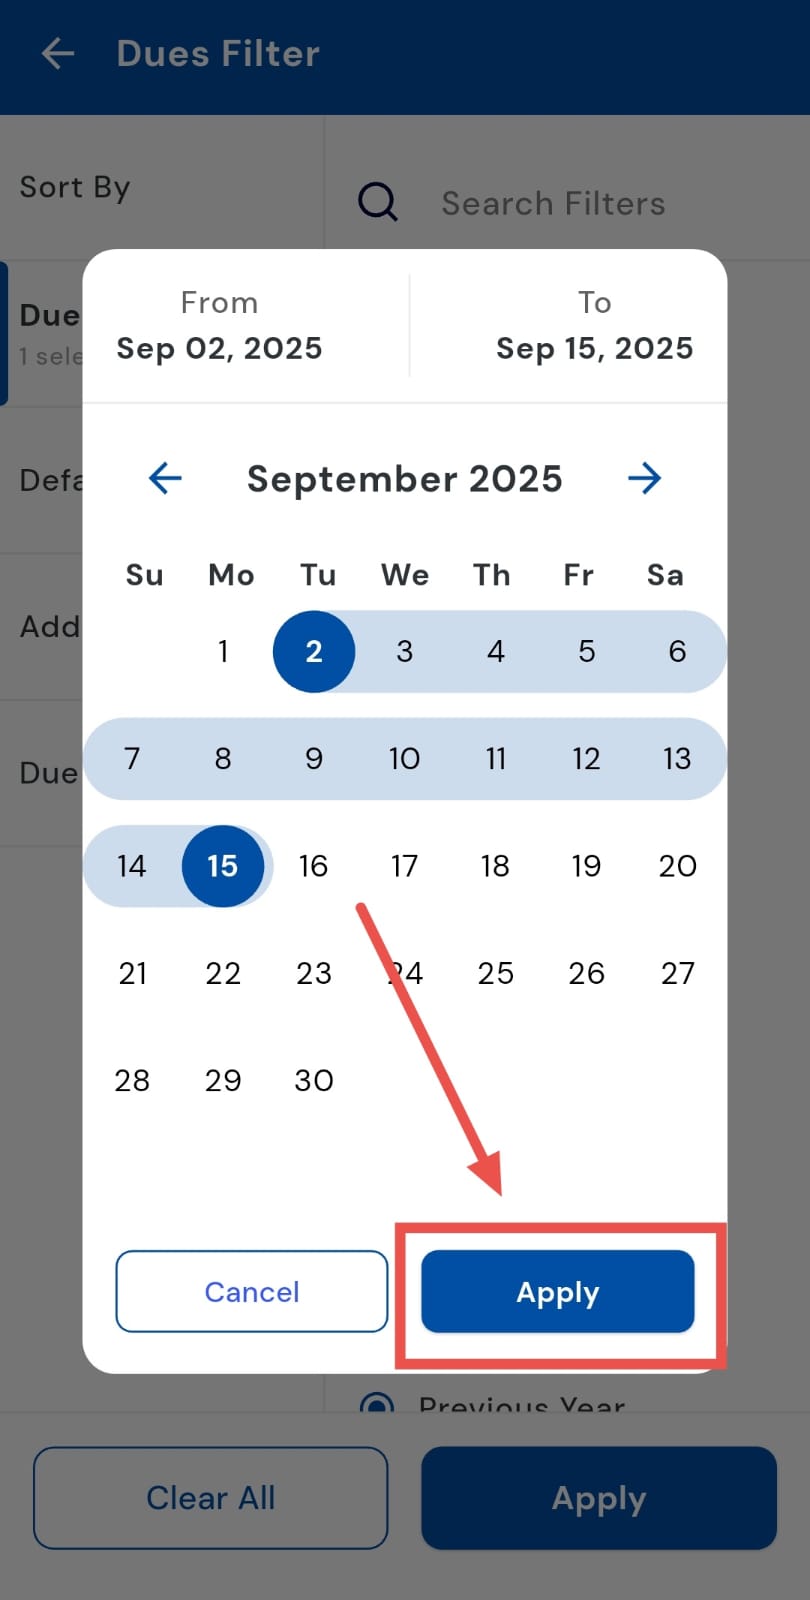
- Step 6: Apply the filter Tap Apply again at the bottom of the screen, and the app will display all dues within the chosen time range, giving you precise results tailored to your needs.

How can I check a rent defaulter?
Stay on top of pending rent payments by using the Defaulter filter in the Dues section. This feature lets you view all rent defaulters in one place, giving you a clear overview of outstanding payments. By having everything in one place, follow-ups and collections become faster, more organized, and easier to manage, helping you keep your property finances on track.
Here’s how you can check them:
- Step 1: Open the Dues tab Tap the Money icon in the bottom navigation menu, then select Dues to access the consolidated list of pending payments.
- Step 2: Open filter options In the search box, tap on the Filter icon. It helps the users to narrow down their search.
- Step 3: Select “Defaulter” A new tab will open with multiple options. Choose Defaulter to filter for tenants with pending payments.
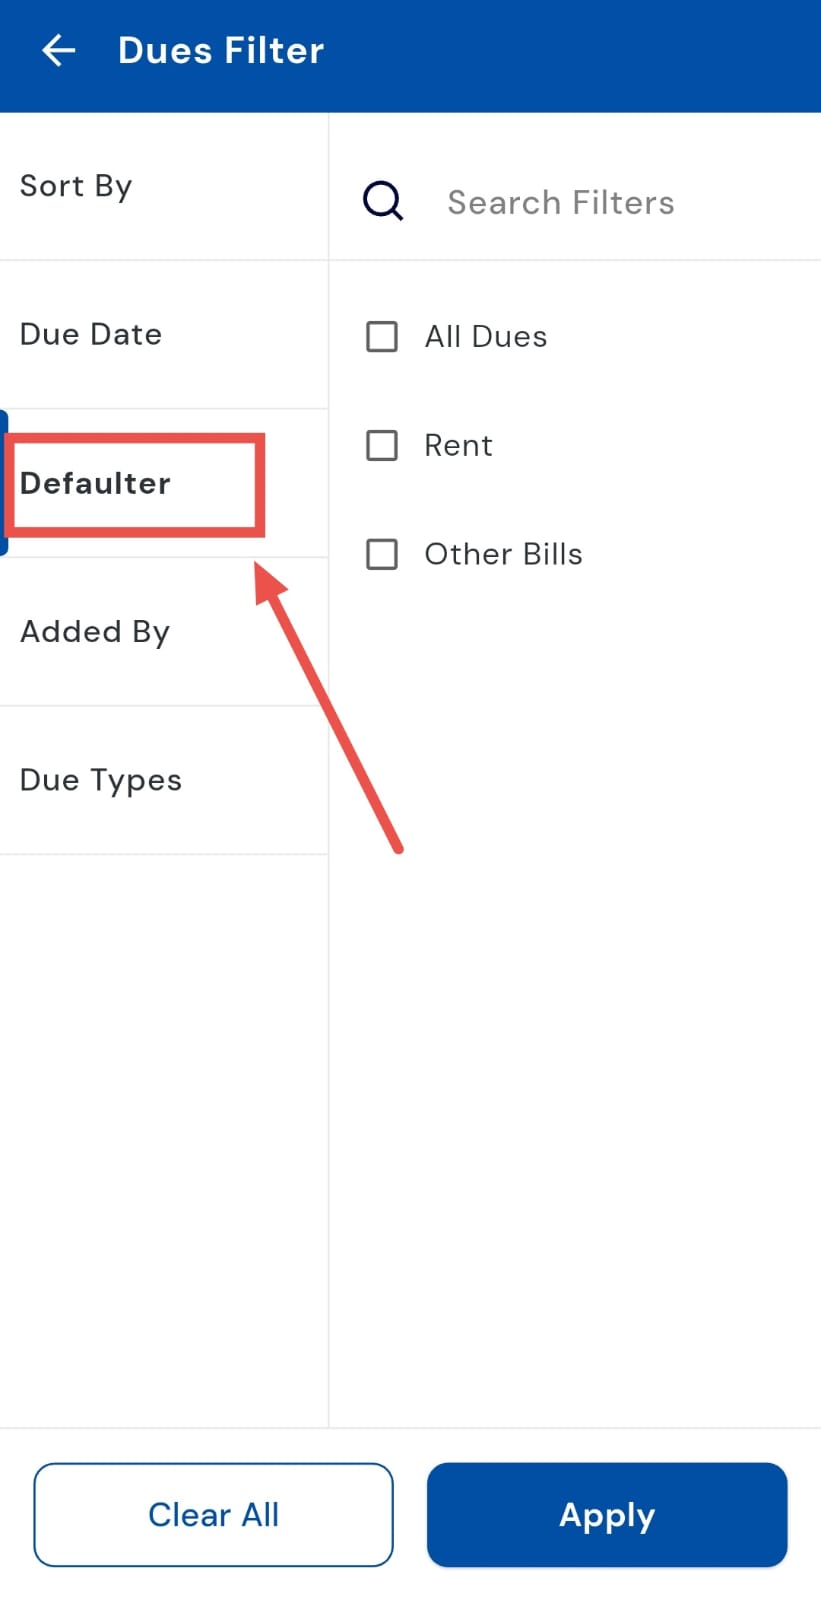
- Step 4: Choose “Rent” Within the Defaulter options, select Rent to specifically view tenants who haven’t paid their rent.
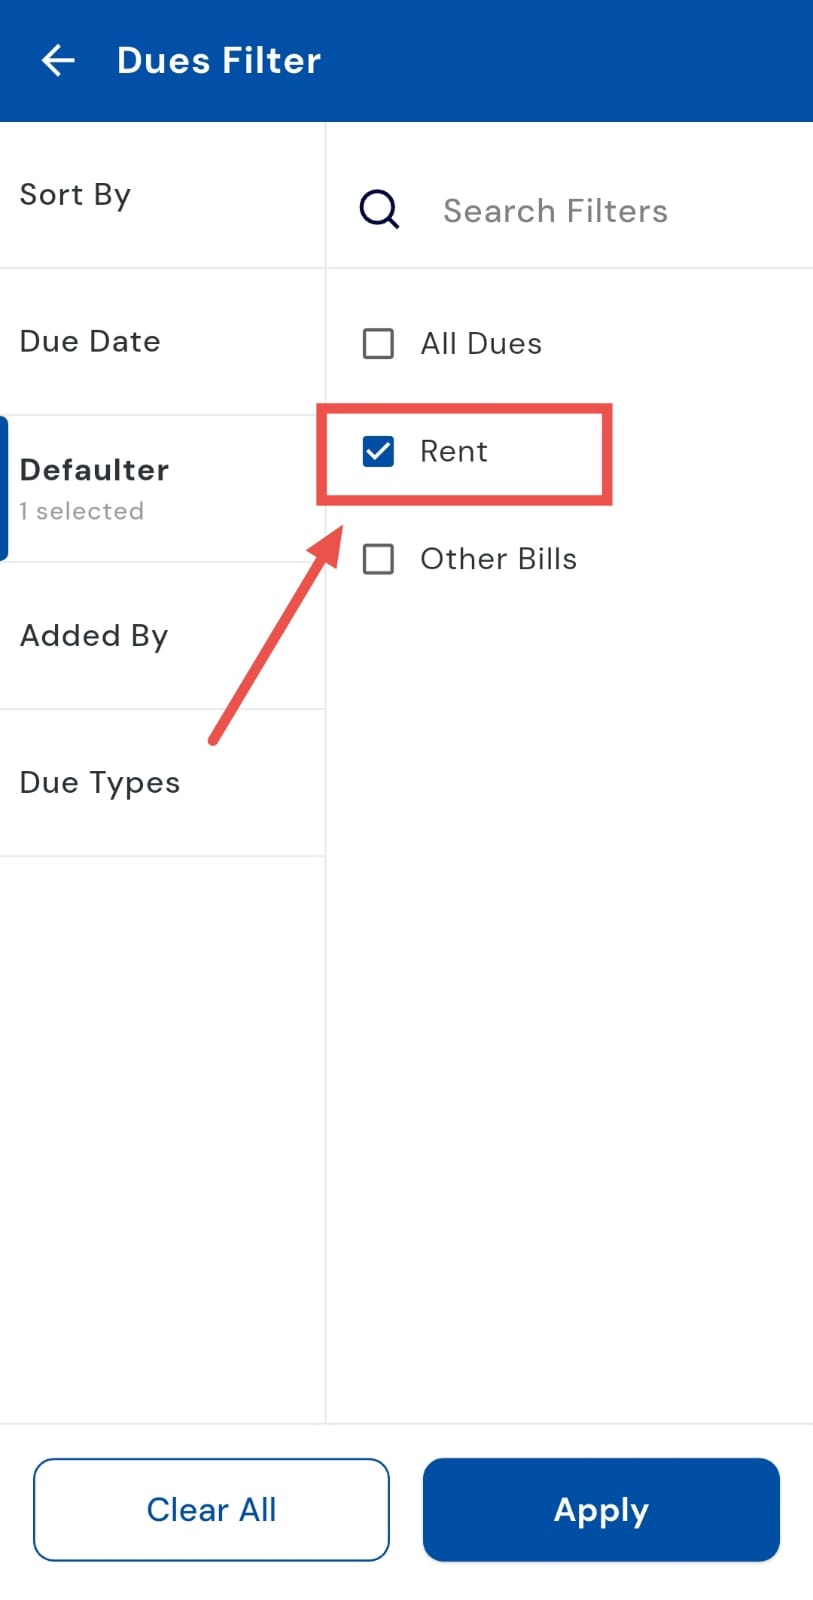
- Step 5: Apply the filter Tap Apply, and the app will display all tenants who are rent defaulters, giving you a clear and actionable list.

How can I check defaulters for other bills?
Besides rent, tenants may sometimes delay payments for utilities, maintenance, or other charges. The Defaulter filter in the Dues section makes it simple to view all such pending amounts in one place. With a ready list at your fingertips, you can take quick and timely follow-ups, making collections more efficient and organized.
And checking it is just as easy, simply follow these steps:
- Step 1: Open the Dues tab Tap the Money icon in the bottom navigation menu, then select Dues to see all pending payments.
- Step 2: Access filter options Tap the Filter icon in the search bar to open advanced search settings.
- Step 3: Choose “Defaulter” A tab with multiple filter types will appear. Select Defaulter to specifically check unpaid amounts.
- Step 4: Select “Other Bills” From the available options, choose Other Bills. This will display a combined view of all bills other than rent.
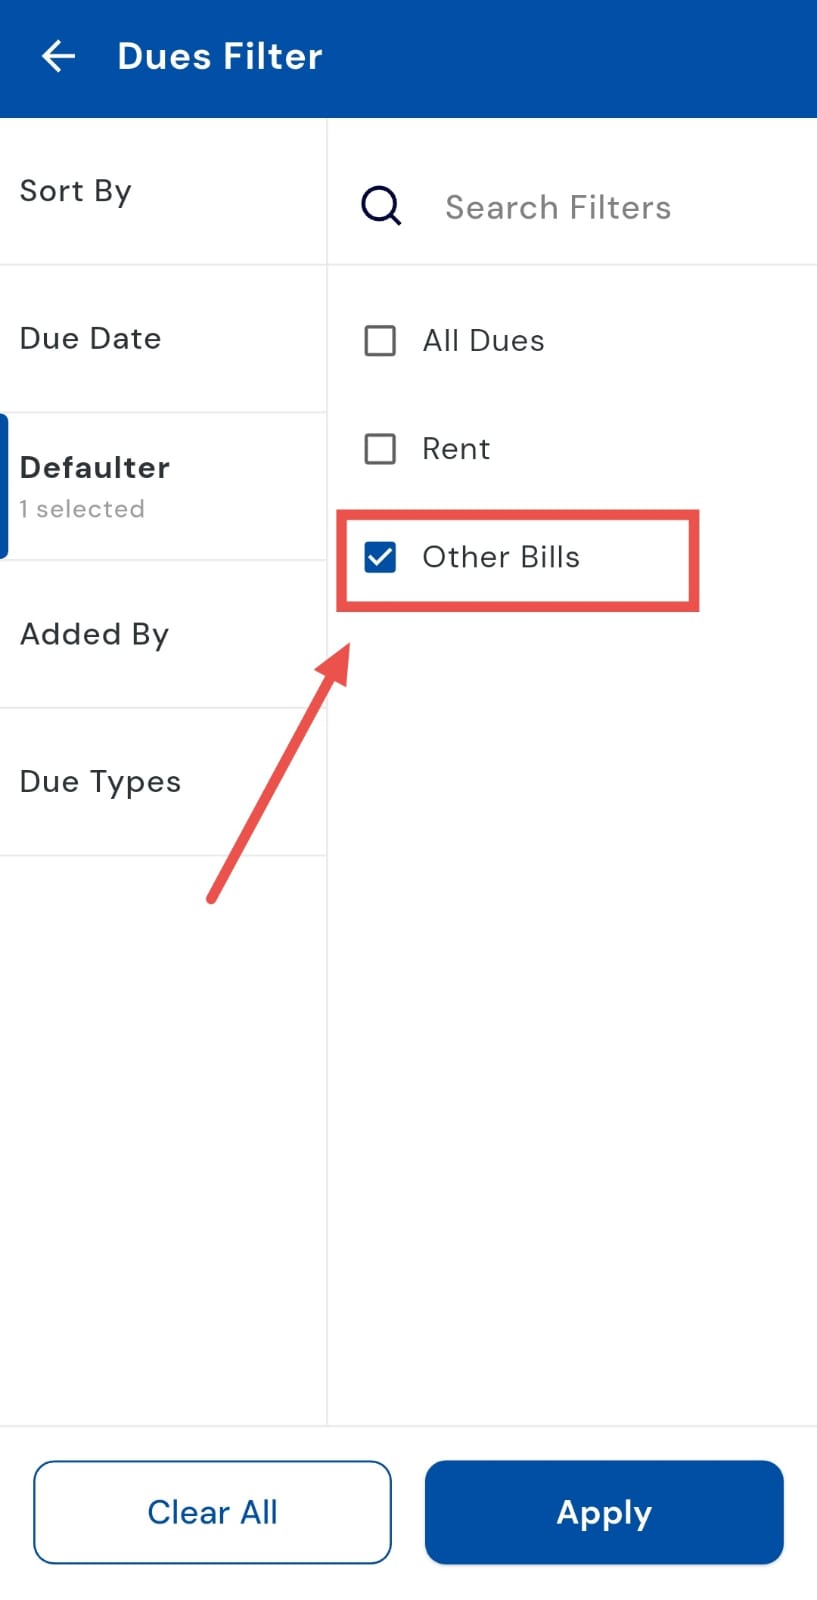
- Step 5: Apply the filter Tap Apply, and the app will show a list of tenants who are defaulters under the selected bill category.

How can I check which tenant has an outstanding security deposit?
Managing security deposits can often feel tedious, but RentOk makes it simple. With the Due Types filter, you can instantly see which tenants still have pending deposits. This quick snapshot helps you stay on top of payments, send timely reminders, and maintain a clear record without the hassle.
Follow these steps:
- Step 1: Go to the Dues tab Tap the Money icon from the bottom navigation menu. This opens the payments section, where you’ll find all tenant-related dues and transactions. Select the Dues tab to continue.
- Step 2: Open the filter menu At the top of the screen, inside the search box, you’ll see a Filter option. Tap on it to access different ways of sorting and narrowing down dues.
- Step 3: Choose “Due Types” A dialog window window will appear with multiple filter categories. From here, select Due Types to refine the results by the type of pending payment.
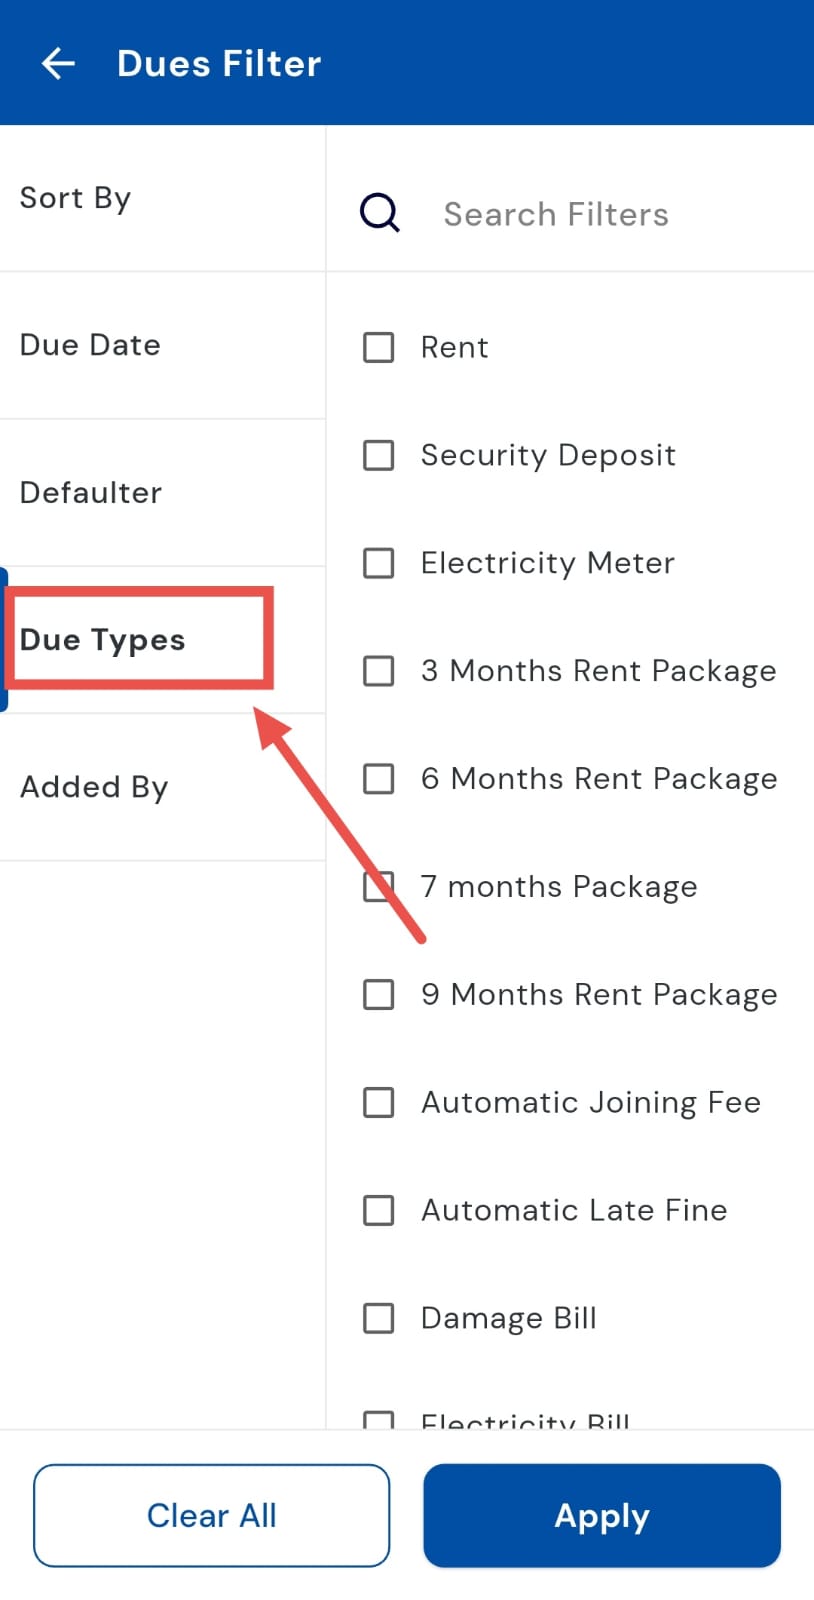
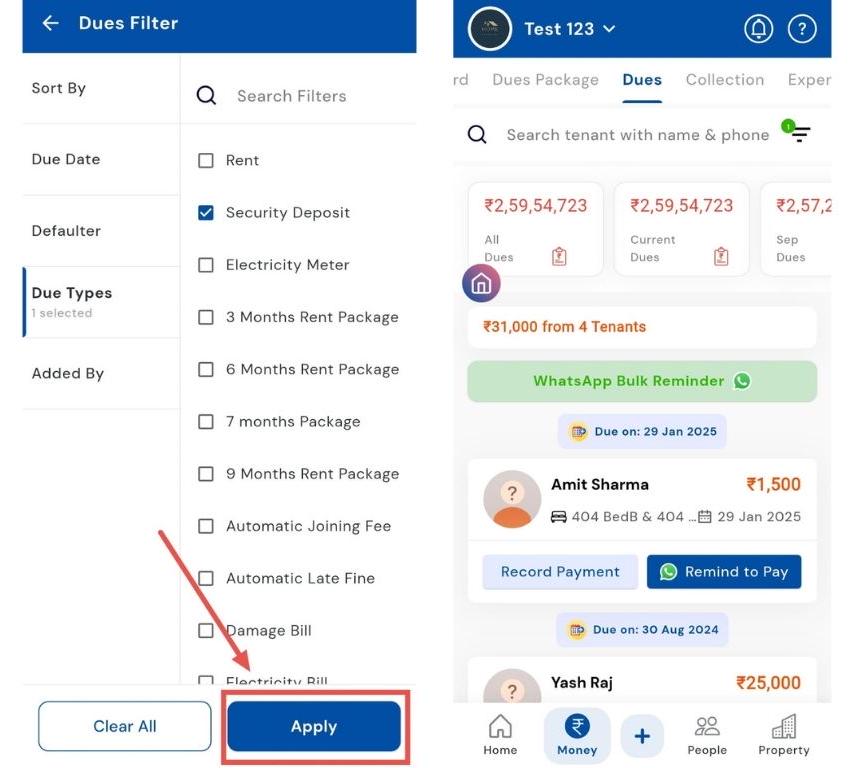
- Step 4: Select “Security Deposit” Under the Due Types options, tap Security Deposit. This will specifically pull out tenants whose pending amount belongs to this category.
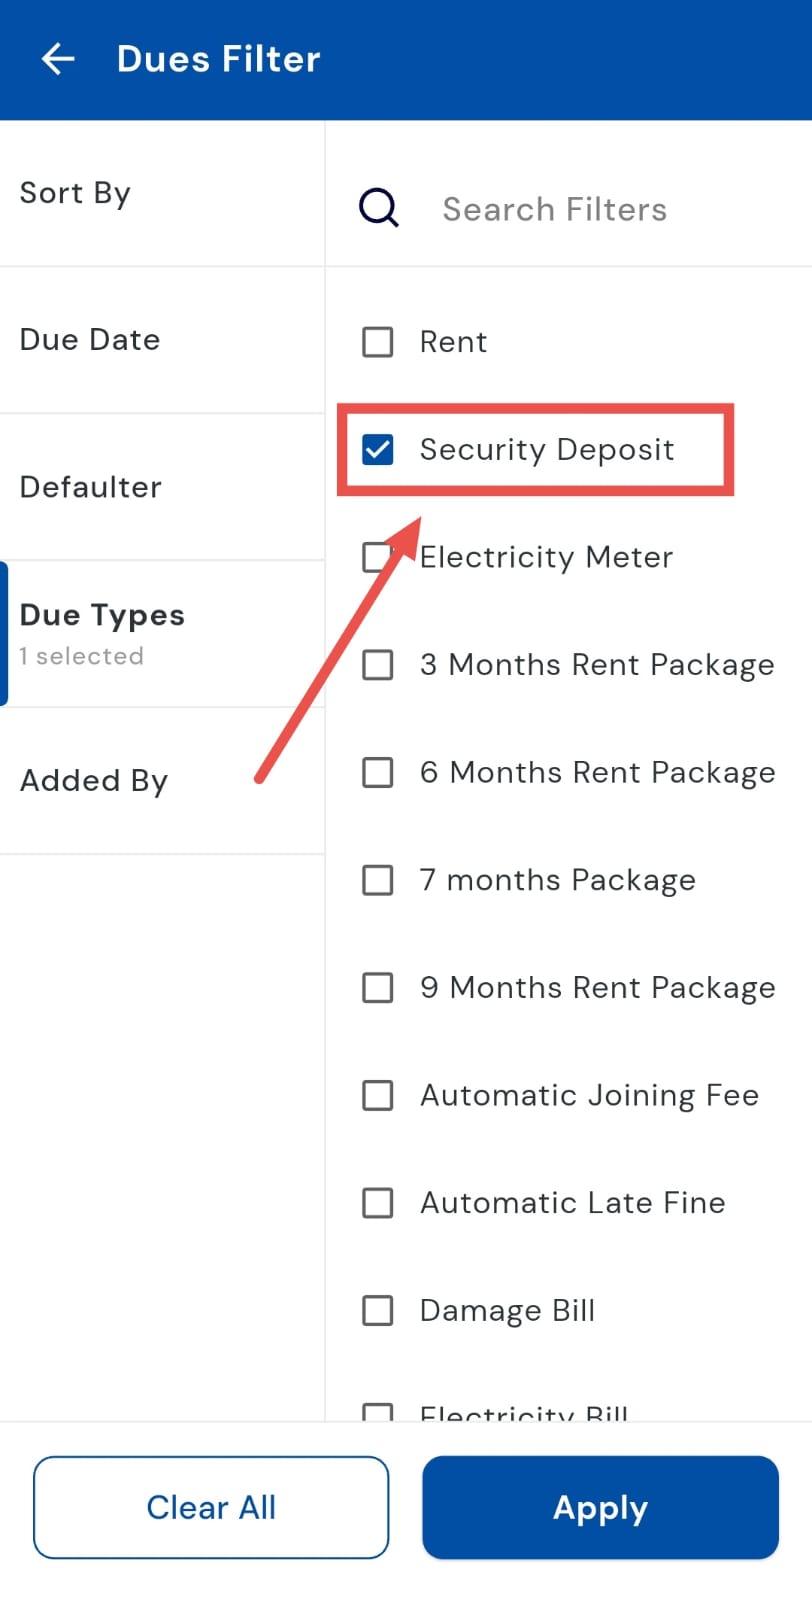
- Step 5: Apply the filter Once you’ve made your selection, tap Apply. The app will now display a list of tenants who have outstanding security deposit dues.
How can I check only the rent category dues?
Rent dues often need special attention, and RentOk makes it easy to filter them out separately. Using the Dues Types filter, you can view only rent-related pending amounts while excluding maintenance, utilities, or deposits. This gives you a clear picture of exactly what’s pending for rent across all tenants.
Here's how you can do it:
- Step 1: Open the Dues tab Tap the Money icon in the bottom navigation menu. This takes you to the payments section. Select the Dues tab to view all outstanding payments across tenants.
- Step 2: Access the filter option At the top of the Dues screen, inside the search bar, you’ll find the Filter button. Tap on it to bring up advanced filtering options.
- Step 3: Choose “Due Types” A dialog window will appear with four filtering categories. From here, select Due Types to narrow down dues based on specific categories.
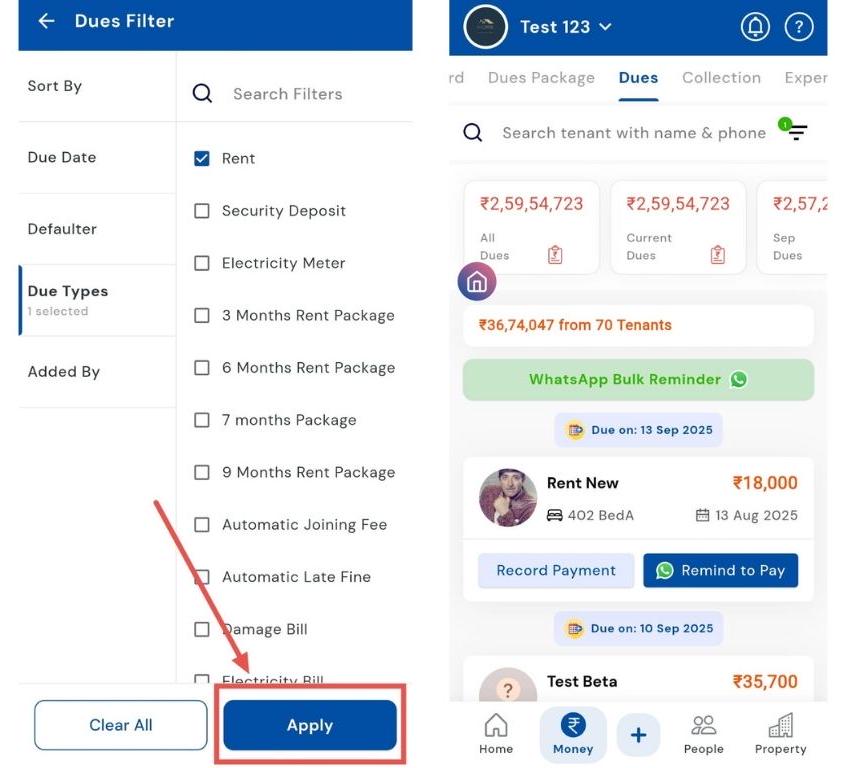
- Step 4: Select the “Rent” option Under Due Types, tap on Rent. This ensures that only pending rent dues will be shown, excluding any other charges.
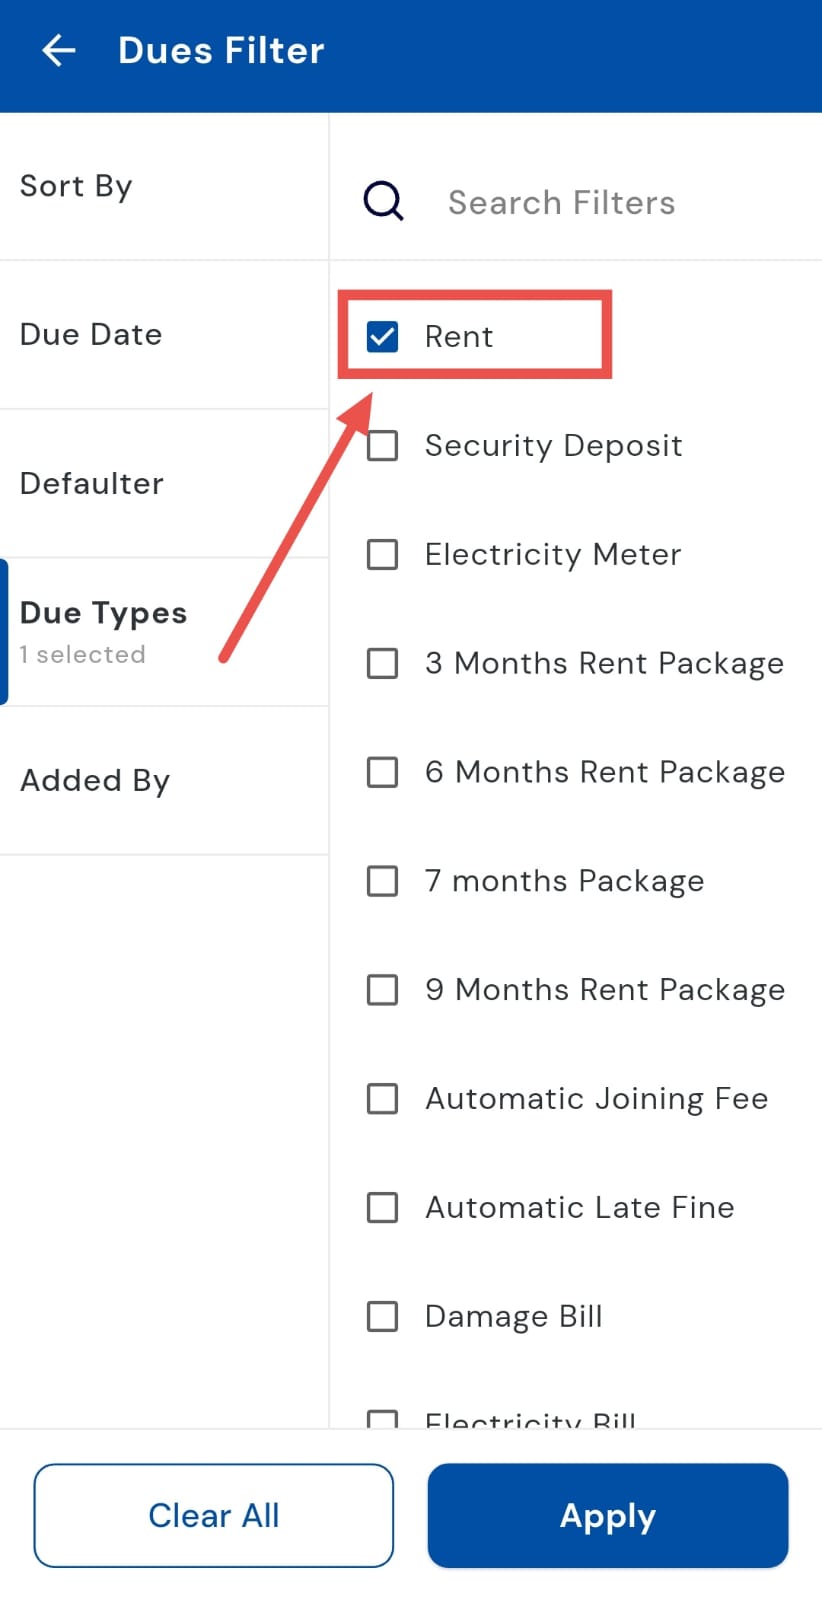
- Step 5: Apply the filter Once you’ve chosen Rent, tap Apply. The app will now display a list of tenants with outstanding rent dues only, making it easy to track collections.
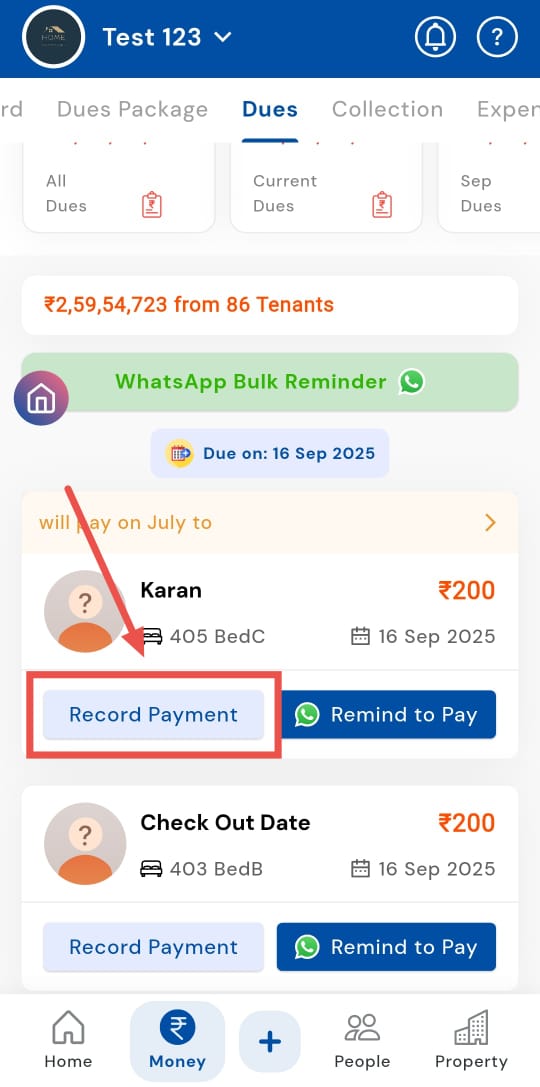
- How can I record a payment from a tenant?"
Need to log a tenant’s payment right after collection? The Record Payment option makes it quick and hassle-free. As soon as a tenant pays, you can log the payment with details like mode and amount, and the system instantly updates the tenant’s passbook. This keeps your records accurate without the need for manual ledgers.
Follow these steps:
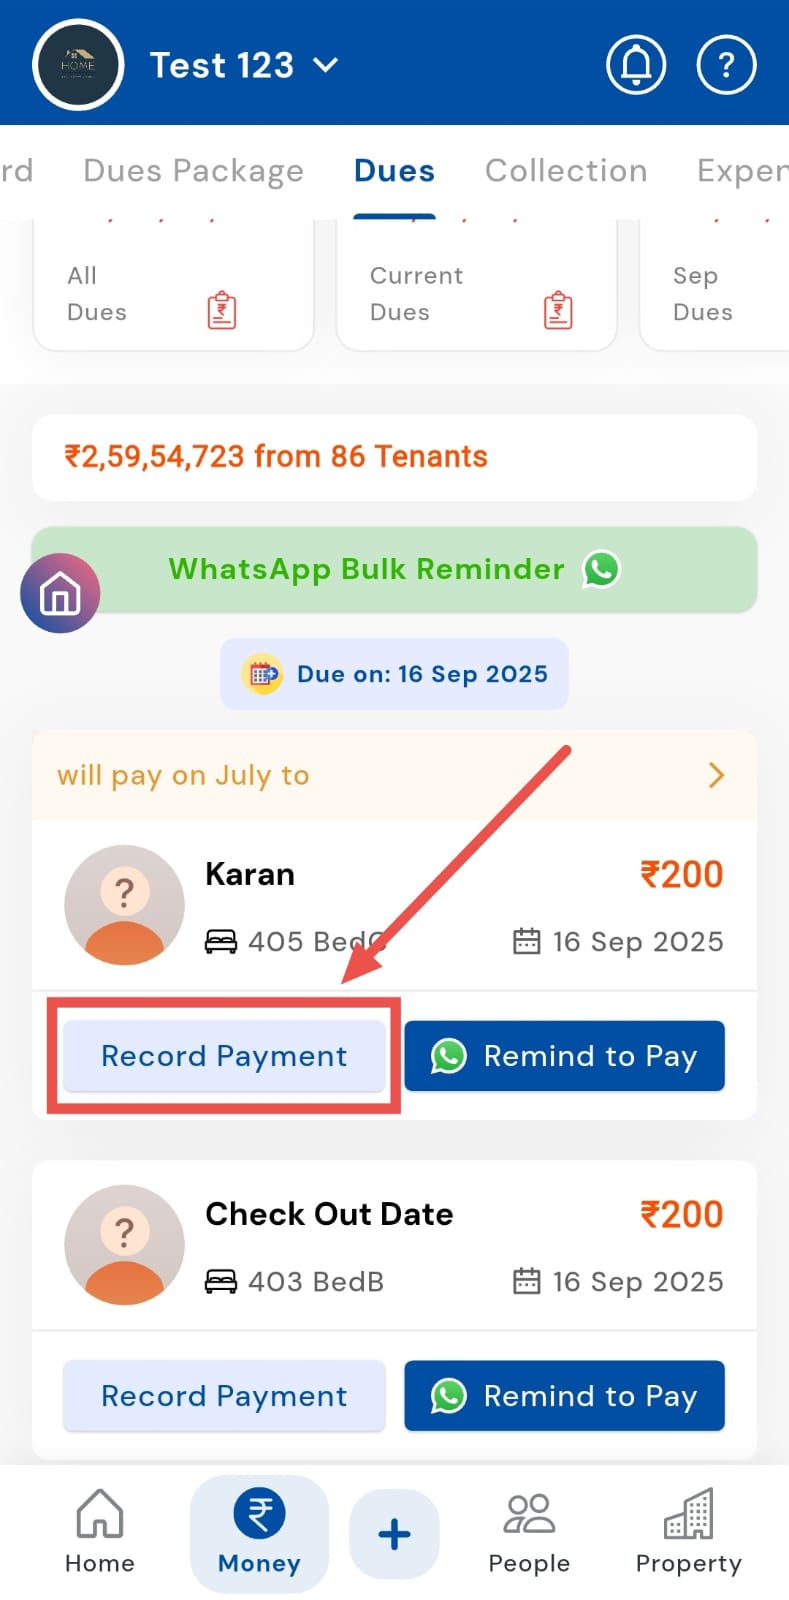
- Step 1: Open the Dues tab Tap the Money icon in the bottom navigation menu, then select Dues to see the list of tenants with pending amounts.
- Step 2: Tap Record Payment on the tenant card Find the tenant whose payment you received and tap Record Payment on their due card. This opens the payment entry window for that tenant.
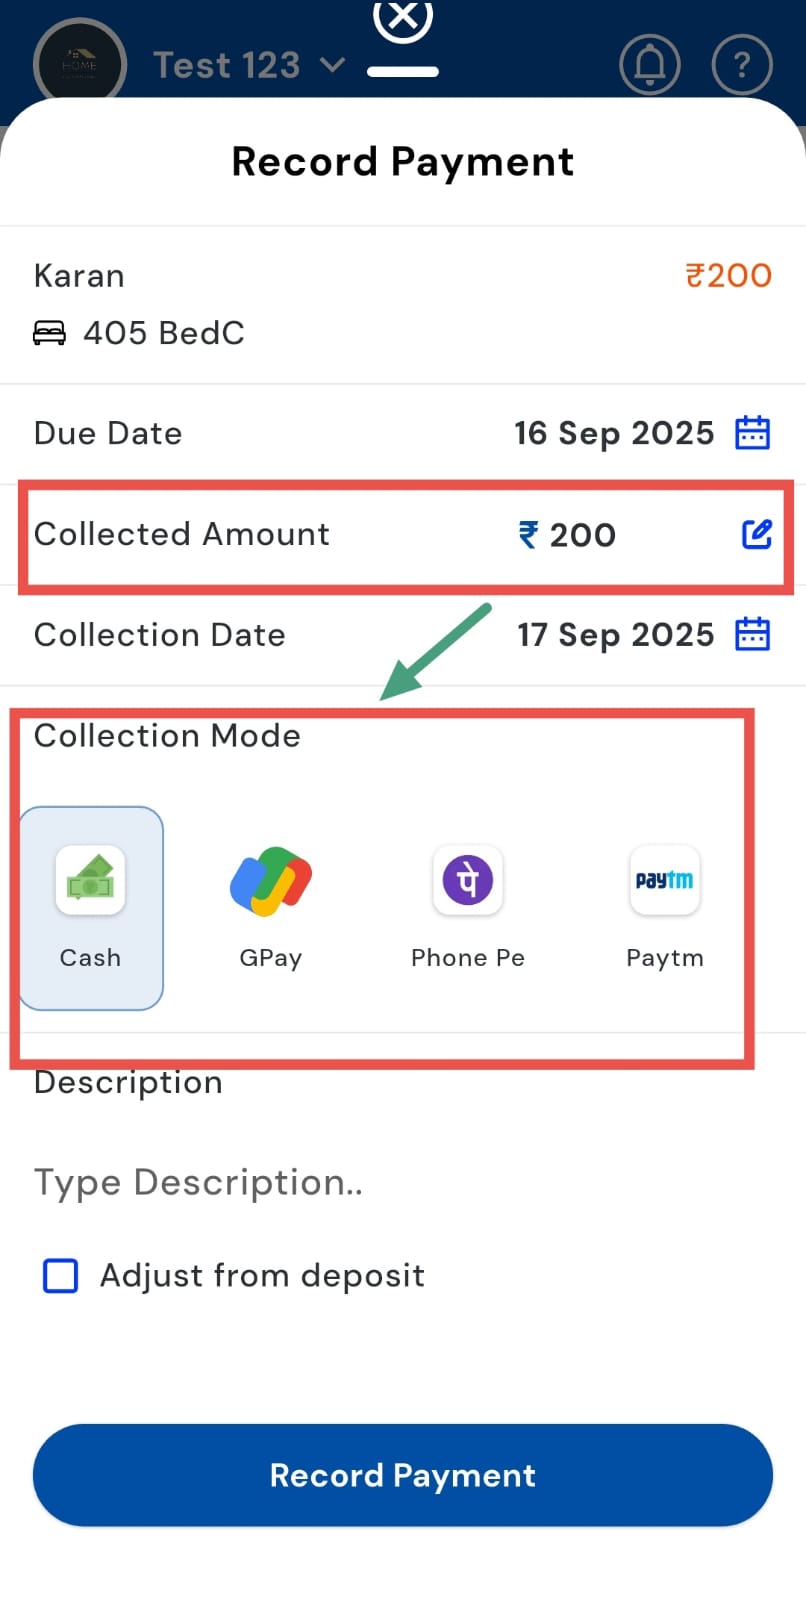
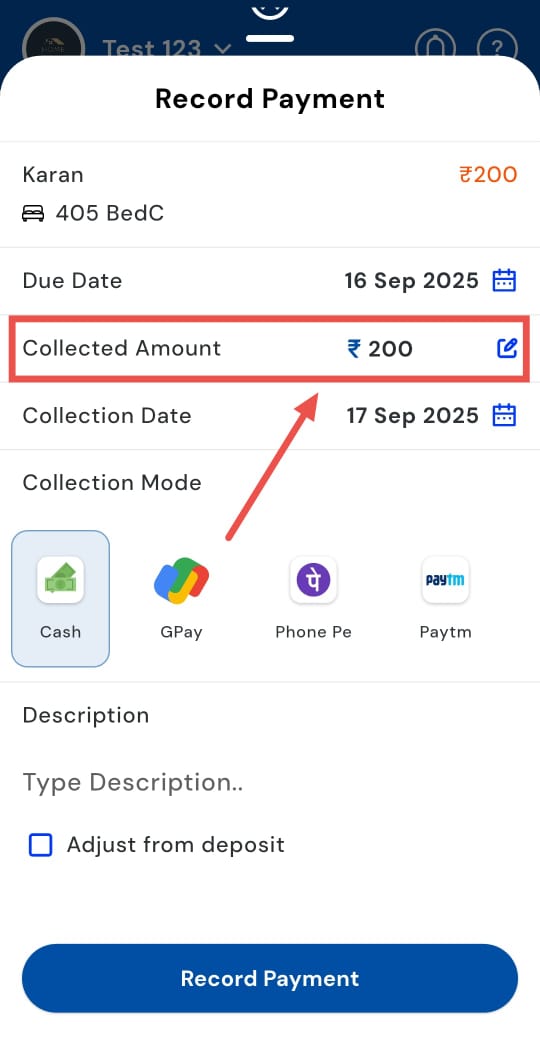
- Step 3: Choose payment details In the window, enter the amount received and select the Collection Mode (e.g., cash, UPI, bank transfer, cheque). Optionally add a note or reference (transaction ID, cheque number) for future reconciliation.
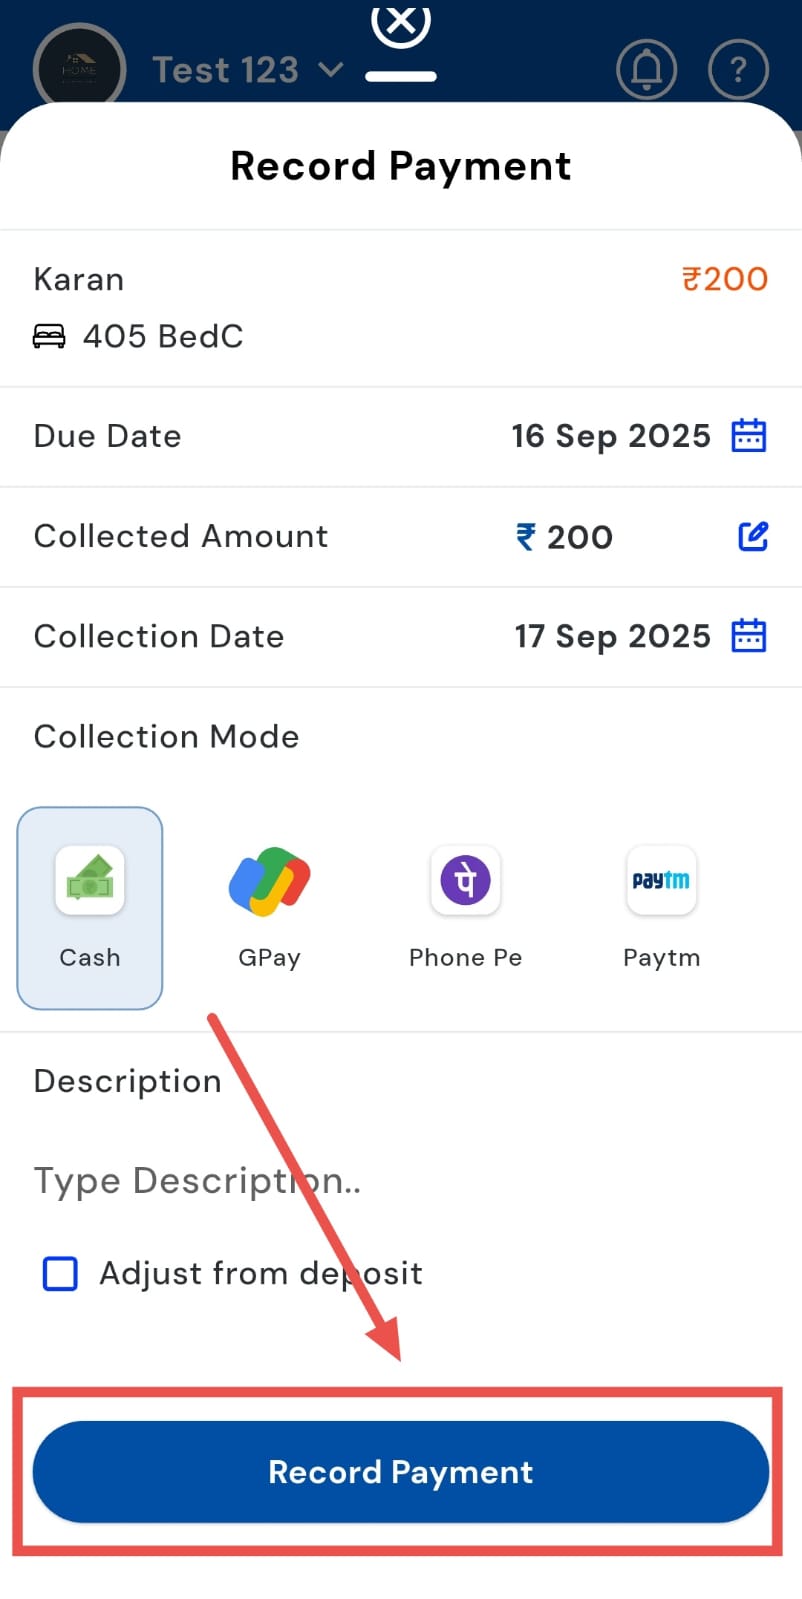
- Step 4: Confirm and save After verifying the details, tap Record Payment to save. The app will update the tenant’s dues, reflect the transaction in their passbook, and adjust the overall balances accordingly.
How can I record a partial payment from a tenant?
Not all tenants pay their dues in full at once, and we make it easy to track every payment, no matter how big or small. The Partial Payment feature lets you log received amounts while keeping the remaining dues visible, ensuring both paid and outstanding balances are accurately tracked in the tenant’s account.
Follow these steps:
- Step 1: Open the Dues tab Tap the Money icon in the bottom navigation menu, then select Dues. This opens a list of all tenants with pending payments across your properties.
- Step 2: Tap Record Payment on the tenant card Locate the tenant who has made a partial payment and tap Record Payment on their dues card. This opens the payment entry window.
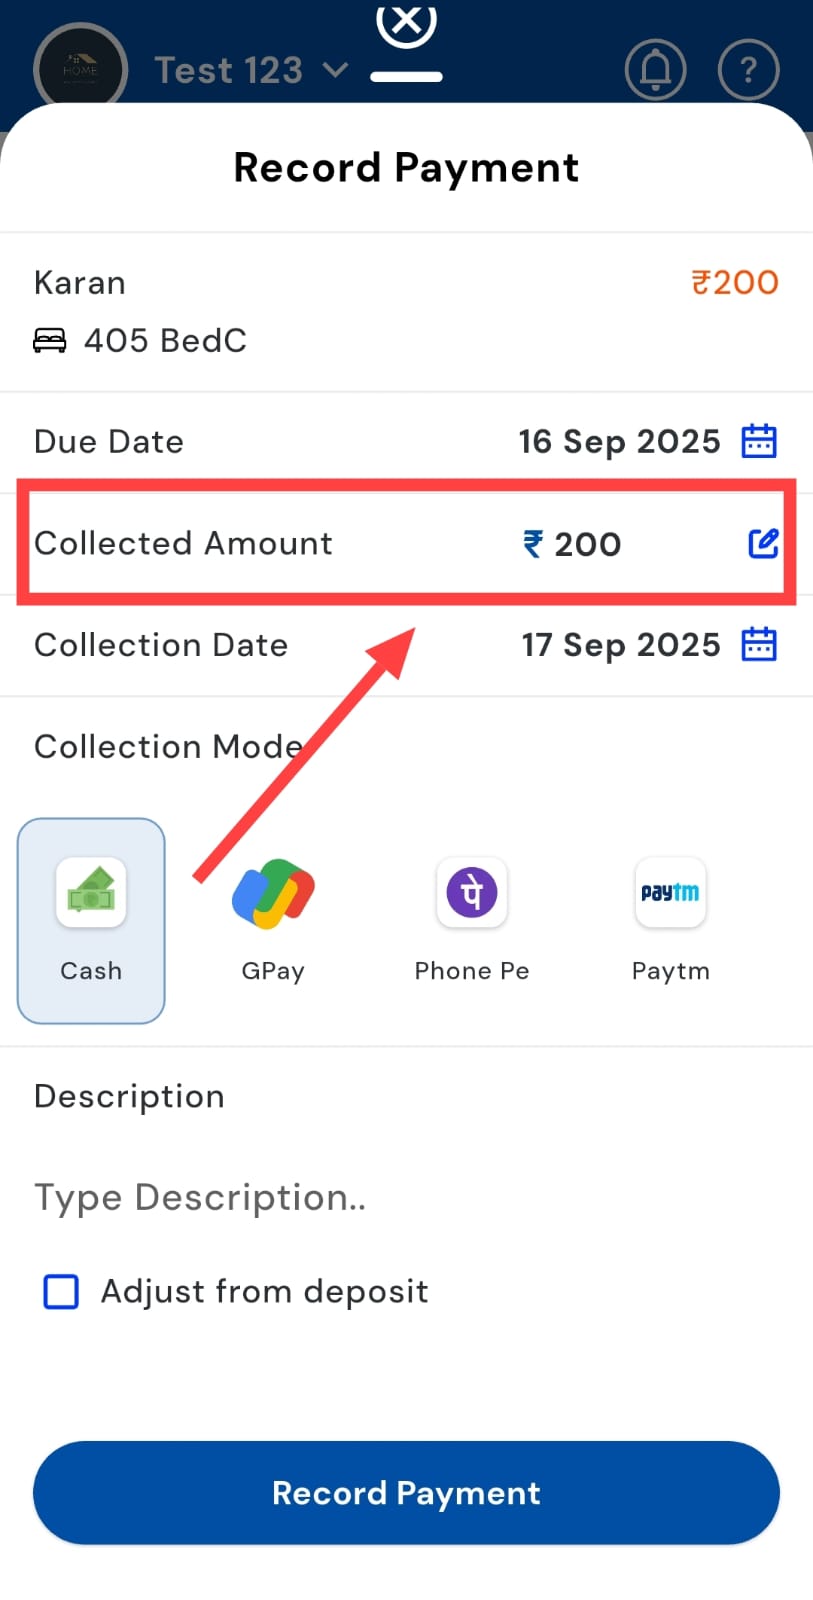
- Step 3: Enter payment details In the window, go to the Collected Amount field and type in the exact amount that the tenant has paid. This ensures the app only deducts the amount actually received.
- Step 4: Select the Collection Mode Choose the method of payment, such as cash, UPI, bank transfer, or cheque. Optionally, add a note or reference (like a transaction ID) for future tracking.
- Step 5: Record the payment Tap Record Payment to confirm. The app will update the tenant’s dues, reflect the partial payment in their passbook, and adjust the remaining balance automatically.
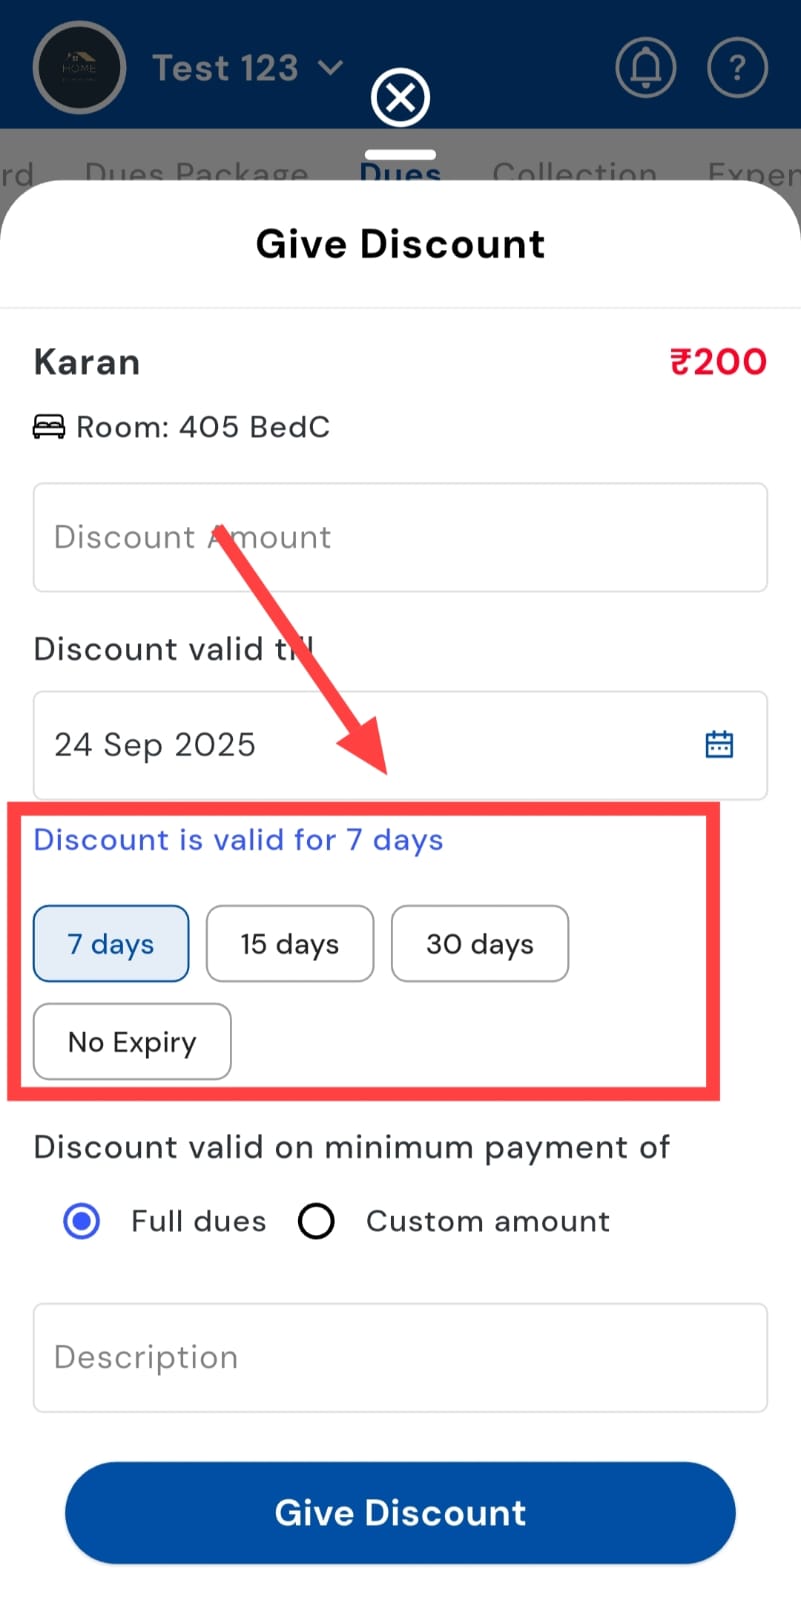
How can I offer a discount to a tenant?
Need to provide a temporary reduction on dues? RentOk makes it simple with the Discount feature. You can quickly apply a reduction to a tenant’s dues, controlling the amount and validity period. This helps manage tenant relationships, encourages timely payments, and keeps records transparent.
Follow these easy steps to use the feature:
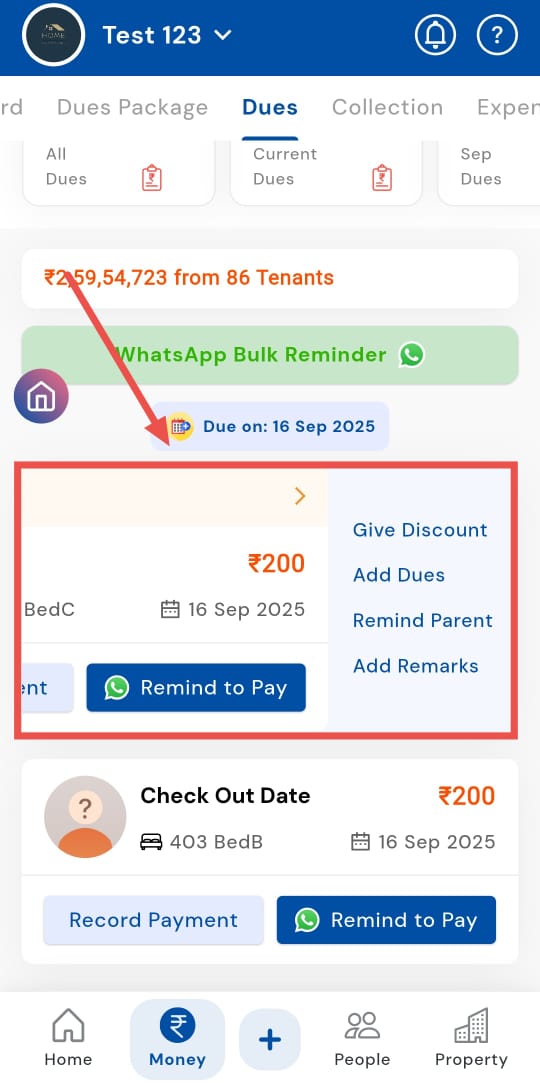
- Step 1: Open the Dues tab Tap the Money icon in the bottom navigation menu, then select Dues. This displays all tenants with pending payments.
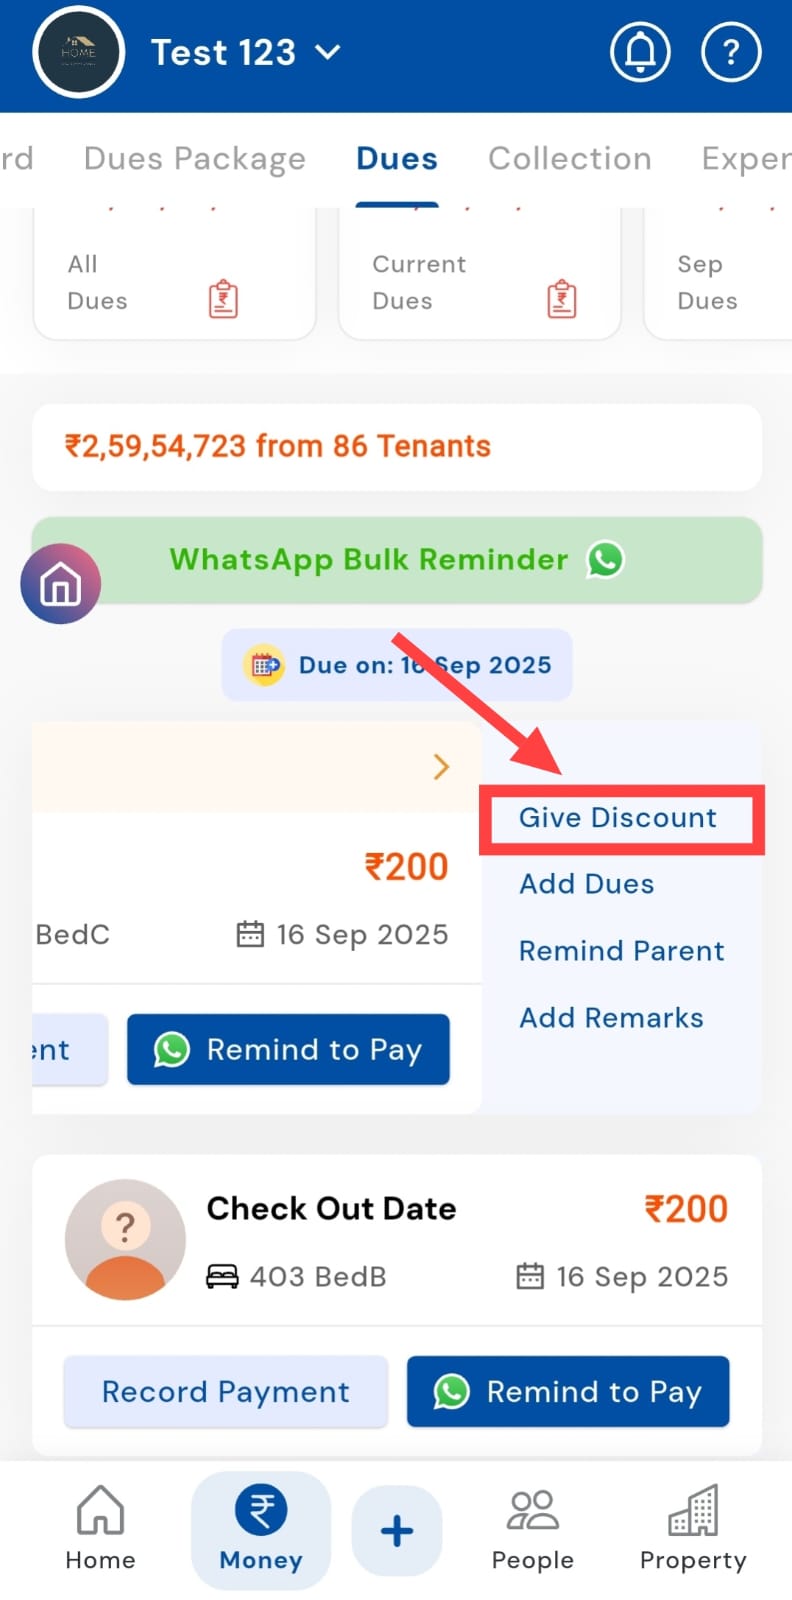
- Step 2: Swipe the tenant’s dues card Find the tenant for whom you want to offer a discount. Swipe their dues card to the left to reveal additional options.
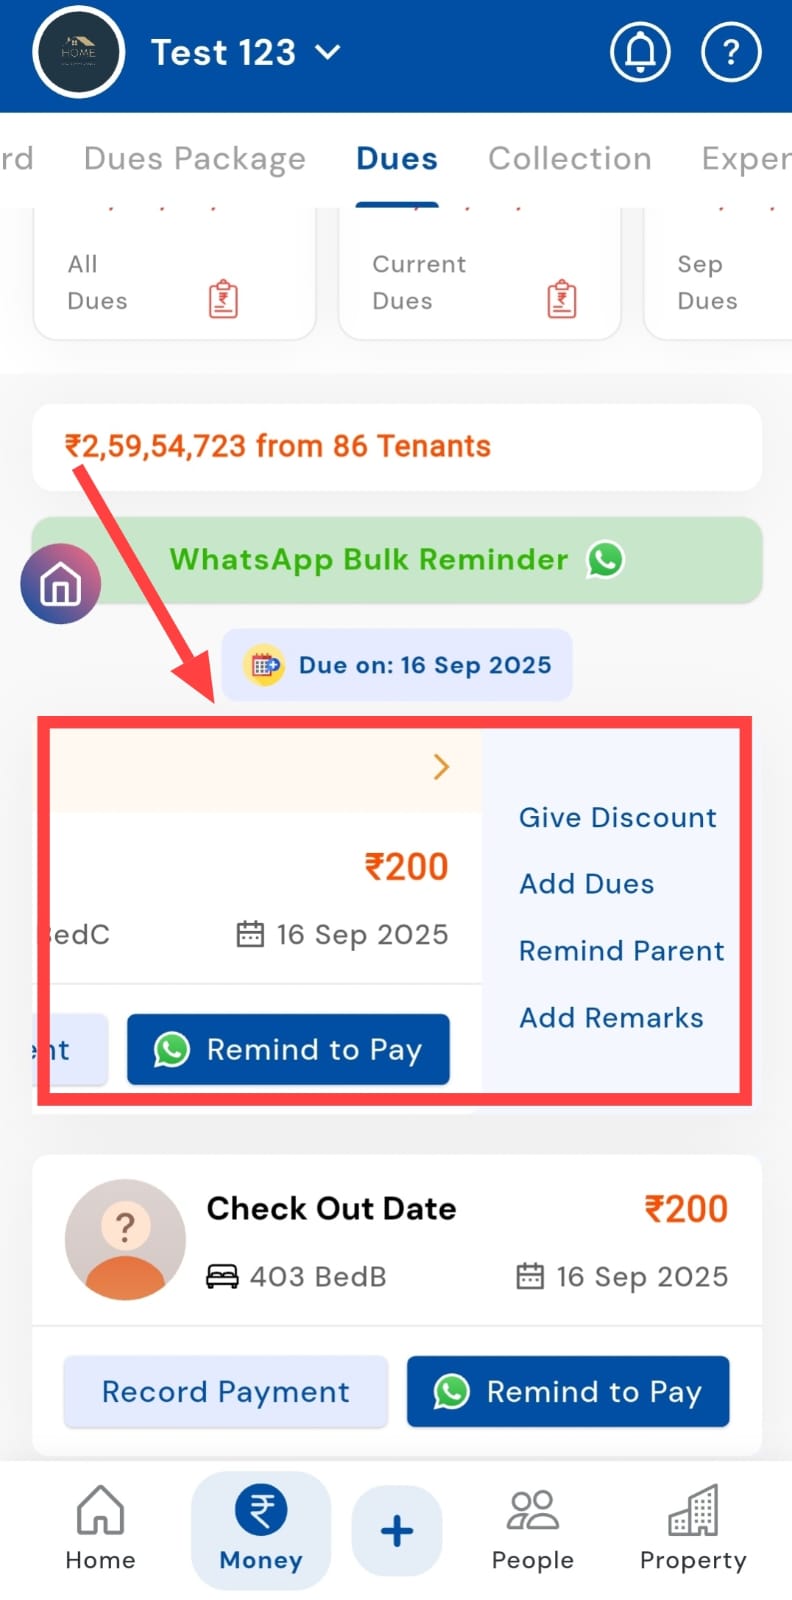
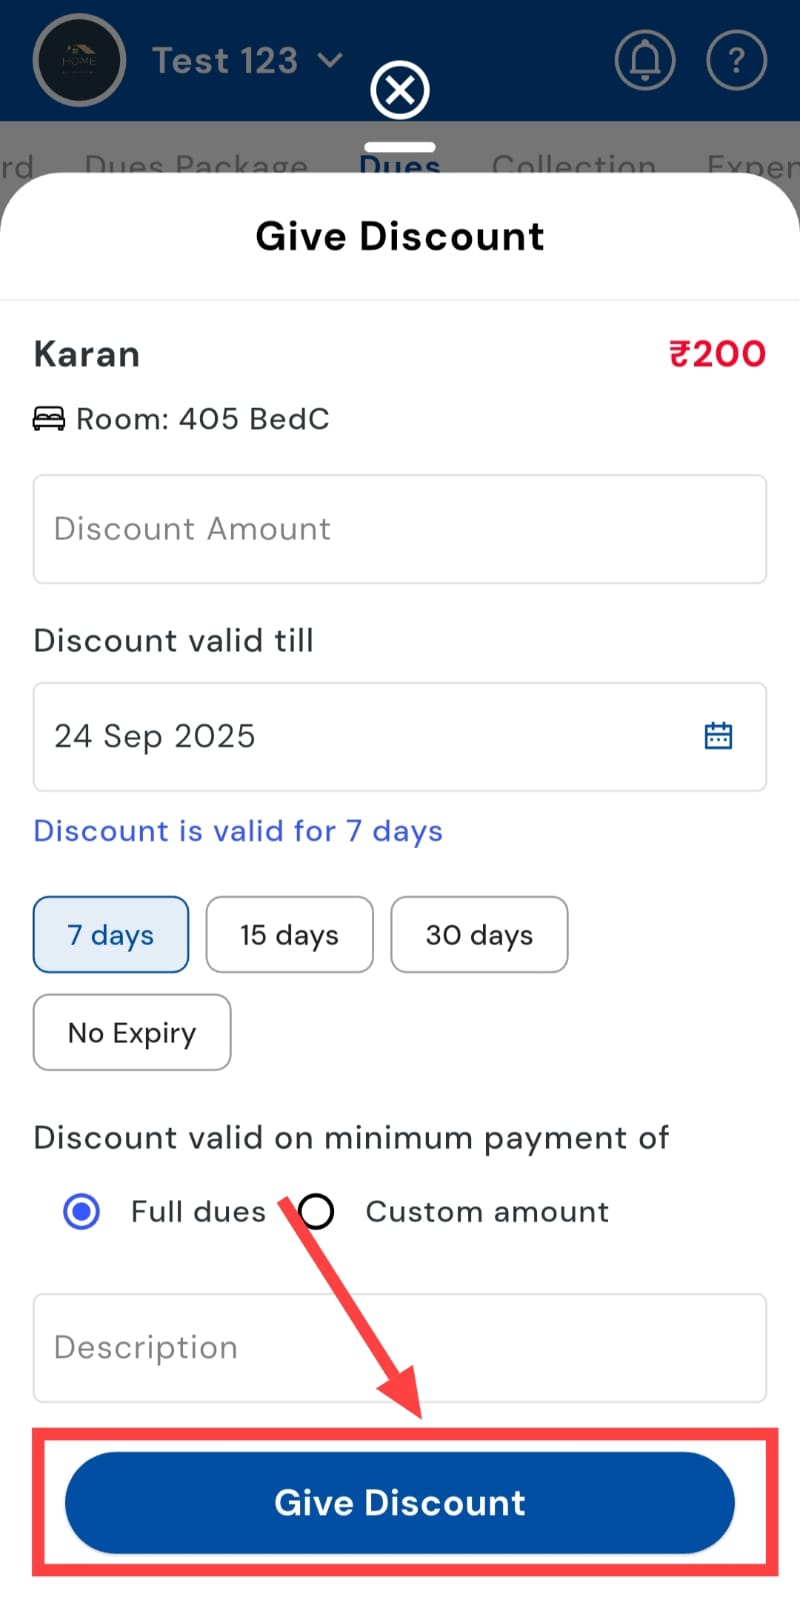
- Step 3: Tap Give Discount Select Give Discount from the options that appear. A discount detail window will open for entering discount details.
- Step 4: Enter the discount amount Type in the discounted amount you want to offer. The app will calculate the new due balance based on this amount.
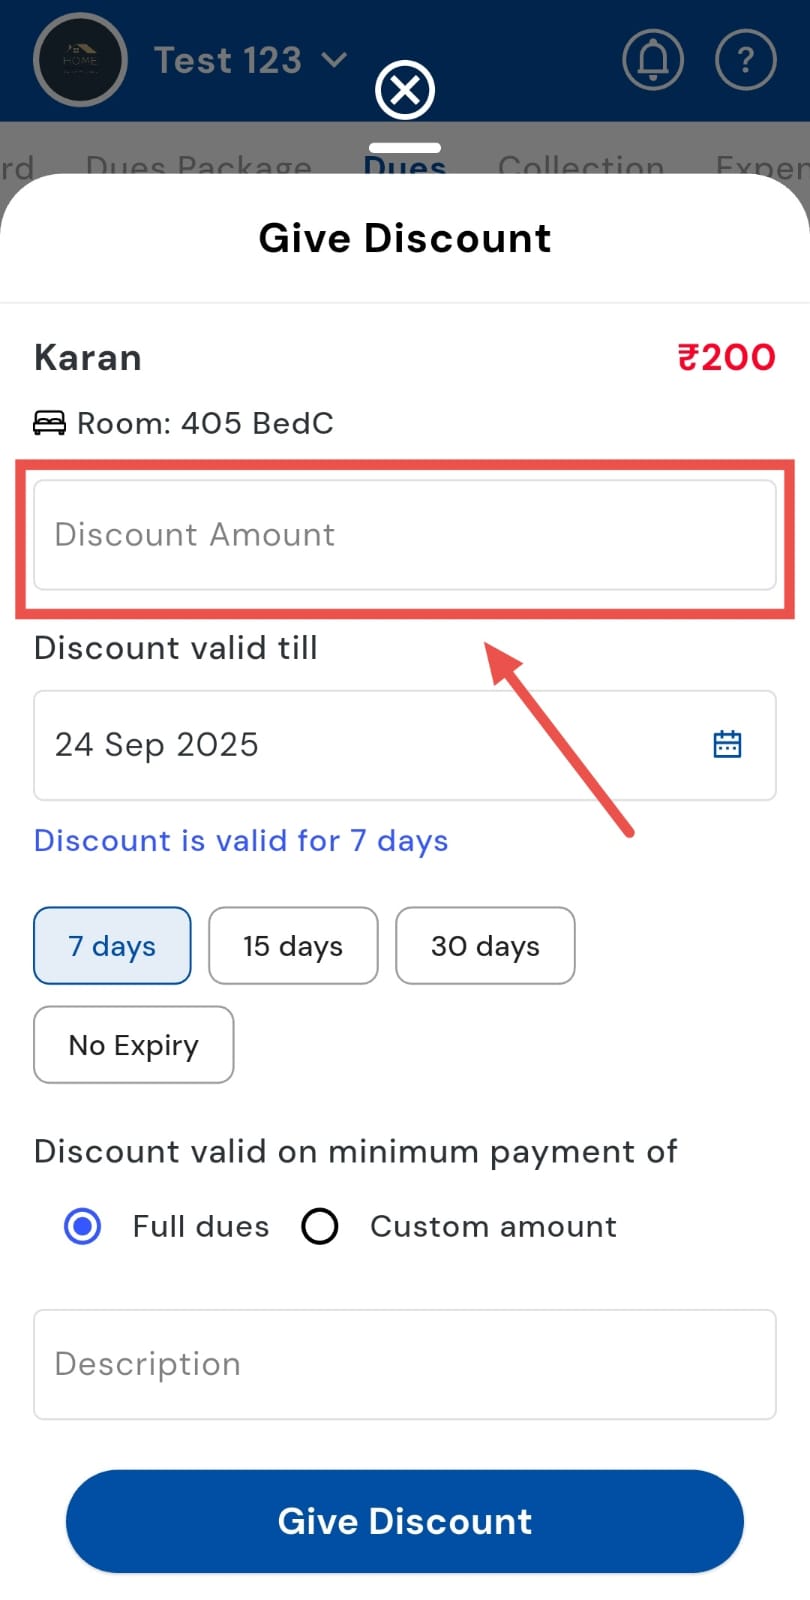
- Step 5: Set the validity period Choose how many days the discount should remain valid. After this period, the discount will no longer apply automatically.
- Step 6: Apply the discount Tap Give Discount to save. The tenant’s dues will be updated with the discounted amount, and the app reflects the new balance immediately.
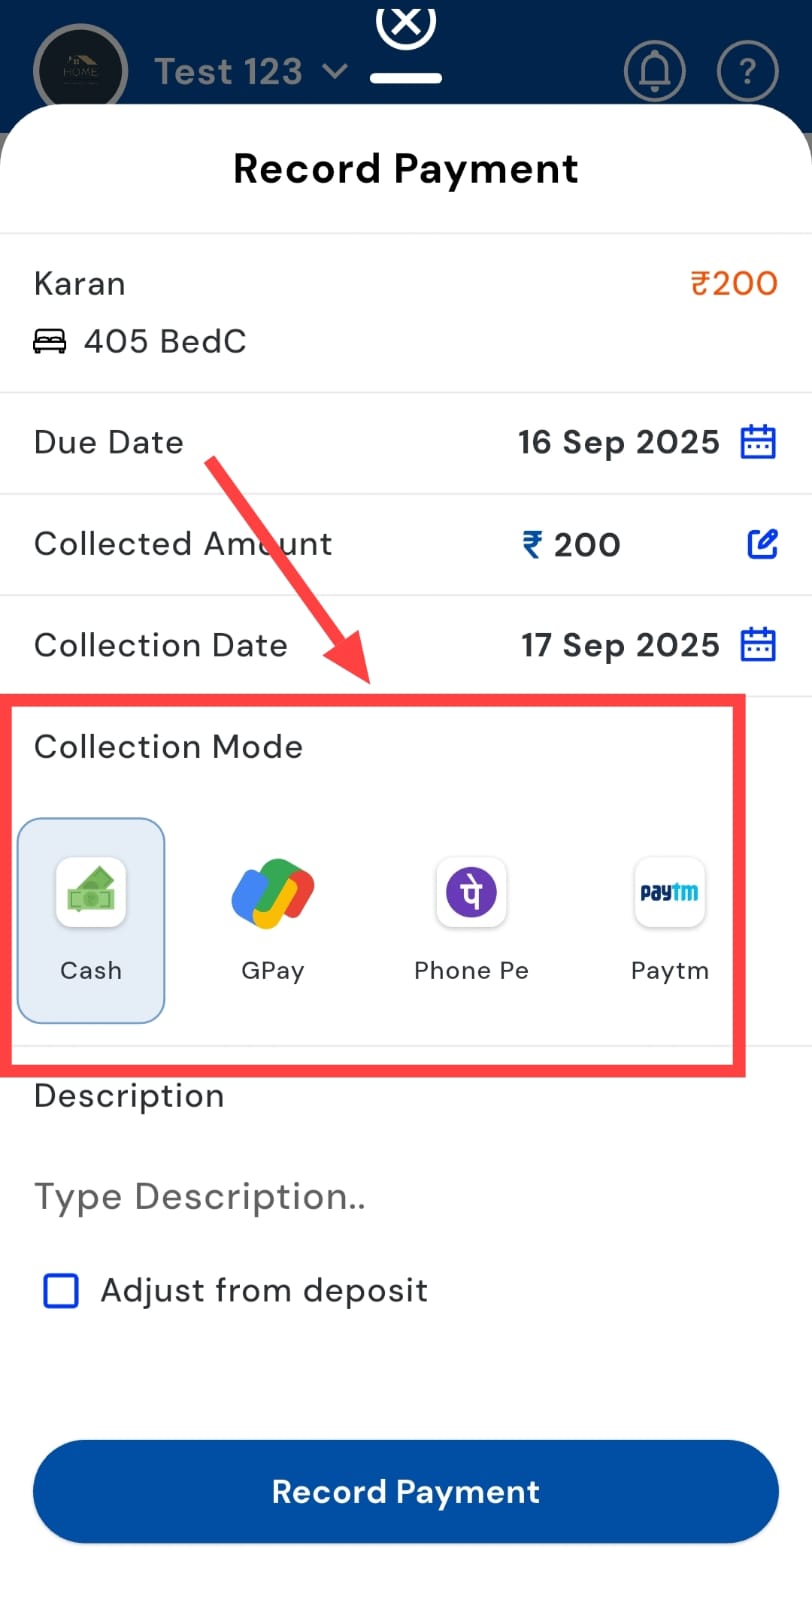
How can I select the payment method?
Different tenants pay in different ways, and we allow you to select the payment method for every transaction. Recording the correct method not only keeps your records accurate but also simplifies reconciliation later. This ensures you have a clear, organized view of all payments, making collections and financial tracking hassle-free.
Follow these steps:
- Step 1: Open the Dues tab Tap the Money icon in the bottom navigation menu, then select Dues. This opens a list of all tenants with pending amounts.
- Step 2: Tap Record Payment On the tenant’s dues card, tap Record Payment. This opens a window to enter payment details.
- Step 3: Select the Collection Mode In the window, choose the method used by the tenant: cash, UPI, bank transfer, cheque, etc. This ensures that each transaction is logged correctly in the system.
- Step 4: Confirm and record After selecting the Collection Mode, tap Record Payment to save. The tenant’s dues and passbook are updated instantly, reflecting the payment along with its mode.
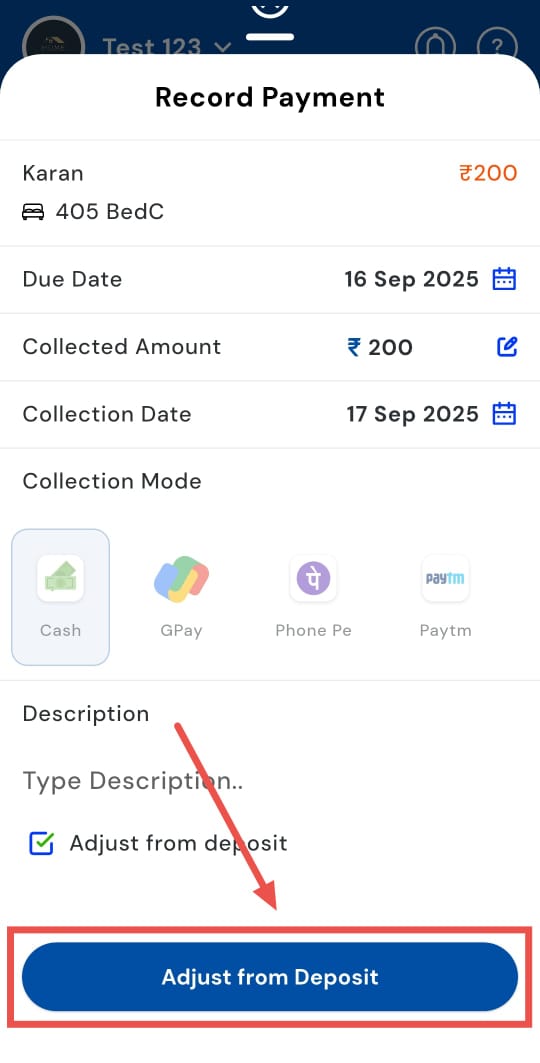
How to adjust any type of dues through a security deposit?
If a tenant has unpaid dues but also a security deposit, RentOk lets you use the deposit to clear all or part of the outstanding amount. This ensures the tenant’s account stays up to date, with any remaining balance accurately reflected in the passbook. The app handles all updates automatically, making the process quick and hassle-free.
- Step 1: Open the Dues tab Tap the Money icon in the bottom navigation menu, then select Dues. This shows a list of all tenants with pending payments.
- Step 2: Tap Record Payment On the tenant’s dues card, tap Record Payment to open the payment entry window.
- Step 3: Enter the amount to adjust In the Collected Amount field, enter the amount you want to offset using the security deposit.
- Step 4: Adjust the deposit Tap Adjust from Deposit. The app will automatically deduct this amount from the tenant’s security deposit instead of recording a regular payment.
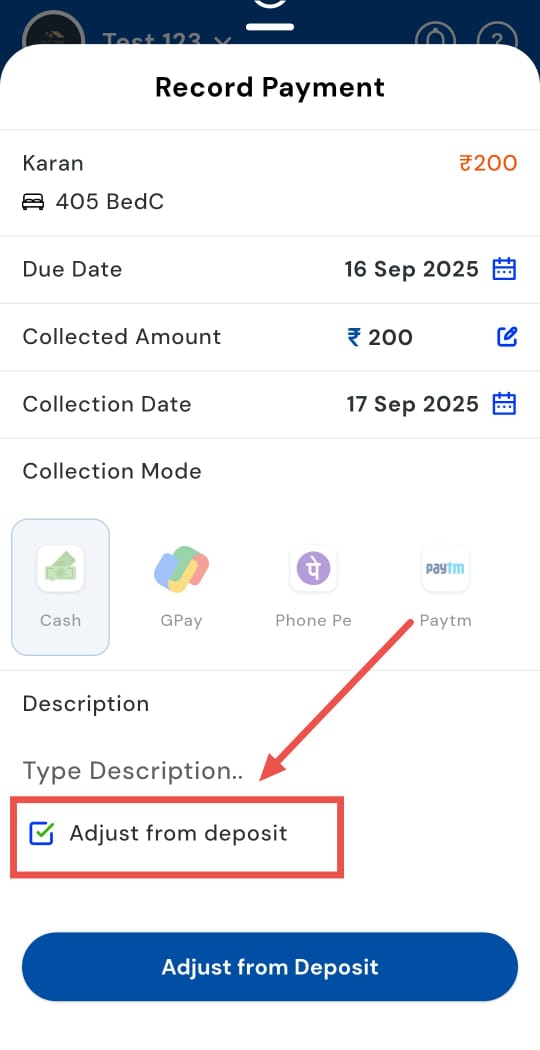
- Step 5: Confirm and save Click Adjust from Deposit to finalize. The tenant’s dues and deposit balance will be updated instantly, and the payment will appear in the passbook as an adjustment.
- **How to share ****the **payment link individually?
Do your tenants sometimes forget to pay? No worries! With RentOk, you can send a personalized payment link to any tenant with pending dues. They can pay instantly and securely, and you’ll see the update right away. Collections become faster, smoother, and completely hassle-free, turning what used to be a tedious task into a simple, efficient process.
Try it now and see how easy managing dues can be. Just follow these simple steps:
- Step 1: Open the Dues tab Tap the Money icon in the bottom navigation menu, then select Dues. You will see a list of tenants with outstanding amounts.
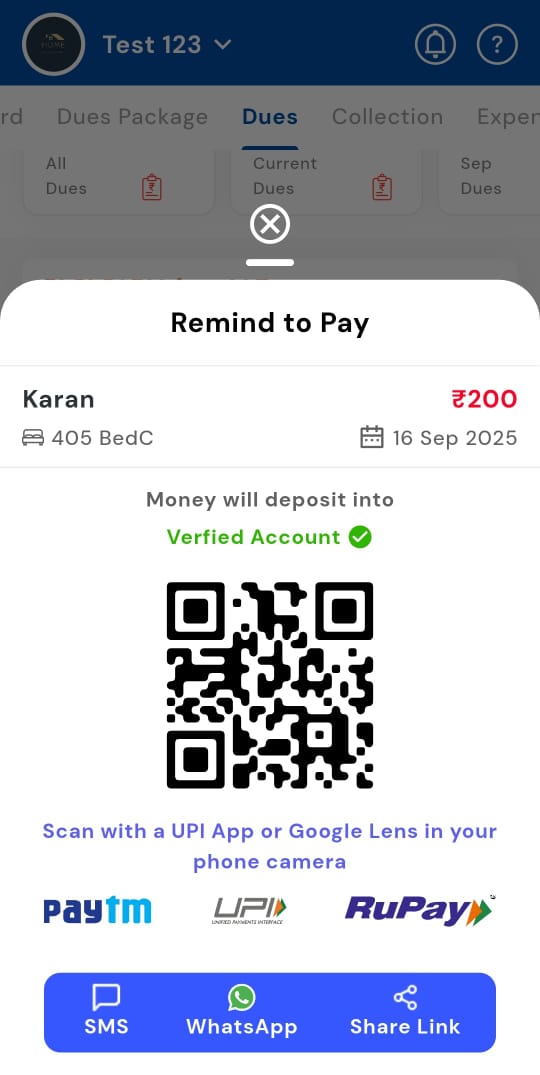
- Step 2: Tap Remind to Pay On the tenant’s dues card, click Remind to Pay. This opens options to notify the tenant.
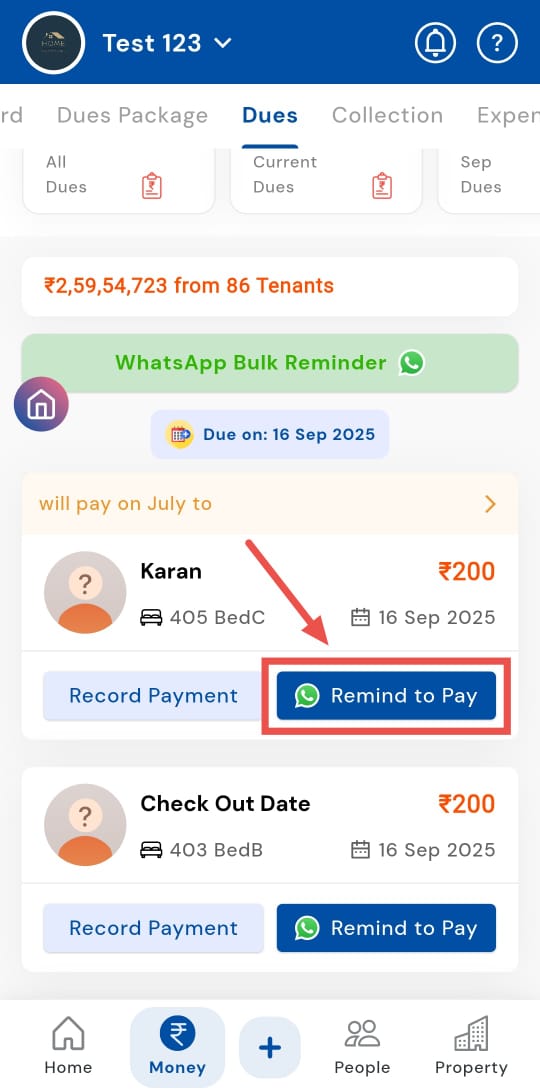
- Step 3: Choose sender mode and share Select the mode through which you want to send the payment link (e.g., SMS, WhatsApp, or simply copy the link to share). The tenant will receive the link individually and can pay the due directly.
How to send a WhatsApp bulk reminder to tenants and parents?
Not just one or two, but multiple tenants at once? RentOk makes it simple! With just a few taps, you can send a bulk WhatsApp reminder to tenants with pending dues and even include their parents. This saves time, streamlines communication, ensures timely payments, and keeps your collections organized. Managing multiple tenants has never been easier!
Follow these steps:
-
Step 1: Open the Dues tab Tap the Money icon in the bottom navigation menu, then select Dues. This will display all tenants with outstanding payments, along with their details.
-
Step 2: Tap WhatsApp Bulk Reminder In the Dues section, click WhatsApp Bulk Reminder. The app will prepare a message template listing all tenants with pending dues. You can quickly review and ensure the details are correct before sending.
-
Step 3: Include parents in the reminder (optional) If you want to keep parents informed, select the checkbox Send WhatsApp reminder to parents too. This ensures both tenants and their parents receive the same notification simultaneously.
-
Step 4: Send the bulk reminder Click Send to notify all selected tenants and parents. The app will confirm once the messages are successfully delivered, making follow-ups smoother and more transparent.
19.1 ** **How to send a WhatsApp bulk reminder?
Not one, not two, but multiple tenants to remind at once? It's okay, we made it simple for you. With just a few taps, you can send a bulk WhatsApp reminder to notify all tenants with pending dues. This not only saves time but also streamlines communication, ensures timely payments, and keeps your collections organized and hassle-free. Managing multiple tenants has never been easier!
Follow these steps:
-
Step 1: Open the Dues tab Tap the Money icon in the bottom navigation menu, then select Dues. This displays all tenants with outstanding payments.
-
Step 2: Tap WhatsApp Bulk Reminder In the Dues section, click WhatsApp Bulk Reminder. This will prepare a message template for all tenants with pending dues.
-
Step 3: Send the reminders Review the message and click to send bulk reminders. All selected tenants will receive a WhatsApp notification about their pending payments. The app will confirm once the reminders are successfully sent.
How can you send WhatsApp Bulk payment reminders to parents?
Keeping parents in the loop about pending dues makes follow-ups smoother and more transparent. RentOk lets you send WhatsApp bulk reminders to both tenants and parents at the same time, keeping everyone informed with a single message and ensuring timely payments.
Follow these steps:
-
Step 1: Open the Dues tab Tap the Money icon in the bottom navigation menu, then select Dues. You will see a list of tenants with outstanding payments.
-
Step 2: Tap WhatsApp Bulk Reminder In the Dues section, click WhatsApp Bulk Reminder. This prepares a notification for all tenants with pending dues.
-
Step 3: Include parents in the reminder Select the checkbox Send WhatsApp reminder to parents too. This ensures that parents receive the same notification as the tenants.
-
Step 4: Send the bulk reminder Click Send to notify all tenants and parents. The app will confirm once the messages are successfully delivered.
How can you send individual payment reminders to parents?
Sometimes, tenants may overlook payments, but you can keep parents informed to encourage timely settlements. RentOk lets you send individual reminders directly to parents, making follow-ups more personal and effective. This ensures parents are aware of their child’s pending dues and helps streamline collections without any confusion.
Follow these steps:
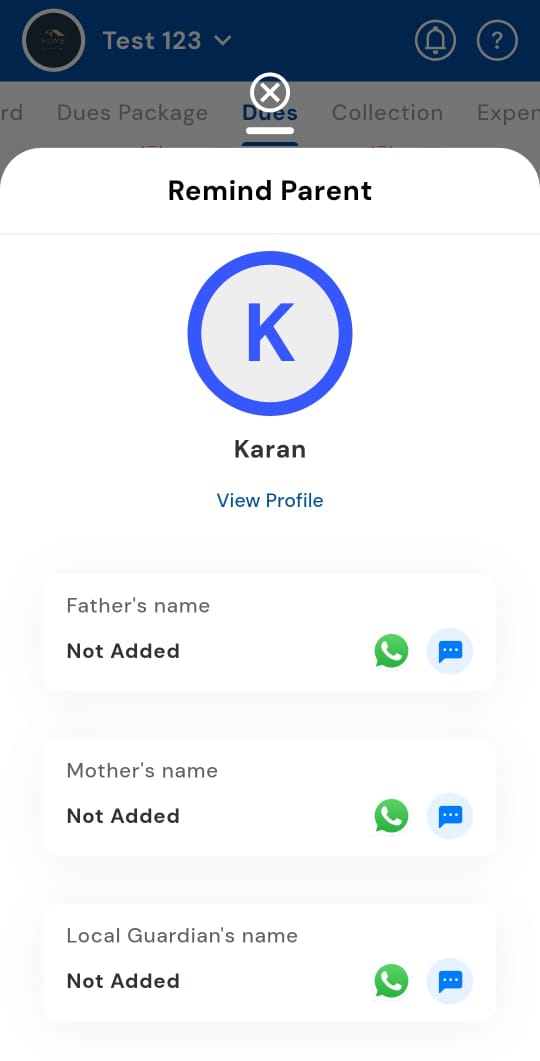
- Step 1: Open the Dues tab Tap the Money icon in the bottom navigation menu, then select Dues. You will see a list of tenants with outstanding payments.
- Step 2: Swipe the tenant card On the tenant’s dues card, swipe to the left to reveal additional options.
- Step 3: Tap Remind Parent Click Remind Parent. This opens the parent notification options.

- Step 4: Select the parent and send Choose the parent you want to notify (e.g., father, mother, local guardian), then click Send. The selected parent will receive a personalized payment reminder immediately.
How can we check various types of dues?
Want to see exactly what types of dues are pending for your tenants? You can easily track and manage various dues by filtering payments by category. Whether it’s rent, maintenance, utilities, or other charges, filtering lets you focus on specific types of payments at a time. This provides a clear overview of what’s pending, helps you prioritize follow-ups, and ensures timely action to keep accounts up to date.
Just follow these steps:
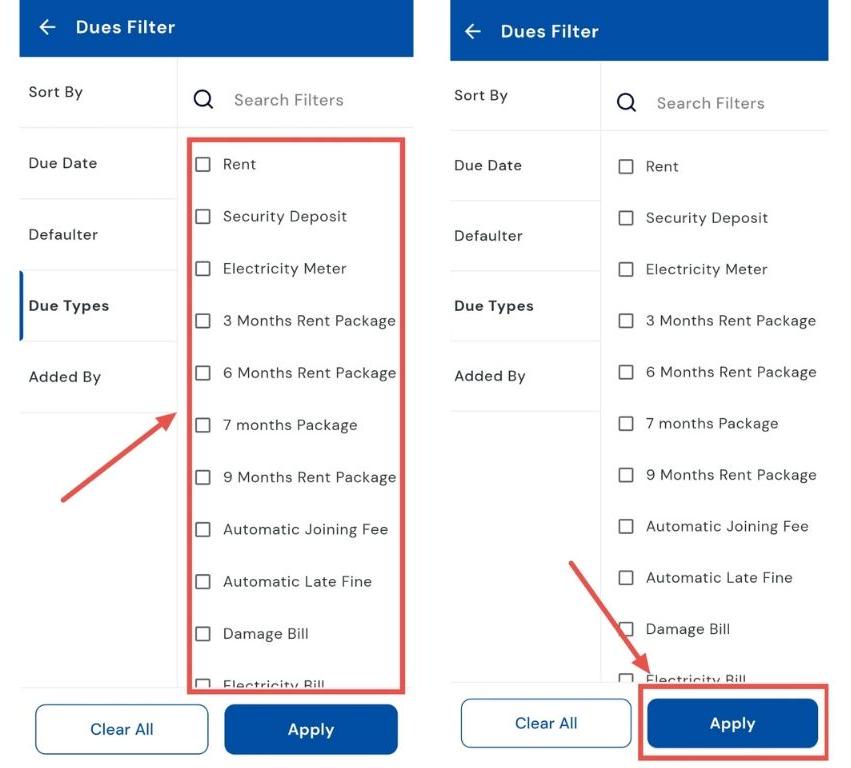
- Step 1: Open the Dues tab Tap the Money icon in the bottom navigation menu, then select Dues. You will see a list of all tenants with pending payments across all categories.
- Step 2: Open the filter Tap the Filter icon in the search box. This will open a window with multiple options to refine your search.
- Step 3: Select Due Types In the window, click on Due Types to choose which category of dues you want to view.
- Step 4: Choose the category Pick the specific type of dues you want to check, such as rent, maintenance, utilities, or any other charges. Then tap Apply, and the app will display only the dues for the chosen category.
How can I check who added the Dues?
Curious who added a specific dues entry? You can check the records to see which user recorded it, ensuring transparency and clear documentation of all tenant transactions. Staying informed about who entered each payment helps maintain organized records, simplifies follow-ups, and strengthens overall management of your property accounts.
Follow these steps to view the responsible user:
- Step 1: Open the Dues tab Tap the Money icon in the bottom navigation menu, then select Dues. You will see all pending payments across your properties.
- Step 2: Open the filter Tap the Filter icon in the search box. This opens options to refine your dues view.
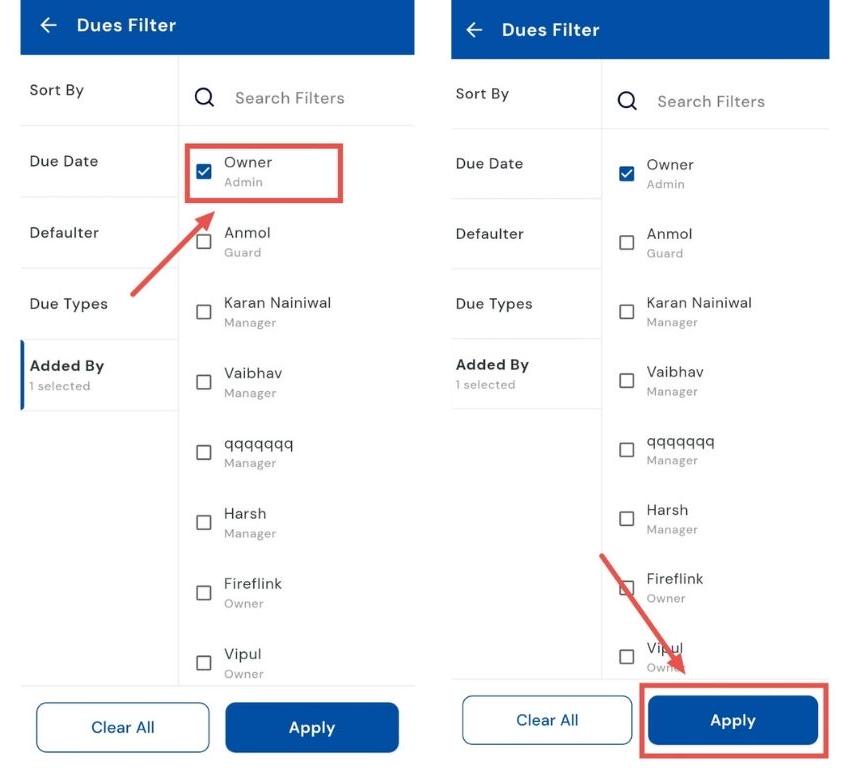
- Step 3: Select “Added By” In the filter window, click Added By to see the list of users who have added dues entries.
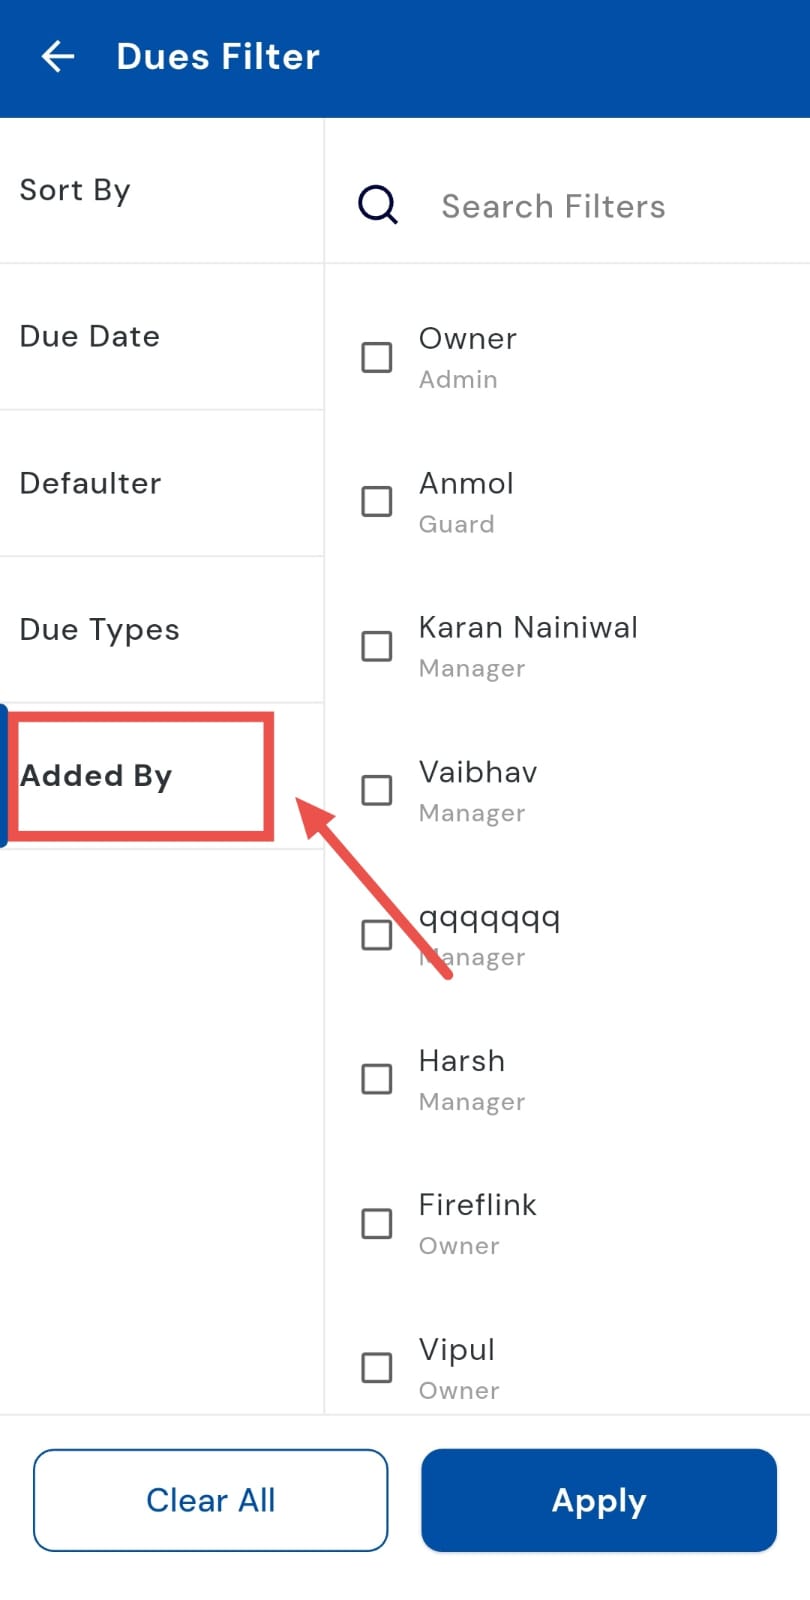
- Step 4: Choose the user Select the relevant team member from the options. The app will display all the dues entries added by that specific user. Then tap Apply to view the filtered results.