Money Collection
MONEY>COLLECTION
- MONEY>COLLECTION
How do I review collections for a specific period?
Tracking collections has become flexible and easy. You can now review payments using “Was Collected On,” “Was Due On,” or even a combined view of both. This allows you to track received payments, pending dues, or analyze both together for a comprehensive overview. Whether reviewing daily updates, monthly reports, or yearly trends, these filters keep your records organized, simplify trend analysis, and make follow-ups hassle-free.
Steps to review collections:
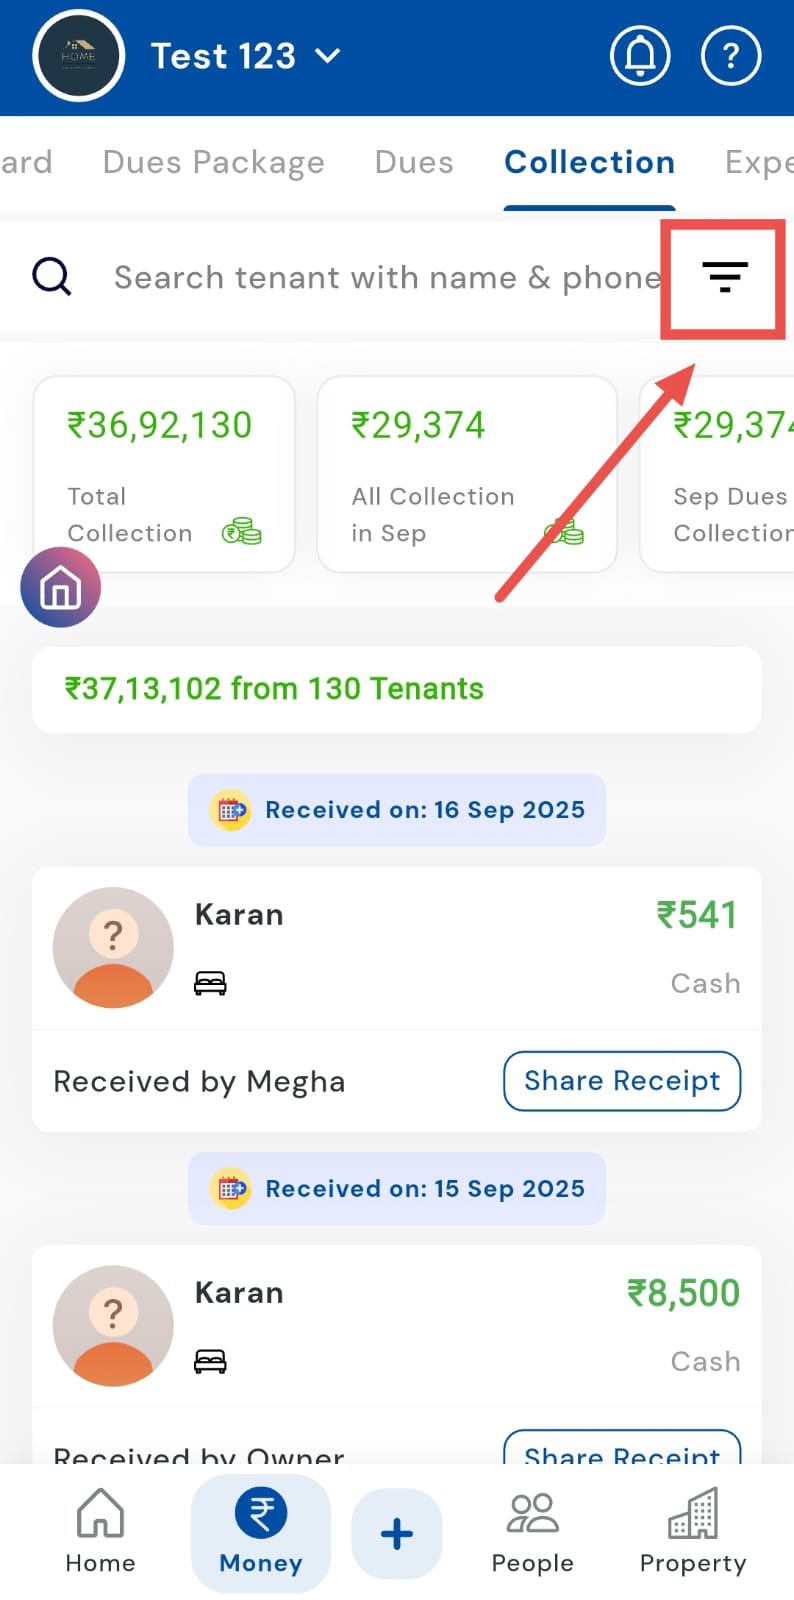
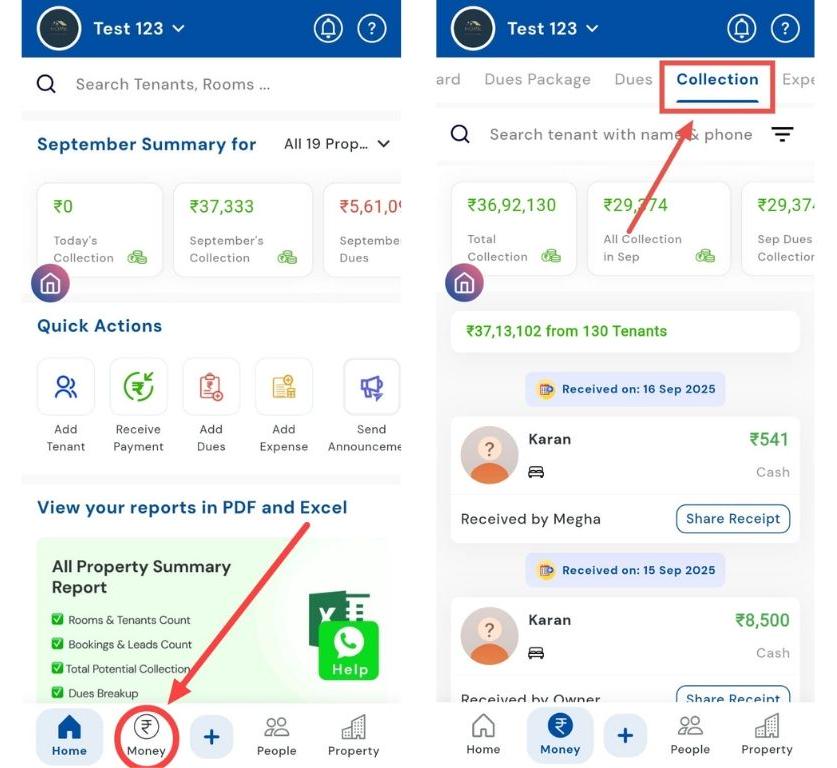
- Open the Collections tab Tap the Money icon in the bottom navigation menu. From the menu, select Collections to view all recorded payments.

- Access the filter option At the top of the Collections screen, tap the Filter option inside the search bar to see filtering choices.
-
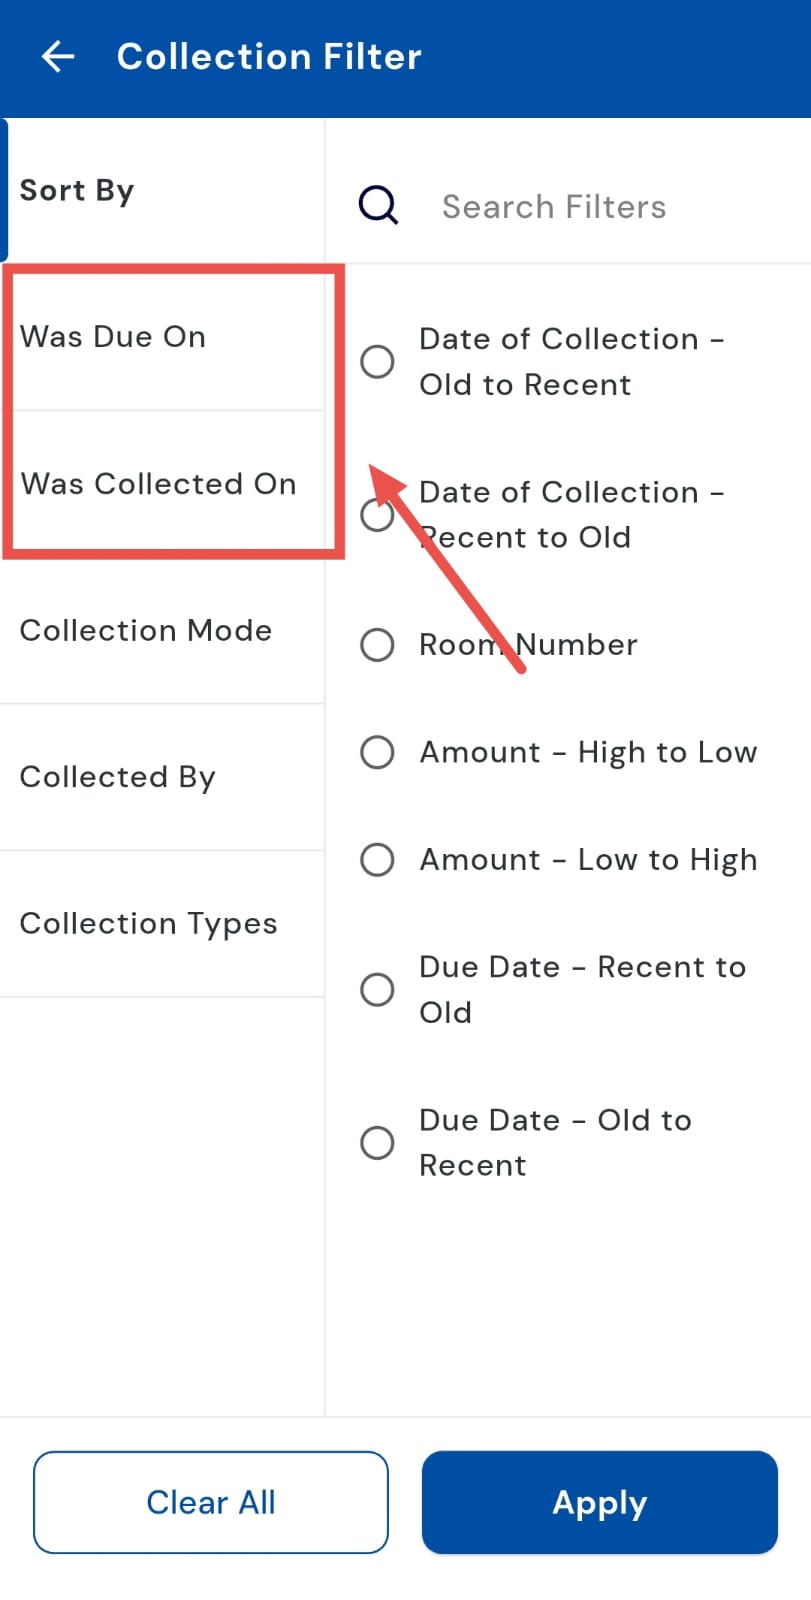
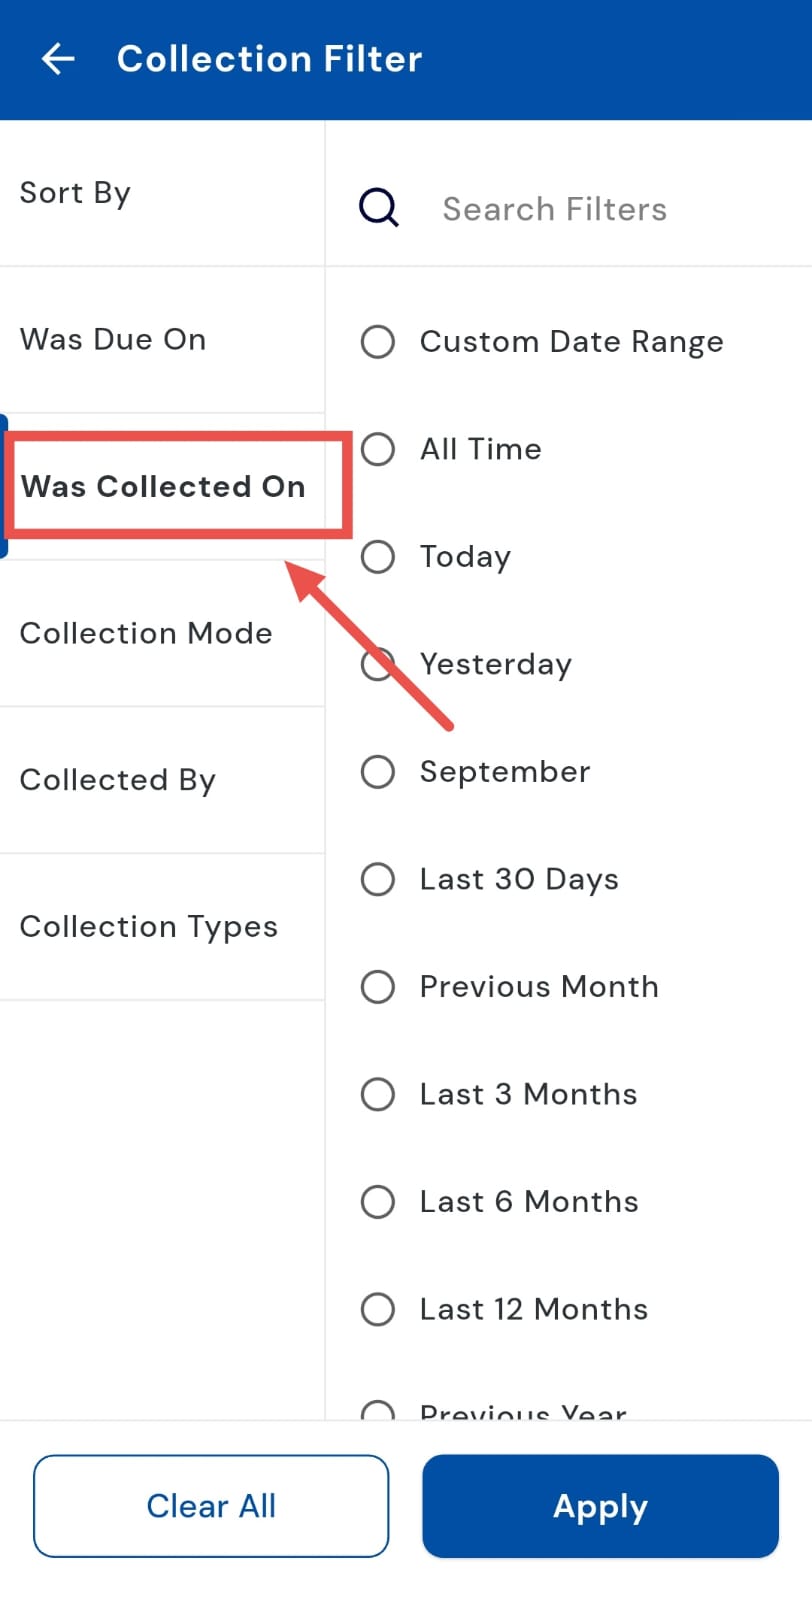
Choose the appropriate filter You will see multiple filter options, including:
-
“Was Collected On” - generally preferred for reviewing payments received.
-
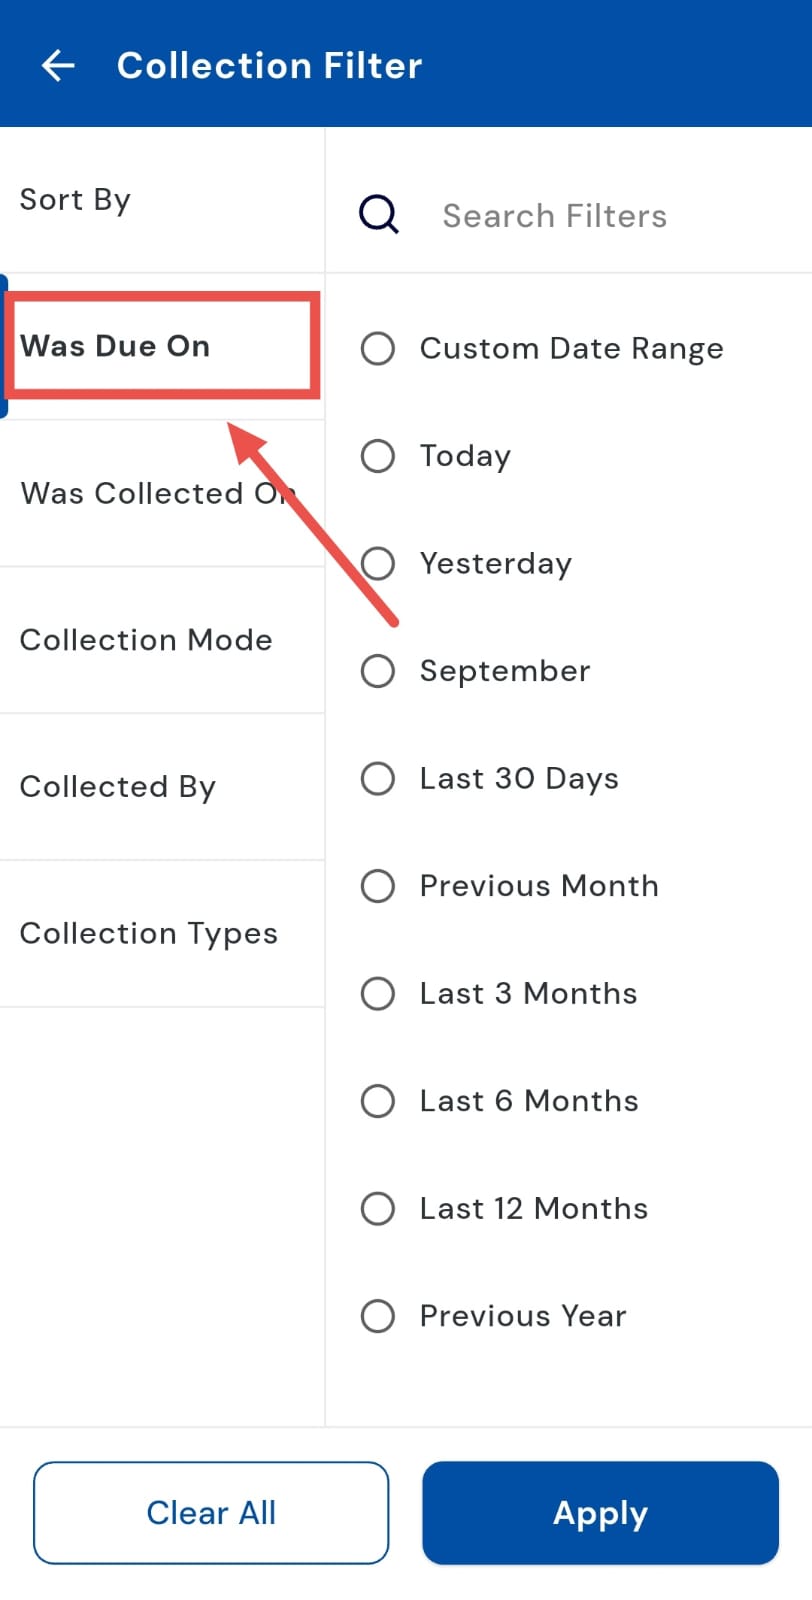
“Was Due On” - useful for tracking pending or due amounts.
-
Combined Option - lets you view both collected and due payments together. Most users prefer “Was Collected On,” but “Was Due On” is equally important depending on your review needs.
-
-
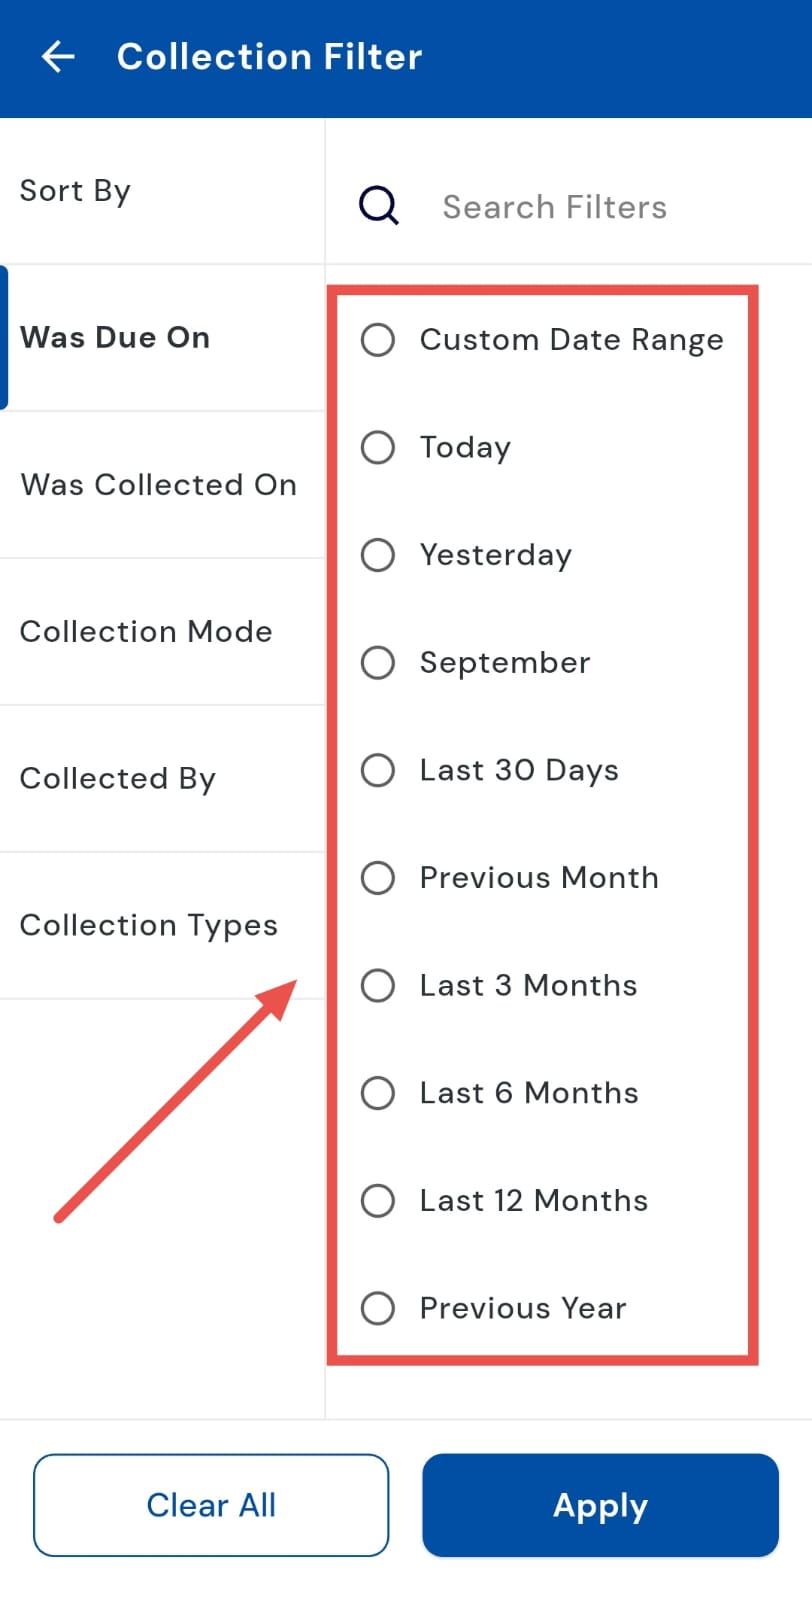
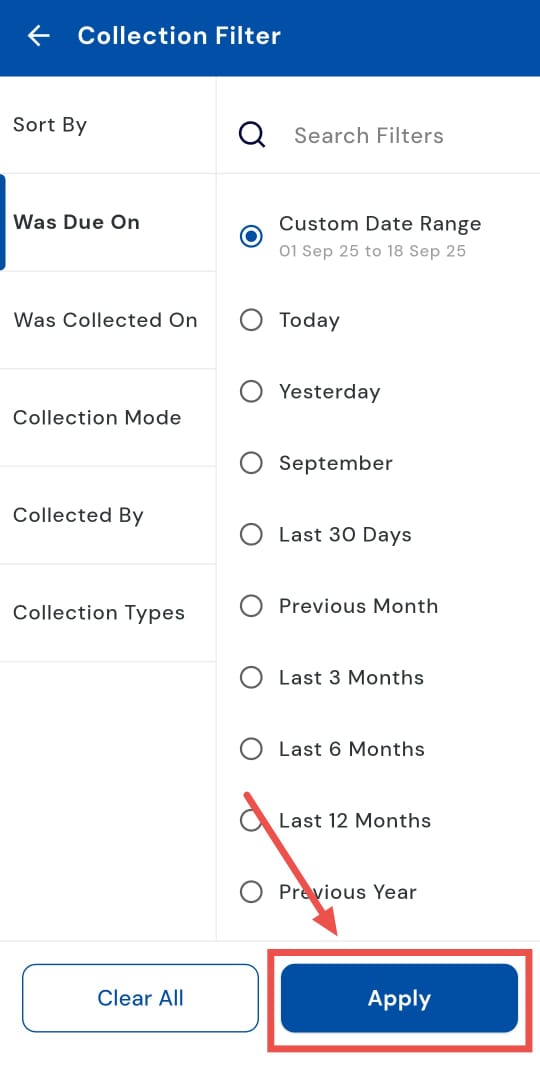
Select your preferred date range You can either:
-
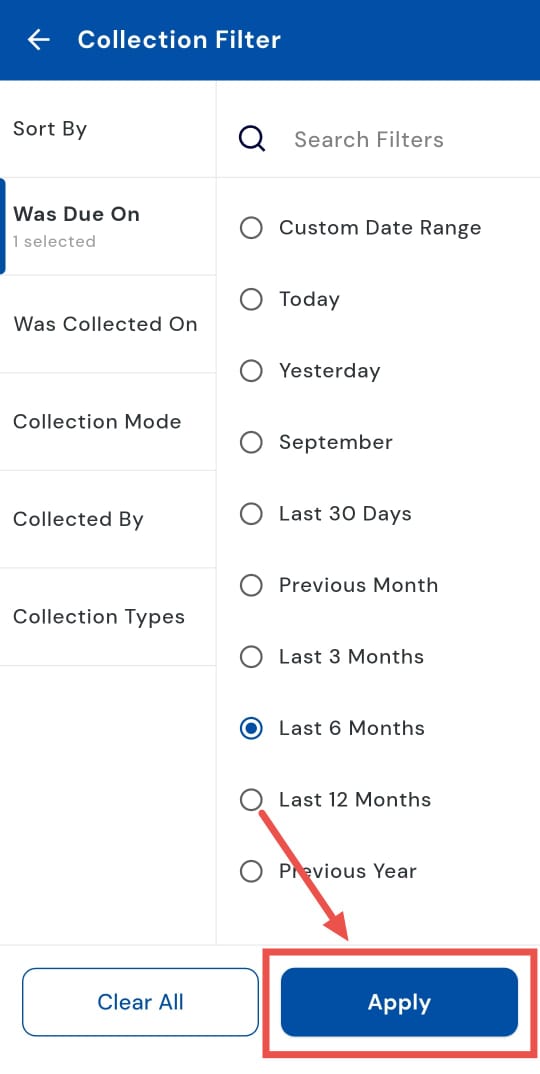
Pick from preset options like Today, Yesterday, Last 30 Days, Previous Month, Last 3 Months, Last 6 Months, or Previous Year.
-
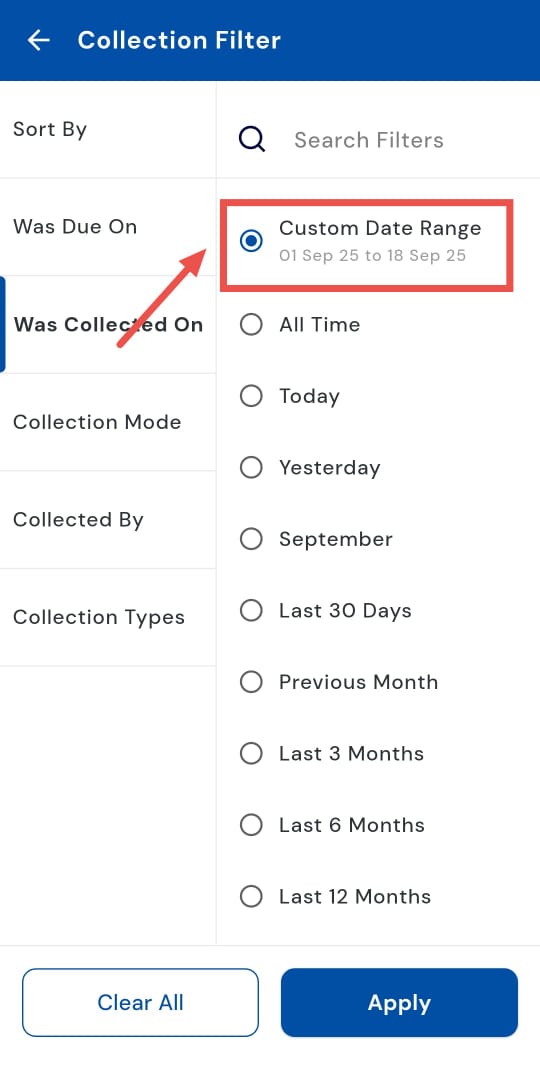
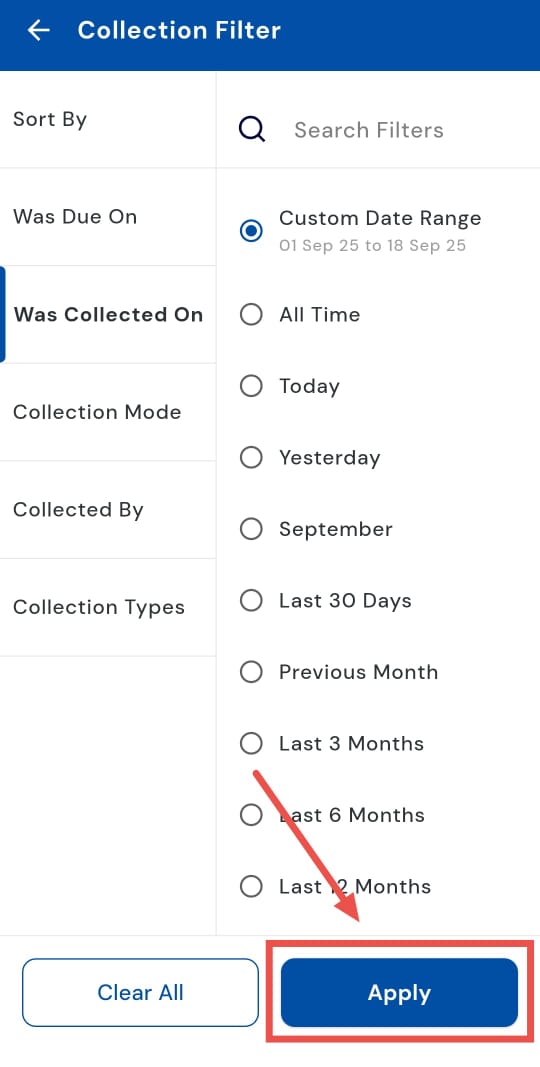
Or, choose Custom Date Range to manually set the exact Start Date and End Date you want to review.
-
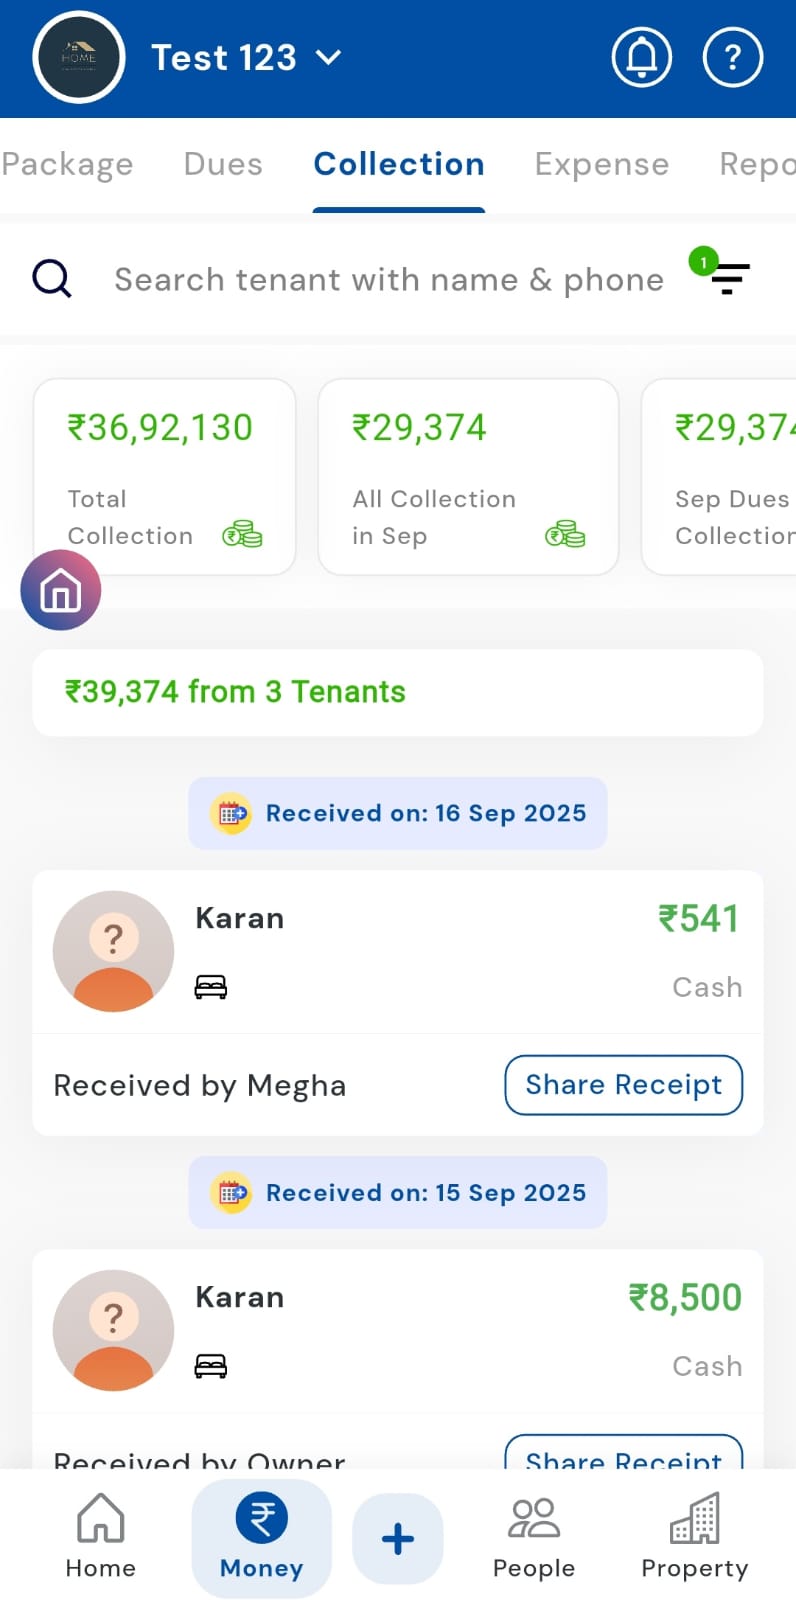
- Apply your selection Once you’ve set the timeframe, tap Apply to confirm your choice.

- View filtered collections The system will instantly display all collections based on your chosen filter(s) and date range.
How do I review collections within a specific date range?
Tracking collections for any duration is now effortless with the "Was collected on" filter. Whether you want to review monthly collections, quarterly updates, or a completely custom timeframe, you can simply select the start and end dates to get a clear view of all payments collected in that period. This not only keeps your records organized but also makes it easier to analyze trends, prepare reports, and follow up on pending amounts, keeping your payment tracking smooth and hassle-free.
Simply follow these steps:
- Step 1: Open the Collections tab Tap the Money icon at the bottom navigation bar. From the menu, select Collections to view all the payment entries recorded.
- Step 2: Access the filter option At the top of the Collections screen, you’ll see a Filter option inside the search bar. Tap on it to bring up filtering choices.
- Step 3: Select the "Was collected on" option A filter window with the filter categories will appear. From these options, tap on Was collected on to proceed.
- Step 4: Choose “Custom Date Range” Within the Date Range section, select Custom Date Range so you can manually define the exact period you want to review.
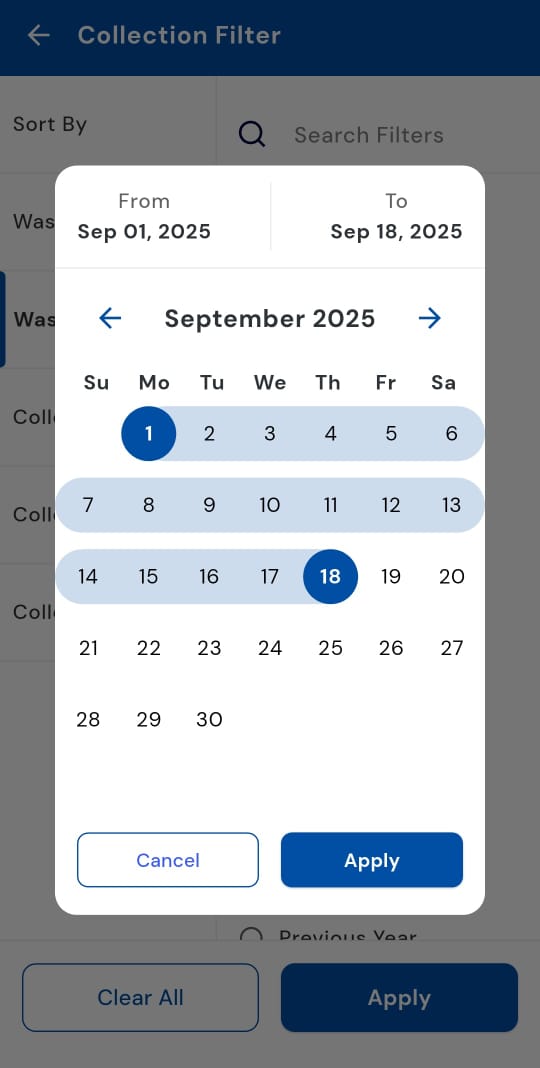
- Step 5: Pick the start and end dates A new page will open where you can set a Start Date and an End Date. Adjust these as per the duration you want to analyze.
- Step 6: Save your selection Once the dates are selected, tap Apply to confirm your custom range.
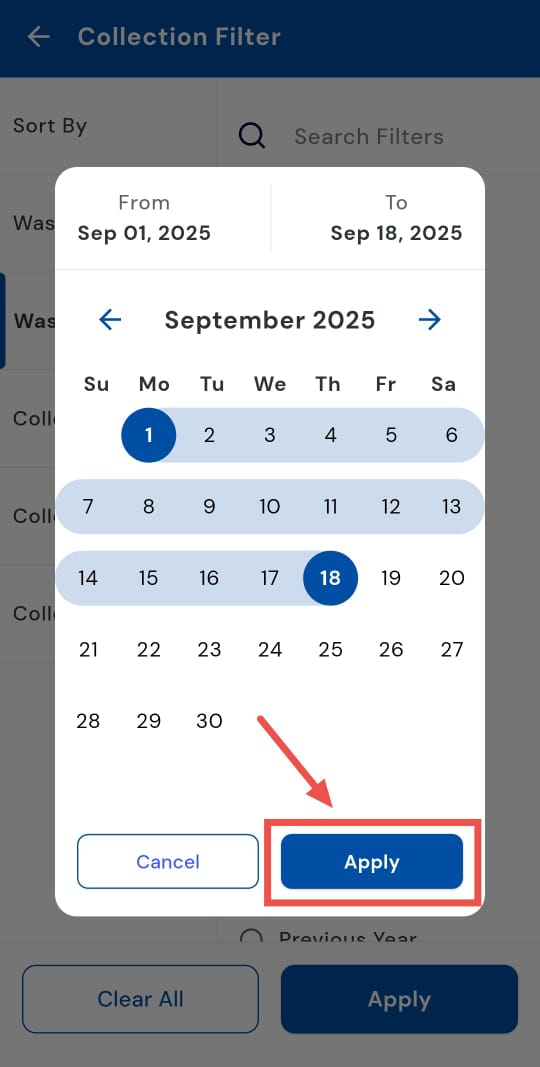
- Step 7: Apply the filter Finally, tap Apply, and the system will display all collections collected during your chosen timeframe.
How can I access the total collection over all time?
Keeping track of your total collections doesn’t have to be complicated. With the "Was collected on" filter, you can view the entire history of payments collected in just a few taps. Simply choose the “All Time” option to see a complete record of every collection ever made, without limiting yourself to a specific month or period. This gives you a clear overview of your overall collections, helps you analyze long-term trends, and ensures nothing gets missed when reviewing your accounts.
Here's how you can do it:
- Step 1: Open the Collections tab Tap the Money icon located in the bottom navigation menu. From the available options, select Collections to view all payment records.
- Step 2: Access the filter option On the Collections screen, locate the Filter option inside the search bar and tap on it to open filter settings.
- Step 3: Choose the "Was collected on" filter A window will appear, with the filter categories. Tap on "Was collected on" to proceed.
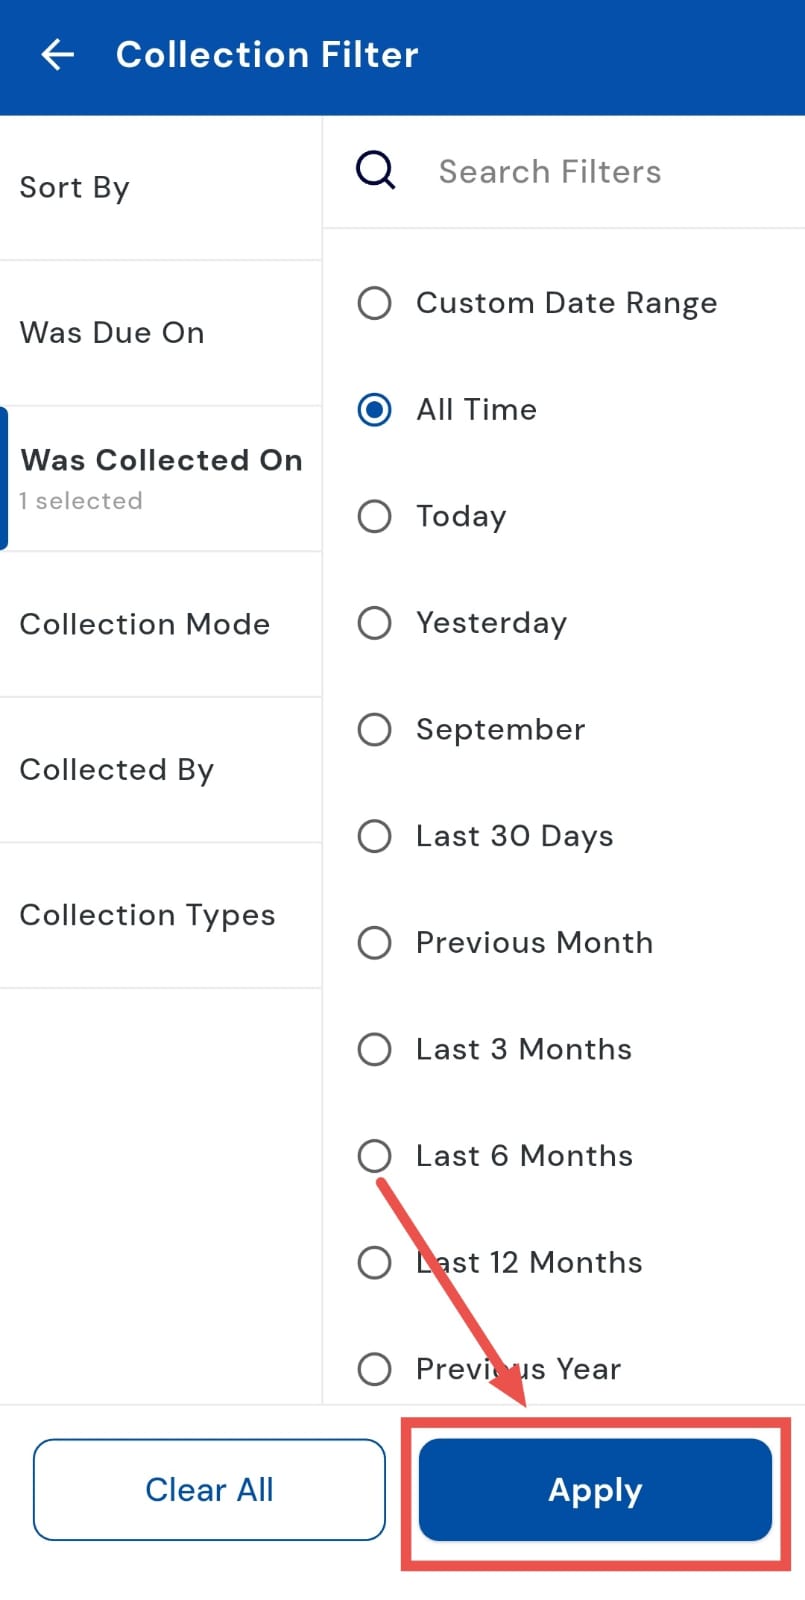
- Step 4: Select “All Time” From the available date range options, choose All Time to include every collection entry from the beginning until the present.
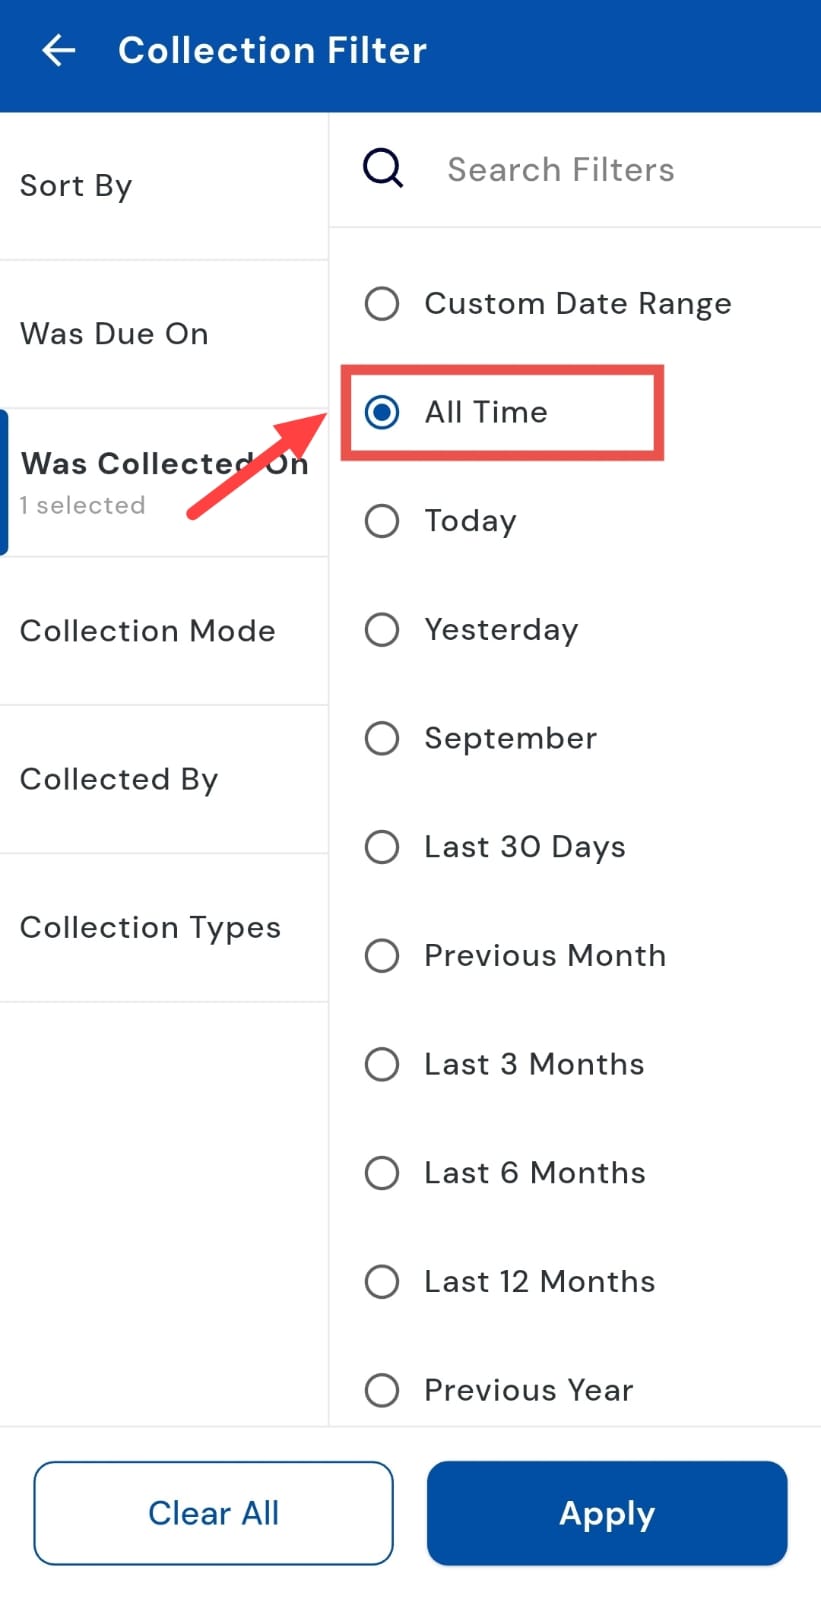
- Step 5: Apply the filter Once you’ve selected All Time, tap Apply. The system will now display the total collection amount across your entire account history.
1.4 **How can I view today's collection? **
Want a quick snapshot of today’s collections? With the "Was collected on" filter, you can easily track all payments collected on the current day. This feature helps you stay updated on daily inflows, making it simple to monitor transactions in real time and keep your records accurate. Whether you’re checking mid-day progress or closing the day’s accounts, reviewing today’s collections gives you instant clarity on where things stand.
Follow these steps:
- Step 1: Open the Collections tab Tap the Money icon in the bottom navigation menu. From the available options, select Collections to access your collection records.
- Step 2: Open the filter settings On the Collections screen, tap the Filter option located in the search bar to bring up different filter categories.
- Step 3: Select the "Was collected on" filter A window will appear with the filter options. From here, tap on "Was collected on" to proceed.
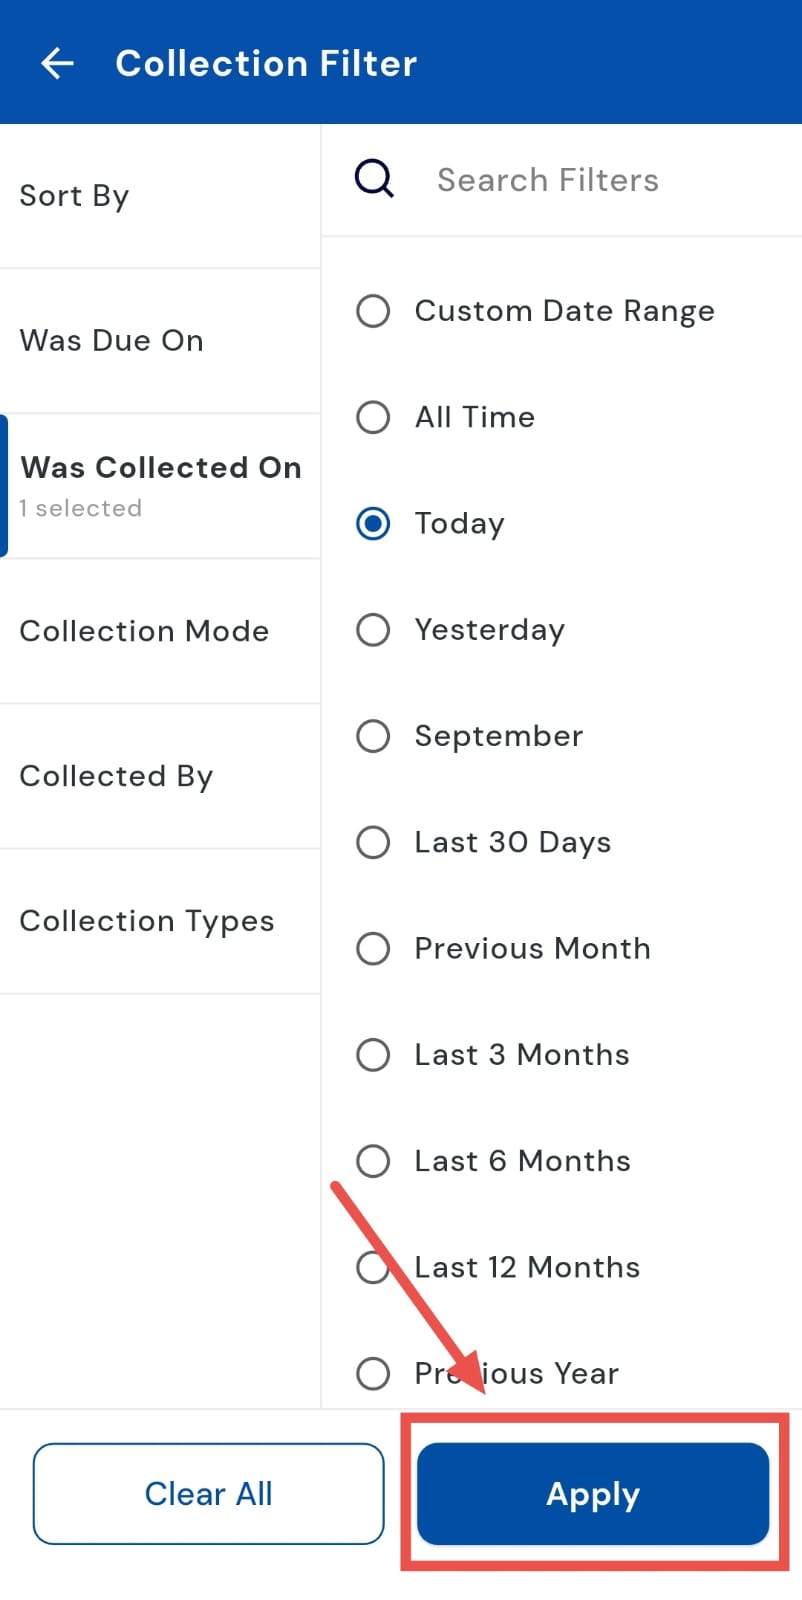
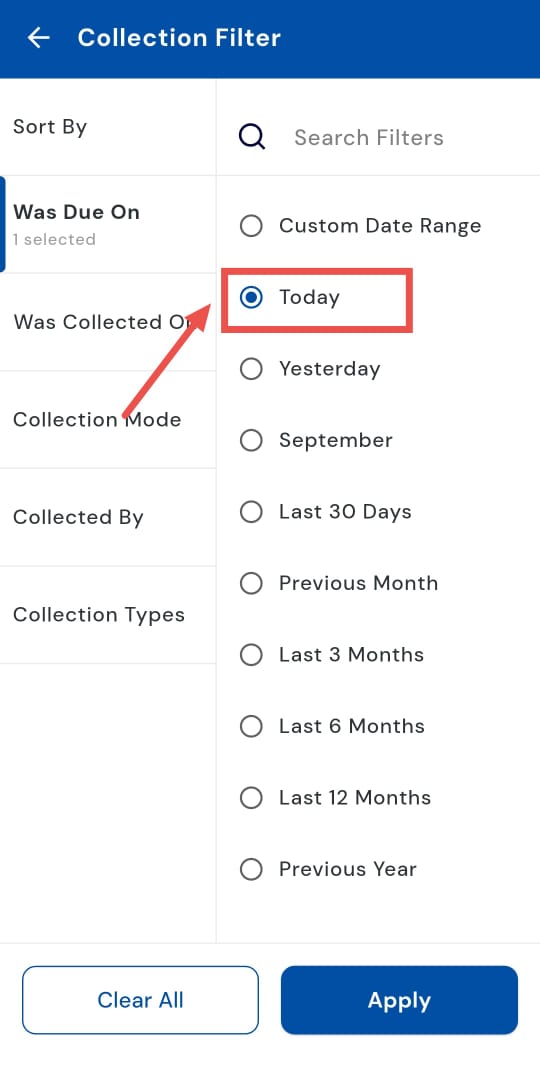
- Step 4: Choose “Today” In the date range menu, select Today to restrict the results to payments collected during the current day only.
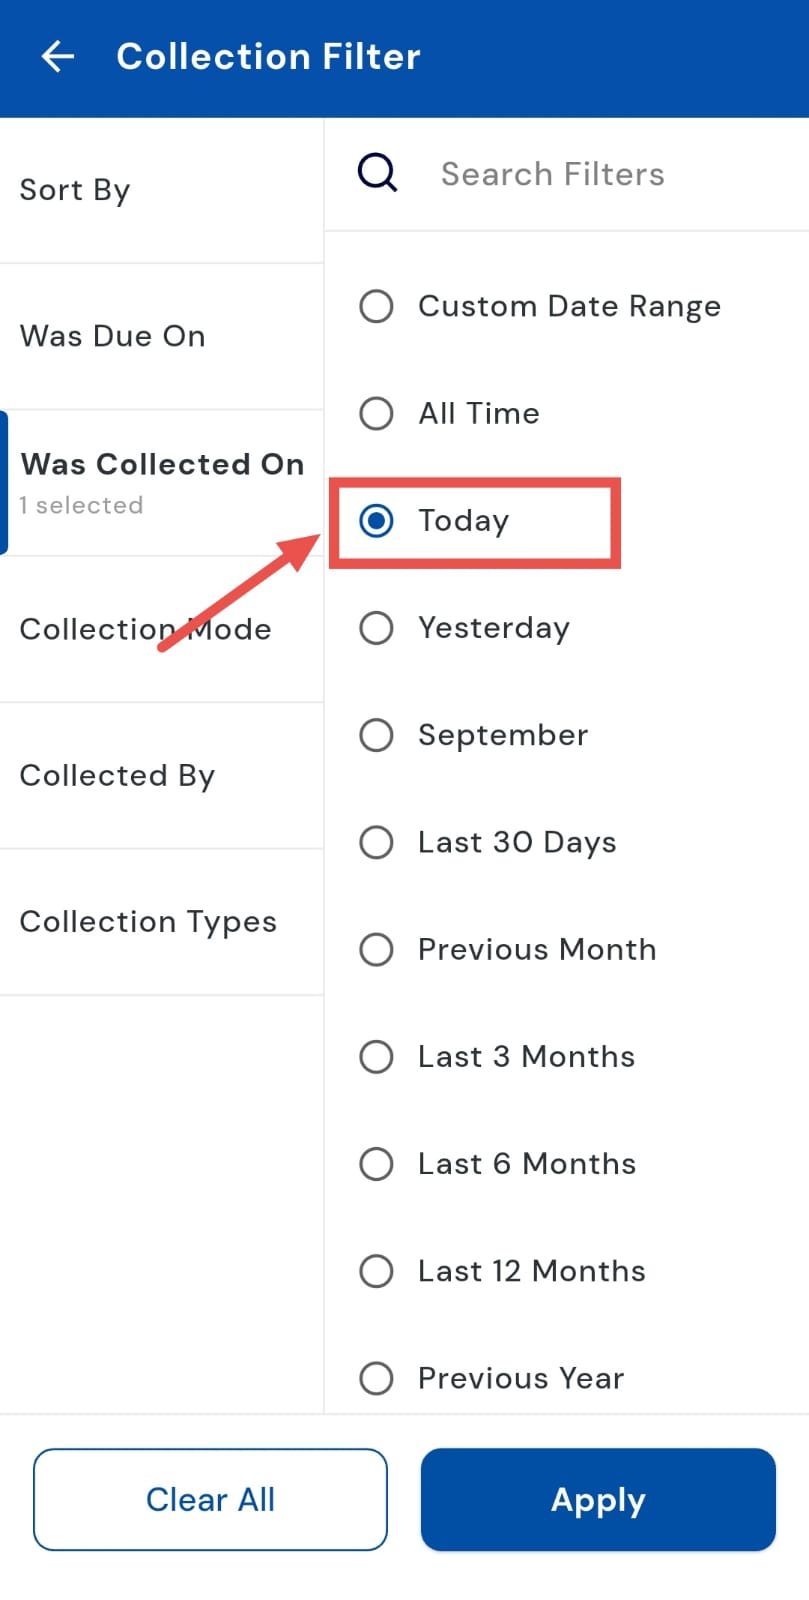
- Step 5: Apply the filter Tap on Apply, and the system will instantly display the total collection amount for today.
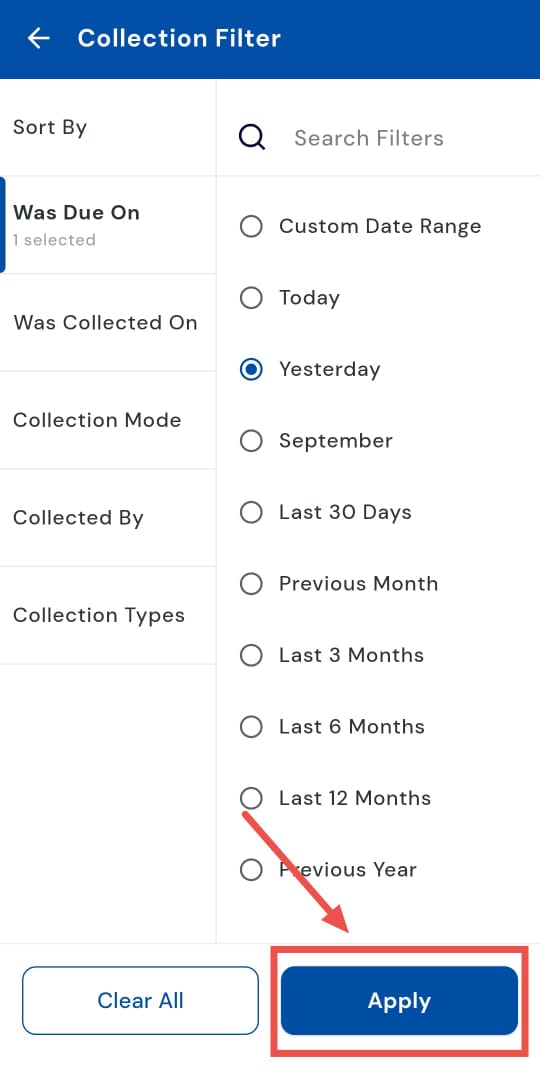
How can I view yesterday's collection?
Want to catch up on yesterday’s collections? Using the "Was collected on", you can easily view all payments collected on the previous day. This helps you stay updated on past transactions, reconcile accounts, and ensure nothing is missed. Reviewing yesterday’s collections gives you a clear picture of payments collected and helps you plan timely follow-ups.
Follow these steps:
- Step 1: Open the Collections tab Tap the Money icon located in the bottom navigation menu. From the options that appear, select Collections to access your collection records.
- Step 2: Access the filter option On the Collections page, tap the Filter button available in the search bar. This will open up additional filtering choices.
- Step 3: Select the "Was collected on" filter A window will appear with the different filter categories. Tap on "Was collected on" to continue.
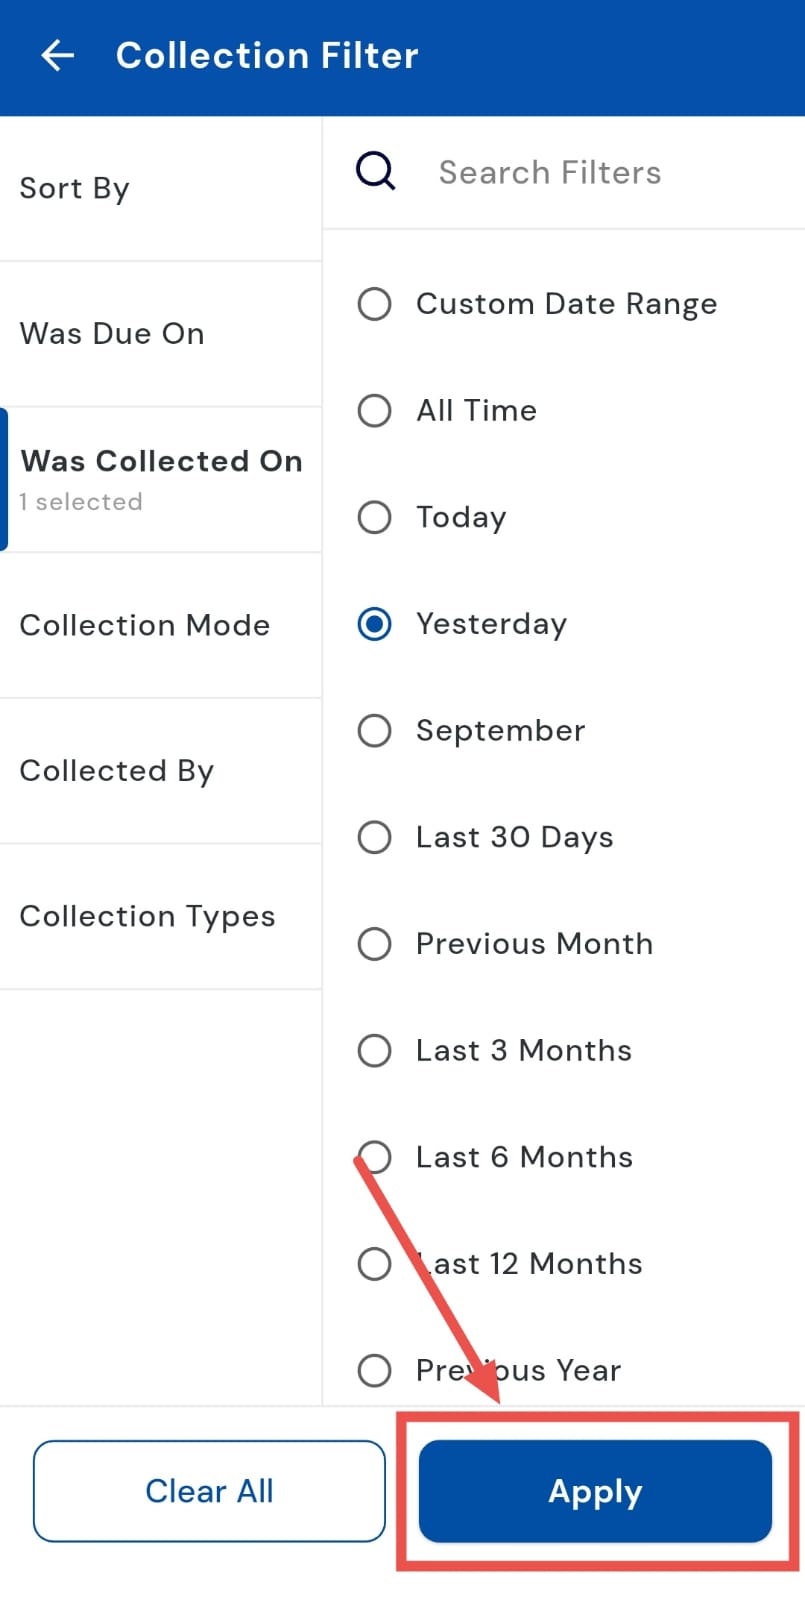
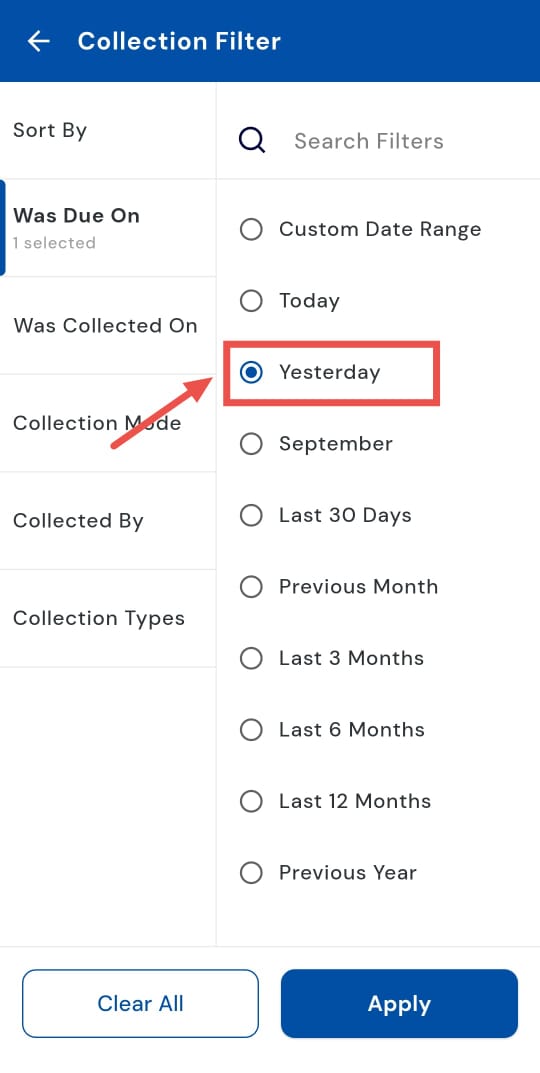
- Step 4: Choose “Yesterday” From the available options, select Yesterday to narrow down the data to just the previous day’s transactions.
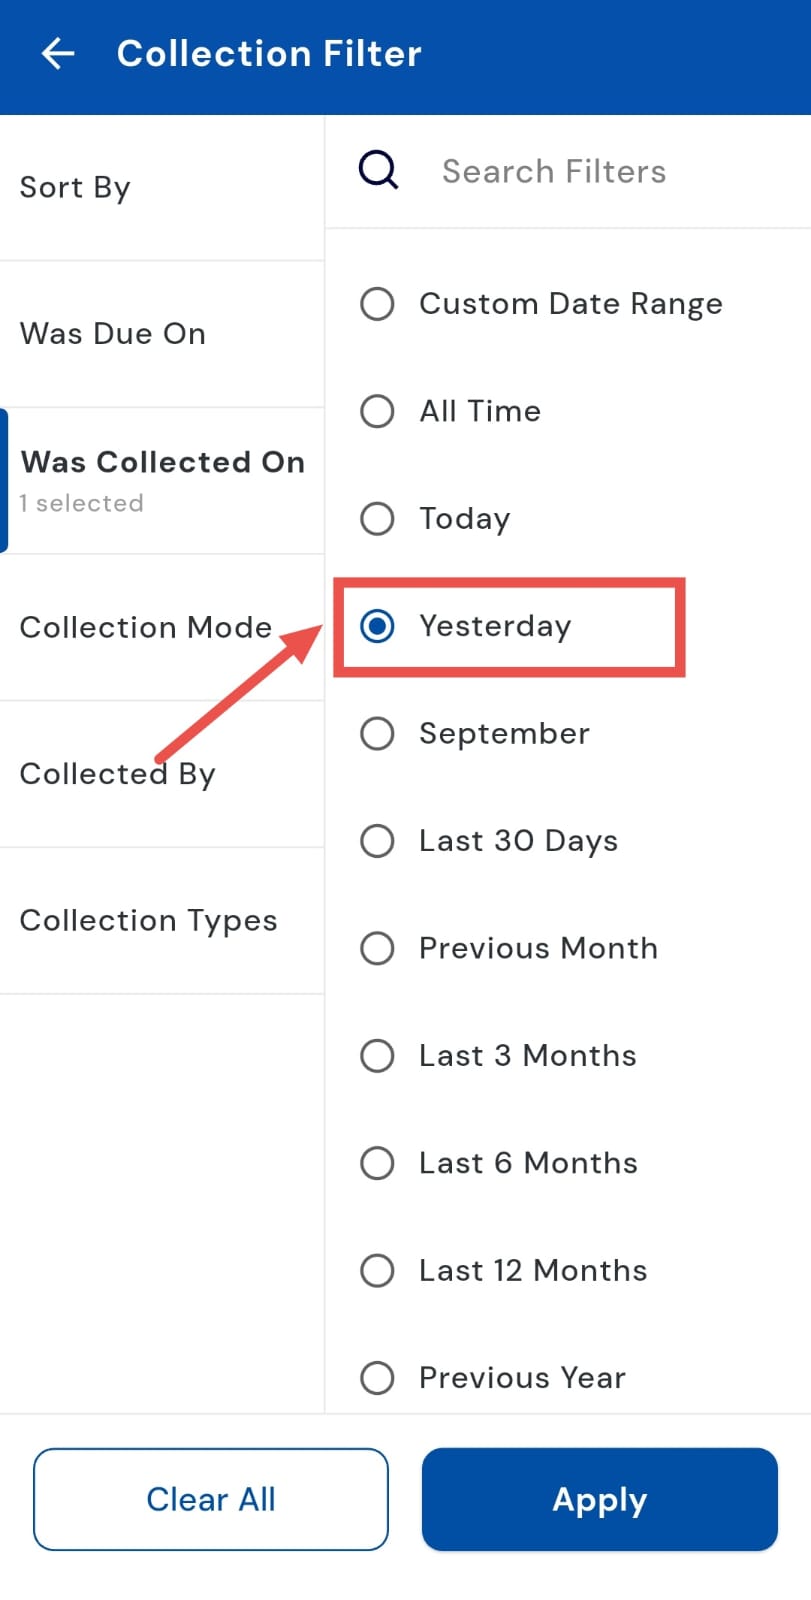
- Step 5: Apply the filter Tap on Apply, and the app will immediately display the total amount collected yesterday.
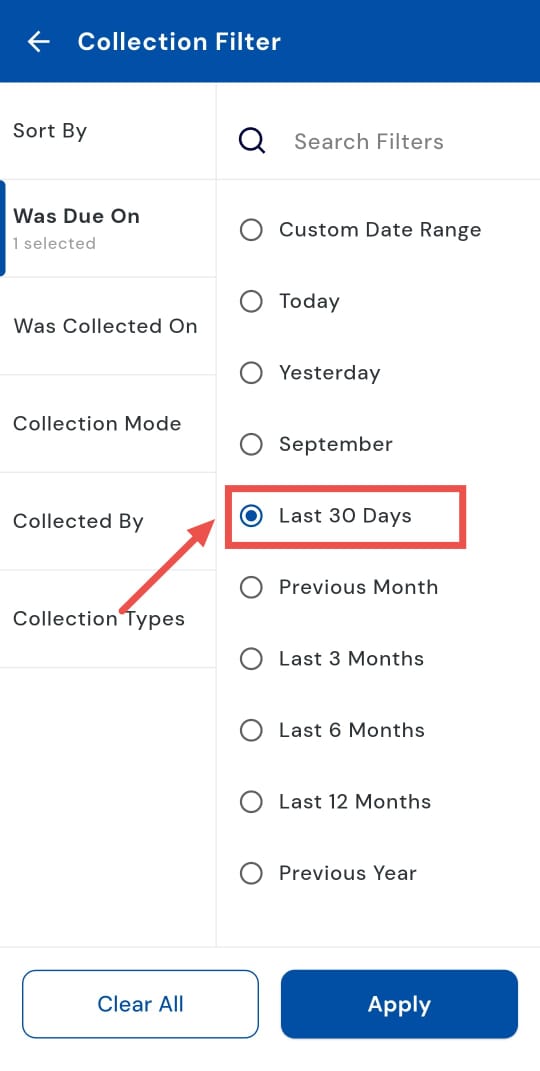
1.6 How can I view the last 30-day collection?
Stay on top of your recent collections by reviewing all payments collected in the last 30 days. Using the Last 30 Days filter, you can easily track short-term trends, monitor recurring payments, and ensure all expected collections are accounted for. This gives you a clear snapshot of your month’s activity and helps you plan follow-ups efficiently.
Follow these steps:
- Step 1: Open the Collections tab Tap the Money icon at the bottom navigation menu. From the options displayed, select Collections to access all recorded payments.
- Step 2: Access the filter option On the Collections screen, tap the Filter button in the search bar to open filtering choices.
- Step 3: Select the "Was collected on" filter A window will appear with the options. Tap on "Was collected on" to proceed.
- Step 4: Choose “Last 30 Days” From the date range options, select Last 30 Days to view all collections recorded over the previous month.
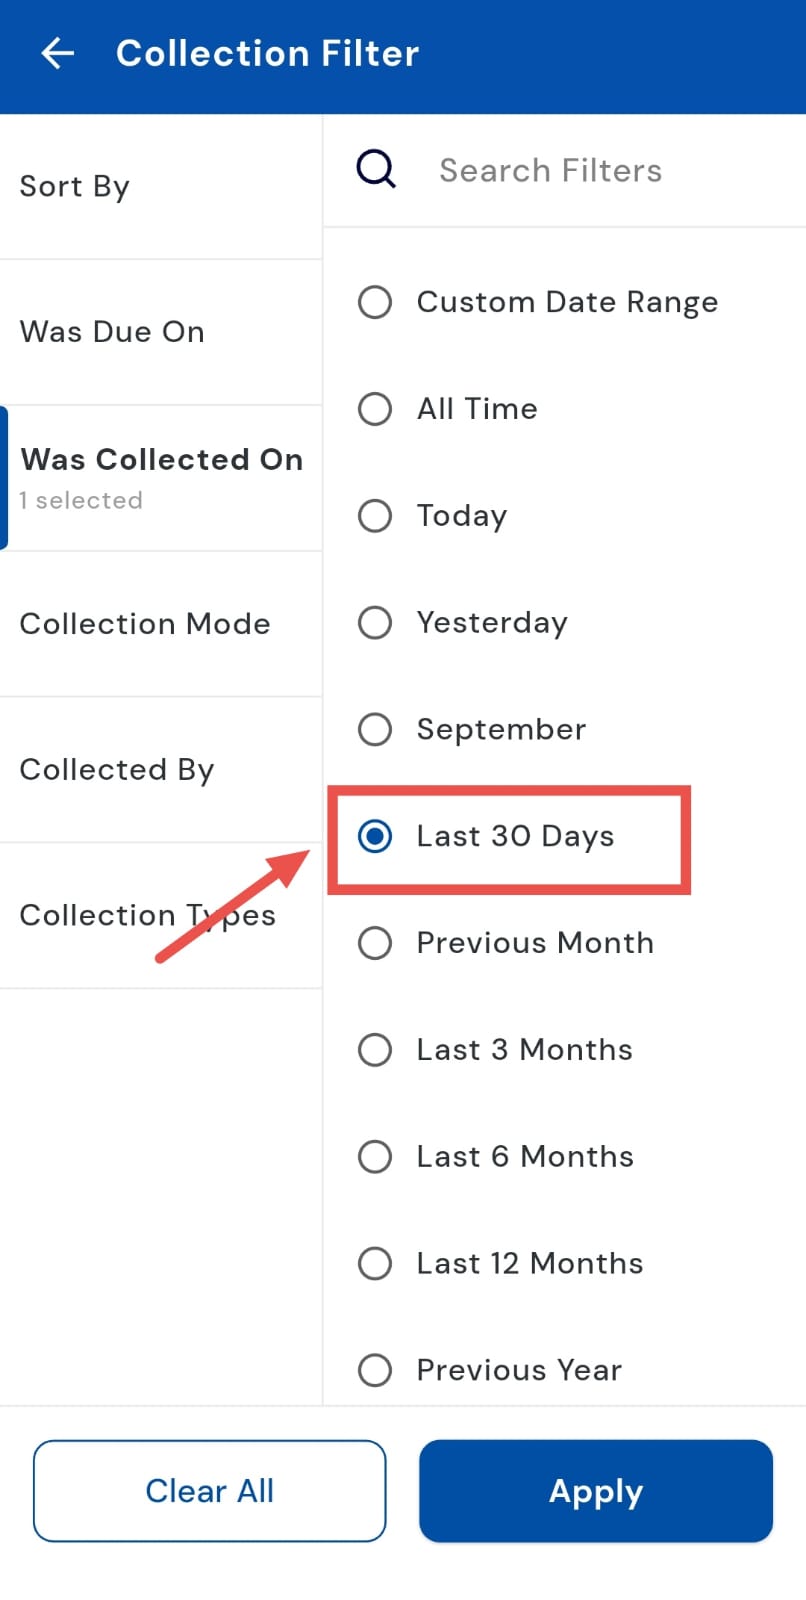
- Step 5: Apply the filter Tap Apply, and the app will display the total collection amount for the last 30 days.

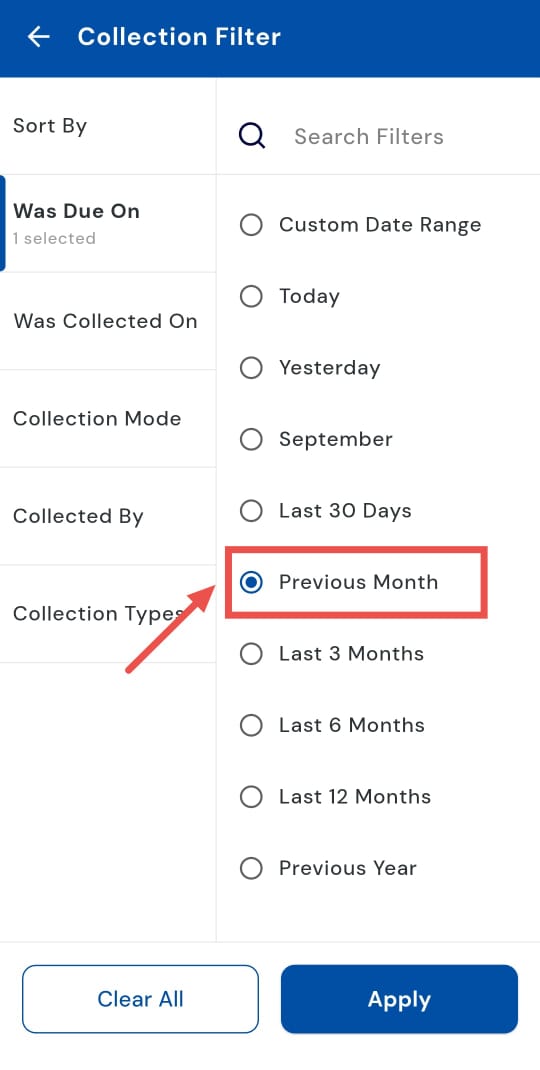
How can I view the previous month's collection?
Tracking collections from the previous month is easy with the “Previous Month” filter. By selecting this option, you can view all payments collected during the last month, helping you verify past collections, reconcile accounts, and analyze monthly payment trends. This provides a clear snapshot of your recent activity and ensures you stay on top of your finances.
Follow these steps:
- Step 1: Open the Collections tab Tap the Money icon in the bottom navigation menu. From the options displayed, select Collections to access all payment records.
- Step 2: Access the filter option On the Collections screen, tap the Filter button available in the search bar to open filtering options.
- Step 3: Select the “Was collected on” filter A window will appear with the filter categories. Tap on “Was collected on” to specify the period you want to review.
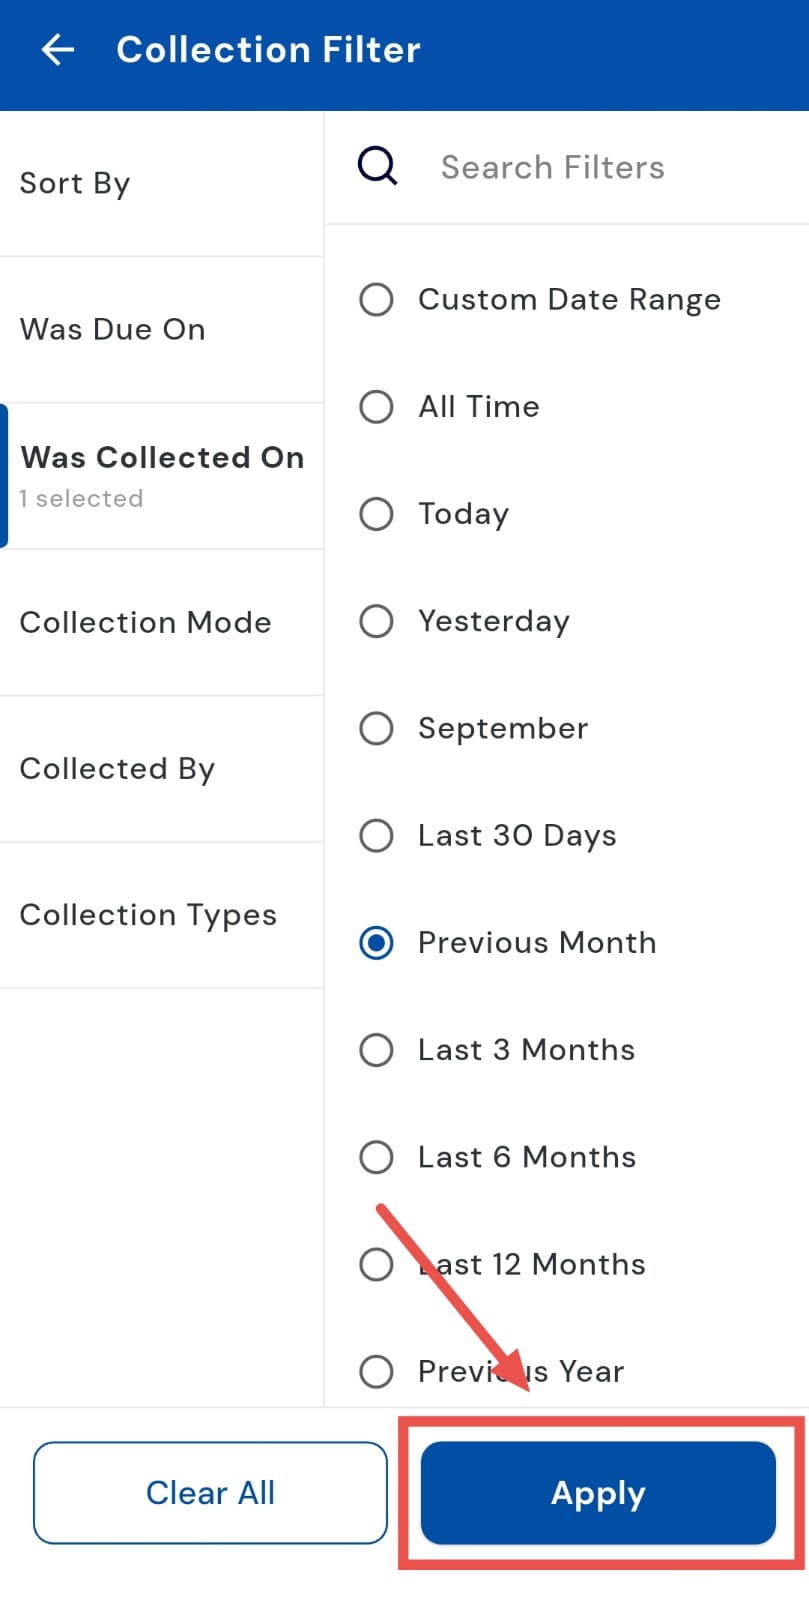
- Step 4: Choose “Previous Month” From the available options under the “Was collected on” filter, select Previous Month to include all payments collected during that period.

- Step 5: Apply the filter Tap Apply, and the system will display the total collection amount recorded for the previous month.
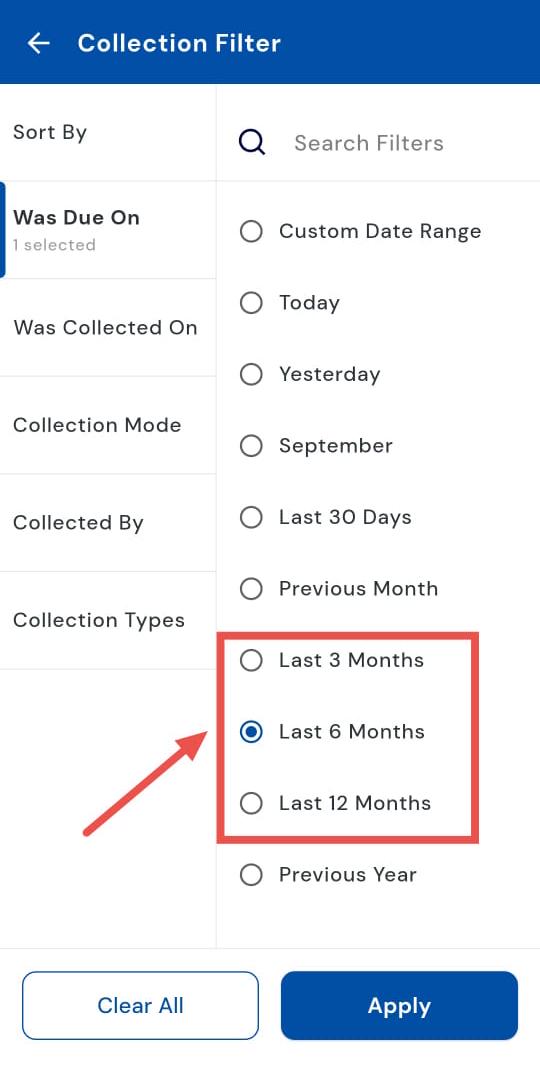
1.8 How can I view the last 3, 6**,**** and 12 months collection?**
Monitoring collections over a longer period is simple with the app. You can quickly view payments collected over the last 3, 6, or 12 months using the convenient date filter. This allows you to analyze mid- and long-term trends, track cash flow effectively, and ensure that all expected payments are accounted for. With a clear overview of extended collection periods, staying on top of your finances becomes effortless.
Follow these steps:
- Step 1: Open the Collections tab Tap the Money icon in the bottom navigation menu. From the options displayed, select Collections to access all recorded payments.
- Step 2: Access the filter option On the Collections screen, tap the Filter icon in the search bar. A window will appear showing the different filter options.
- Step 3: Select “Was collected on” From the window, tap on “Was collected on” to specify the period you want to review.
- Step 4: Choose a duration Depending on your requirement, select Last 3 Months, Last 6 Months, or Last 12 Months to review collections for that specific period.
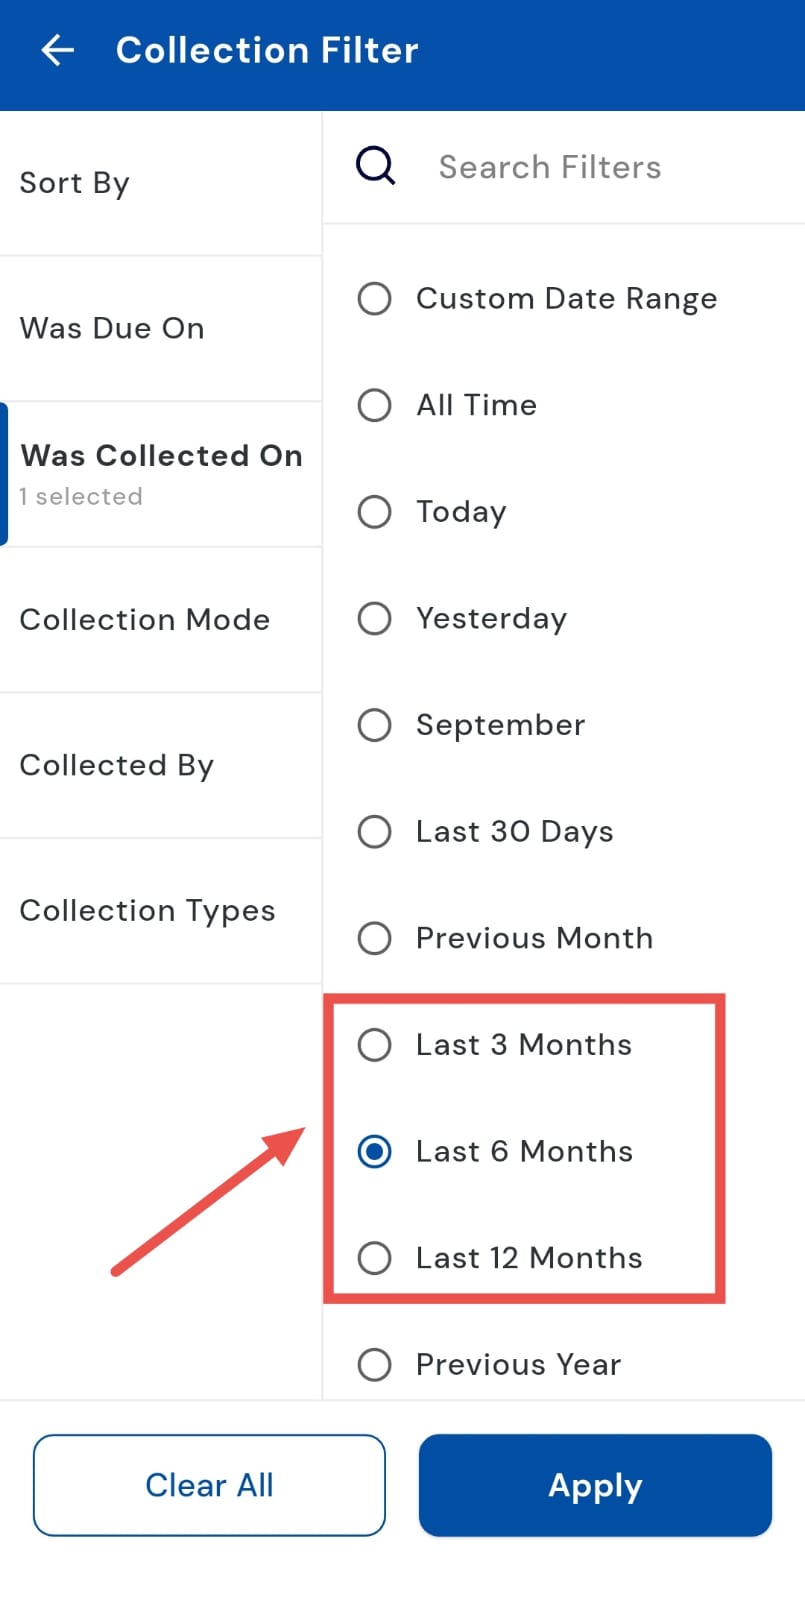
- Step 5: Apply the filter Tap Apply, and the system will display all collections collected within the selected time frame, giving you a clear overview of the period’s transactions.

How do I check the collection for the previous year?
Keep track of annual collections with ease by reviewing all payments recorded over the past year. Using the “Was collected on” filter, you can view every payment collected during the previous year, helping with annual reporting, account reconciliation, and analysis of yearly payment trends. This provides a complete overview of your finances and ensures nothing is overlooked when reviewing yearly collections.
Follow these steps:
- Step 1: Open the Collections tab Tap the Money icon located in the bottom navigation menu. From the options displayed, select Collections to access all recorded payments.
- Step 2: Access the filter option On the Collections screen, tap the Filter button in the search bar to open additional filtering choices.
- Step 3: Select the “Was collected on” filter A window will appear with the filter categories. Tap on “Was collected on” to specify the time period you want to review.
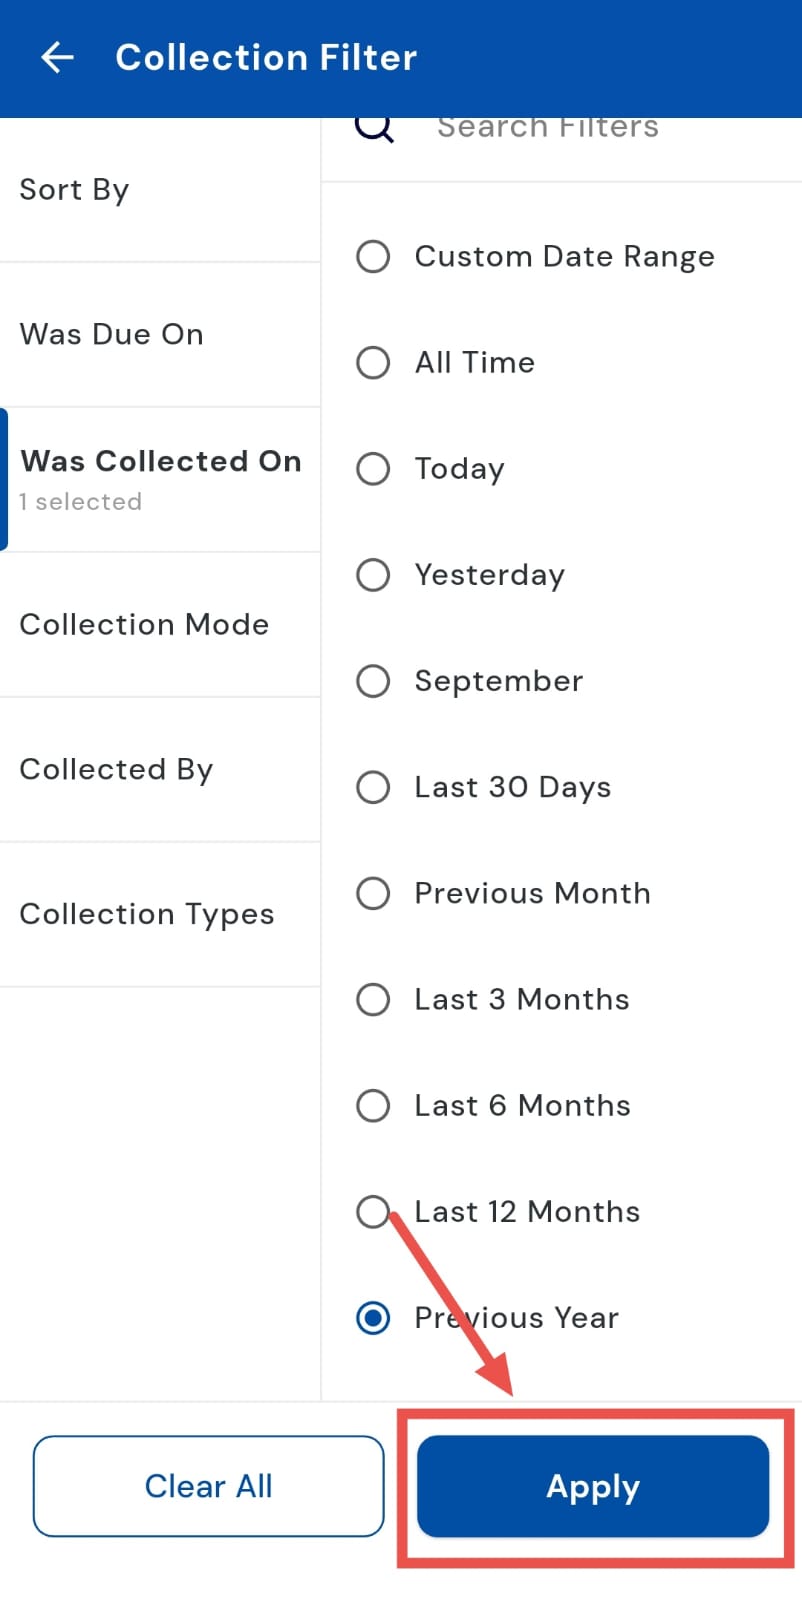
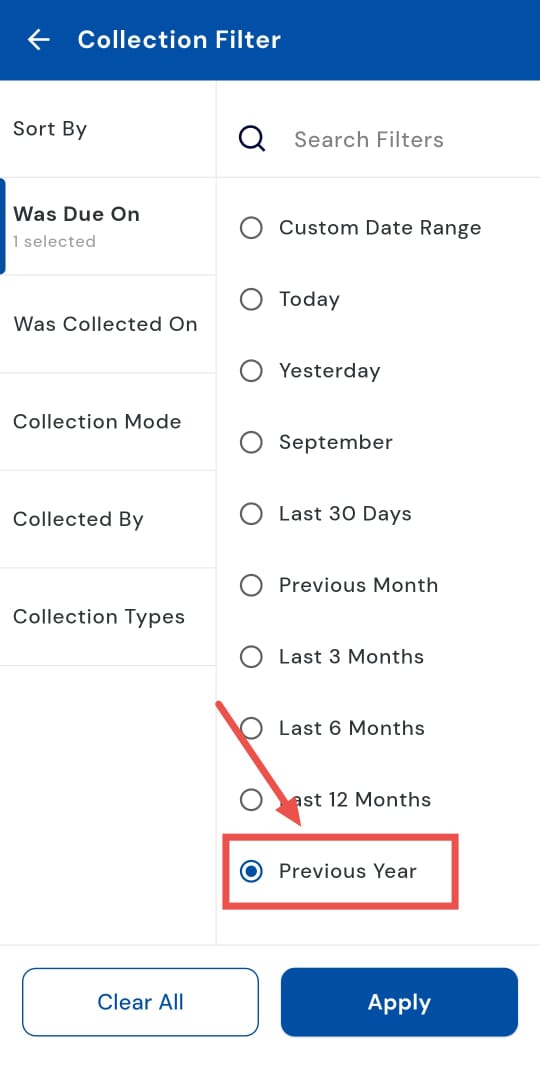
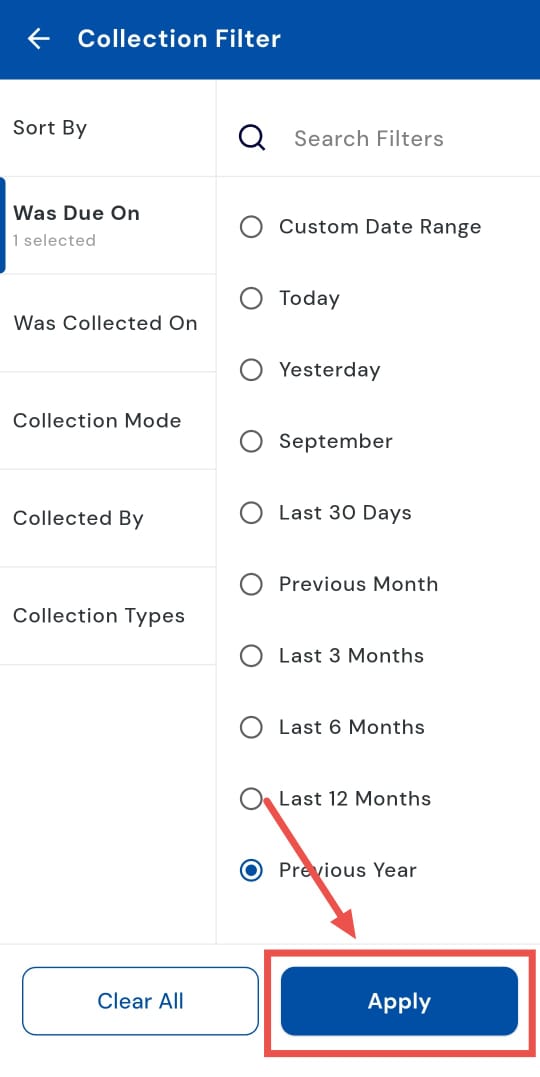
- Step 4: Choose “Previous Year” From the options, select the Previous Year to view all collections collected during the last calendar year.
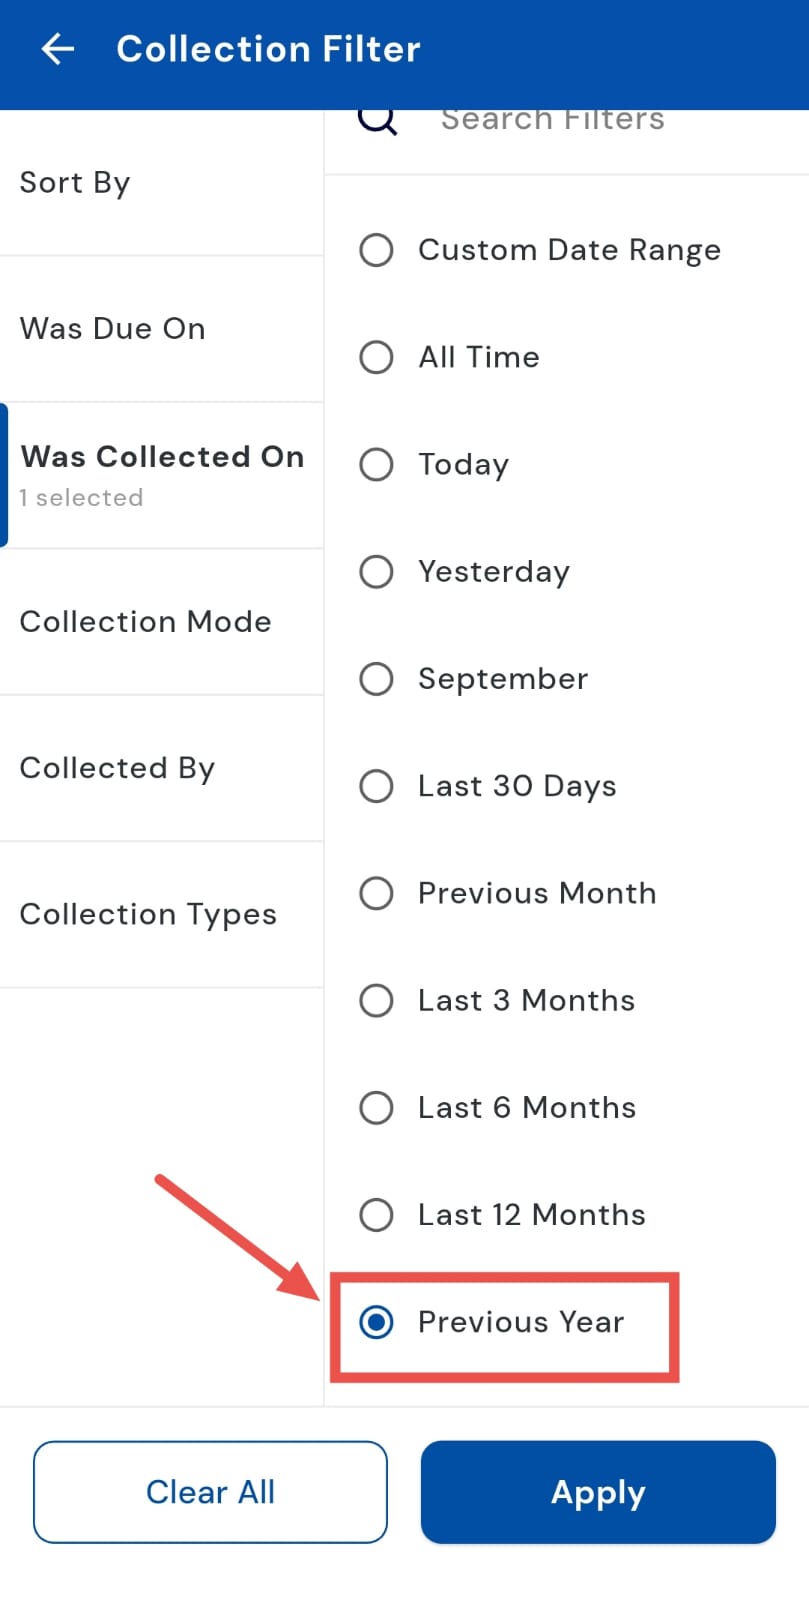
- Step 5: Apply the filter Tap Apply, and the app will display the total collections for the previous year, giving you a clear view of yearly transactions.
How do I review due collections within a specific date range?
Tracking due collection for any duration is now effortless with the "Was due on" filter. Whether you want to review monthly due collection, quarterly updates, or a completely custom timeframe, you can simply select the start and end dates to get a clear view of all payments due in that period. This not only keeps your records organized but also makes it easier to analyze trends, prepare reports, and follow up on pending amounts, keeping your payment tracking smooth and hassle-free.
Simply follow these steps:
- Step 1: Open the Collections tab Tap the Money icon at the bottom navigation bar. From the menu, select Collections to view all the payment entries recorded.
- Step 2: Access the filter option At the top of the Collections screen, you’ll see a Filter option inside the search bar. Tap on it to bring up filtering choices.
- Step 3: Select the "Was due on" option A window window with the filter categories will appear. From these options, tap on Was due on to proceed.
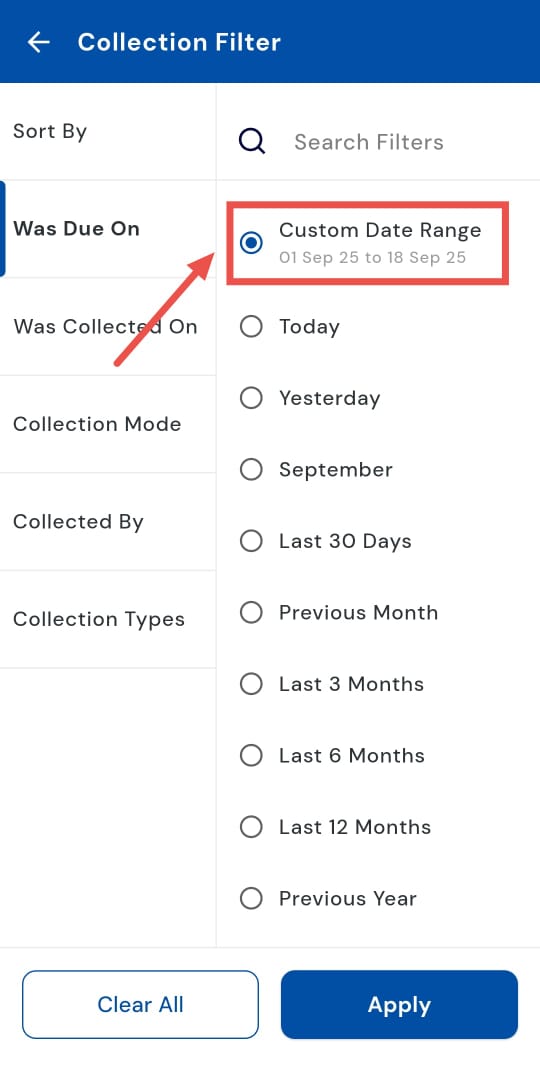
- Step 4: Choose “Custom Date Range” Within the "was due on" section, select Custom Date Range so you can manually define the exact period you want to review.
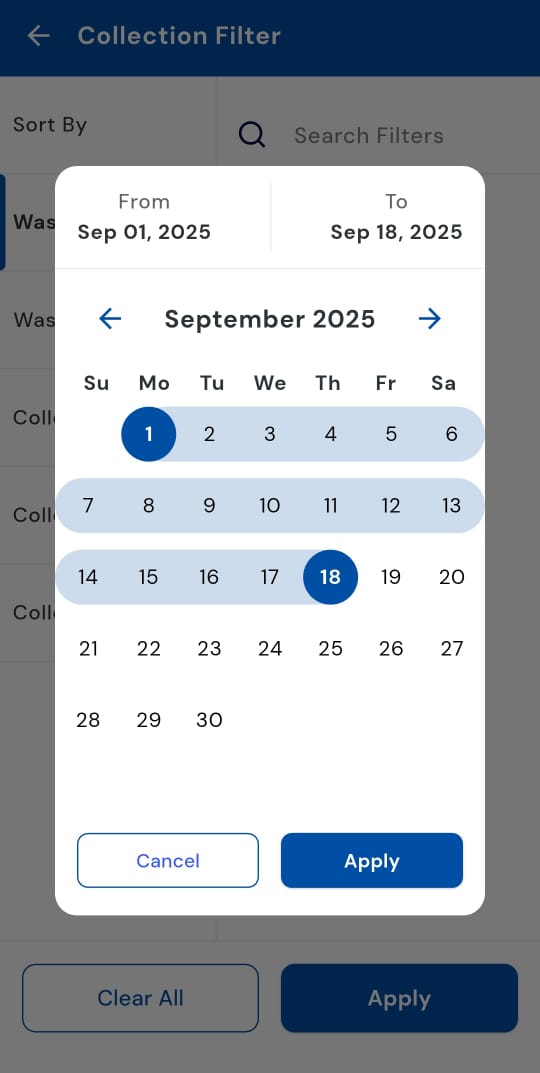
- Step 5: Pick the start and end dates A new page will open where you can set a Start Date and an End Date. Adjust these as per the duration you want to analyze.
- Step 6: Save your selection Once the dates are selected, tap Apply to confirm your custom range.
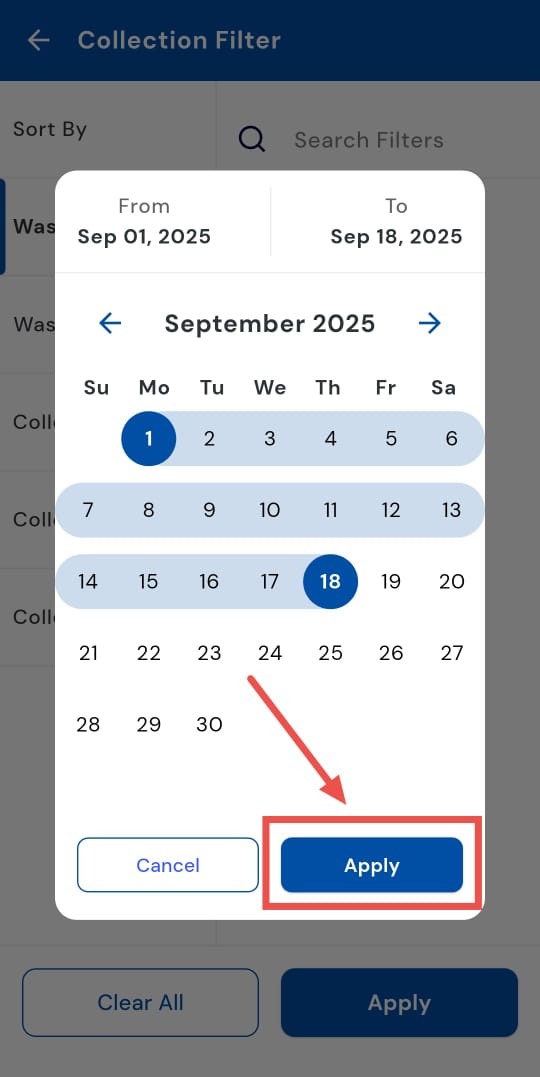
- Step 7: Apply the filter Finally, tap Apply, and the system will display all due collection during your chosen timeframe.
1.11 **How can I view today's due collection? **
Want a quick snapshot of today’s due collection? With the "Was due on" filter, you can easily track all payments due on the current day. This feature helps you stay updated on daily inflows, making it simple to monitor transactions in real time and keep your records accurate. Whether you’re checking mid-day progress or closing the day’s accounts, reviewing today’s due collection gives you instant clarity on where things stand.
Follow these steps:
- Step 1: Open the Collections tab Tap the Money icon in the bottom navigation menu. From the available options, select Collections to access your collection records.
- Step 2: Open the filter settings On the Collections screen, tap the Filter option located in the search bar to bring up different filter categories.
- Step 3: Select the "Was due on" filter A window will appear with the filter options. From here, tap on "Was due on" to proceed.
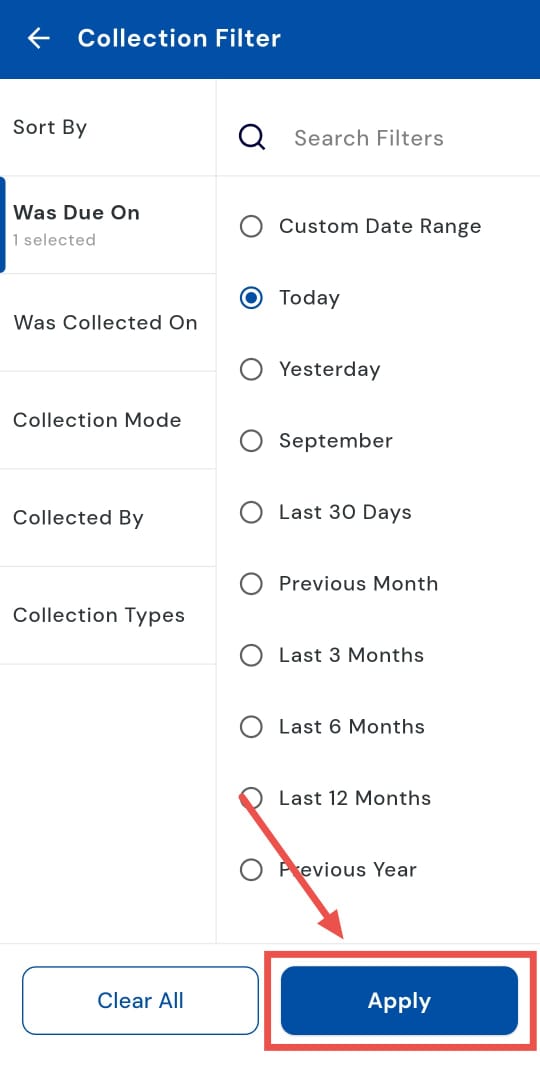
- Step 4: Choose “Today” In the date range menu, select Today to restrict the results to payments due during the current day only.
- Step 5: Apply the filter Tap on Apply, and the system will instantly display the total collection amount for today.
How can I view yesterday's due collection?
Want to catch up on yesterday’s due collection? Using the "Was due on", you can easily view all payments due on the previous day. This helps you stay updated on past transactions, reconcile accounts, and ensure nothing is missed. Reviewing yesterday’s due collection gives you a clear picture of payments due and helps you plan timely follow-ups.
Follow these steps:
- Step 1: Open the Collections tab Tap the Money icon located in the bottom navigation menu. From the options that appear, select Collections to access your collection records.
- Step 2: Access the filter option On the Collections page, tap the Filter button available in the search bar. This will open up additional filtering choices.
- Step 3: Select the "Was due on" filter A window will appear with the different filter categories. Tap on "Was due on" to continue.
- Step 4: Choose “Yesterday” From the available options, select Yesterday to narrow down the data to just the previous day’s transactions.
- Step 5: Apply the filter Tap on Apply, and the app will immediately display the total amount due yesterday.
1.13 How can I view the last 30-day due collection?
Stay on top of your recent due collection by reviewing all payments due in the last 30 days. Using the Last 30 Days filter, you can easily track short-term trends, monitor recurring payments, and ensure all expected due collection are accounted for. This gives you a clear snapshot of your month’s activity and helps you plan follow-ups efficiently.
Follow these steps:
- Step 1: Open the Collections tab Tap the Money icon at the bottom navigation menu. From the options displayed, select Collections to access all recorded payments.
- Step 2: Access the filter option On the Collections screen, tap the Filter button in the search bar to open filtering choices.
- Step 3: Select the "Was due on" filter A window will appear with the options. Tap on "Was due on" to proceed.
- Step 4: Choose “Last 30 Days” From the date range options, select Last 30 Days to view all due collection recorded over the previous month.
- Step 5: Apply the filter Tap Apply, and the app will display the total collection amount for the last 30 days.
How can I view the previous month's due collection?
Tracking due collection from the previous month is easy with the “Previous Month” filter. By selecting this option, you can view all payments due during the last month, helping you verify past due collection, reconcile accounts, and analyze monthly payment trends. This provides a clear snapshot of your recent activity and ensures you stay on top of your finances.
Follow these steps:
- Step 1: Open the Collections tab Tap the Money icon in the bottom navigation menu. From the options displayed, select Collections to access all payment records.
- Step 2: Access the filter option On the Collections screen, tap the Filter button available in the search bar to open filtering options.
- Step 3: Select the “Was due on” filter A window will appear with the filter categories. Tap on “Was due on” to specify the period you want to review.
- Step 4: Choose “Previous Month” From the available options under the “Was due on” filter, select Previous Month to include all payments due during that period.
- Step 5: Apply the filter Tap Apply, and the system will display the total due amount recorded for the previous month.

1.15 How can I view the last 3, 6**,**** and 12 months due collection?**
Monitoring due collection over a longer period is simple with the app. You can quickly view payments due over the last 3, 6, or 12 months using the convenient date filter. This allows you to analyze mid- and long-term trends, track cash flow effectively, and ensure that all expected payments are accounted for. With a clear overview of extended collection periods, staying on top of your finances becomes effortless.
Follow these steps:
- Step 1: Open the Collections tab Tap the Money icon in the bottom navigation menu. From the options displayed, select Collections to access all recorded payments.
- Step 2: Access the filter option On the Collections screen, tap the Filter icon in the search bar. A window will appear showing the different filter options.
- Step 3: Select “Was due on” From the window, tap on “Was due on” to specify the period you want to review.
- Step 4: Choose a duration Depending on your requirement, select Last 3 Months, Last 6 Months, or Last 12 Months to review due collection for that specific period.
- Step 5: Apply the filter Tap Apply, and the system will display all due collection within the selected time frame, giving you a clear overview of the period’s transactions.
How do I check the due collection for the previous year?
Keep track of annual due collection with ease by reviewing all payments recorded over the past year. Using the “Was due on” filter, you can view every payment due during the previous year, helping with annual reporting, account reconciliation, and analysis of yearly payment trends. This provides a complete overview of your finances and ensures nothing is overlooked when reviewing yearly due collection.
Follow these steps:
- Step 1: Open the Collections tab Tap the Money icon located in the bottom navigation menu. From the options displayed, select Collections to access all recorded payments.
- Step 2: Access the filter option On the Collections screen, tap the Filter button in the search bar to open additional filtering choices.
- Step 3: Select the “Was due on” filter A window will appear with the filter categories. Tap on “Was due on” to specify the time period you want to review.
- Step 4: Choose “Previous Year” From the options, select the Previous Year to view all due collection during the last calendar year.
- Step 5: Apply the filter Tap Apply, and the app will display the total due collection for the previous year, giving you a clear view of yearly transactions.
1.17 How can I verify different types of Collection/Payment modes?
Verifying how payments were made is simple with the Collection Mode filter. Whether it’s cash, bank transfer, or online, you can easily track the mode of collection for each transaction. This not only helps with smoother reconciliation but also ensures your records remain accurate and transparent.
Follow these steps:
- Step 1: Open the Collections tab Tap the Money icon located in the bottom navigation menu. From the options, select Collections to access all recorded payments.
- Step 2: Access the filter option On the Collections screen, tap the Filter button in the search bar to open filtering options.
- Step 3: Select the “Collection Mode” filter A window will appear with the filter categories. Tap on Collection Mode to view collections by the method of payment received.
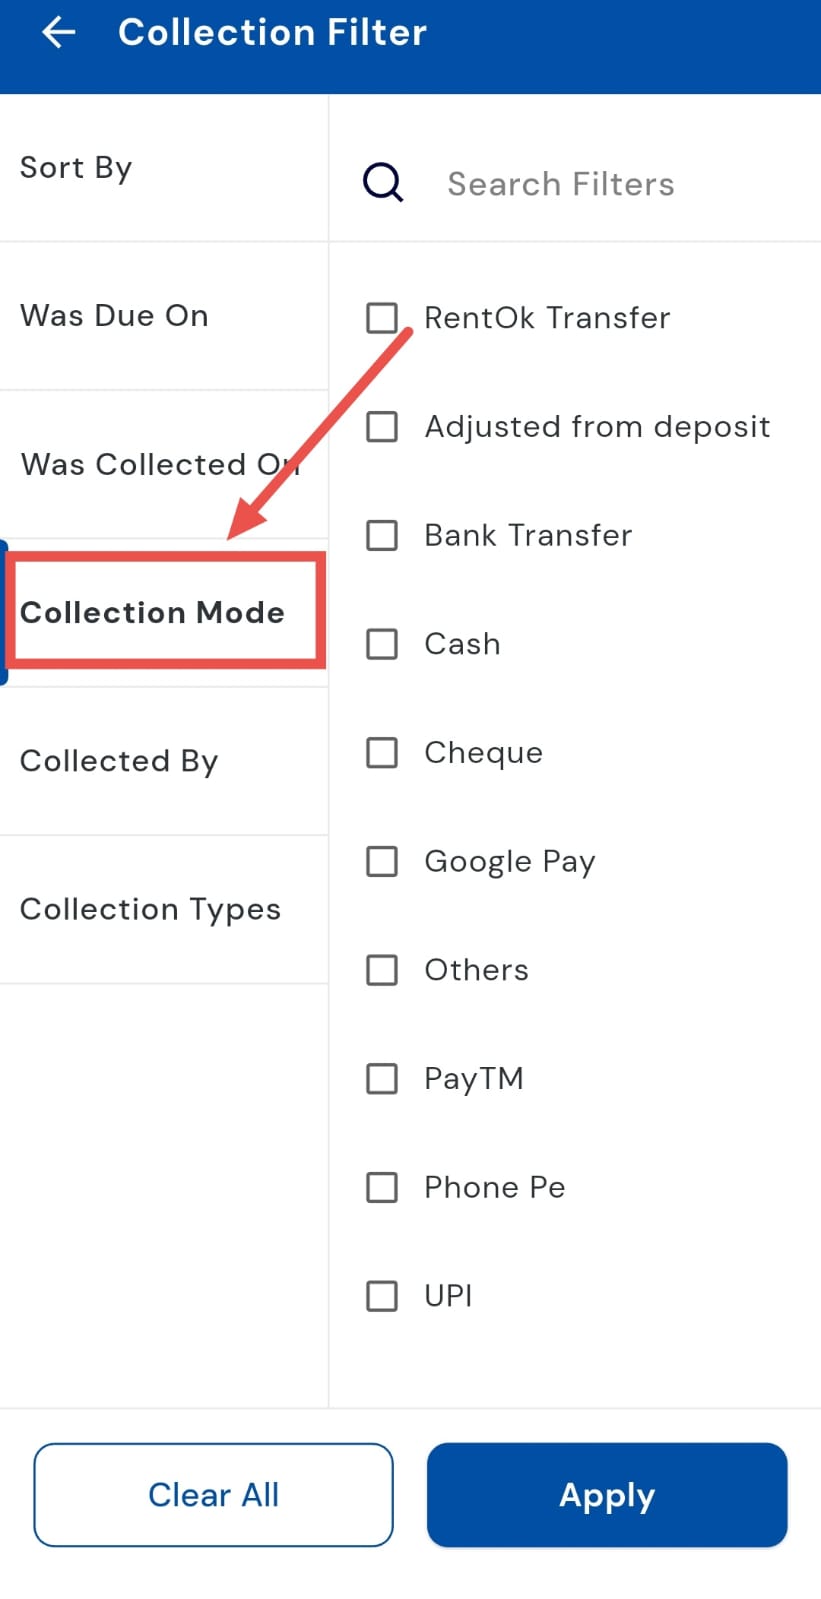
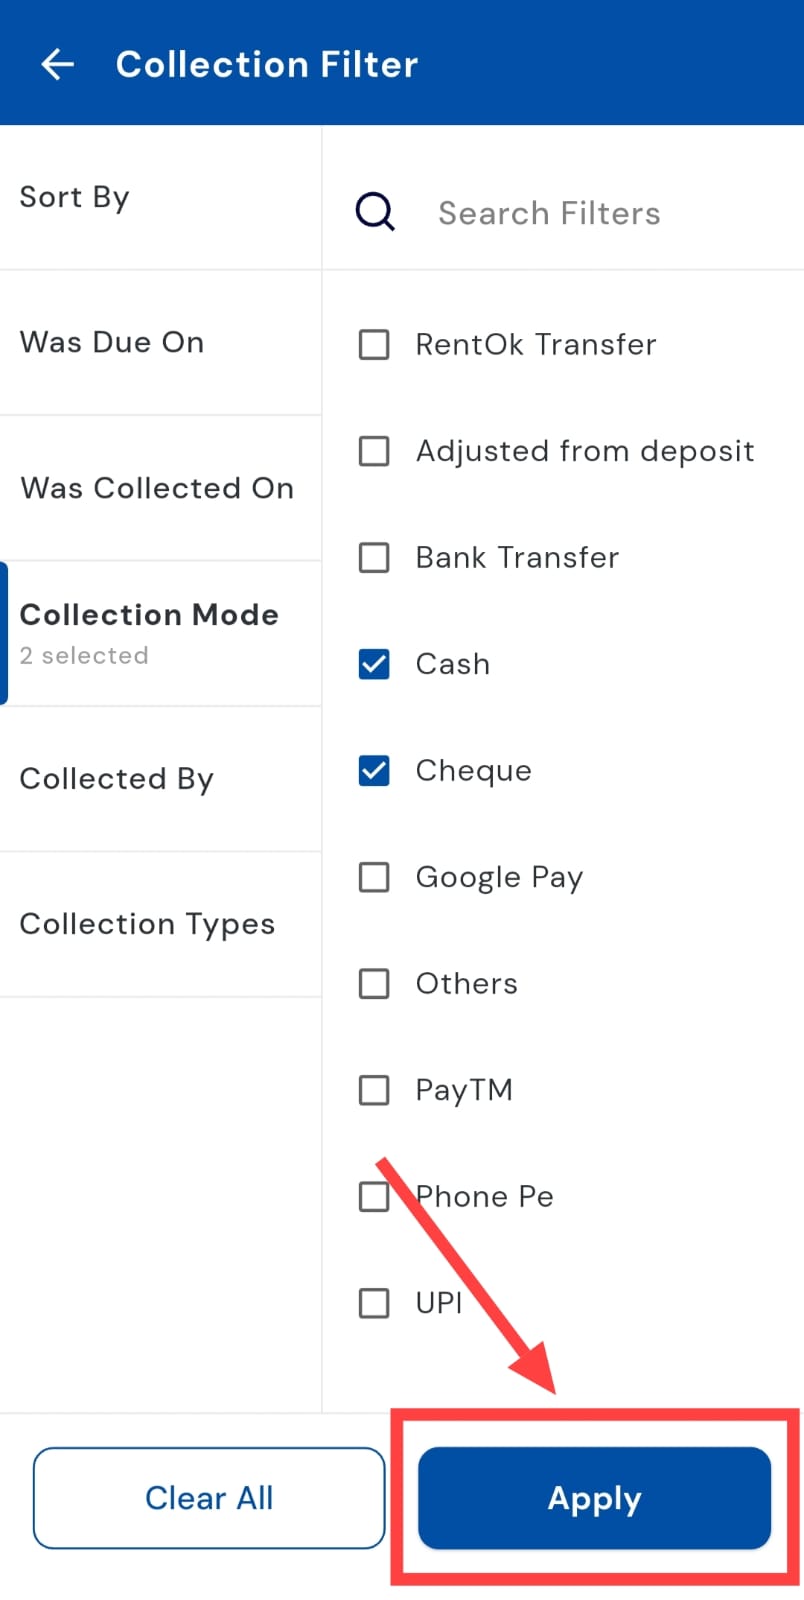
- Step 4: Choose the Collection Mode Select the desired Collection Mode (e.g., cash, bank transfer, or online) to see which payments were made through that method.
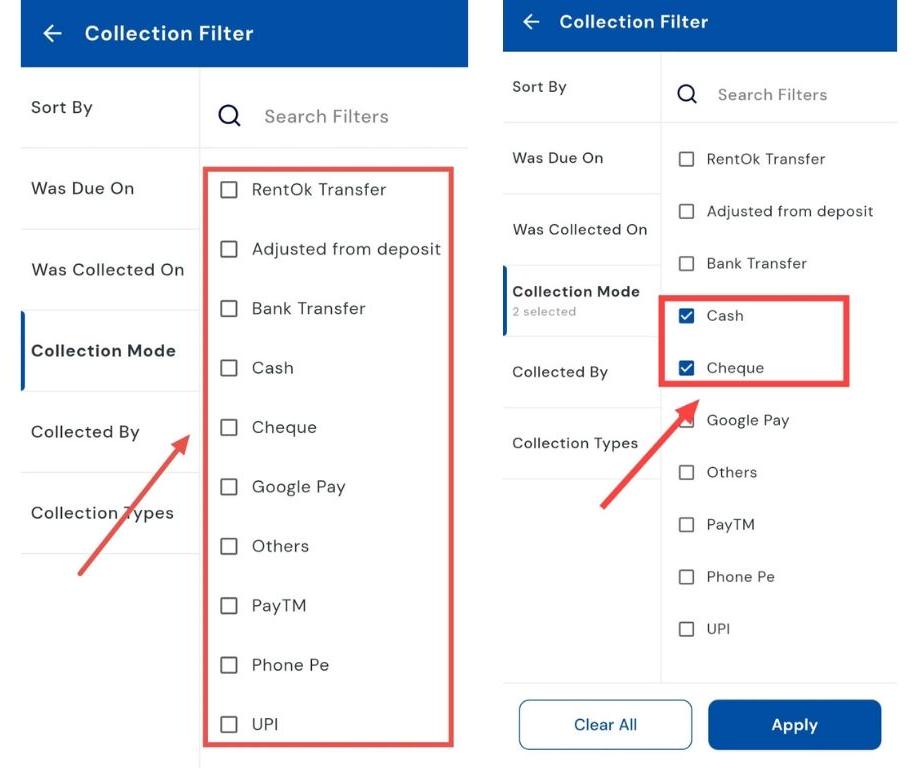
- Step 5: Apply the filter Tap Apply, and the app will display all collections made via the selected Collection Mode.
| Tip: This feature is useful for tracking collection trends, reconciling accounts, and verifying payment methods for accounting purposes. |
|---|
How can I verify who has received the collection?
Keeping track of who received each payment is essential for accountability and smooth management. With the built-in filter, you can easily identify whether a collection was handled by staff, an admin, or automatically recorded by the system. This ensures transparency in your records, makes follow-ups easier, and helps you stay in control of all financial transactions.
Follow these steps:
- Step 1: Open the Collections tab Tap the Money icon in the bottom navigation menu, then select Collections to access all recorded payments.
- Step 2: Access the filter menu On the Collections screen, tap the Filter button in the search box to open filtering options.
- Step 3: Choose “Collected By” A window will appear with the filter categories. Select Collected By to narrow down results based on the person or source who collected the payment.
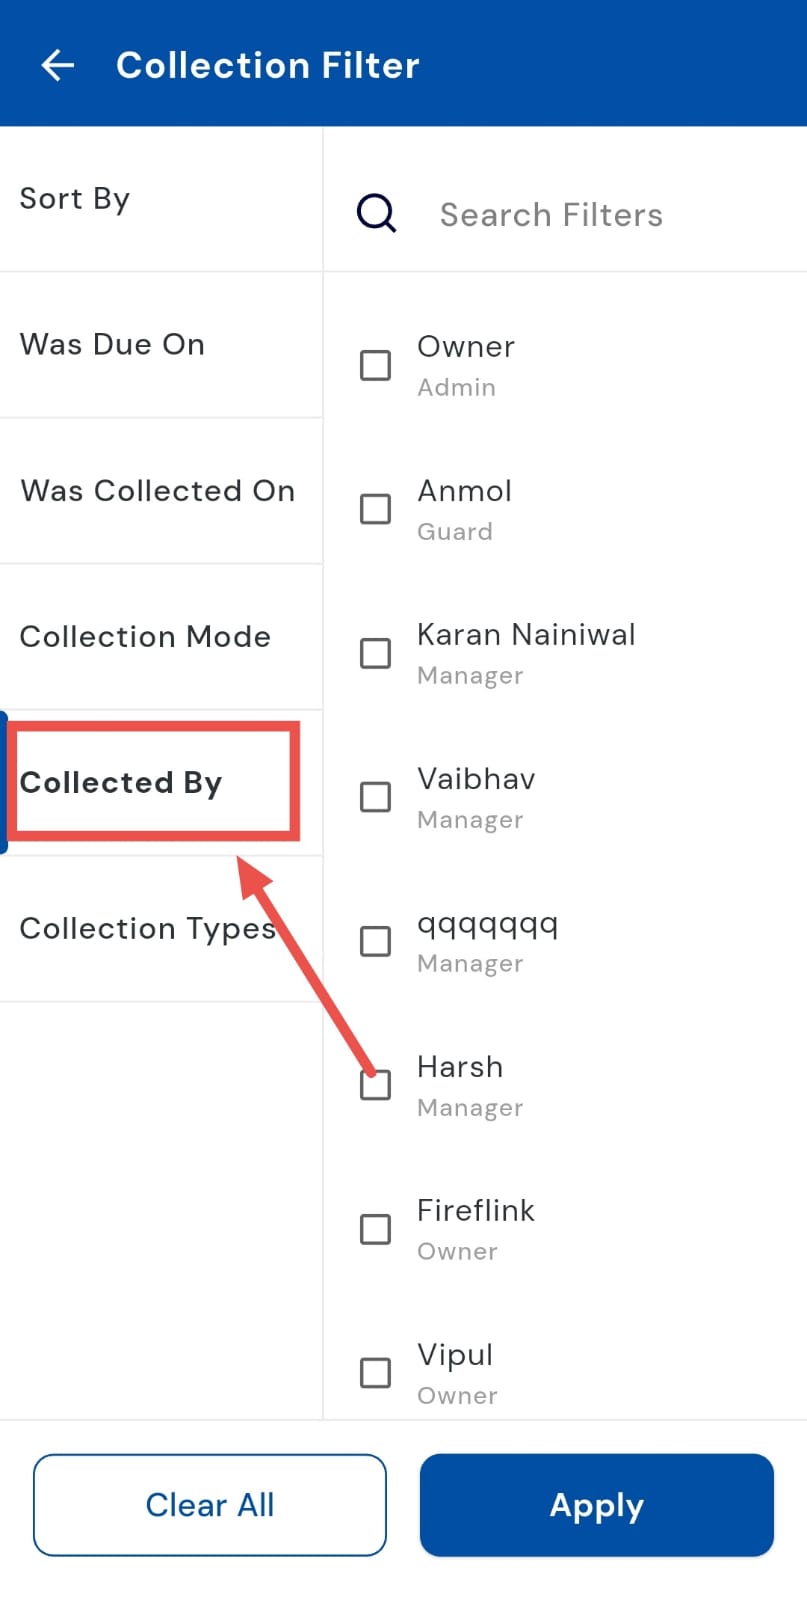
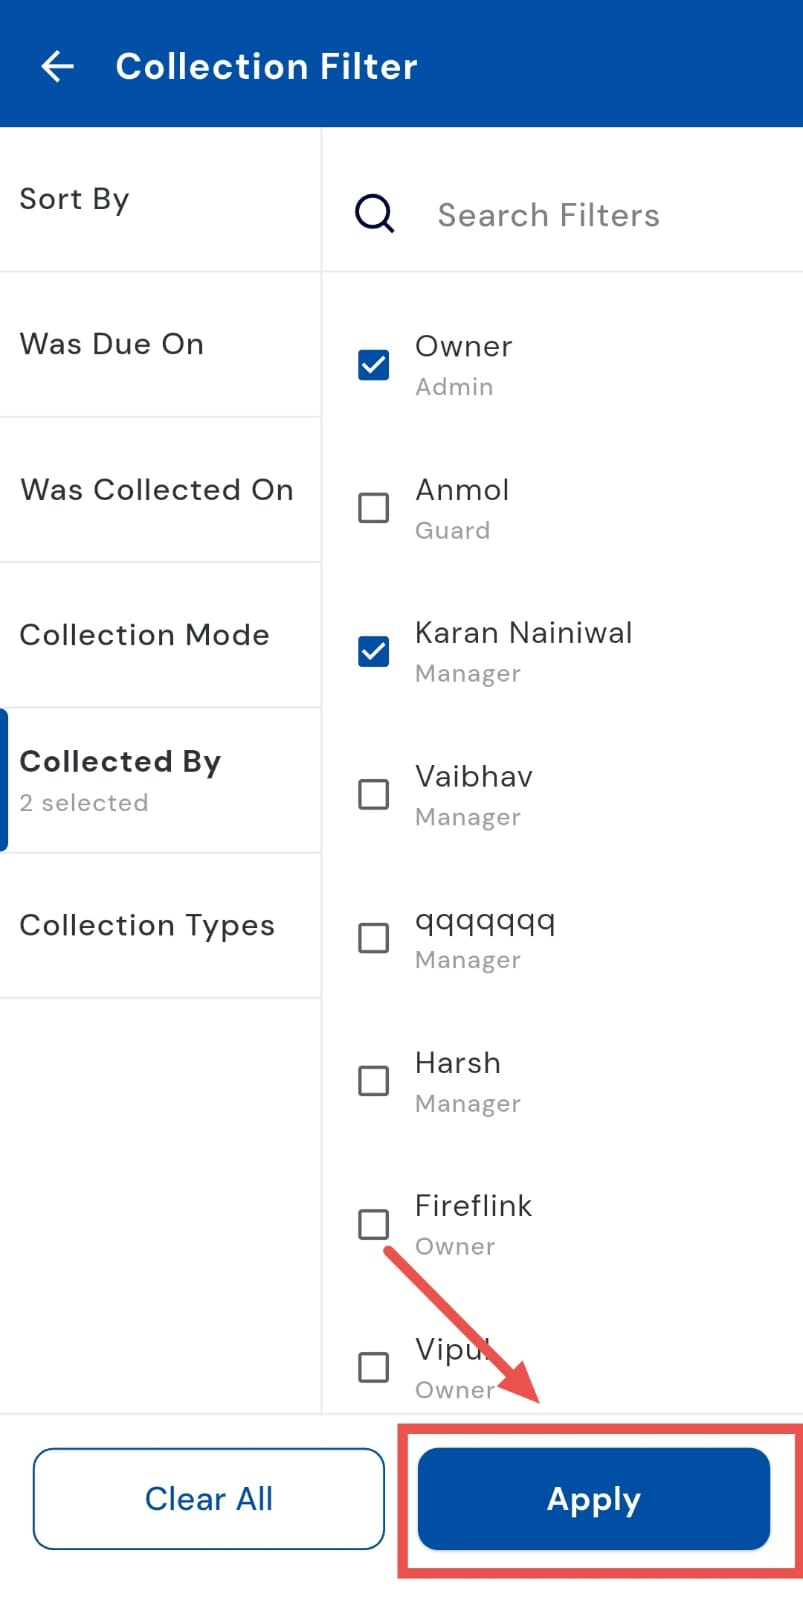
- Step 4: Select the option Pick the specific staff member, admin, or system entry you want to verify. This ensures you see only the collections recorded under their name.
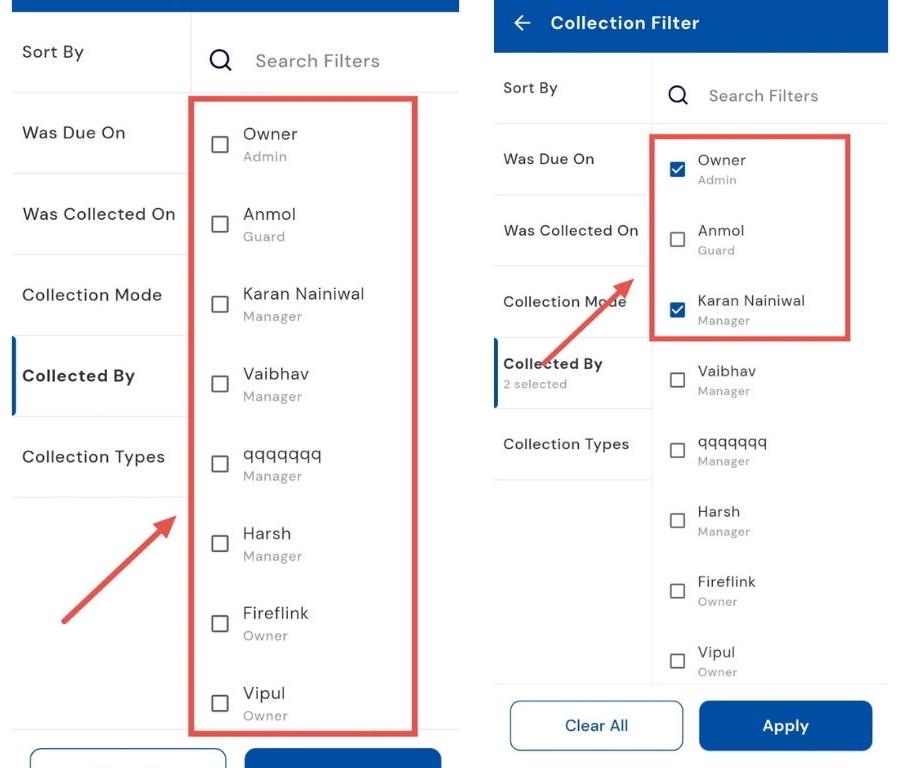
- Step 5: Apply the filter Tap Apply, and the app will display all collections that were received by the selected person or method.
| Tip: Here, you can view all types of collections, such as rent collection, security deposit collection, late fee collection, or even automatic joining fee collections. This helps maintain accurate records and accountability for every payment. |
|---|
How can I share the receipt with the tenant?
Whether for record-keeping or keeping tenants informed, sharing payment receipts is simple and convenient. The app generates receipts in PDF format, which you can easily share via WhatsApp, email, or other platforms. This ensures professional transparency, keeps tenants updated, and helps maintain accurate financial records effortlessly.
Follow these steps:
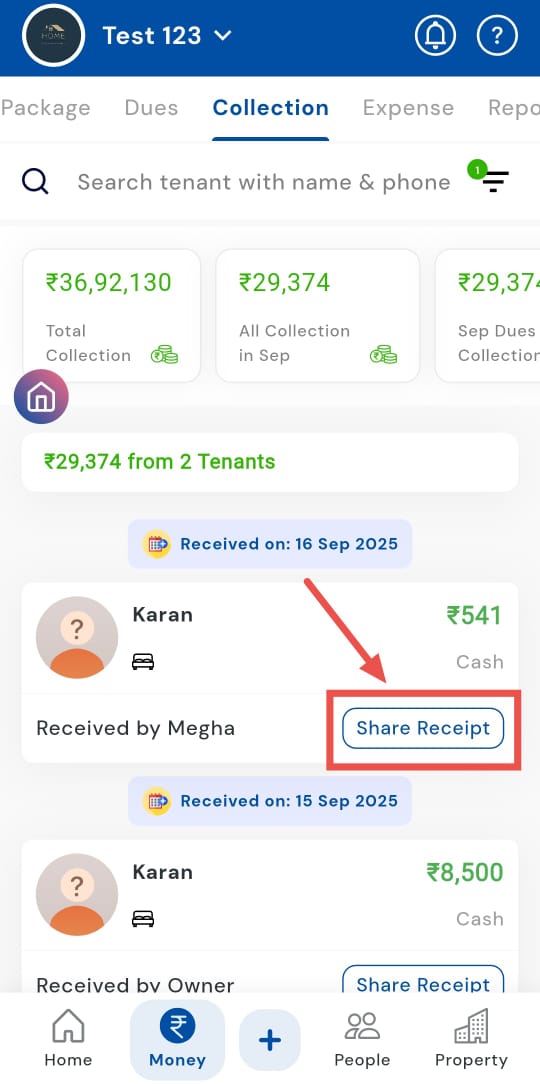
- Step 1: Open Collections Tap the Money icon in the bottom navigation menu, then select Collection to view all tenant payments.
- Step 2: Select the tenant’s receipt Locate the tenant’s card from the list and tap on Share Receipt to access their payment details.
-
Step 3: View the receipt A PDF view of the receipt will open, showing all necessary payment details for verification.
-
Step 4: Choose the share option Tap on Share, and a window will appear with available sharing methods.
-
Step 5: Send the receipt Select the desired platform (e.g., WhatsApp, Email, or SMS) and tap Send. The tenant will instantly receive their payment receipt.
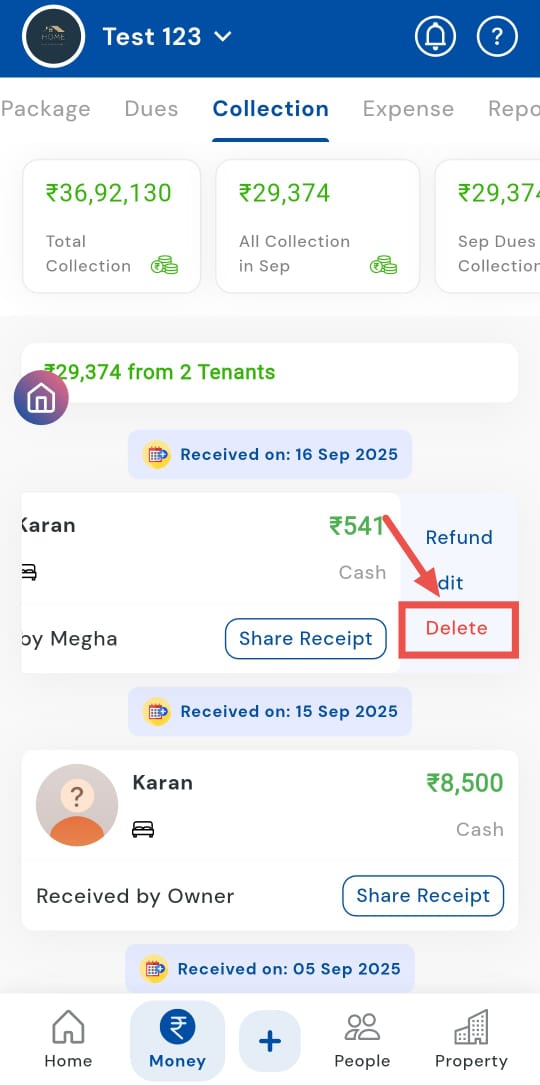
How can I delete a tenant's collection entry?
Maintaining accurate financial records is crucial, and sometimes payments may be entered by mistake or require adjustment. The app allows you to delete a tenant’s collection entry easily, ensuring your records stay correct and up to date. This helps prevent errors, keeps your accounts organized, and ensures smooth financial management.
Here's how you can do it:
- Step 1: Open Collections Tap the Money icon in the bottom navigation menu, then select Collection to access all tenant payments.
- Step 2: Locate the tenant’s collection Scroll through the list or search for the tenant, then swipe the tenant card to the left to reveal additional options.
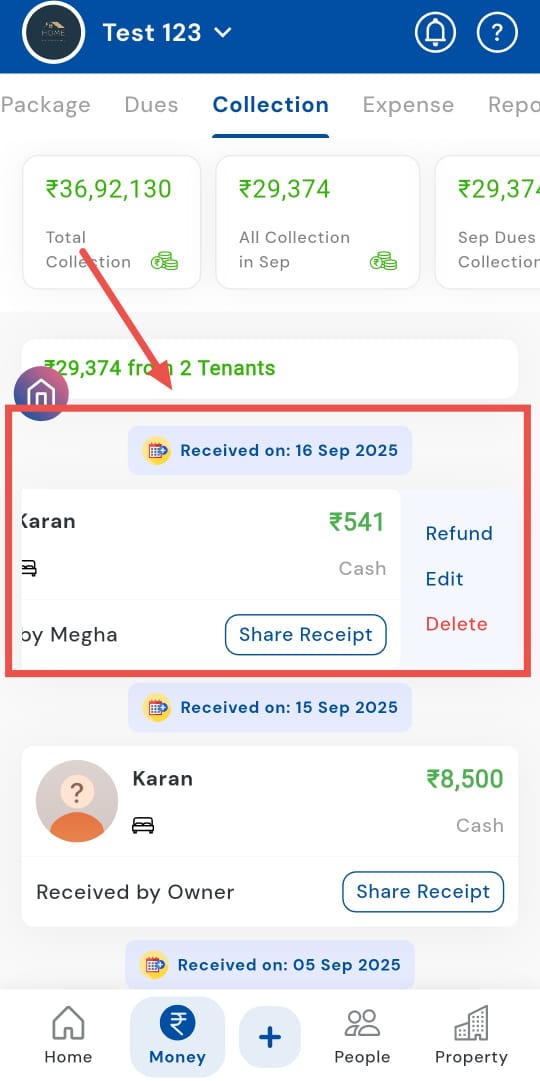
- Step 3: Choose Delete Tap on the Delete option to initiate removal of the entry.
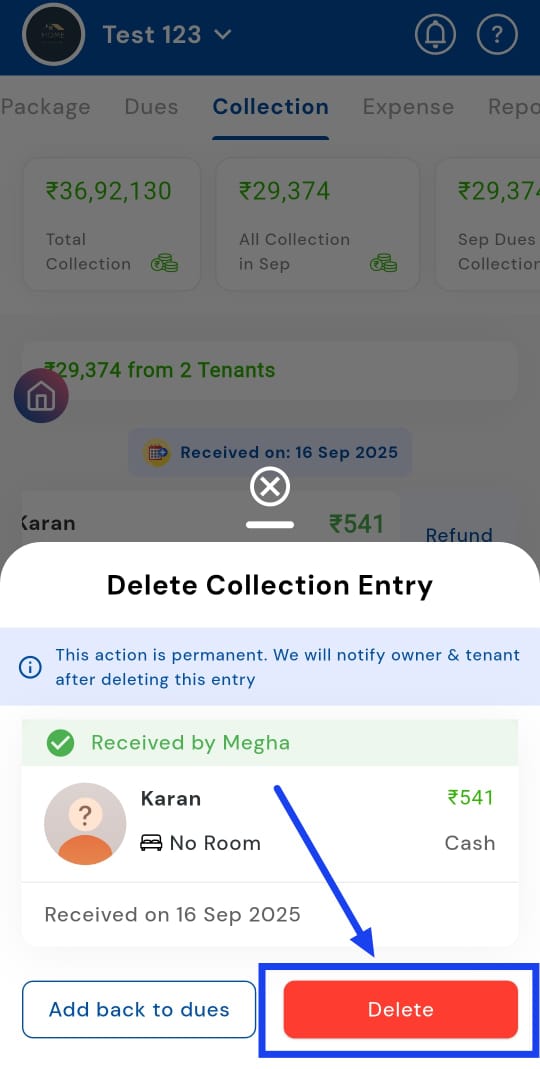
- Step 4: Confirm deletion A window will appear asking for confirmation. Select Delete to permanently remove the collection record from the system.
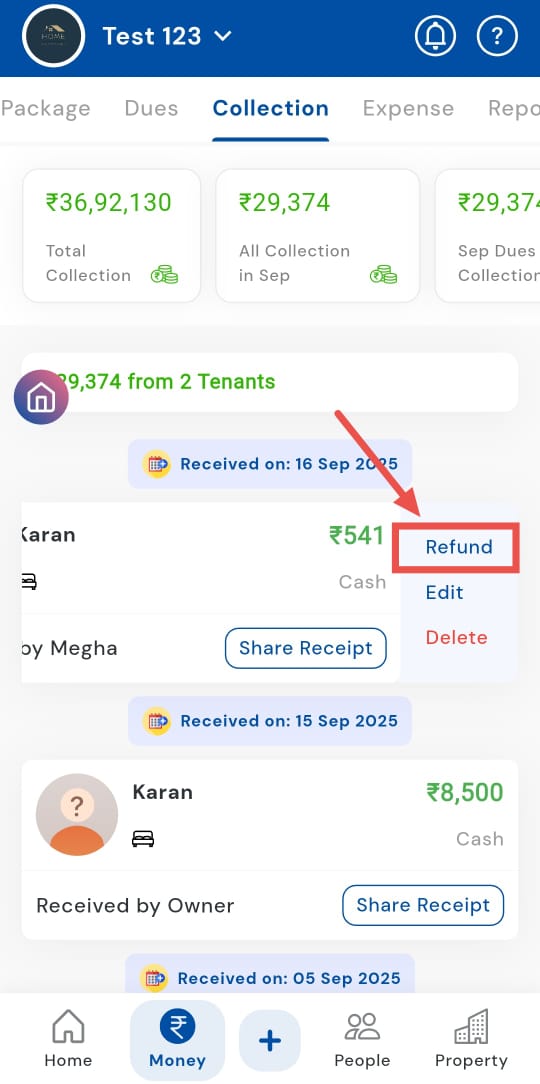
How can I refund the tenant?
Sometimes payments may be made in excess or need to be reversed. The app allows you to refund tenants directly, ensuring accurate financial management and maintaining tenant trust. Processing refunds is simple, transparent, and helps keep your accounts up to date while providing tenants with a smooth experience.
Follow these steps:
- Step 1: Open Collections Tap the Money icon in the bottom navigation menu, then select Collection to access all tenant payments.
- Step 2: Locate the tenant Find the tenant’s card in the collection list and swipe it to the left to reveal options.
- Step 3: Select Refund Tap on the Refund option to open the tenant’s passbook for further action.
- Step 4: Open the dues card In the tenant’s passbook, locate the relevant dues card, then swipe it to the left to access the refund option.
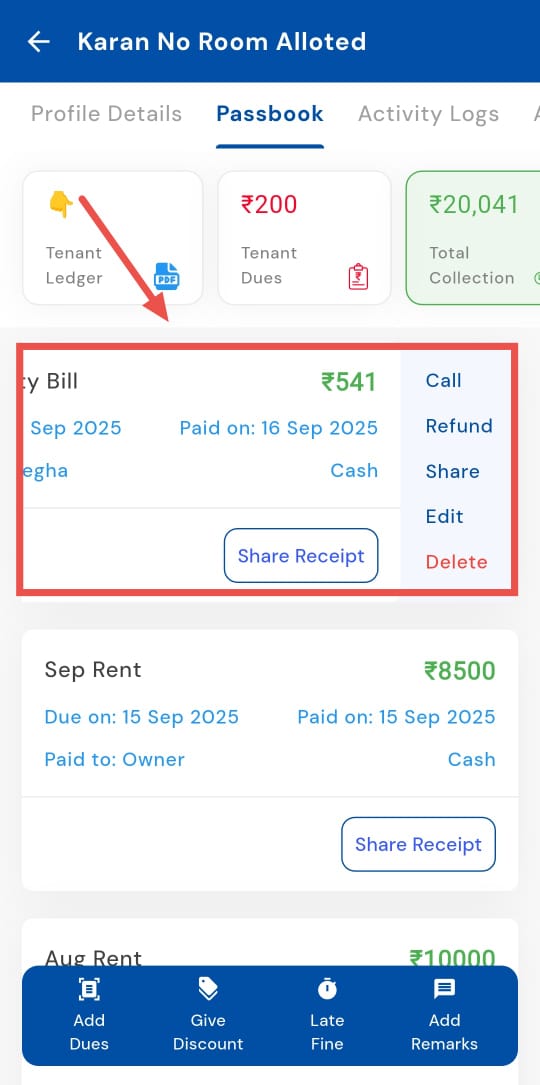
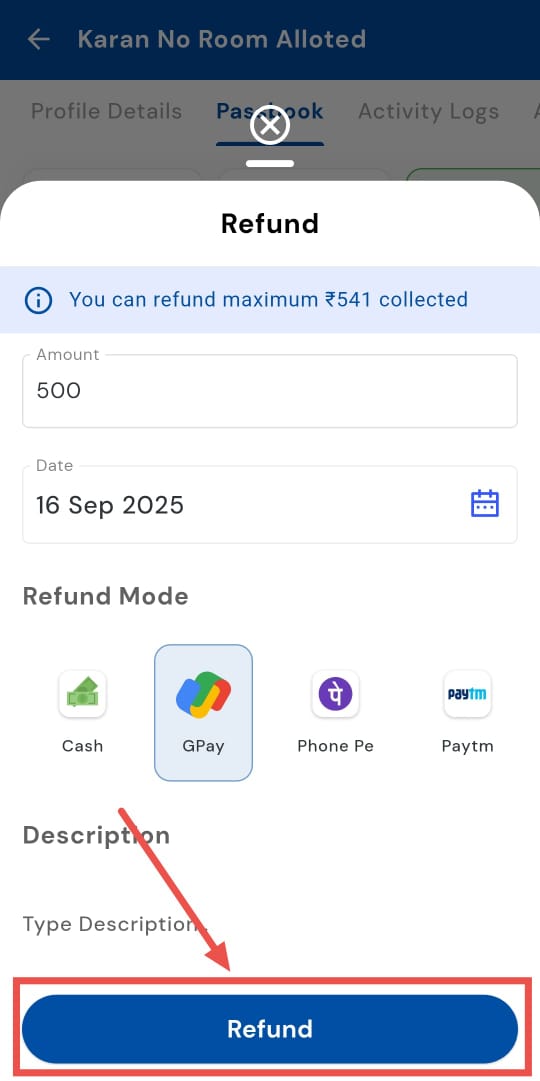
- Step 5: Enter refund details Tap on Refund, and a window will appear. Enter the amount you wish to refund.
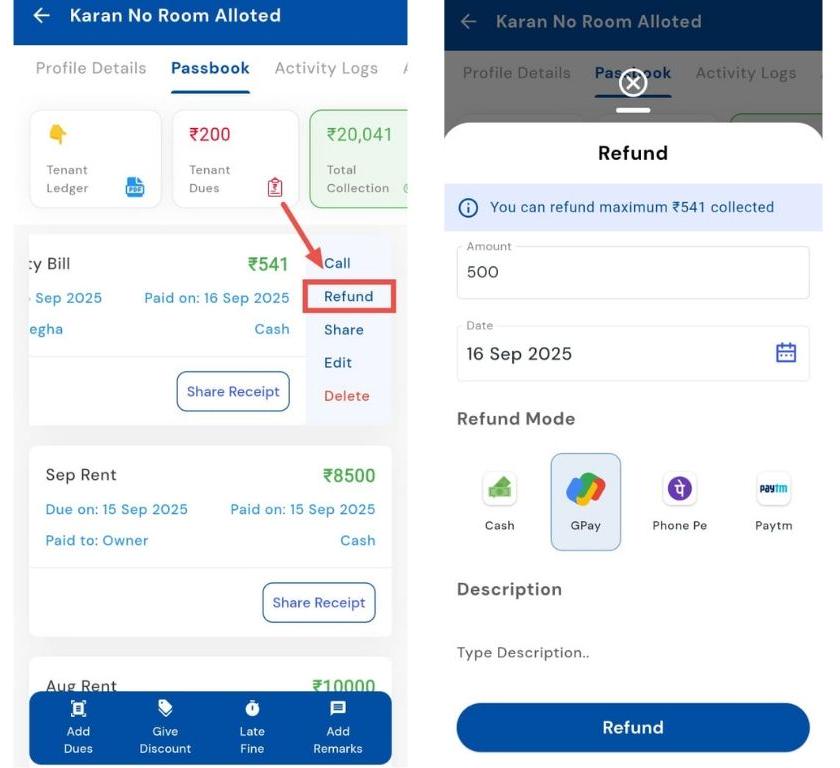
- Step 6: Confirm the refund Click on Refund to process the payment. The refunded amount will be updated in the tenant’s passbook.
How can I edit a tenant collection?
Keeping financial records accurate is essential, and sometimes an entry may need correction. You can easily edit a tenant’s collection entry if there’s an error in the recorded amount or Collection Mode. With just a few taps, you can update the details, ensuring your accounts remain precise and up to date.
Follow these steps:
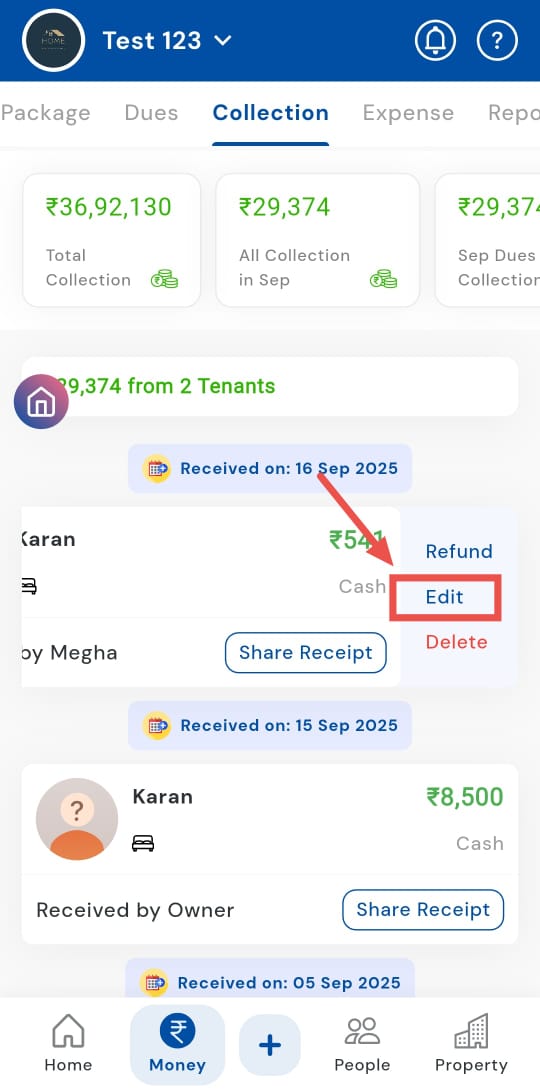
- Step 1: Open Collections Tap the Money icon in the bottom navigation menu, then select Collection to access all tenant payments.
- Step 2: Locate the tenant Find the tenant’s card in the collection list and swipe it to the left to reveal additional options.
- Step 3: Select Edit Tap on the Edit option to open the tenant’s passbook for detailed updates.
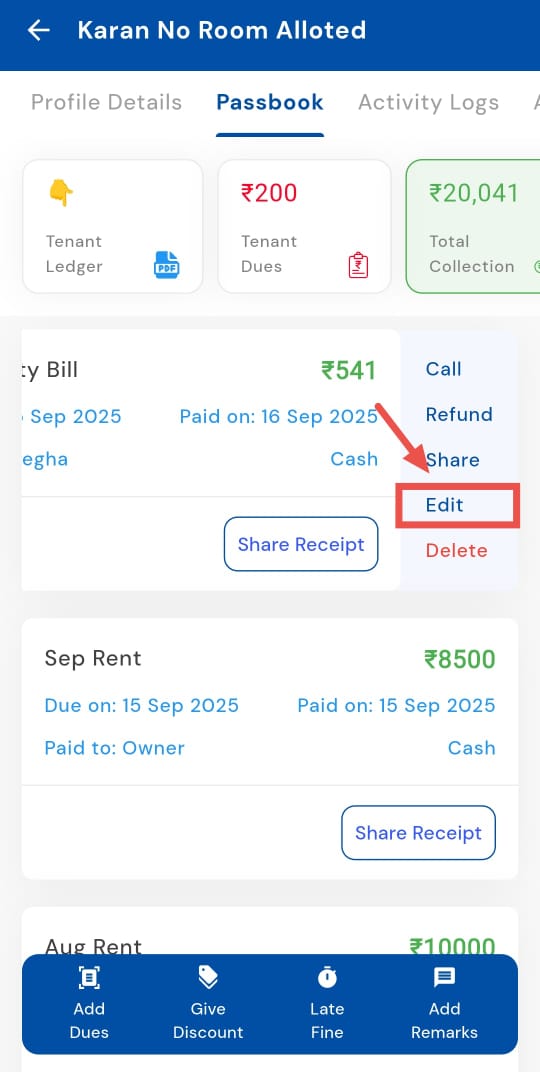
- Step 4: Open the dues card In the tenant’s passbook, locate the relevant dues card and swipe it to the left to access the edit option.
- Step 5: Select Edit Tap on Edit, and a window will appear.
- Step 6: Enter the necessary details Update the collected amount as needed and select the correct collection mode from the available options.
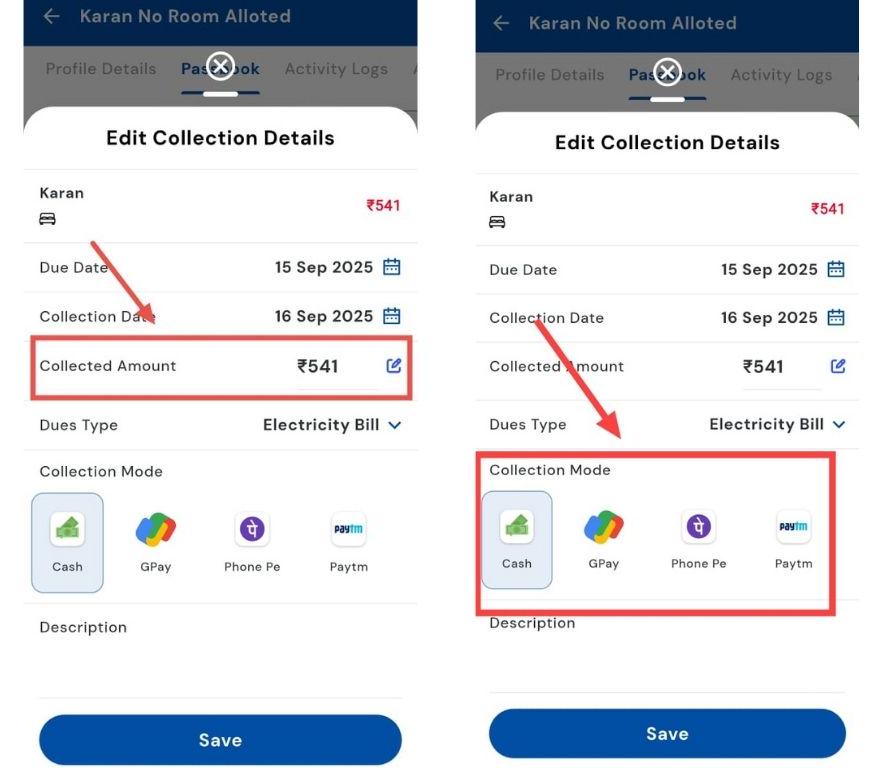
- Step 7: Save changes Click on Save to confirm the edits. The tenant’s collection record will now reflect the updated information.
