Money Expense
MONEY>EXPENSE
- MONEY>Expense
How can I view custom date range expenses?
Easily track and analyze your expenses by selecting any start and end date of your choice. With the custom date range filter, you can focus on a specific period, whether it’s a week, a month, or a project timeline. This makes it simple to review spending patterns, generate reports, and manage your finances with precision.
Follow these steps:
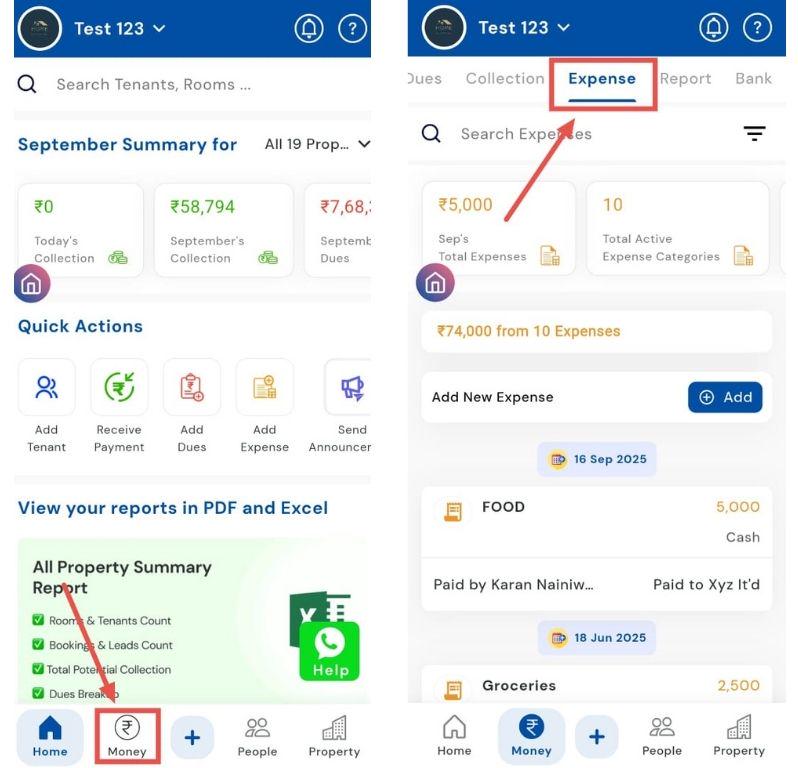
- Step 1: Open Expenses Tap the Money icon in the bottom navigation menu and select Expense to view all recorded expenses.
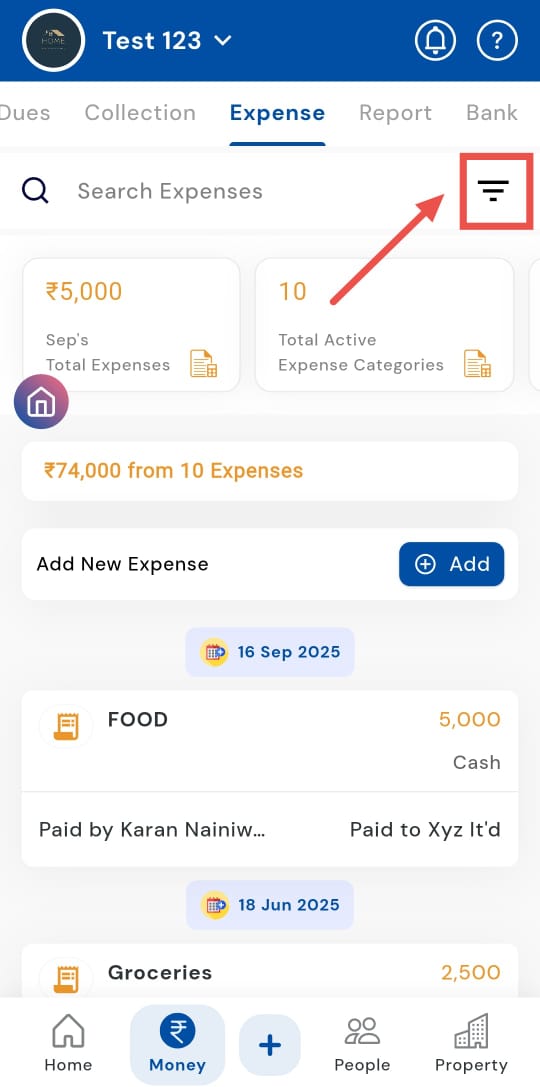
- Step 2: Access the filter In the search bar, tap on the Filter option to refine your expense list.
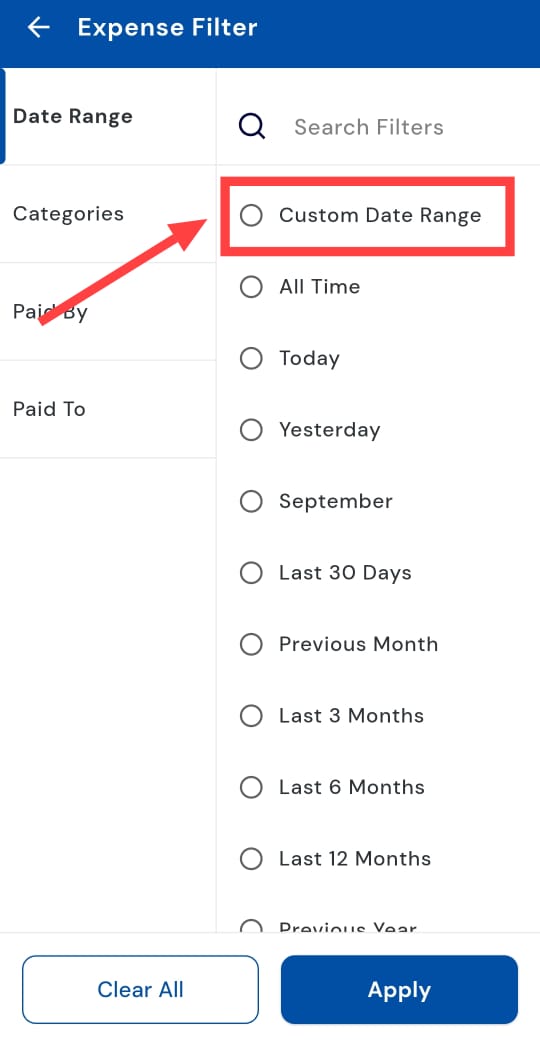
- Step 3: Choose Date Range A window with four filter options will appear. Select Date Range to proceed.
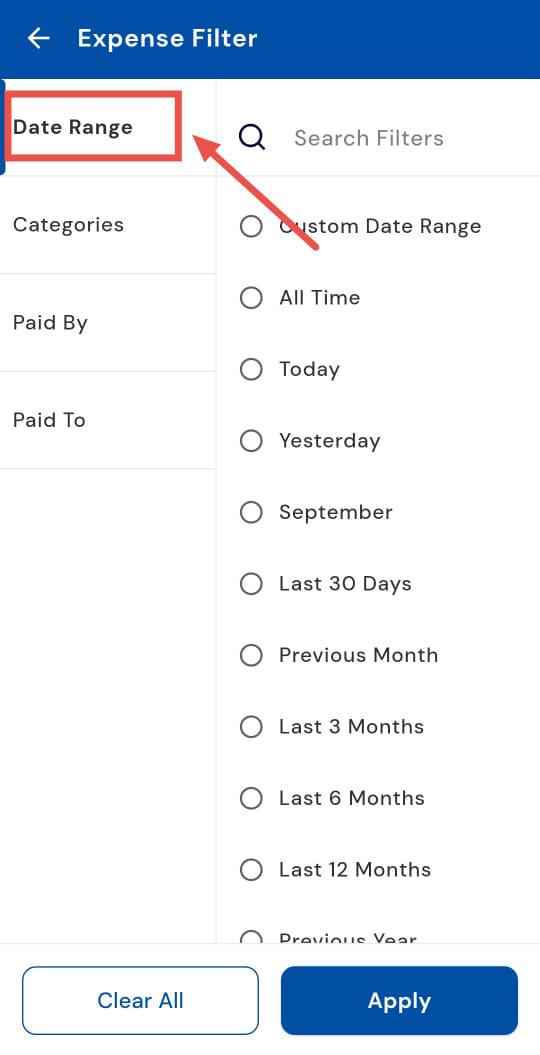
- Step 4: Select Custom Date Range From the available options, tap on Custom Date Range.
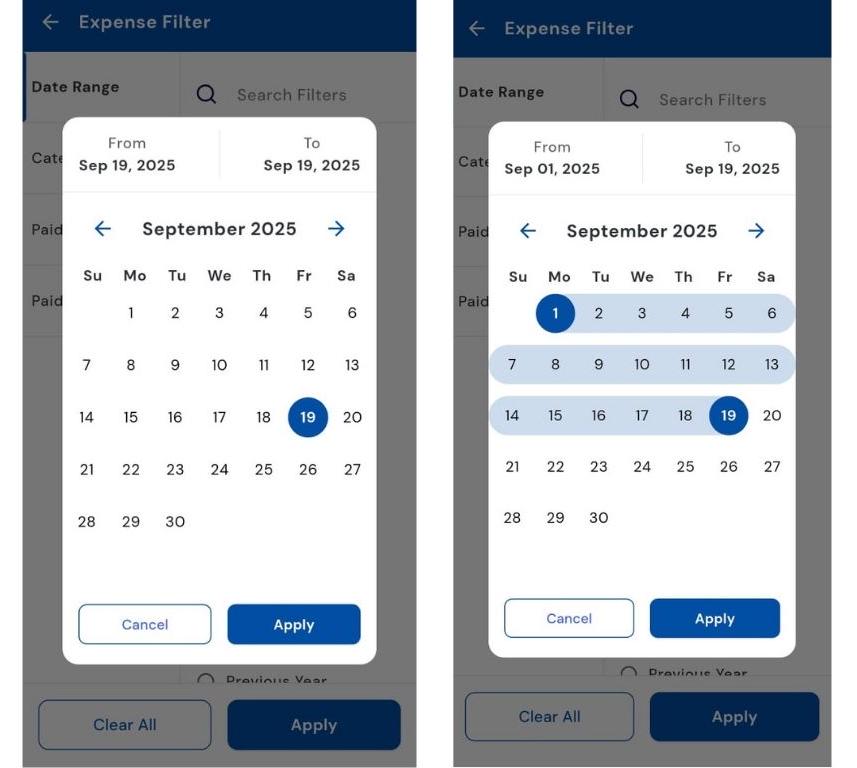
- Step 5: Pick start and end dates A calendar page will open where you need to select the Start Date and End Date for the expense period you want to review.
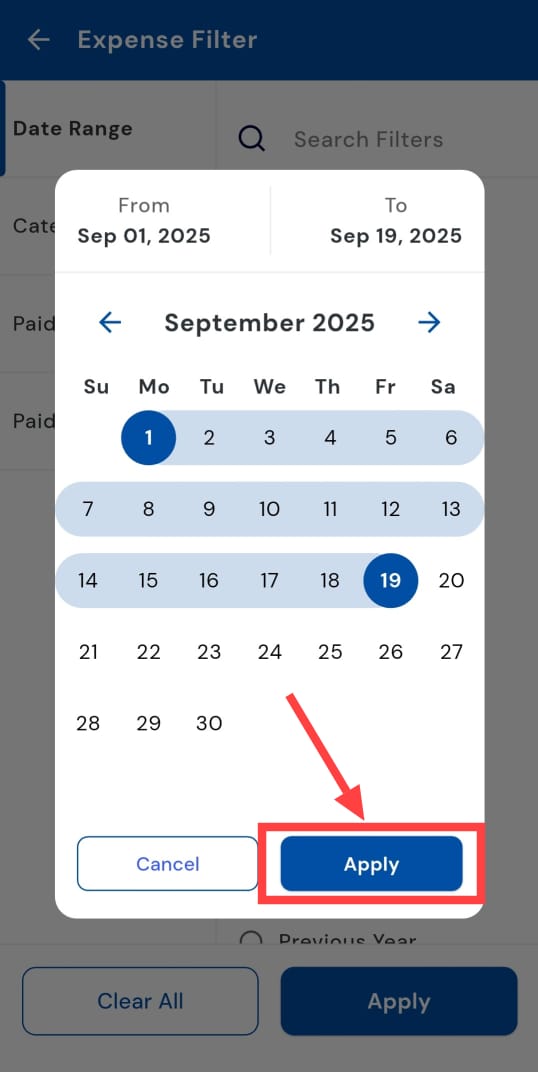
- Step 6: Save your selection Once the dates are chosen, tap on Apply to confirm.
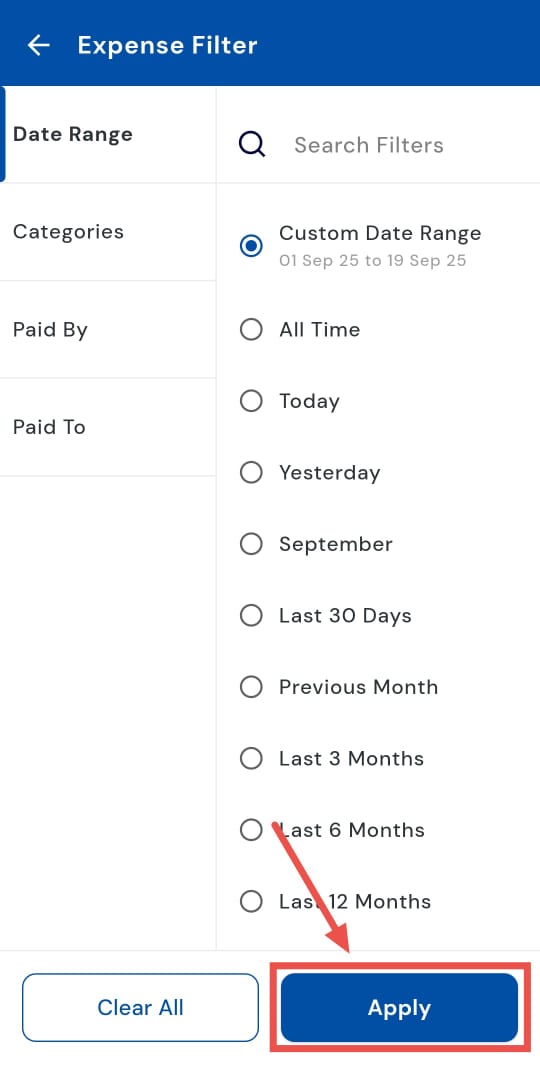
- Step 7: Apply the filter Finally, click on Apply, and the app will display all expenses recorded within the custom date range you selected.
How can I view all-time expenses?
If you’re doing a full audit or yearly reconciliation, the All Time view gives you every expense in one place. By selecting this option, you get a complete history of all expenses recorded in the system, making it easier to audit, analyze trends, or export totals without being limited to a specific period.
The process is quick and simple. Here’s how you can check it for yourself:
- Step 1: Open Expenses Tap the Money icon in the bottom navigation menu, then select Expense to open the list of all recorded expenses.
- Step 2: Access the filter At the top of the Expense screen, tap the Filter option inside the search box to open filtering choices.
- Step 3: Choose Date Range In the filter window, tap Date Range to view available time-range options.
- Step 4: Select “All Time” Pick All Time to include every expense entry from the start of your account up to today.
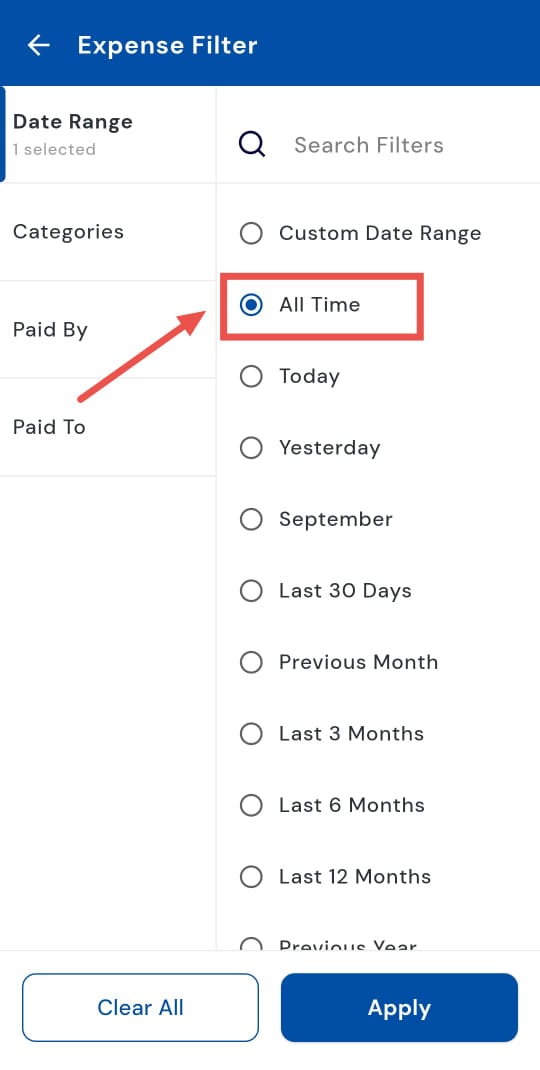
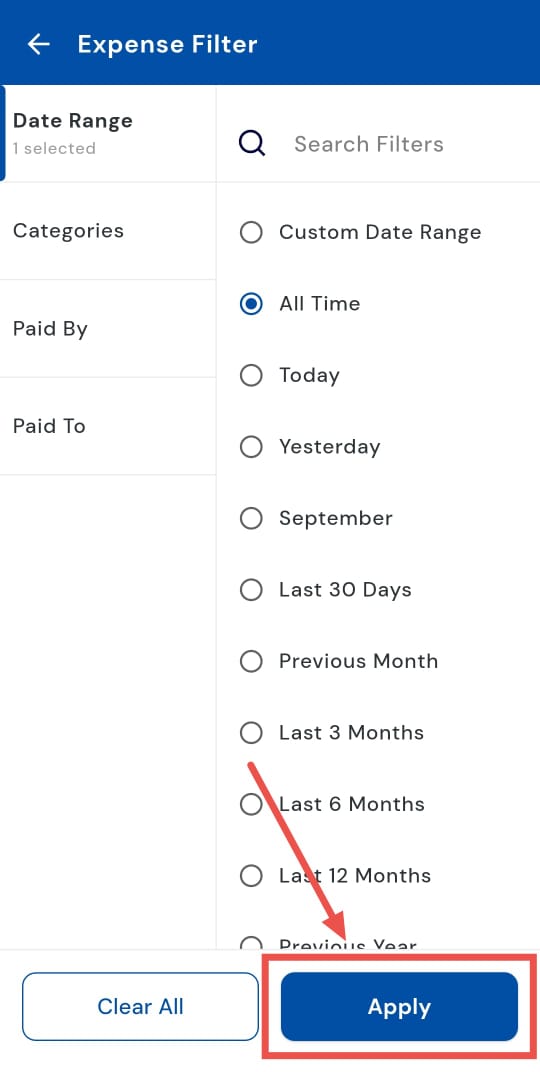
- Step 5: Apply the filter Tap Apply, and the app will display the full list and totals for all expenses recorded.
How do I check today's expenses?
Want to quickly check what you spent today? Just switch on the Today filter. By selecting this option, you’ll see only the expenses recorded for the current day, giving you a clear and focused view of your daily spending without the need to scroll through past entries.
Simply follow these quick steps to check:
- Step 1: Open Expenses Tap the Money icon in the bottom navigation menu. From the options that appear, select Expense to open the complete list of your recorded expenses.
- Step 2: Access the Filter Option At the top of the Expense screen, tap the Filter option inside the search box to open filtering choices.
- Step 3: Select Date Range A filter window will appear with different categories. Choose the Date Range option to set the period for which you want to view expenses.
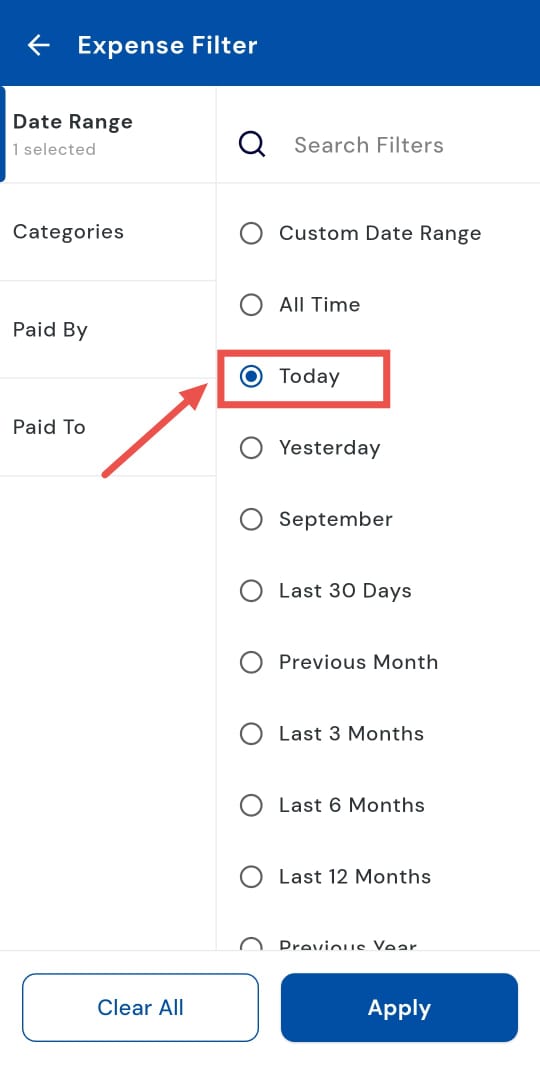
- Step 4: Choose Today From the available date ranges, tap Today. This will limit the results to only those expenses recorded on the current date.
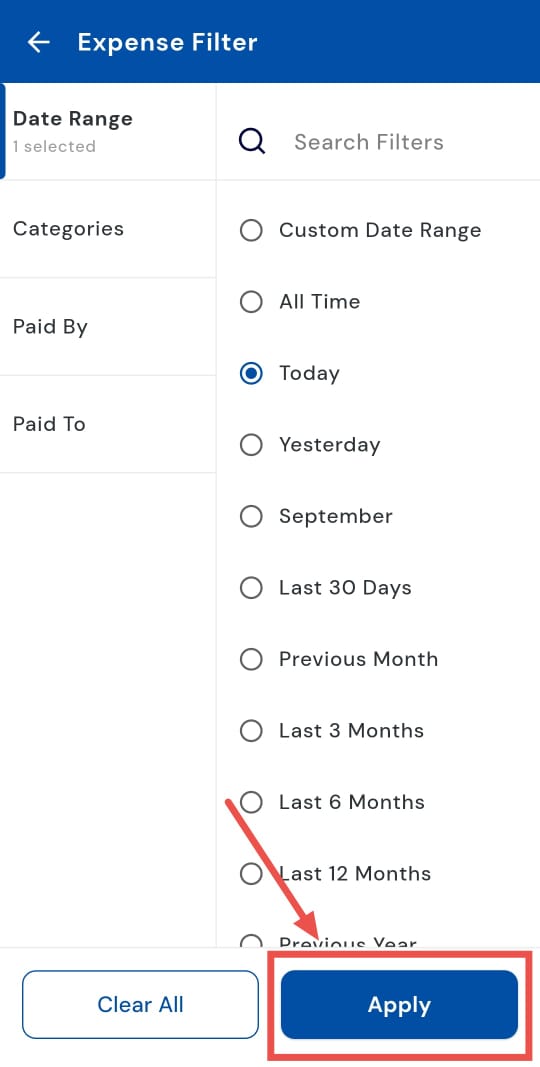
- Step 5: Apply the Filter Then tap Apply to confirm your selection. The app will refresh the list and show only today’s expenses along with their totals.
How do I check yesterday's expenses?
Easily review yesterday’s expenses using the Yesterday filter in the app. This option lets you see all transactions from the previous day, giving you a clear and focused snapshot. It’s perfect for quickly verifying payments, keeping track of your spending, or preparing accurate daily reports.
Simply follow these steps to get a complete view at a glance:
- Step 1: Open the Expenses section Tap the Money icon in the bottom navigation bar. From the options, select Expense to view the list of your expense records.
- Step 2: Open the filter menu At the top of the Expense screen, you’ll see a search box. Inside it, tap the Filter option to open filtering choices.
- Step 3: Choose Date Range A window will appear with different filters. Tap on Date Range to set the time period you want to view.
- Step 4: Select Yesterday From the available options, choose Yesterday. This will narrow down the list to only expenses recorded on the previous day.
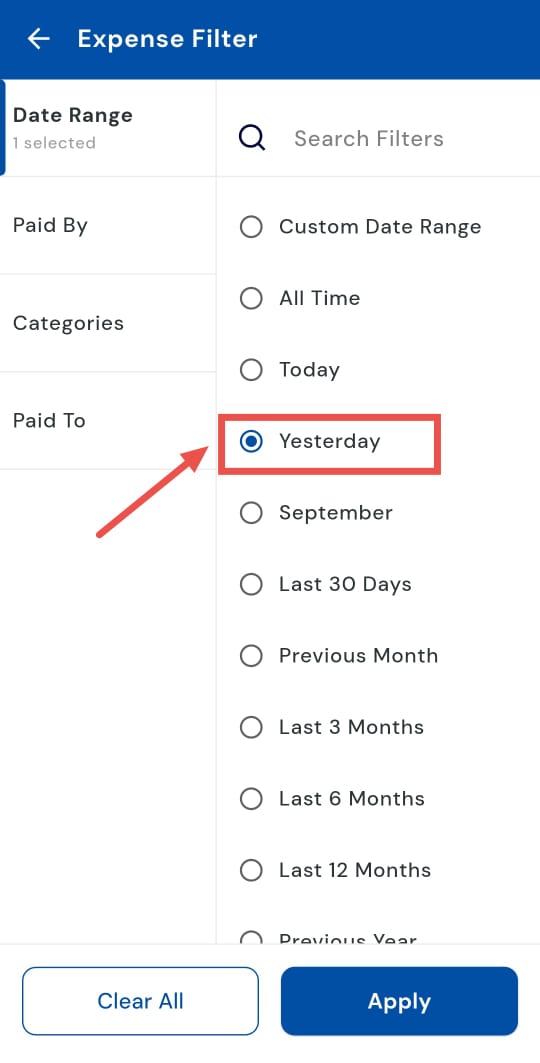
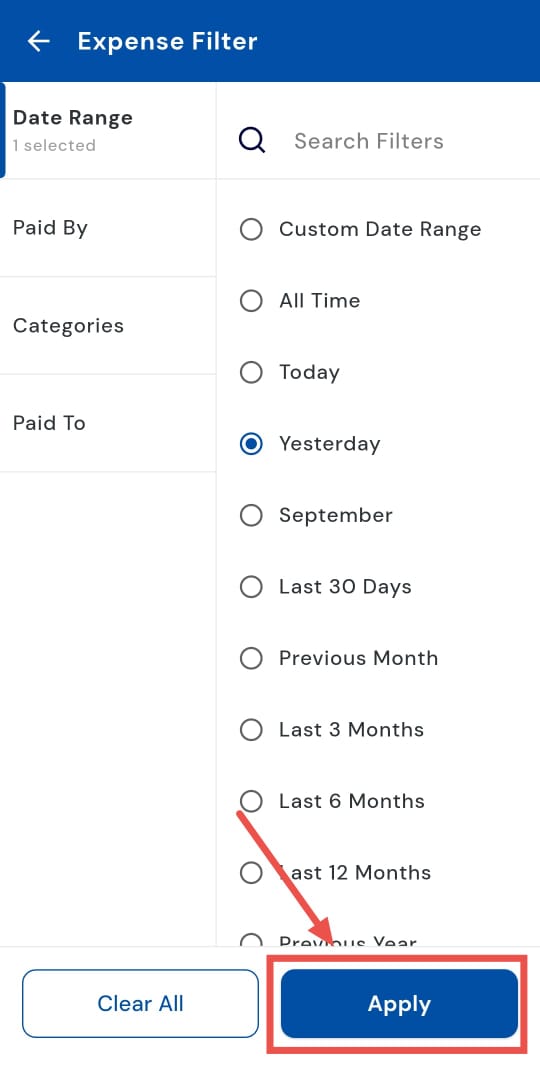
- Step 5: Apply the filter Tap Apply to confirm. The app will now refresh and show only yesterday’s expenses along with their totals.
How do I check the last 30 days expenses?
Want to track your short-term spending trends? Use the Last 30 Days view to see all expenses recorded over the past month. This filter makes it easy to monitor your spending patterns, keep an eye on your budget, and generate short-term reports, all without the hassle of setting a custom date range.
Here’s how you can check it in just a few taps:
- Step 1: Open the Expenses section Tap the Money icon in the bottom navigation bar. From the options, select Expense to see the complete list of your recorded expenses.
- Step 2: Open the filter menu On the Expense screen, look at the top for the search box. Tap the Filter option inside it to bring up filtering choices.
- Step 3: Choose Date Range A window will appear with different filter categories. Select Date Range to adjust the period you want to view.
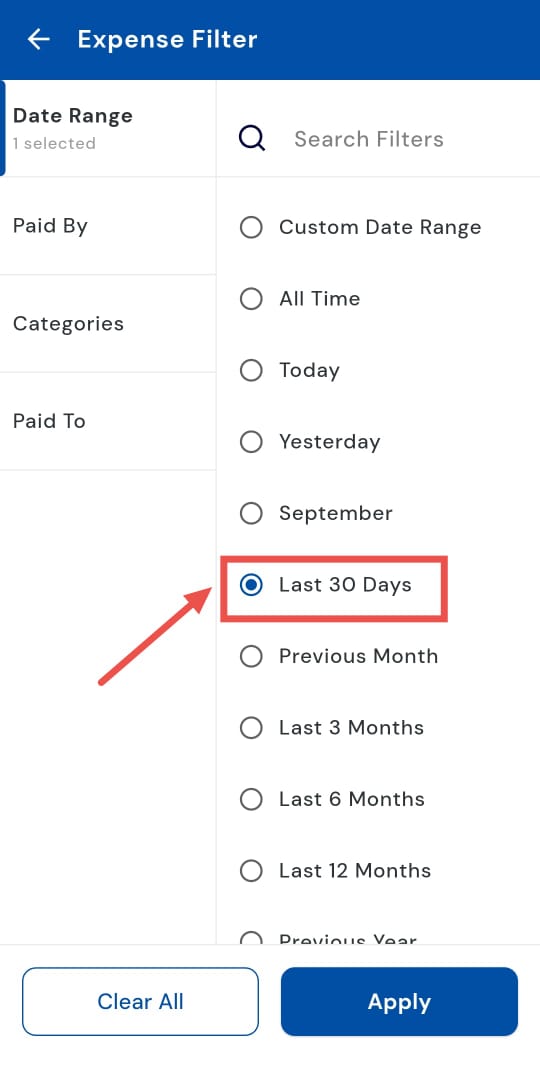
- Step 4: Select Last 30 Days From the available date ranges, tap Last 30 Days. This will narrow down the list of expenses recorded over the last 30 days.
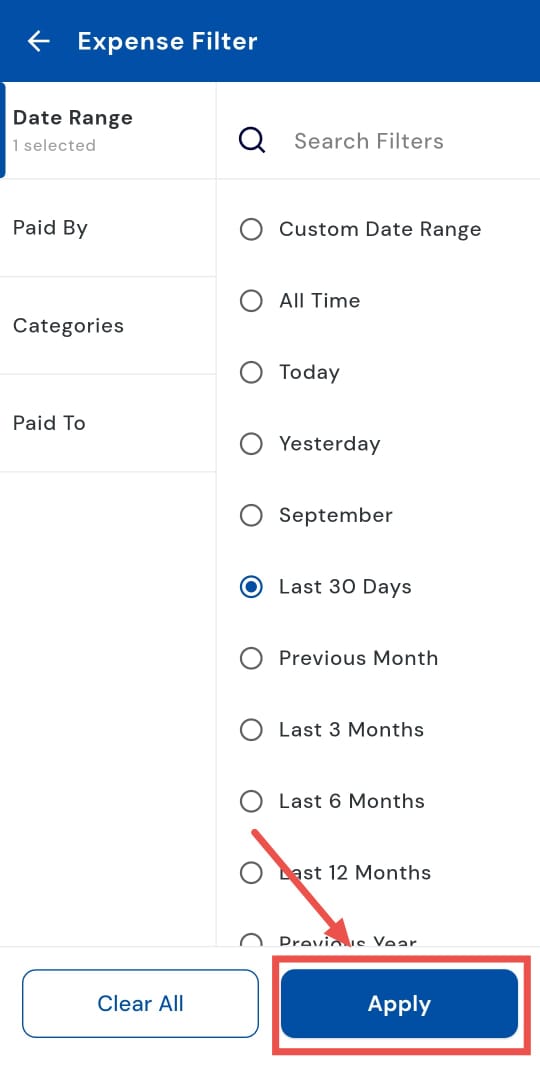
- Step 5: Apply the filter Tap Apply to confirm your selection. The app will refresh and display all expenses from the last 30 days along with totals.
How do I check the previous month's expenses?
Stay on top of your monthly expenses with the Previous Month view. By selecting this filter, you can see all transactions from the last calendar month in one place, giving you a clear picture of your spending. It makes reviewing patterns, reconciling expenses, and preparing your monthly financial summary quick and hassle-free.
Simply follow these steps to get a complete overview:
- Step 1: Open the Expenses section Tap the Money icon in the bottom navigation menu. From the options, select Expense to open your list of recorded expenses.
- Step 2: Open the filter menu At the top of the Expense screen, tap the Filter option inside the search box to view filtering choices.
- Step 3: Choose Date Range A window will appear with various filter options. Tap Date Range to select the time period you want to check.
- Step 4: Select Previous Month From the list of date ranges, choose Previous Month. This will narrow your view to only expenses recorded in the month before the current one.
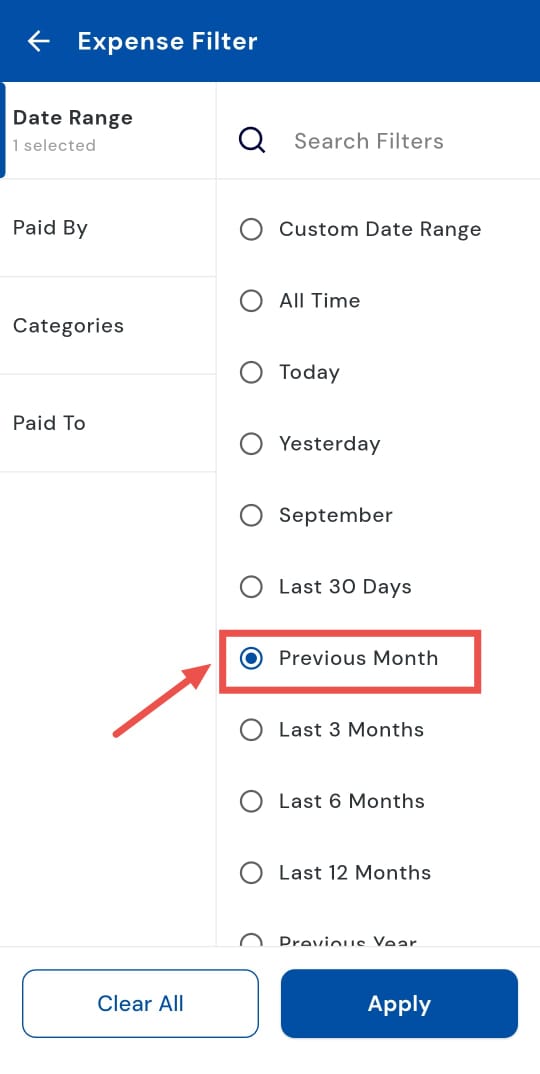
- Step 5: Apply the filter Tap Apply to confirm. The app will refresh and display all expenses from the previous month along with their totals.

1.7 How to check expenses for the last 3, 6, or 12 months
Easily track your expenses over longer periods with the Last 3, 6, or 12 Months filter. This feature lets you view spending for a quarter, half-year, or full year in one place, making it simple to analyze trends, manage budgets, and generate detailed reports.
Follow these steps to get a comprehensive look at your long-term spending patterns:
- Step 1: Open the Expenses section Tap the Money icon in the bottom navigation menu, then select Expense to access your expense records.
- Step 2: Open the filter menu At the top of the Expense screen, tap the Filter option inside the search box to see filtering choices.
- Step 3: Choose Date Range A window will appear with several filter options. Select Date Range to pick the period you want to review.
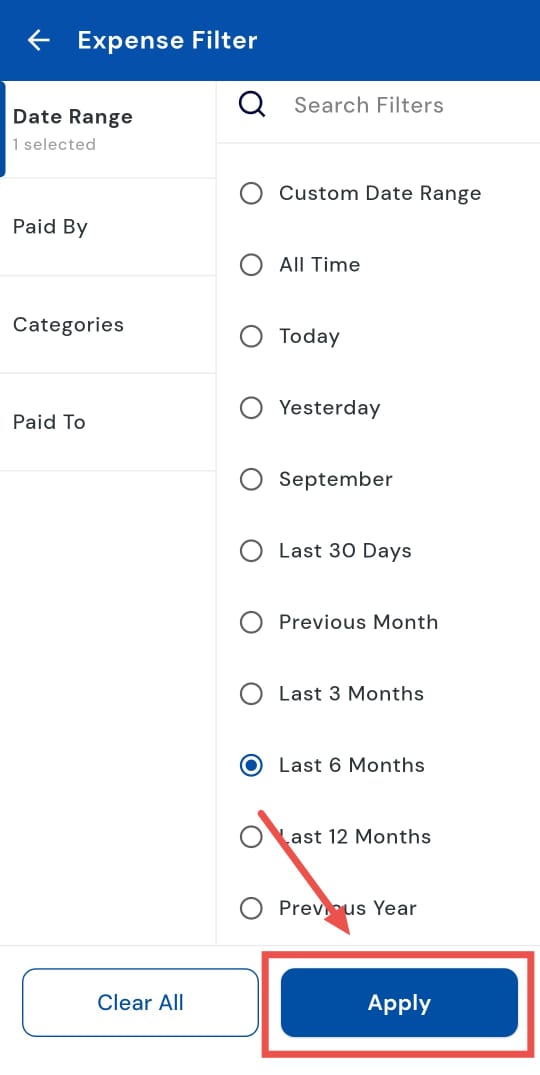
- Step 4: Select the desired period From the list, choose either Last 3 Months, Last 6 Months, or Last 12 Months, depending on how far back you want to review expenses.
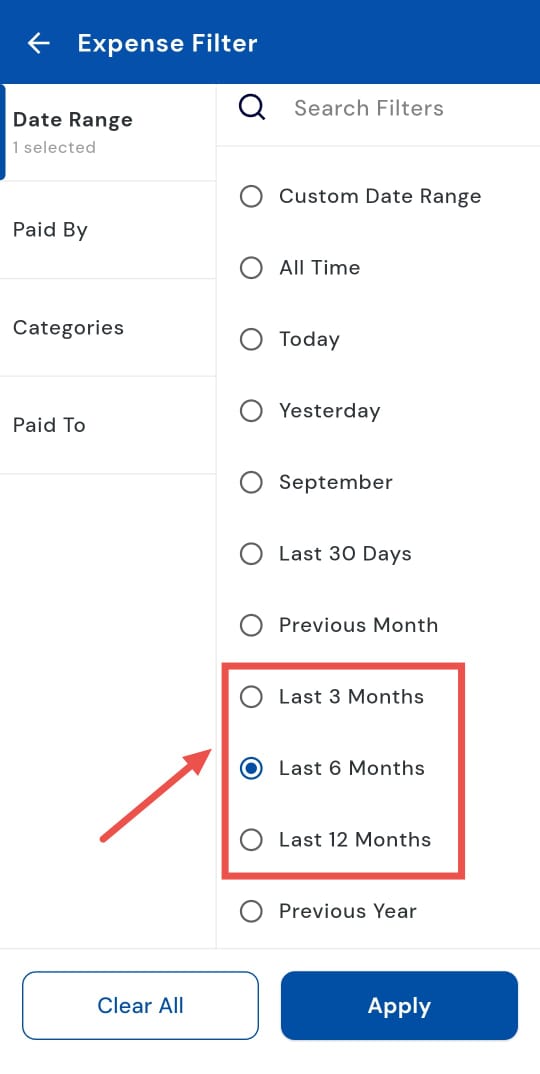
- Step 5: Apply the filter Tap Apply to confirm. The app will refresh and display all expenses recorded in the selected period along with their totals.
How do I check the previous year's expenses?
Checking your expenses for the previous year can be time-consuming, but the Previous Year filter makes it easy. By selecting this option, you can view all transactions from the last calendar year in one place, giving you a complete picture of your spending. It’s perfect for spotting trends, reconciling accounts, or preparing detailed annual financial reports.
Simply follow these steps to get a full overview quickly:
- Step 1: Open the Expenses section Tap the Money icon in the bottom navigation menu, then select Expense to view all recorded entries.
- Step 2: Open the filter menu At the top of the Expense screen, tap the Filter option inside the search box to access filtering choices.
- Step 3: Choose Date Range A window will appear with several options. Tap Date Range to select the time period you want to check.
- Step 4: Select Previous Year From the list, choose Previous Year. This will show all expenses recorded in the last calendar year.
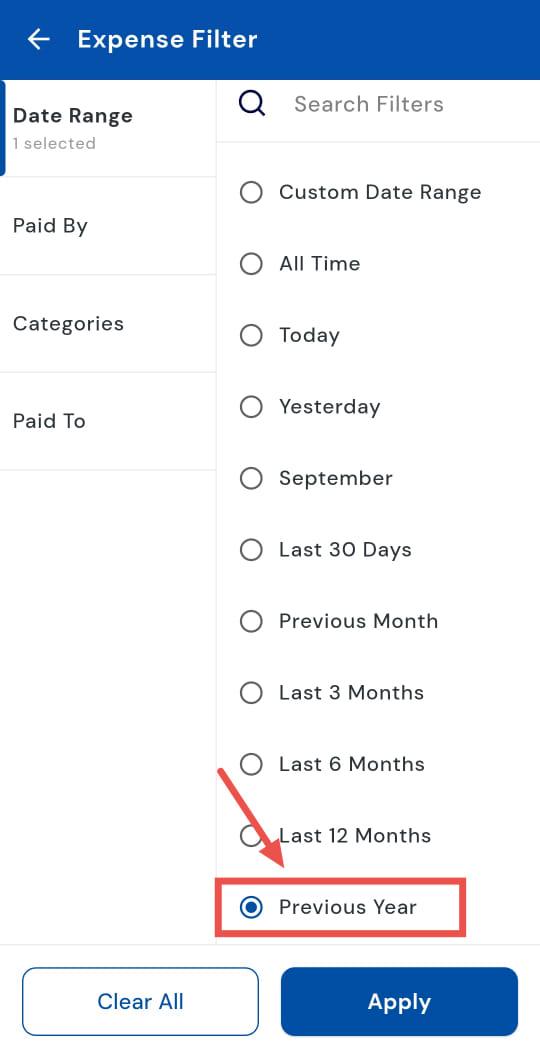
- Step 5: Apply the filter Tap Apply to confirm. The app will refresh and display all entries from the previous year along with their totals.

How can I check expenses for various categories?
Need a clear breakdown of your expenses by category? Use the Categories option to quickly view all transactions for a specific type of spending, such as groceries, transport, or utilities. This makes it easy to see where your money is going, track habits, and make smarter budgeting decisions.
Here’s how you can check your category-wise expenses in just a few taps:
- Step 1: Open the Expenses section Tap the Money icon in the bottom navigation menu, then select Expense to view your recorded entries.
- Step 2: Open the filter menu At the top of the Expense screen, tap the Filter option inside the search box to access filtering choices.
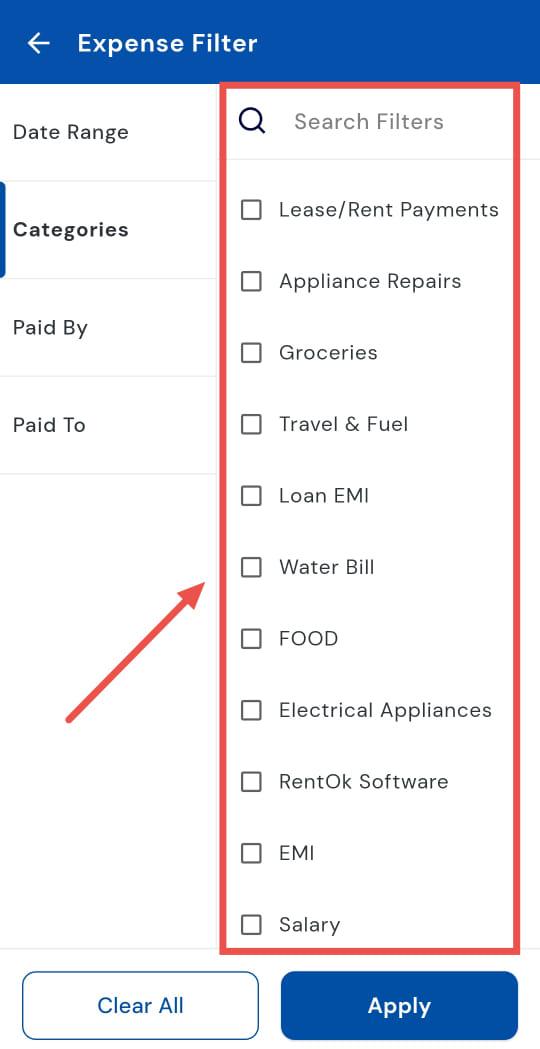
- Step 3: Choose Categories A window will appear with several filter options. Tap Categories to see the list of available categories.
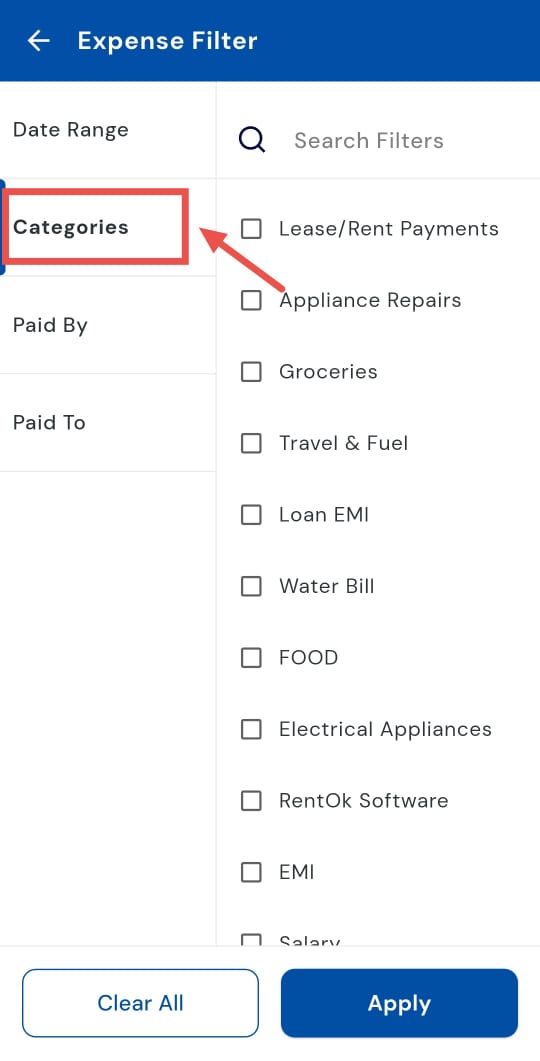
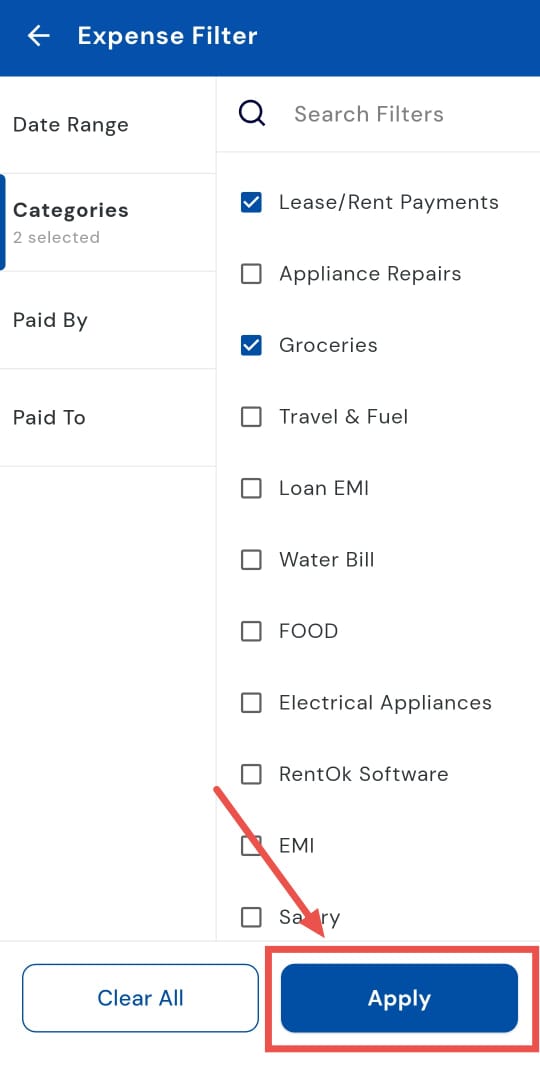
- Step 4: Select the desired category From the list, choose the category for which you want to view expenses. This will narrow the results to that specific type of spending.
- Step 5: Apply the filter Tap Apply to confirm. The app will refresh and display only the expenses for the selected category along with their totals.
How can I check who made the payment for the expense?
Need to check expenses based on who paid? Use the Paid By option to view transactions made by each user. This filter is especially useful for tracking shared expenses, reconciling payments, or reviewing individual contributions.
Follow these steps to quickly see who paid for what and keep your records organized:
- Step 1: Open the Expenses section Tap the Money icon in the bottom navigation menu, then select Expense to see all recorded entries.
- Step 2: Open the filter menu At the top of the Expense screen, tap the Filter option inside the search box to access filtering choices.
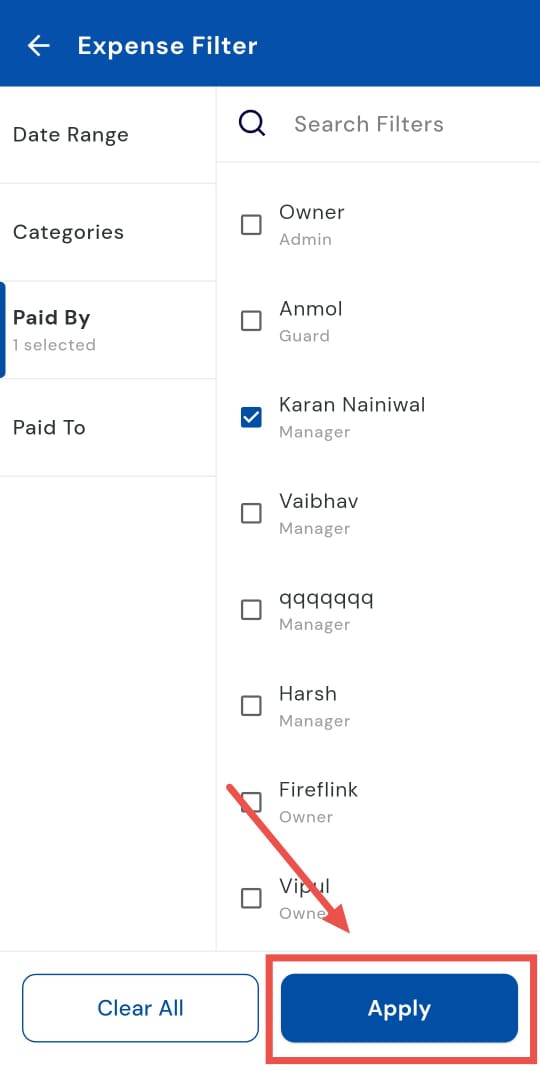
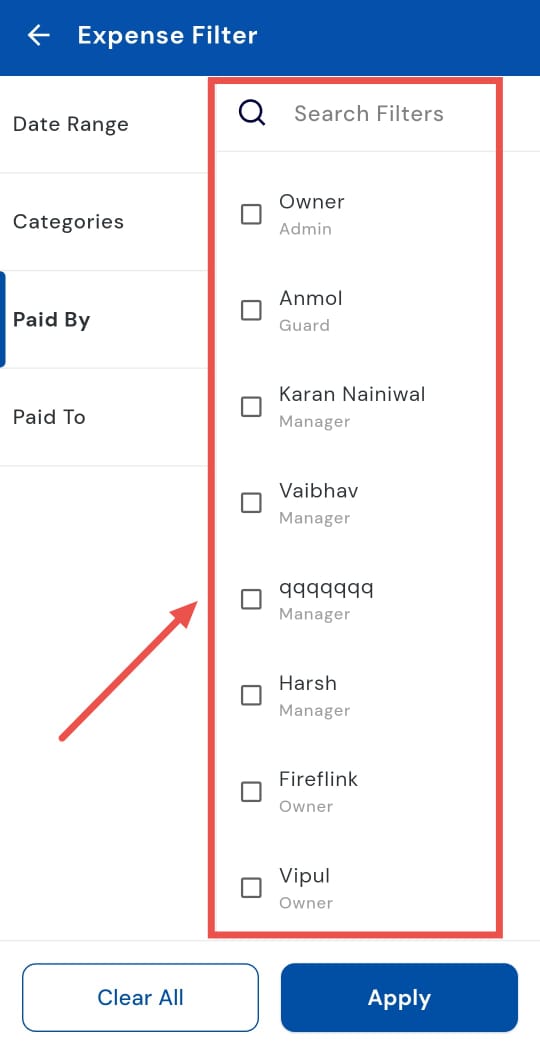
- Step 3: Choose Paid By A window will appear with several filter options. Tap Paid By to view the list of users.
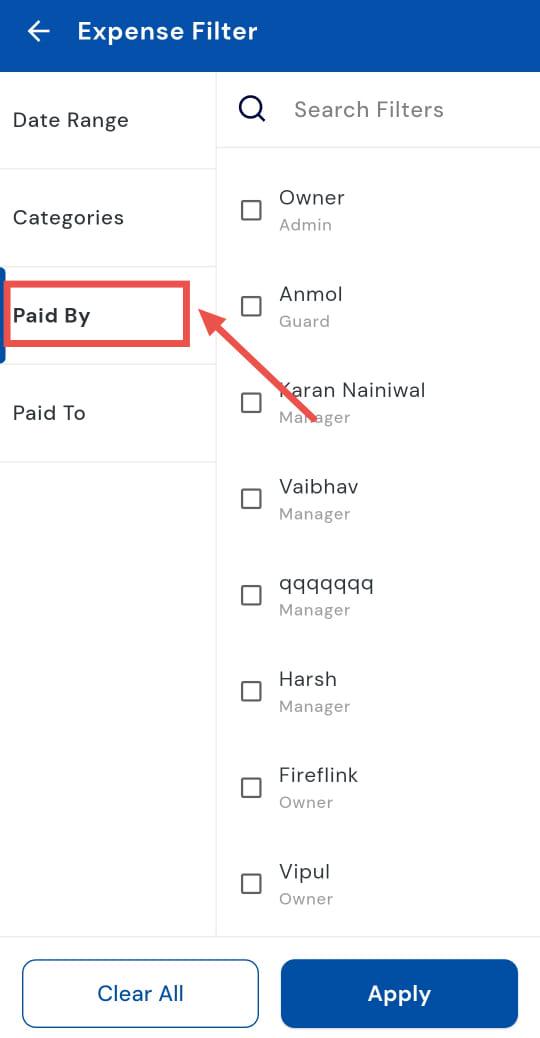
- Step 4: Select the name From the list, choose the person whose payments you want to view. This will narrow the list to only expenses made by that user.
- Step 5: Apply the filter Tap Apply to confirm. The app will refresh and display all expenses made by the selected person, along with their totals.