RentOk Release Note - 27th Aug, 2026
Hello!
Our new release is here, and it's a big one. This release makes tenant communication smarter, gives you clearer numbers to work with, and helps you organise your portfolio your way. We've also fixed important issues in Entry/Exit and Aadhaar verification.
What Is New In This Release
- Genie - Meet Genie – your 24/7 WhatsApp assistant running from your own branded number that handles all your bookings, complaints and announcements.
- Complaint Bot - Tenants can now raise and track complaints by simply chatting – no forms, no calls. Set up your own complaint bot – routing, response time, and escalations – yourself on the web app.
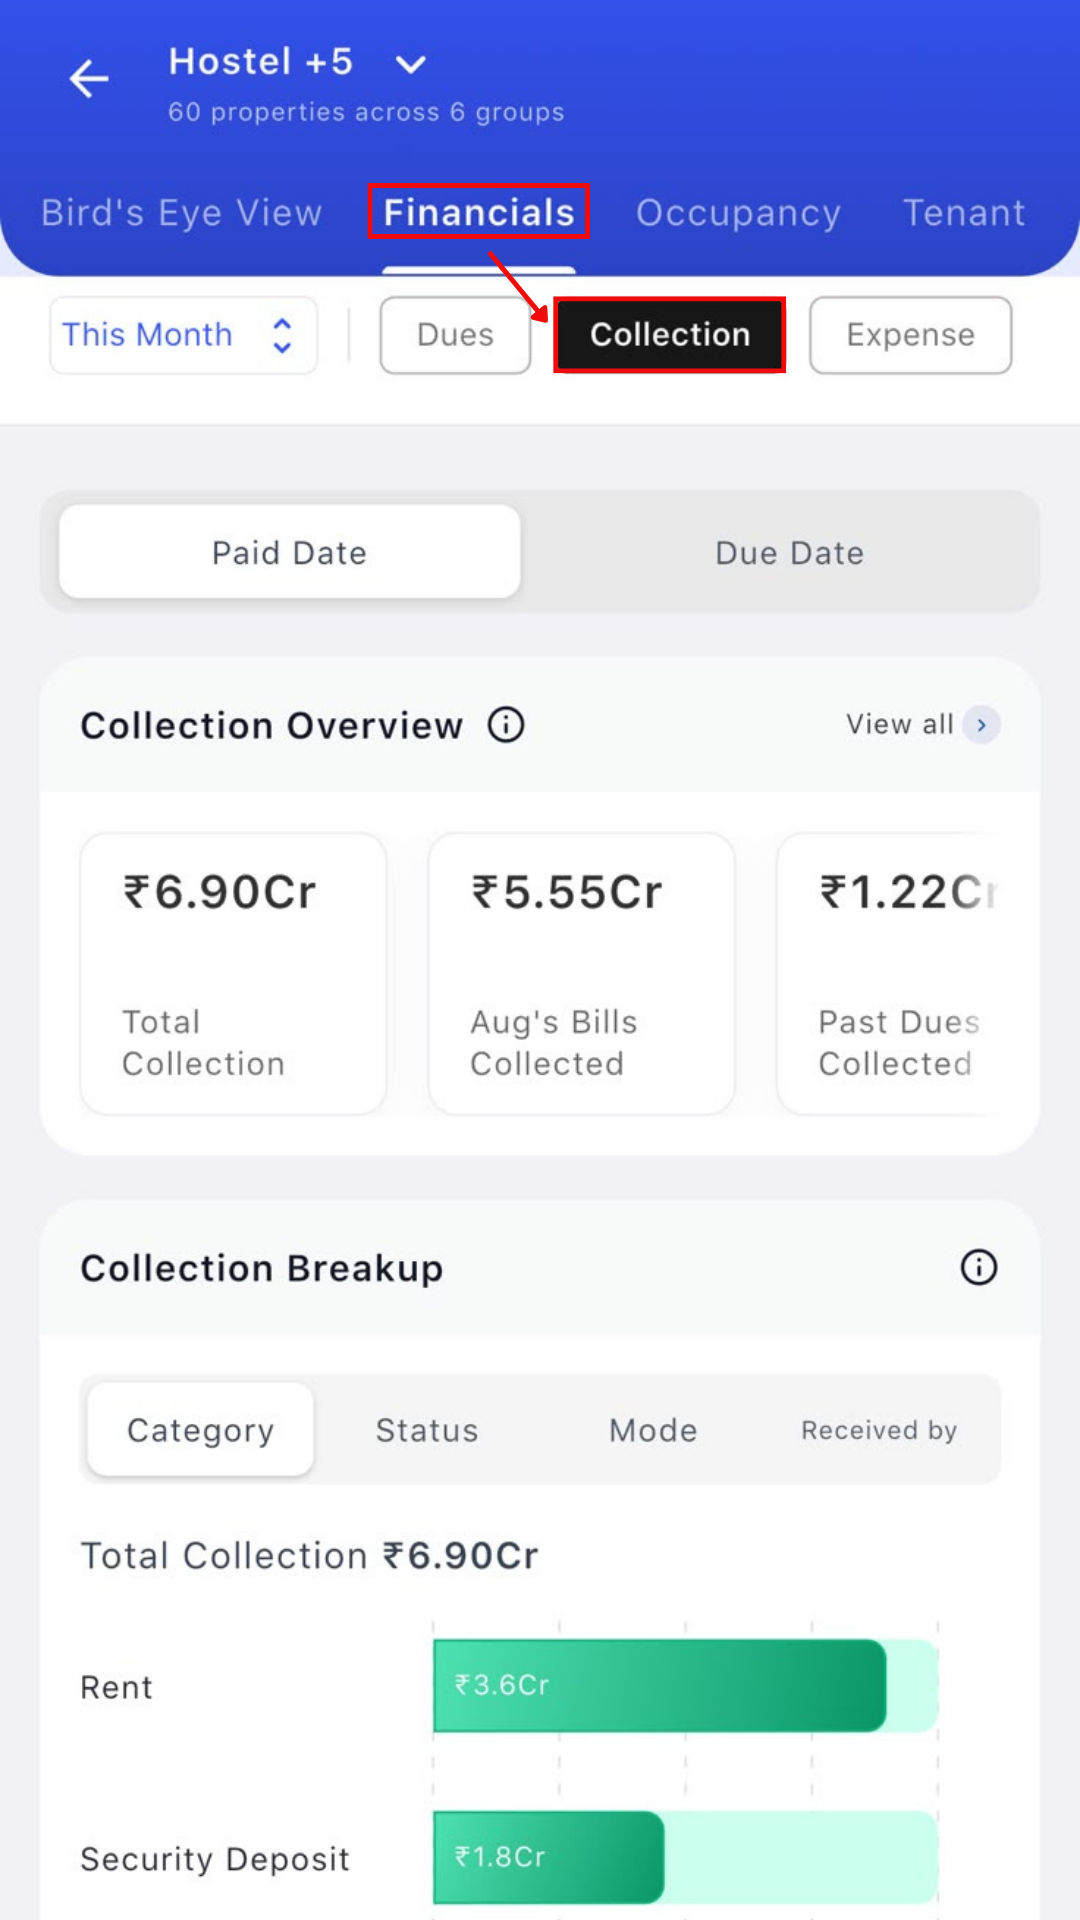
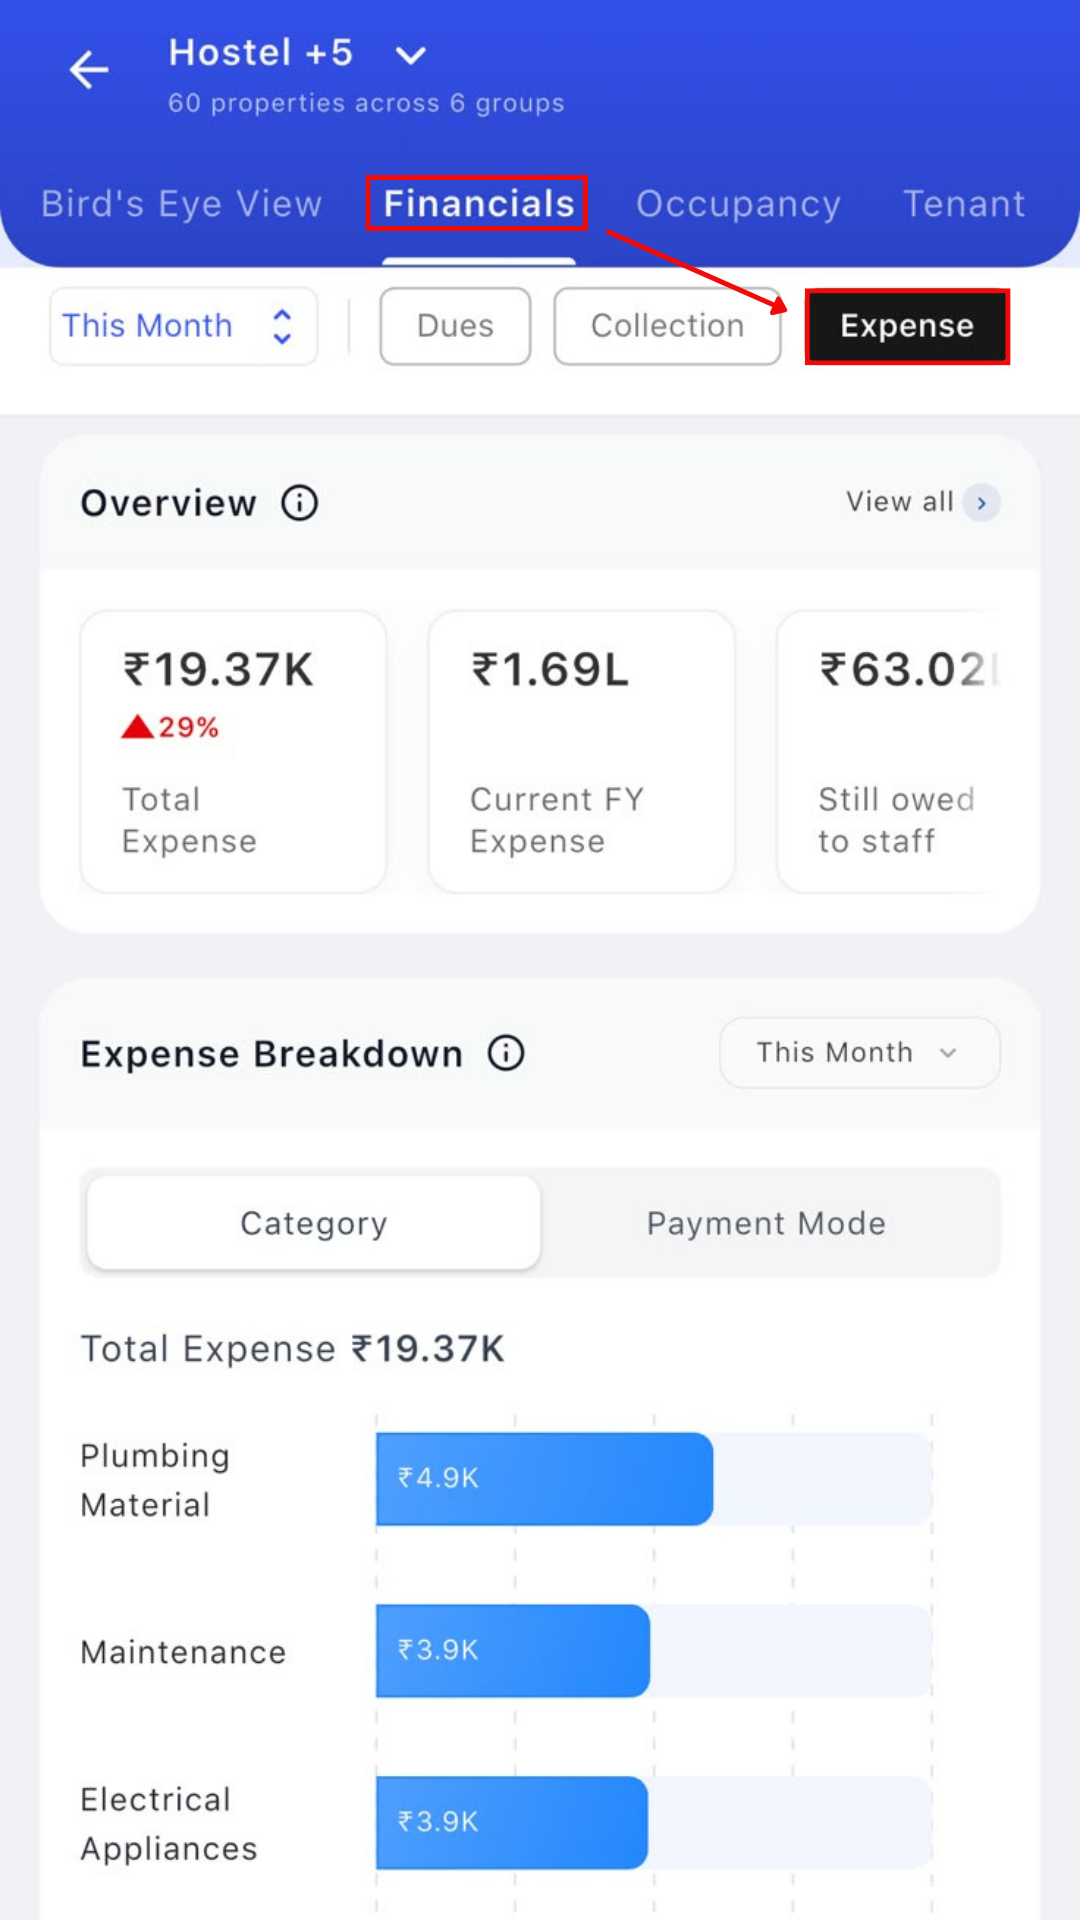
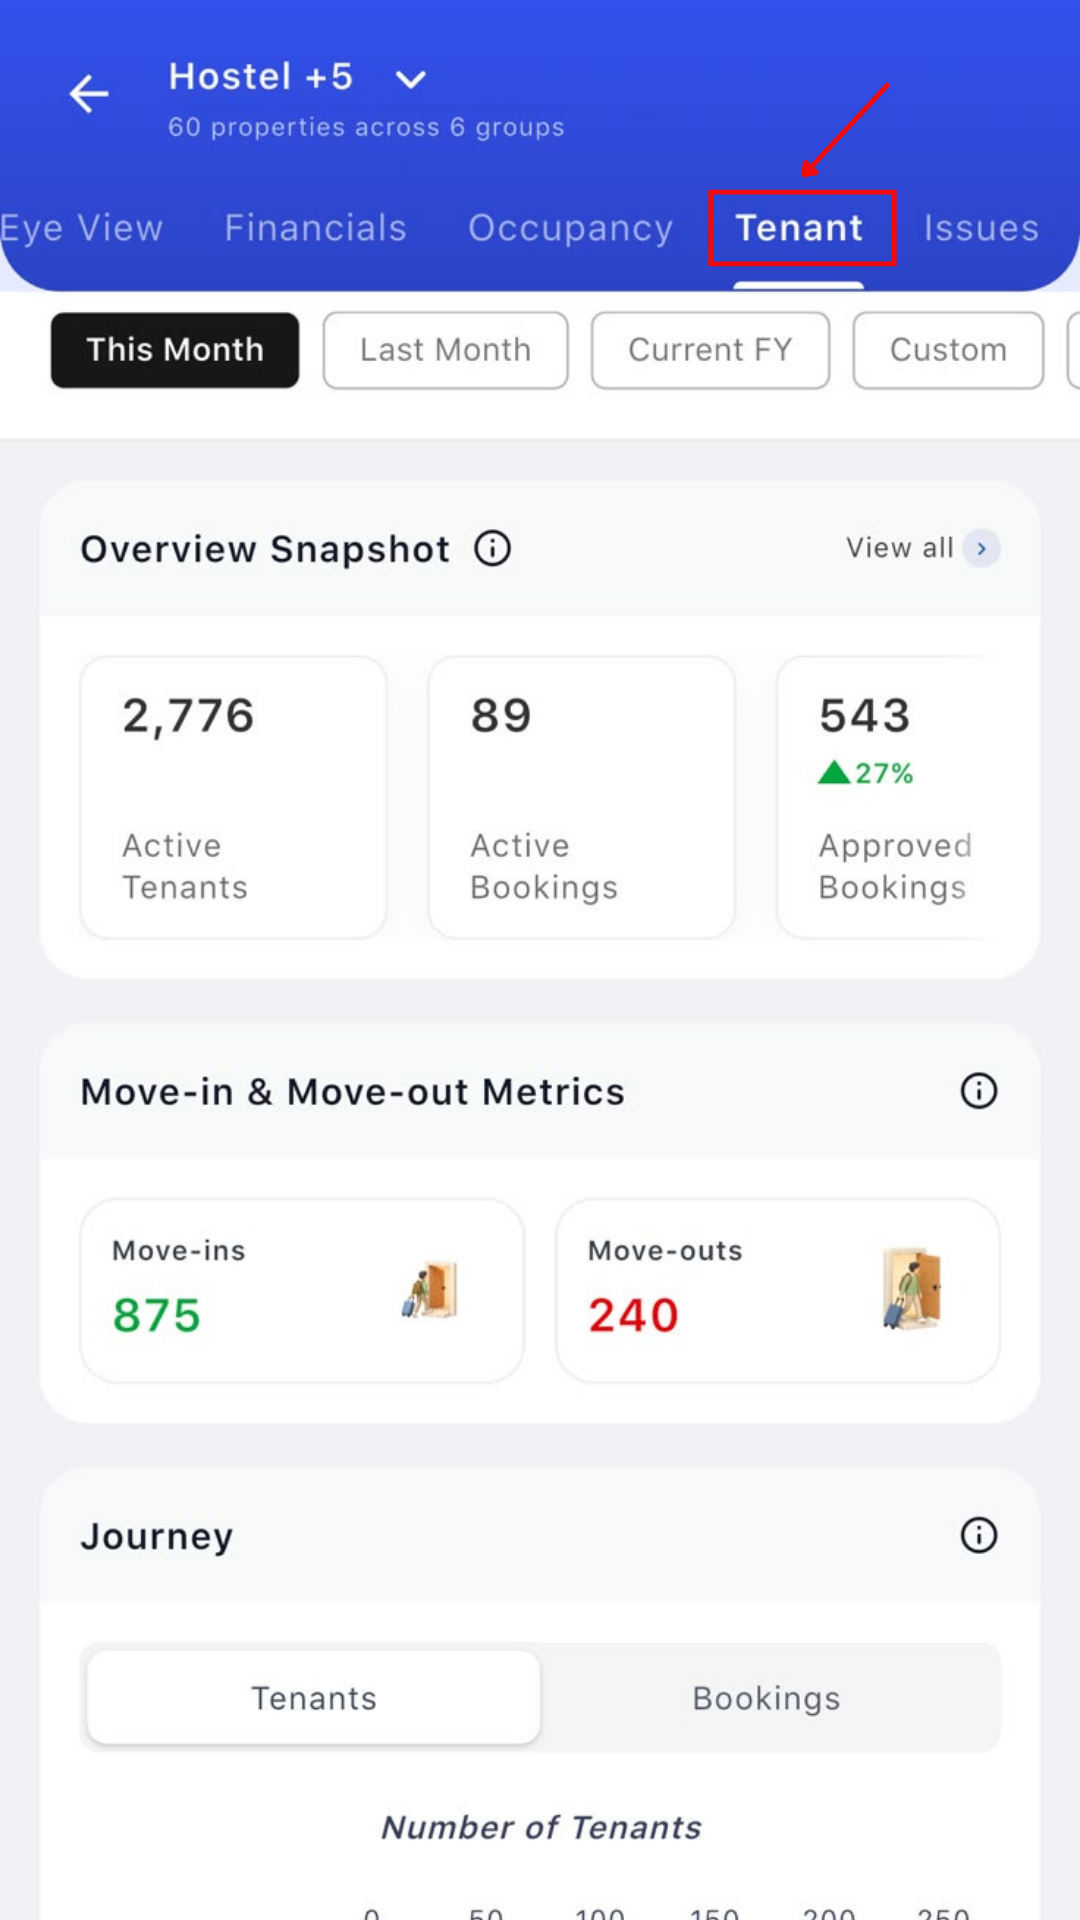
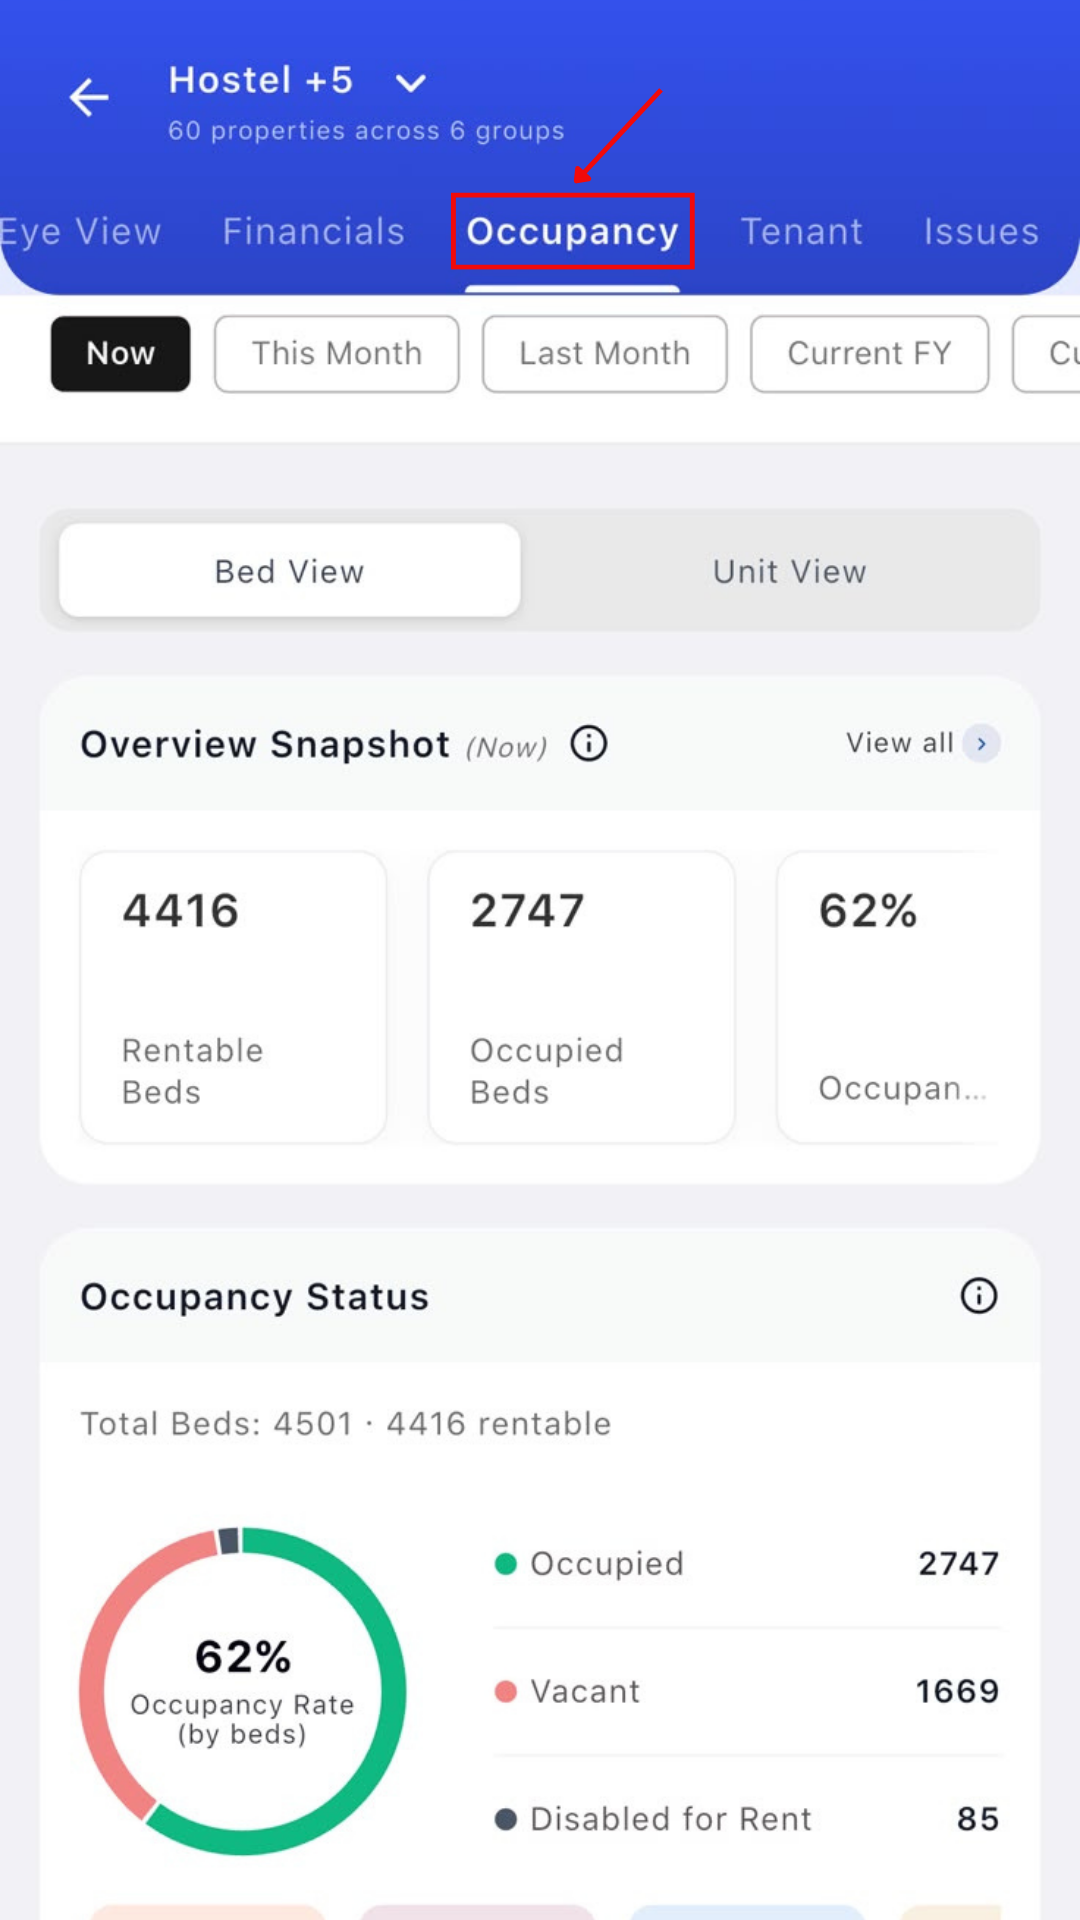
- Analytics - You get a clear, dedicated view at a glance for each part of your business with five new analytics sections – dues, collections, expenses, tenants, and occupancy/inventory.
- Custom Property Groups - Group your properties any way you like, and see them as one portfolio.
- Surveys - Better on Mobile - Surveys and feedback are now clearer and more reliable on your phone.
- Tenant, Bed & Property IDs - Every tenant and bed now gets a simple, readable ID number – visible on your reports too.
- Task Centre - More Pending Tasks: See pending people and compliance tasks in one place so nothing slips through.
- **Entry/Exit - Bug Fixes - **Entry and exit now work the way they're supposed to, with key issues fixed.
Genie
Say hello to Genie – your own 24/7 AI assistant that brings together all your operations under one WhatsApp tab in your web app: the Complaint Bot, the Booking Bot, and a CRM to manage all of it - all running from your own branded, business-verified WhatsApp number, not RentOk's. Every message your tenant or prospect sees now carries your name, so it's your brand they trust, not ours.
Leads get faster replies too – they can check property information, book their visit, or give a token right there on WhatsApp. Complaints get assigned faster and stay transparent for your existing tenants. And because complaints, bookings, and conversations are all managed from one place, your team no longer needs a separate WhatsApp automation tool – and you don't need to be on the phone answering everything.
Highlights
- Your WhatsApp communication – announcements, rent collection, complaints, bookings – now happens from your own branded, business-verified number, not RentOk's, so every message builds trust in you.
- Leads get faster replies – they can see property information and book their visit or give a token right there on WhatsApp.
- Complaints get faster assignment and stay transparent for your existing tenants.
- A built-in CRM lets your staff see and manage every WhatsApp conversation from the web app, in one place – nothing hidden or scattered.
- Replaces the need for a separate WhatsApp automation tool, and means you're not stuck on the phone answering everything yourself.
- This is the first version – more capabilities will be added over time.
💡 Why it matters: Every message your tenant sees is a branding moment - and with Genie, that moment is always yours.
Complaint Bot
Tenants no longer need to fill out a complaint form. They can now just type out their problem in a chat, like they're talking to a person, and the bot takes it from there.
When a tenant raises a complaint over WhatsApp, it's automatically assigned to the right staff member. The staff member can ask the bot questions too – about a visit, a status, or anything else related to the complaint. And if the staff needs permission for something, the manager can grant it right there, through the bot. The complaint bot sits in the middle of this entire conversation between the tenant, staff, and manager, so nothing has to move to a phone call or a separate chat.
You can set up your own routing, response time (TAT), and escalations yourself, on WhatsApp or on the web app.
Highlights
- Tenants raise complaints in a natural, conversational way – no dropdowns or forms.
- The bot automatically assigns the complaint to the right staff member.
- Staff can ask the bot questions about the complaint – like visit status or next steps.
- If a staff member needs permission for something, the manager can approve it directly through the bot.
- Set up your own routing, TAT (turnaround time), and escalation rules – on WhatsApp or on the web app.
How To Try And Set-Up
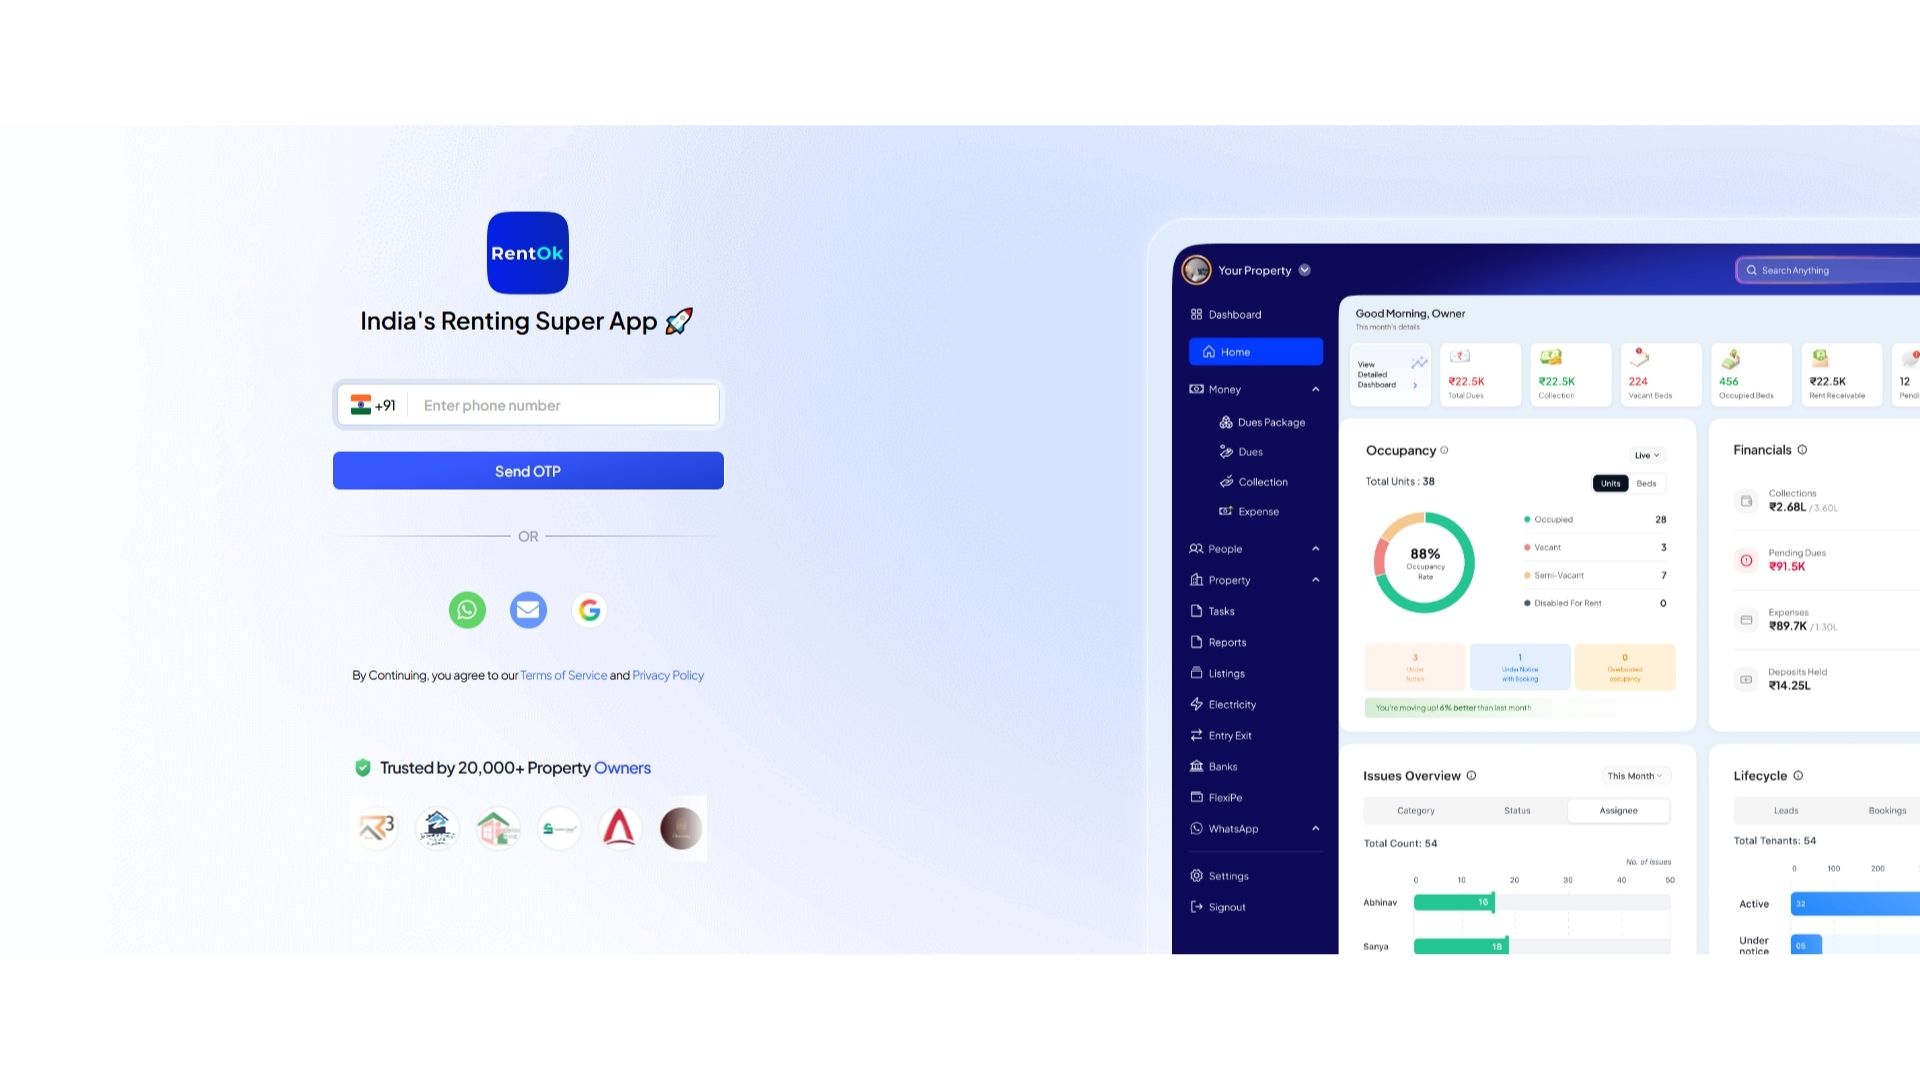
- Step 1: Log in to the Web App
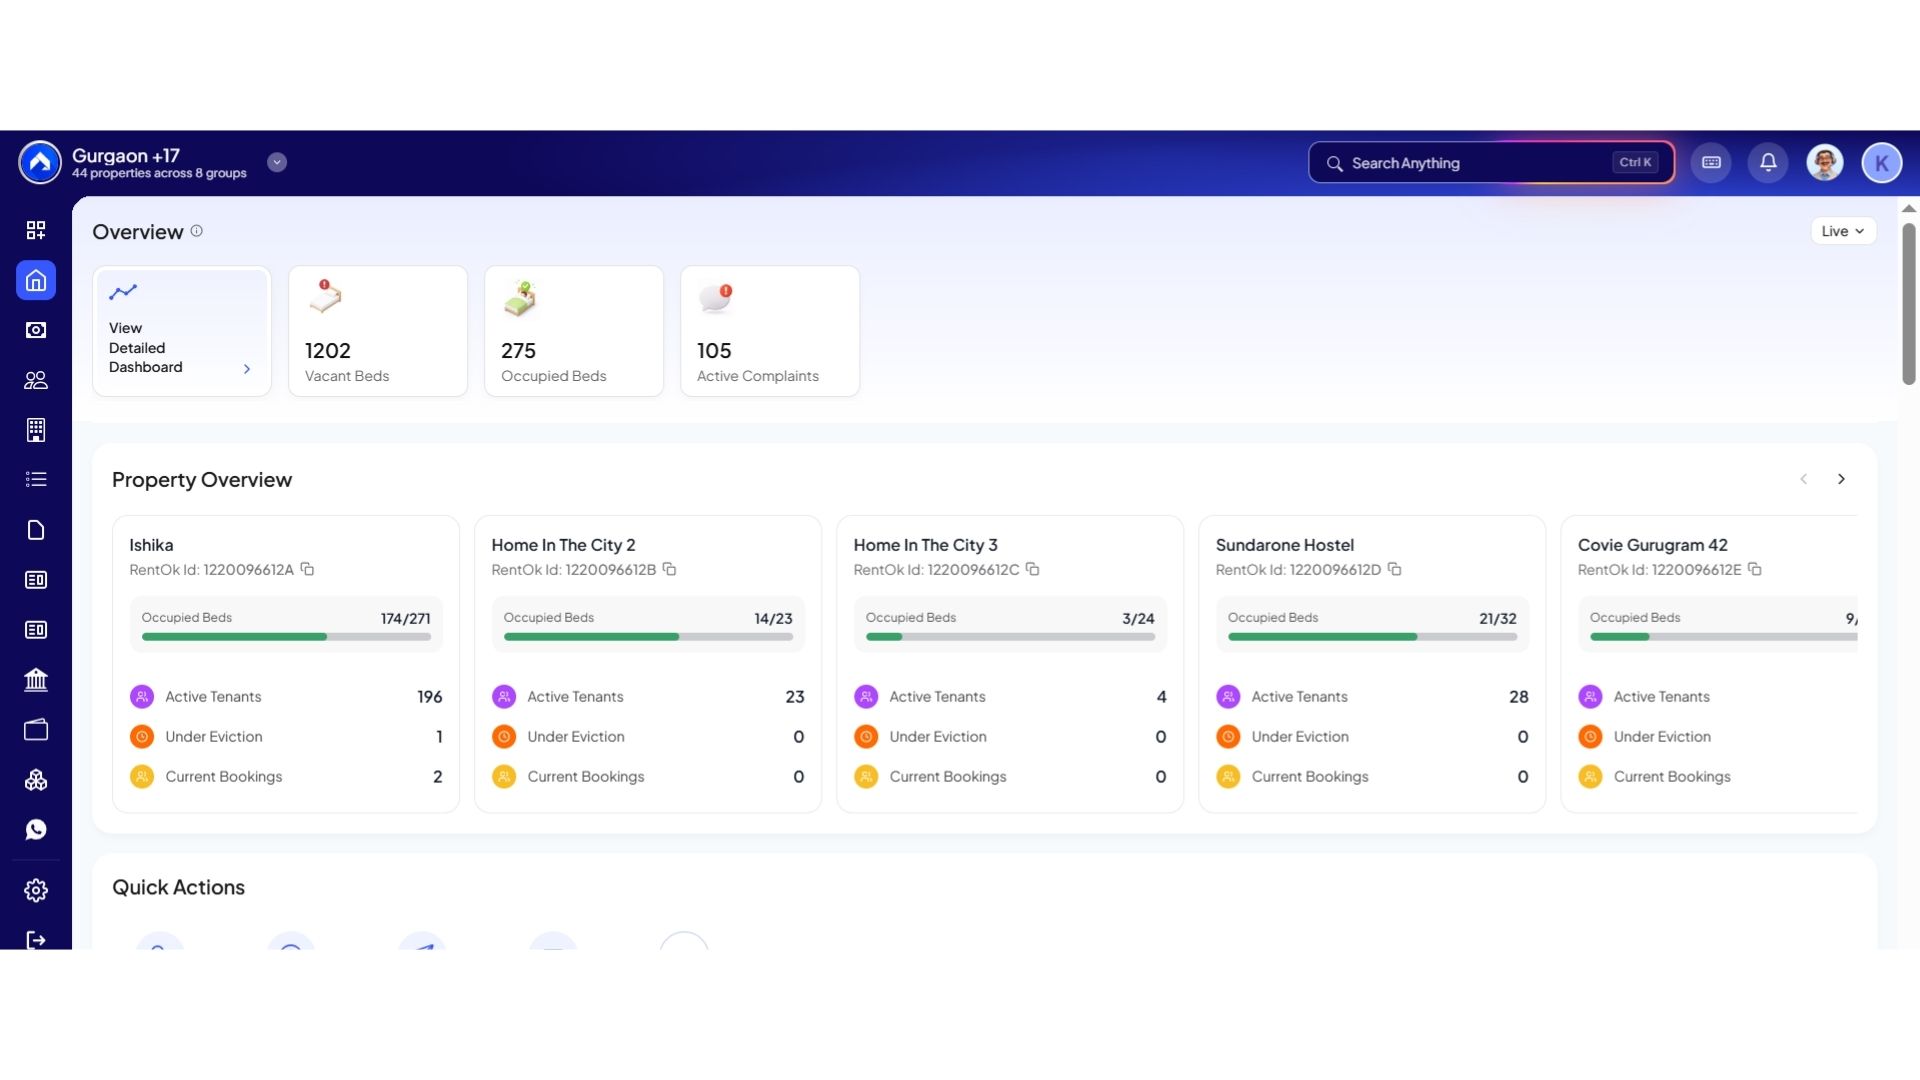
Open the web version of the app and enter your login credentials. Once logged in, you will be taken to the Dashboard.
- Step 2: Open Complaint Bot Setup
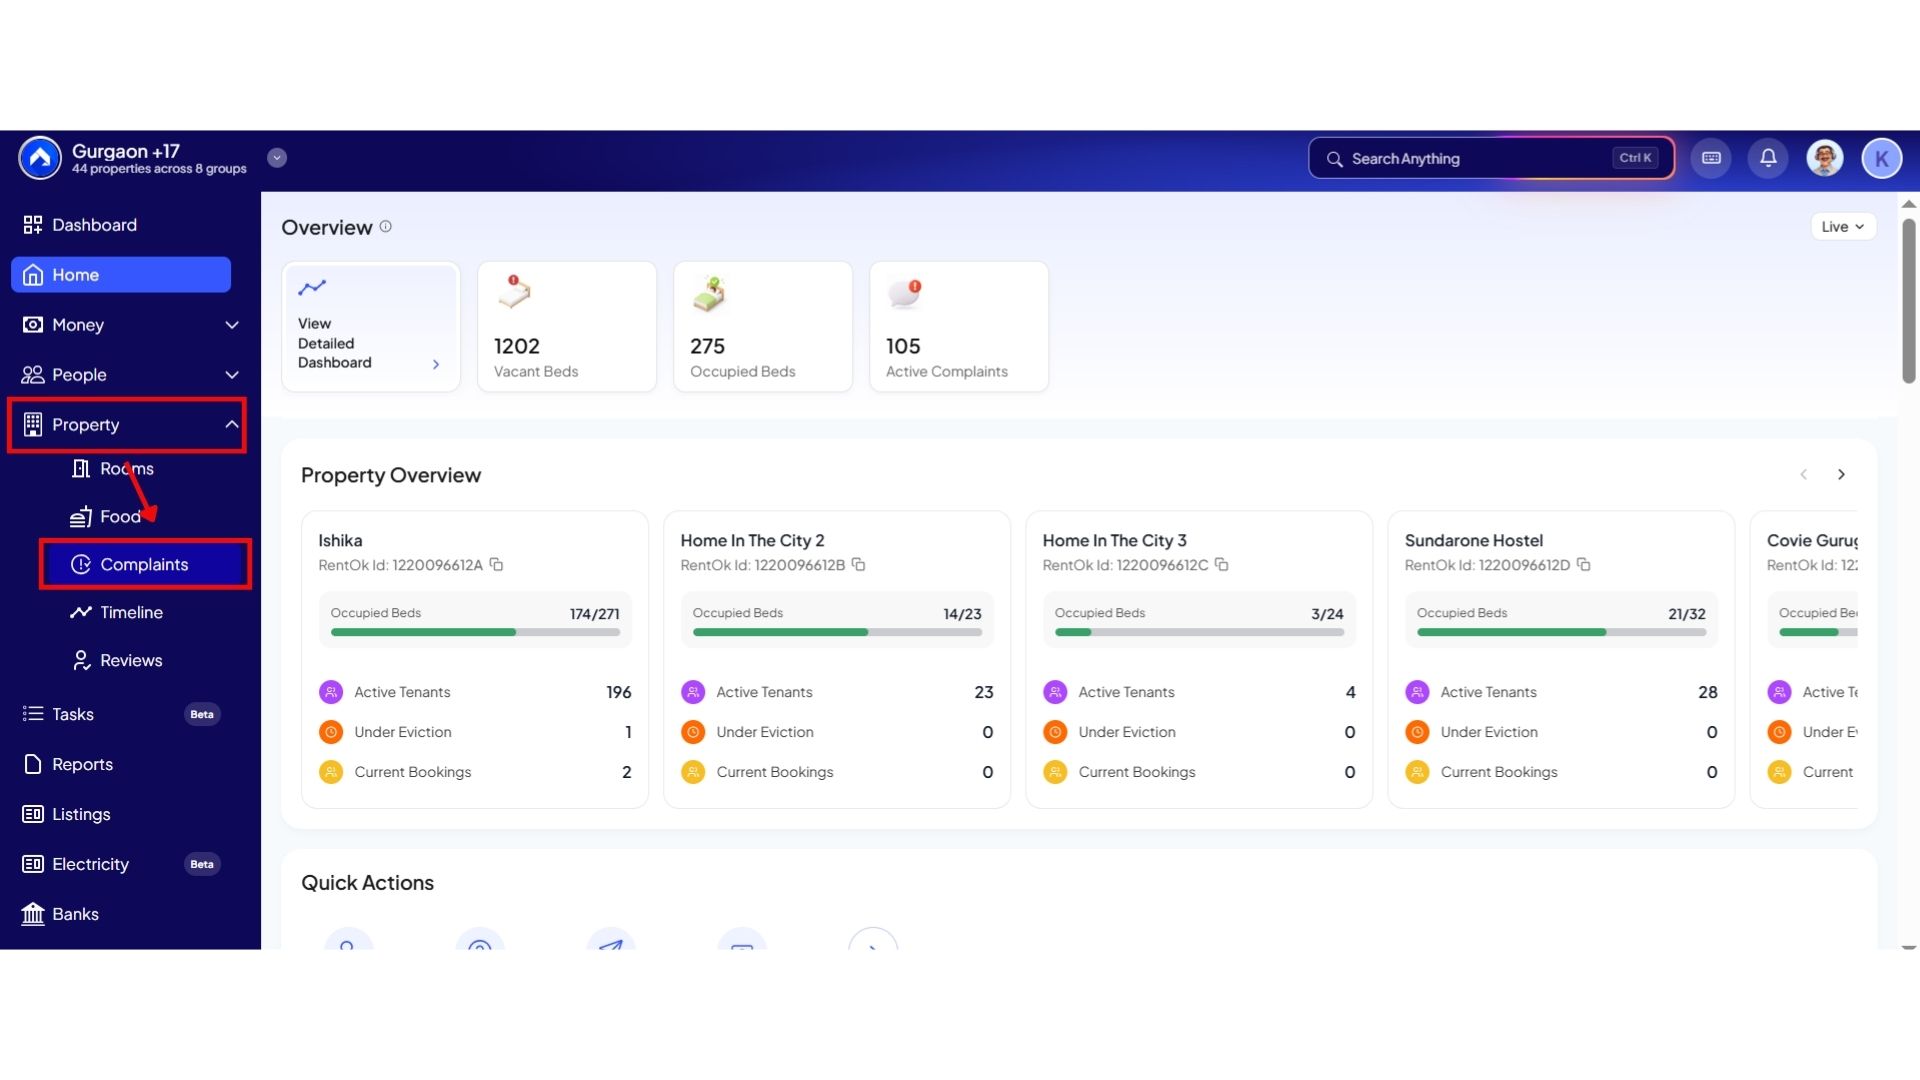
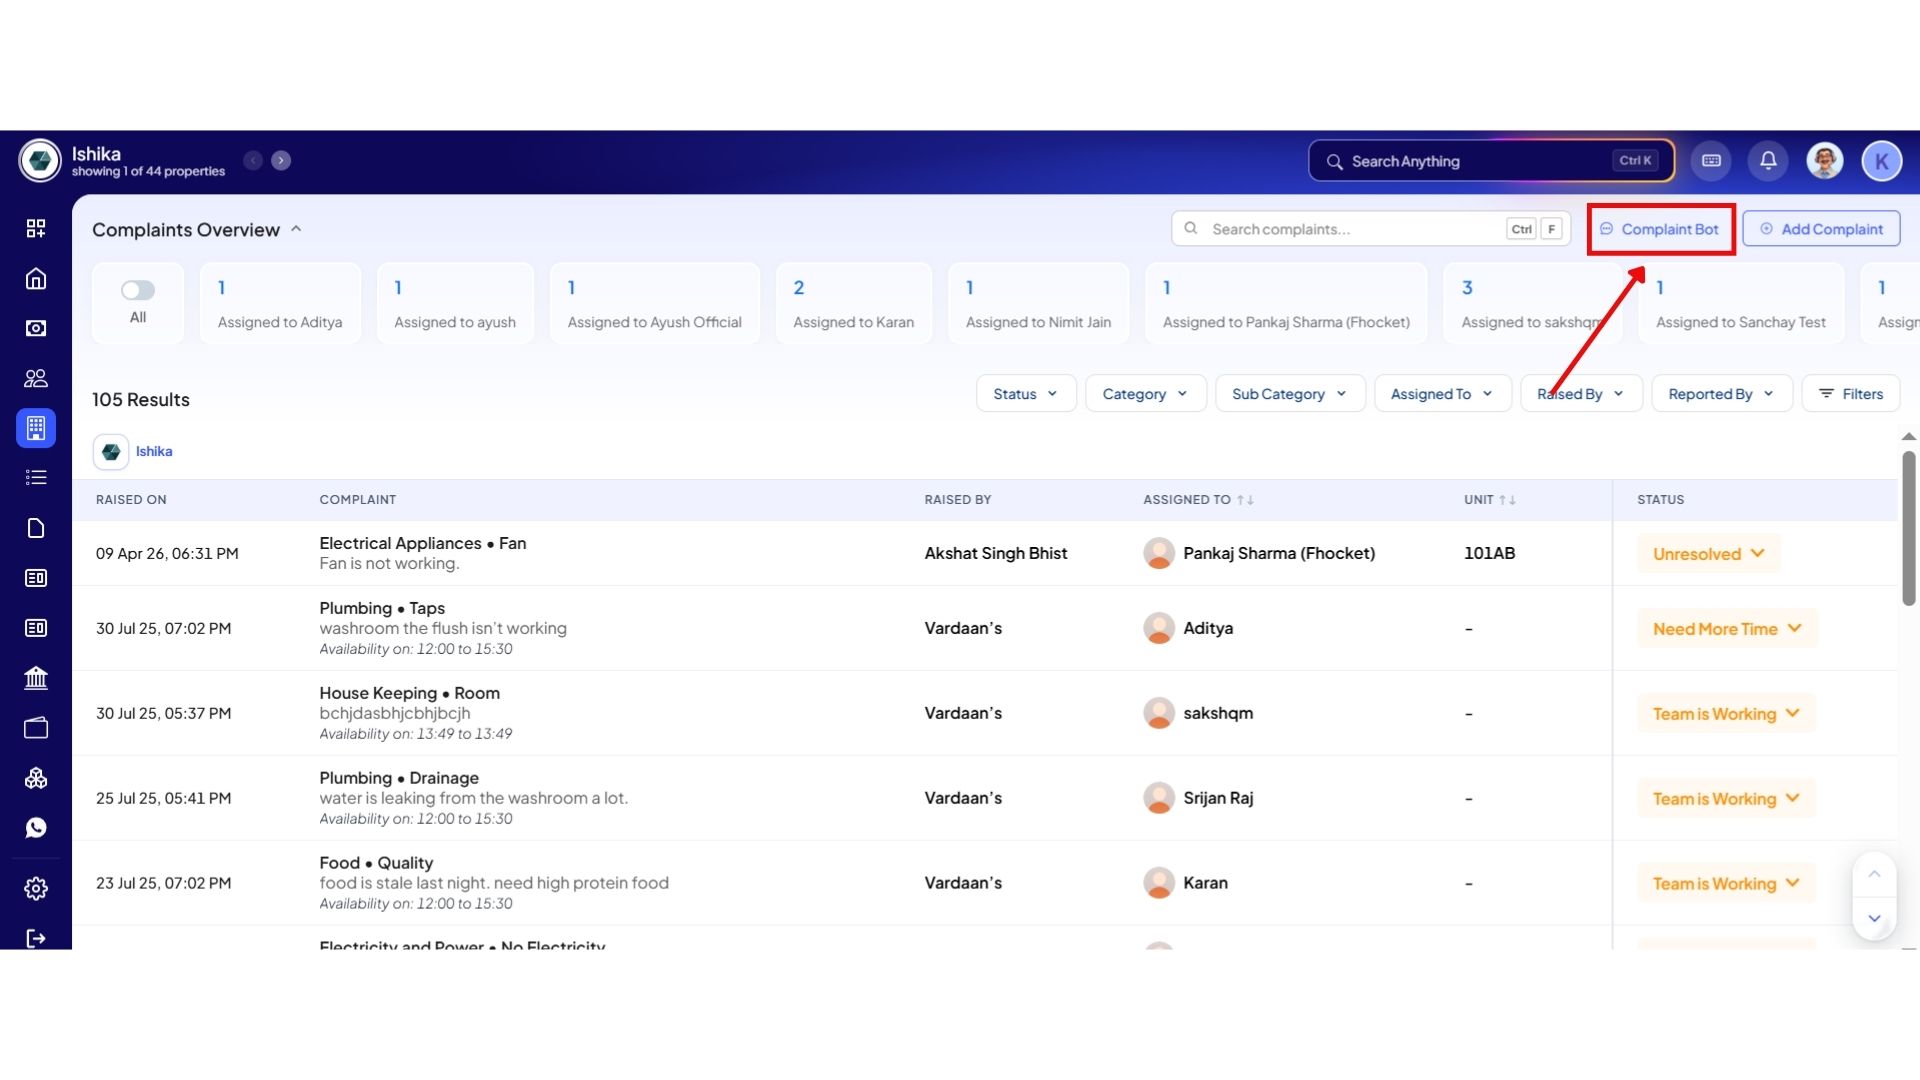
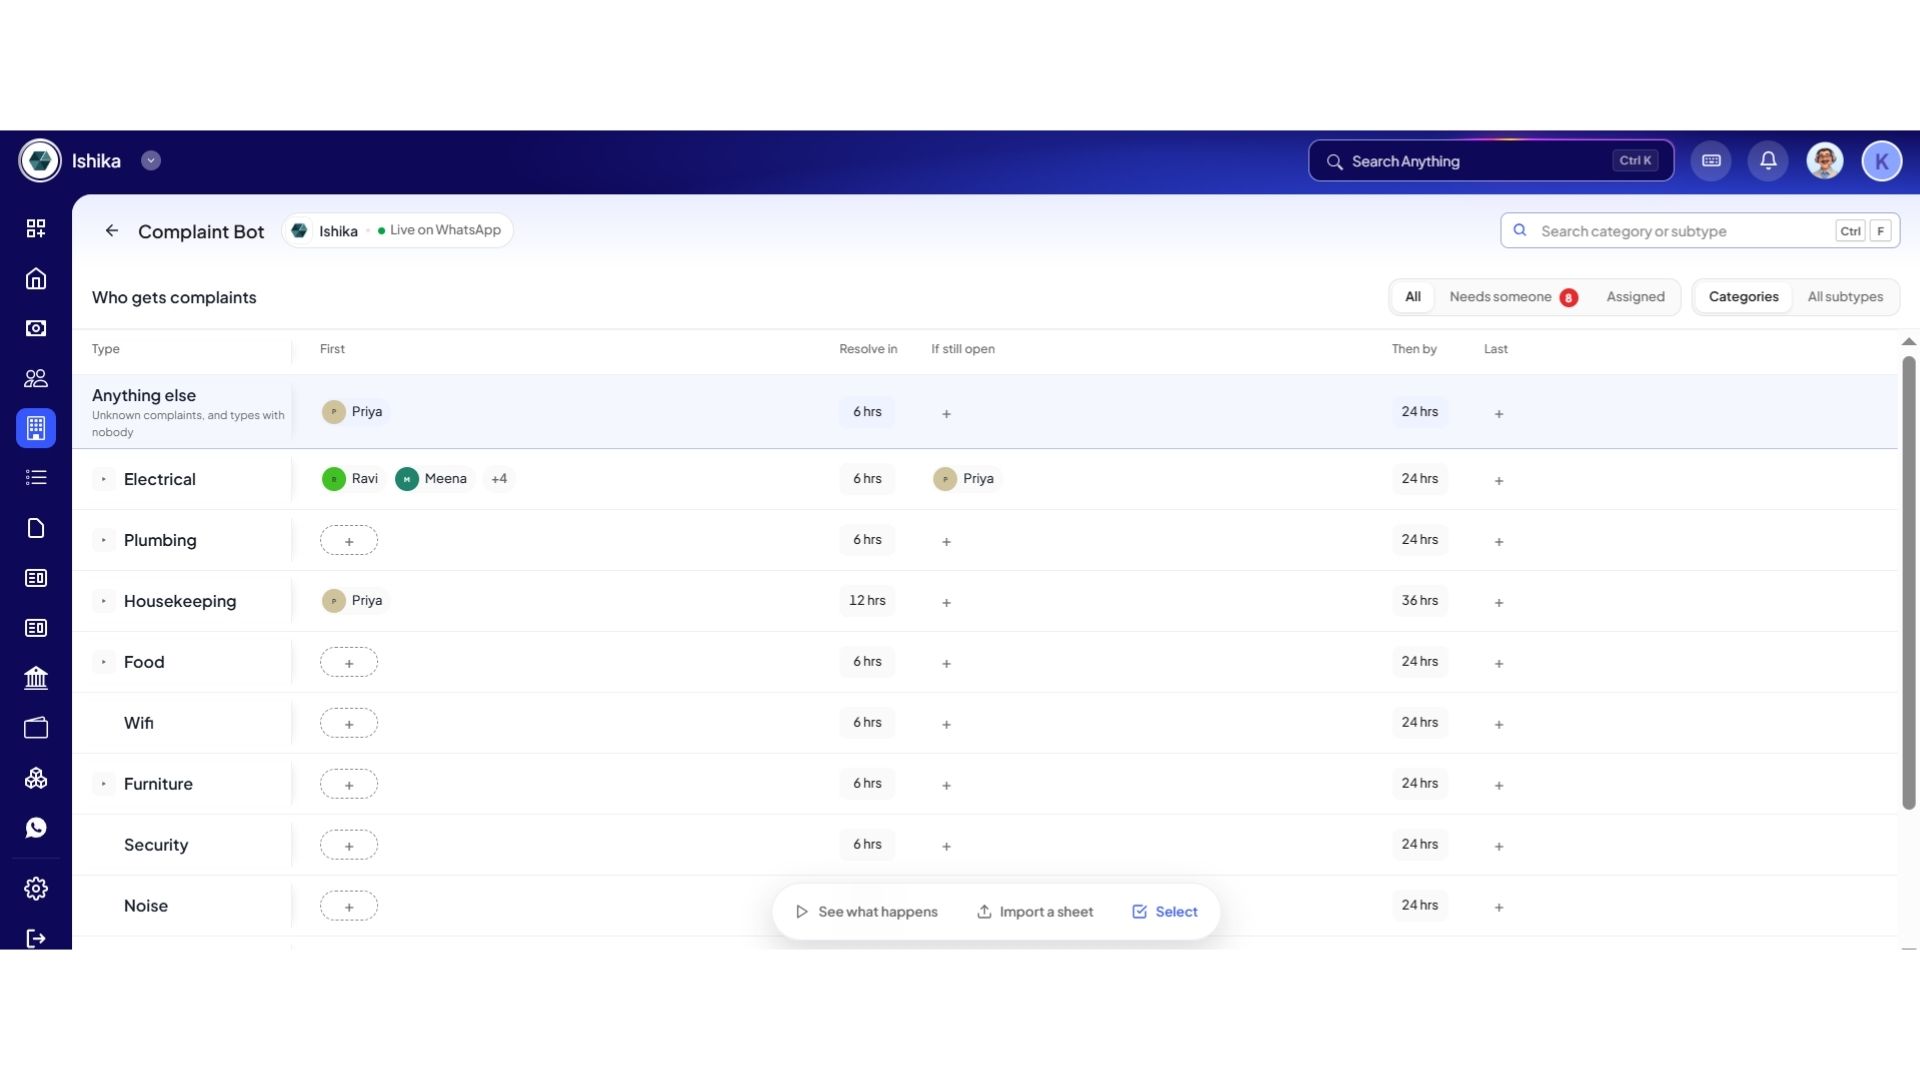
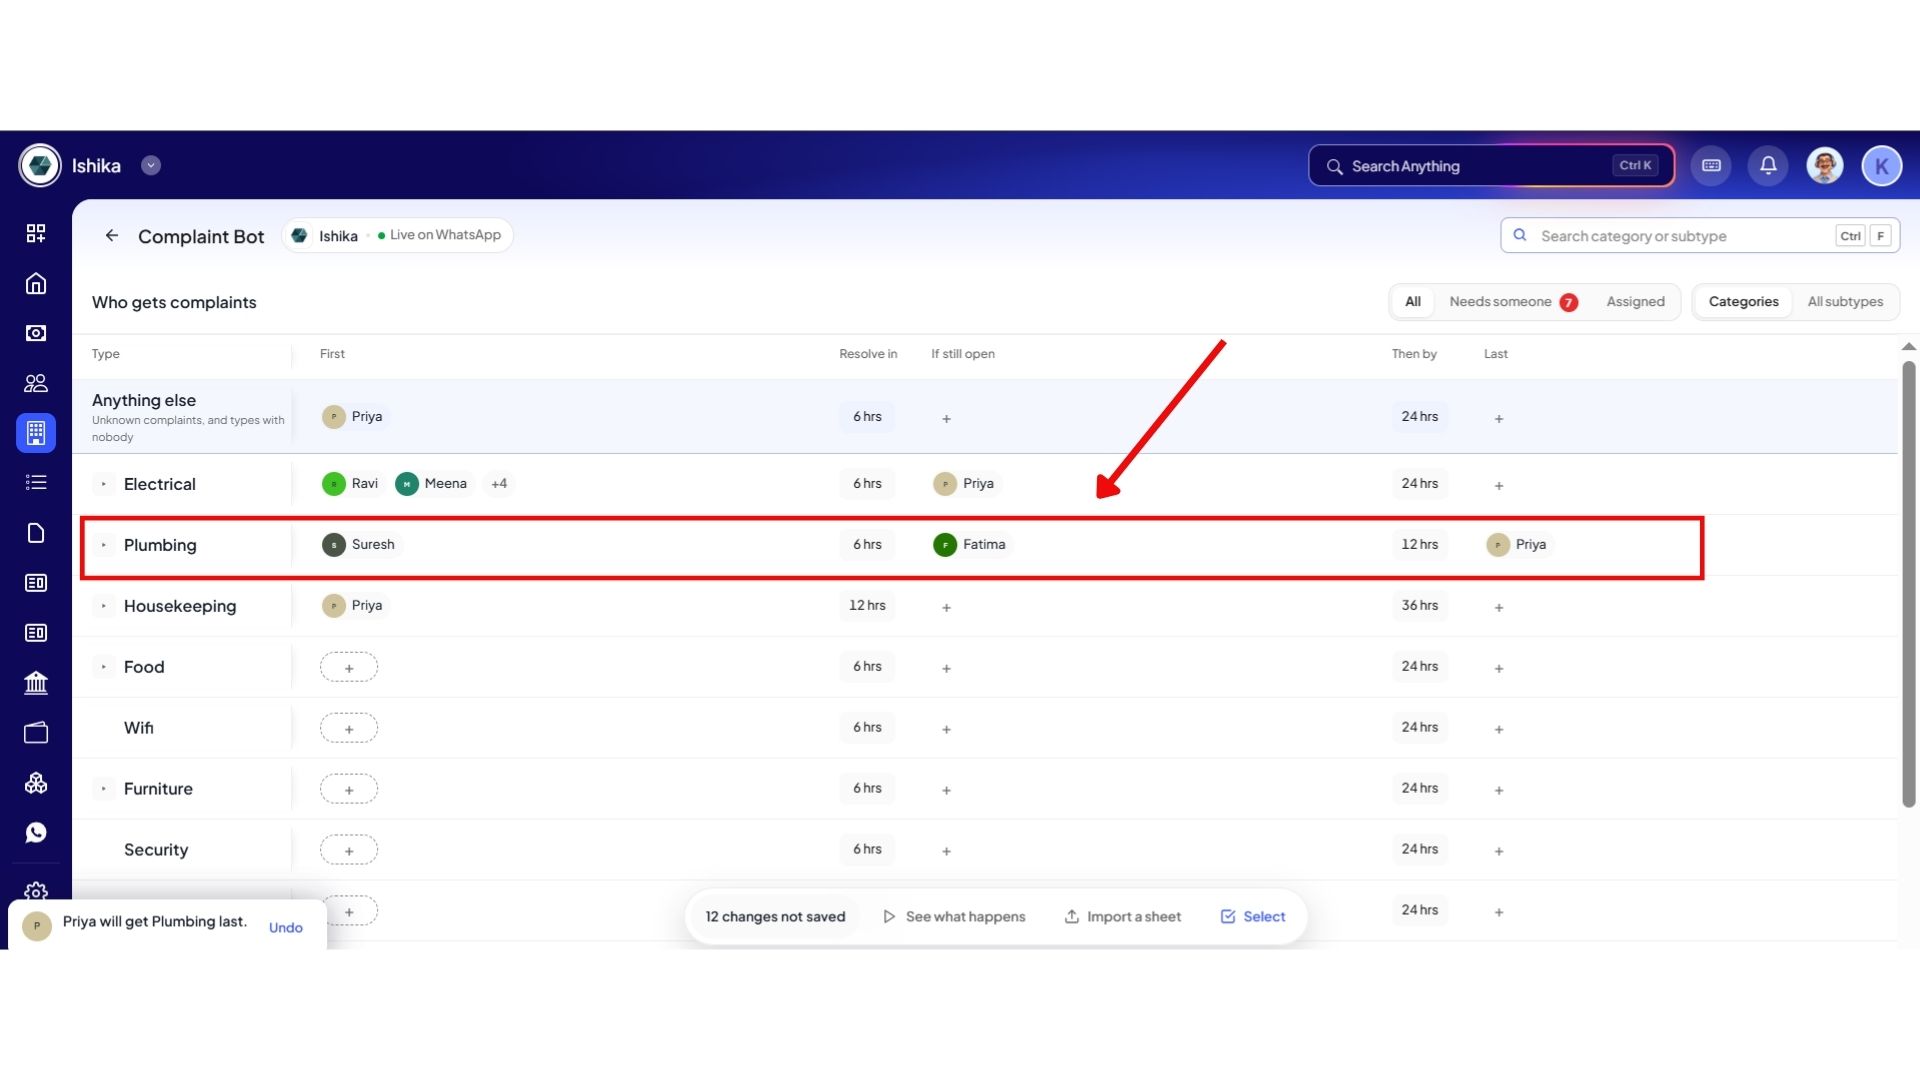
From the Dashboard, go to Property and open the Complaint section. Here, you will find the Complaint Bot Setup option. Click on it to view the available complaint categories and subcategories.
- Step 3: Select a Complaint Category
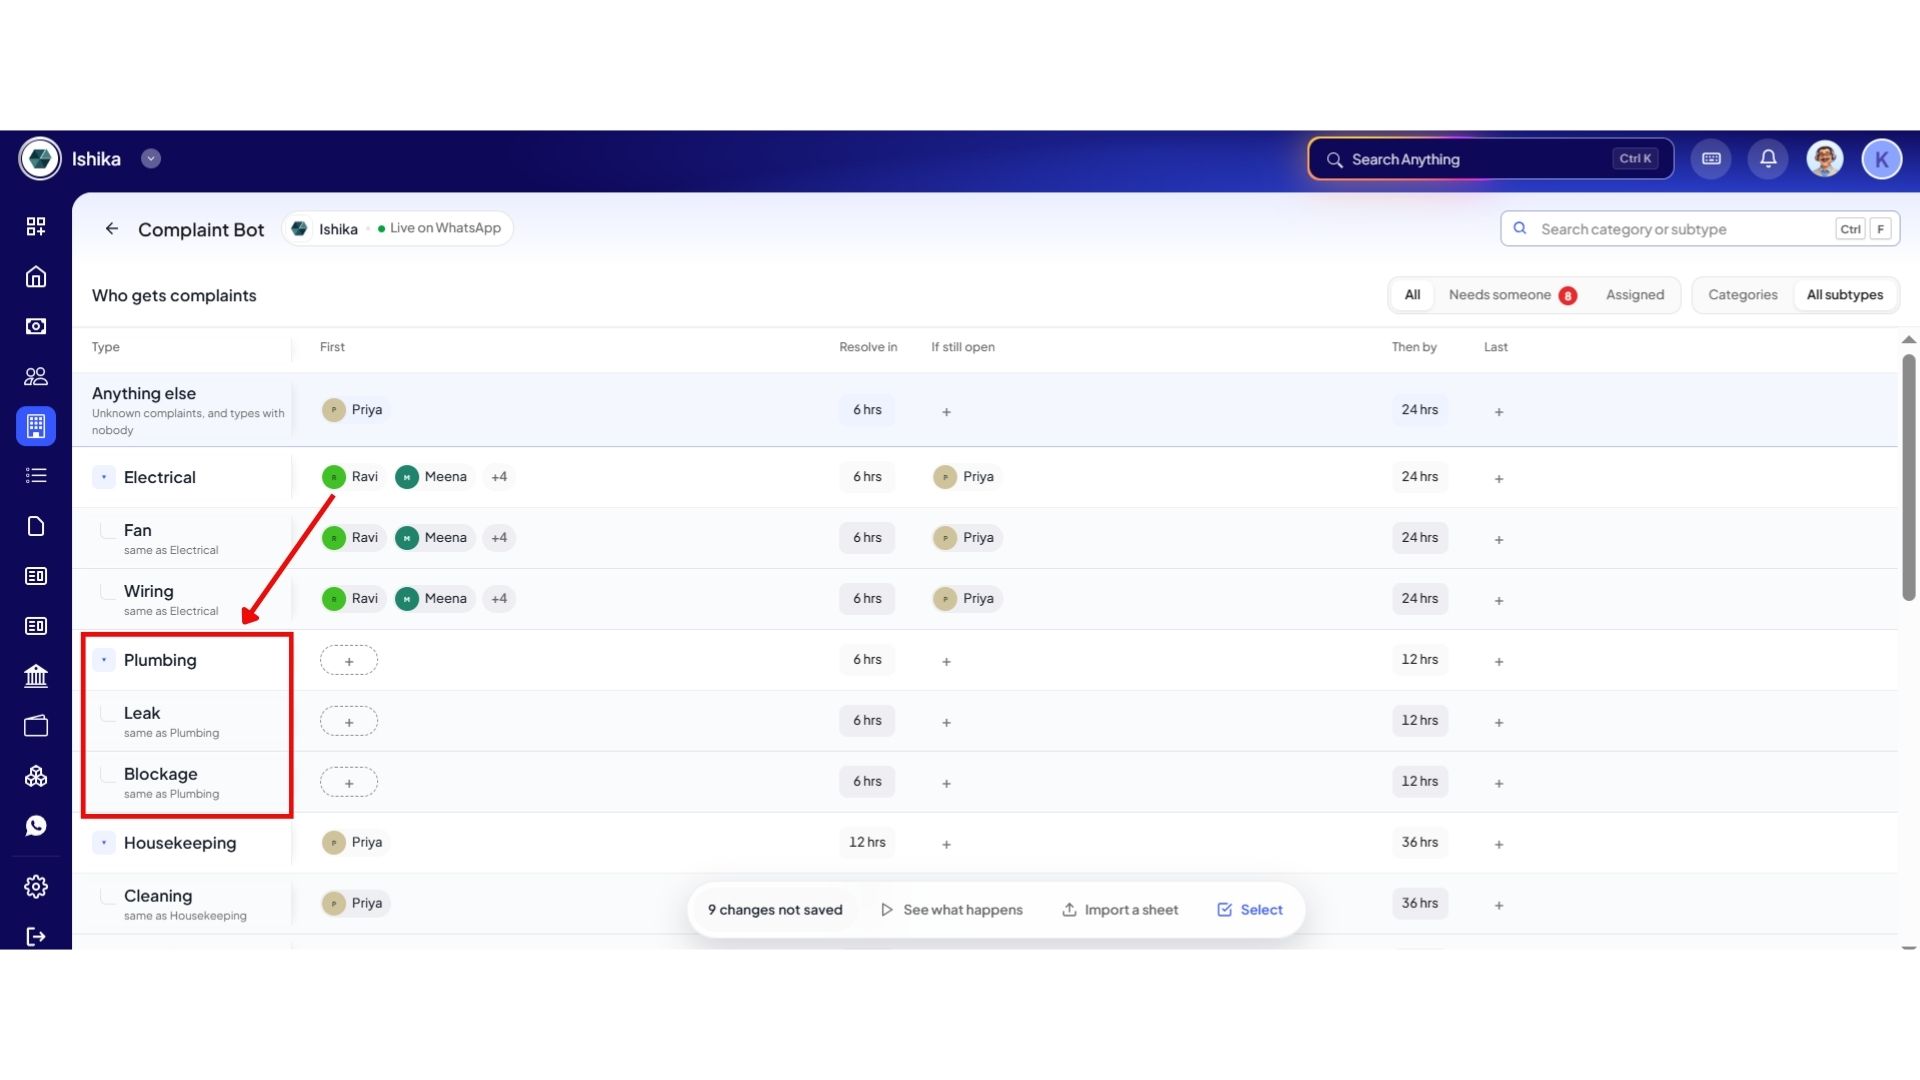
Choose the category you want to set up. For example, if you select Plumbing, you can view the complaints and subcategories related to plumbing issues.
- Step 4: Assign the First Team Member
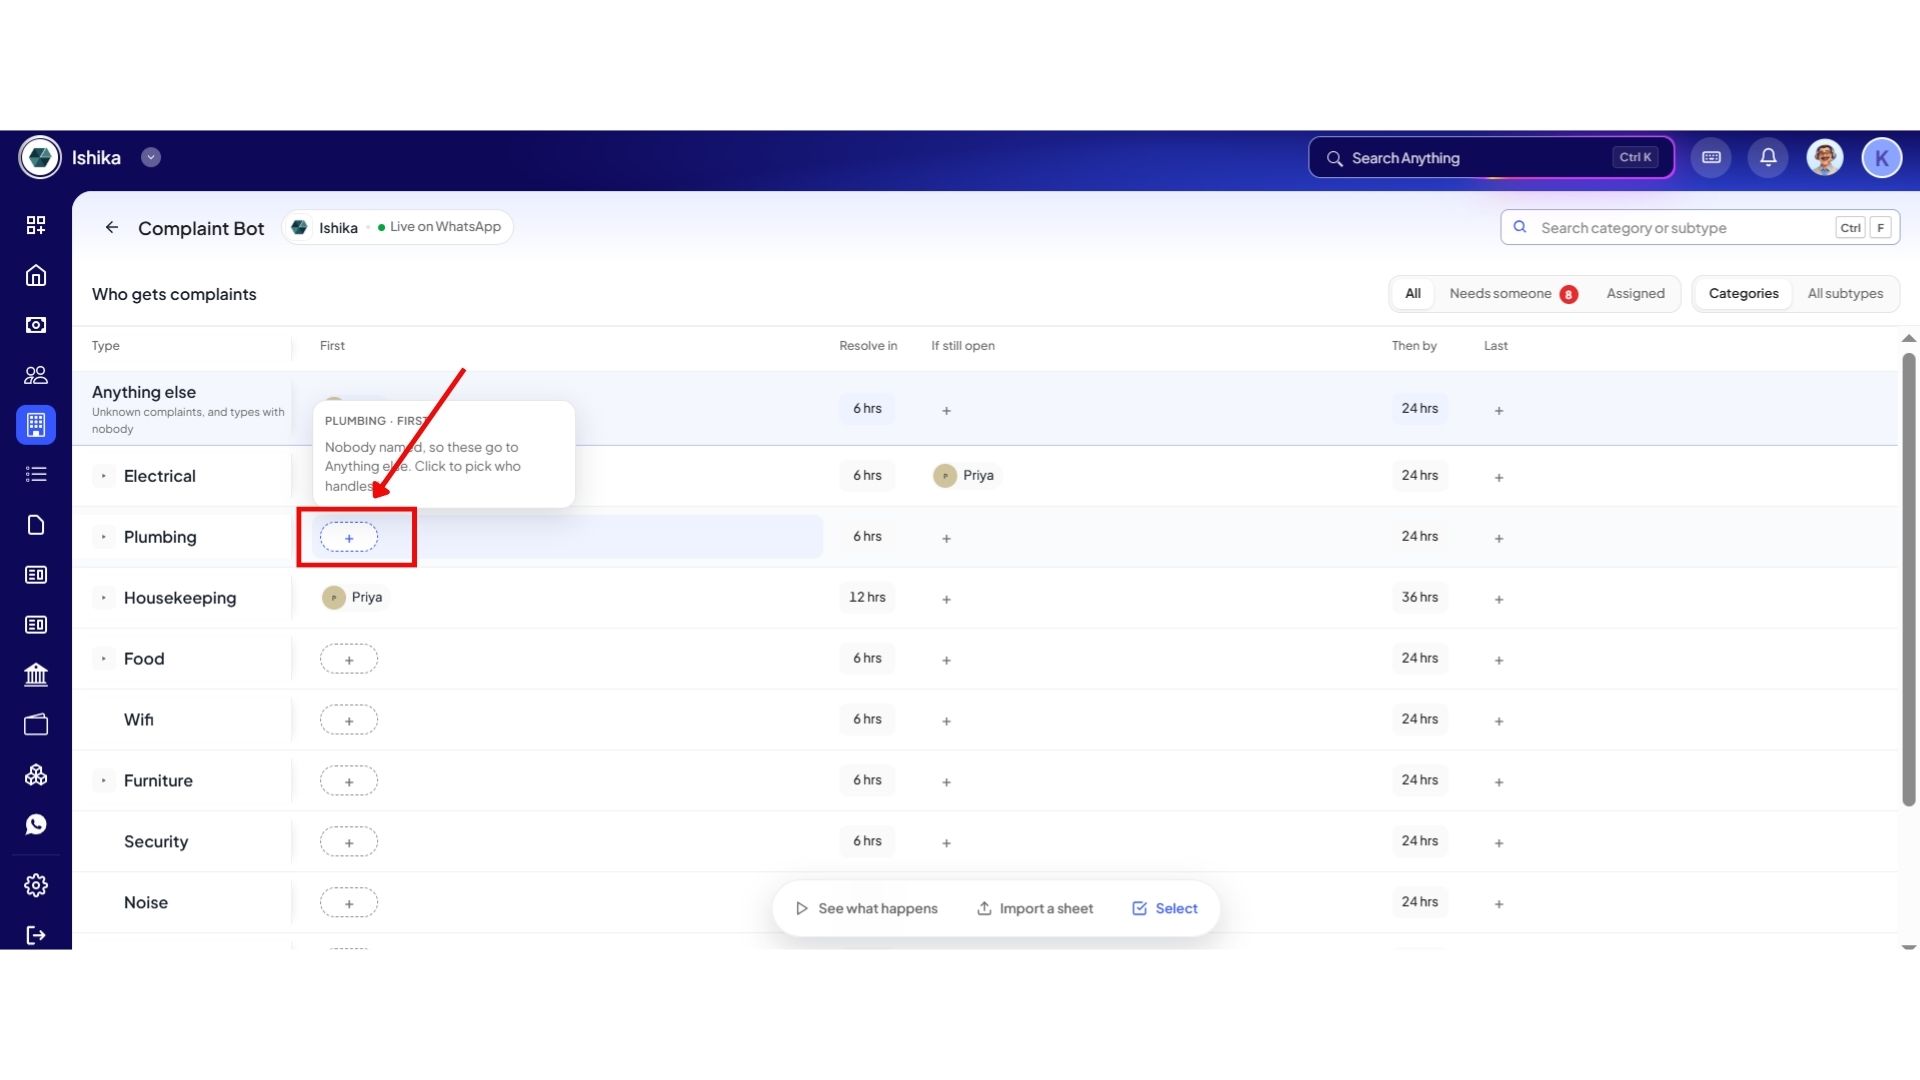
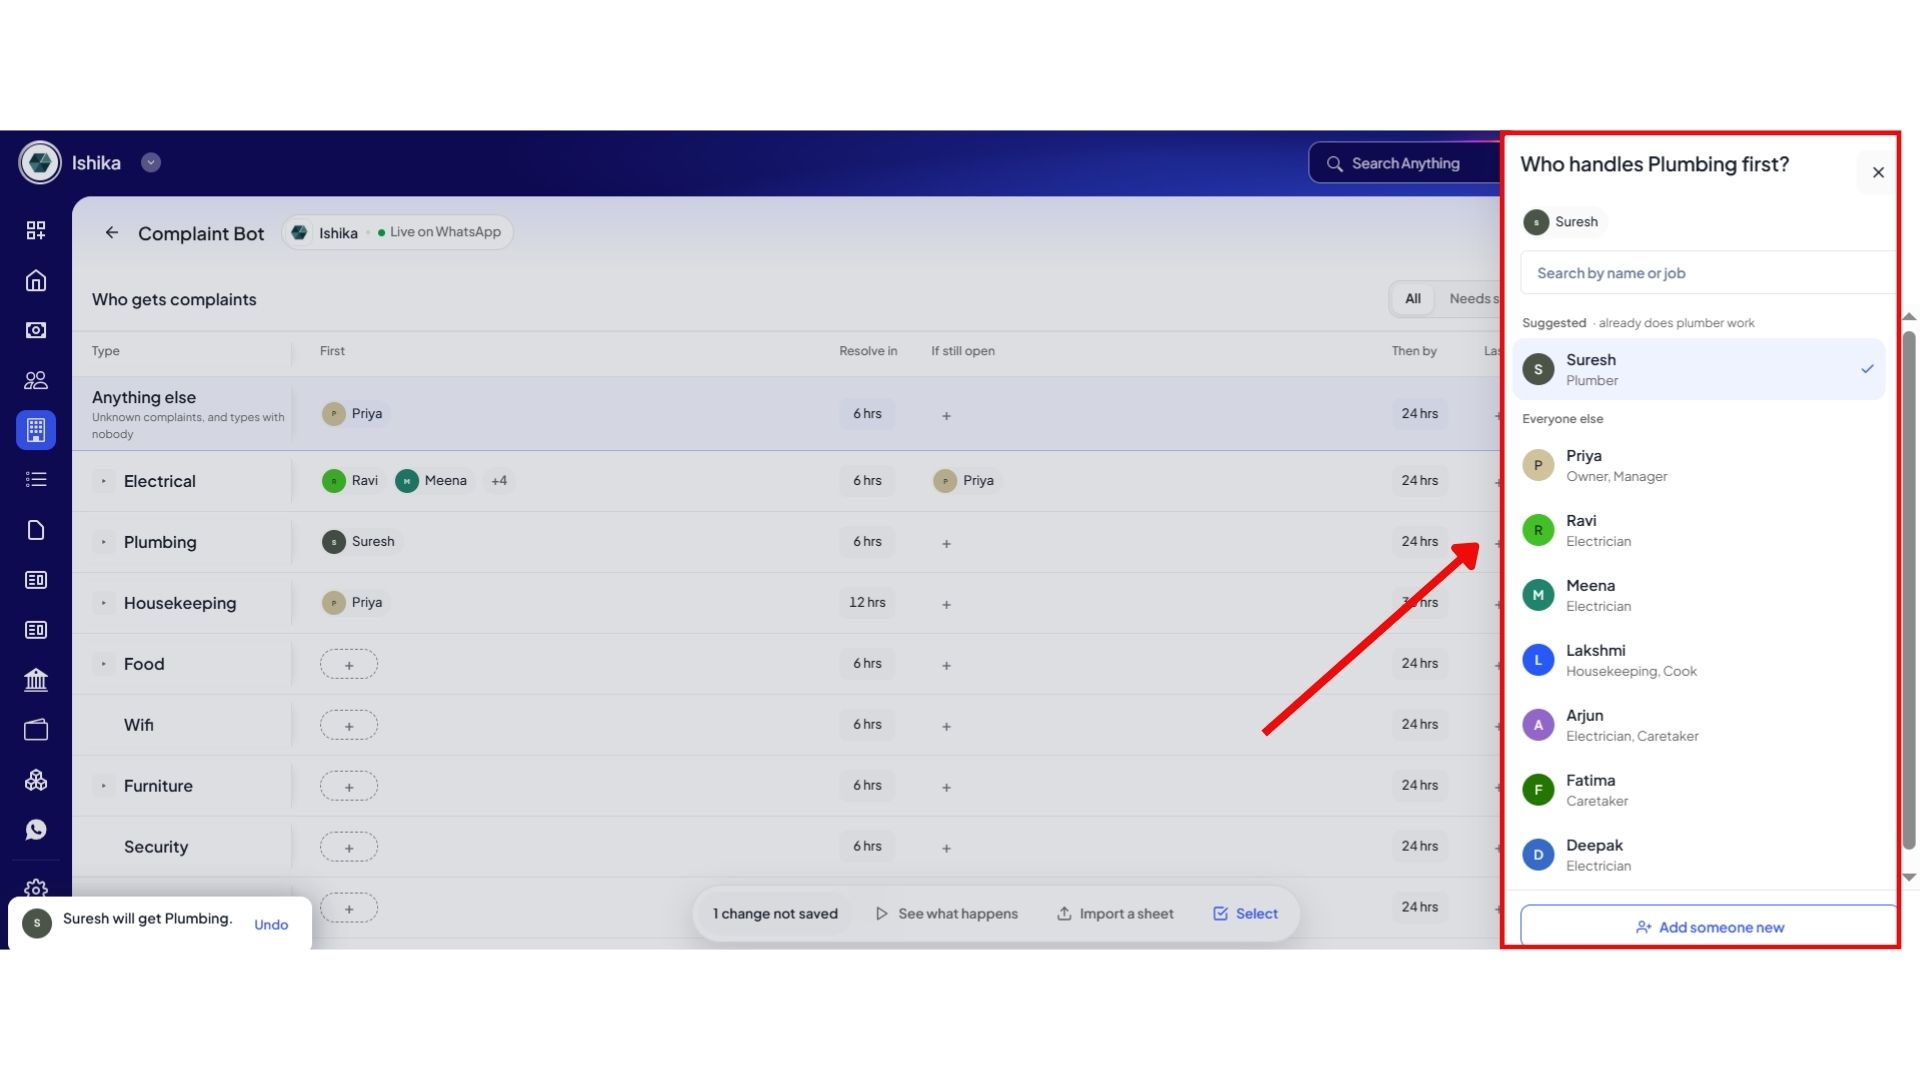
Click the + icon next to the selected category to assign a team member. Select the appropriate person who should handle the complaint first, such as a Plumber.
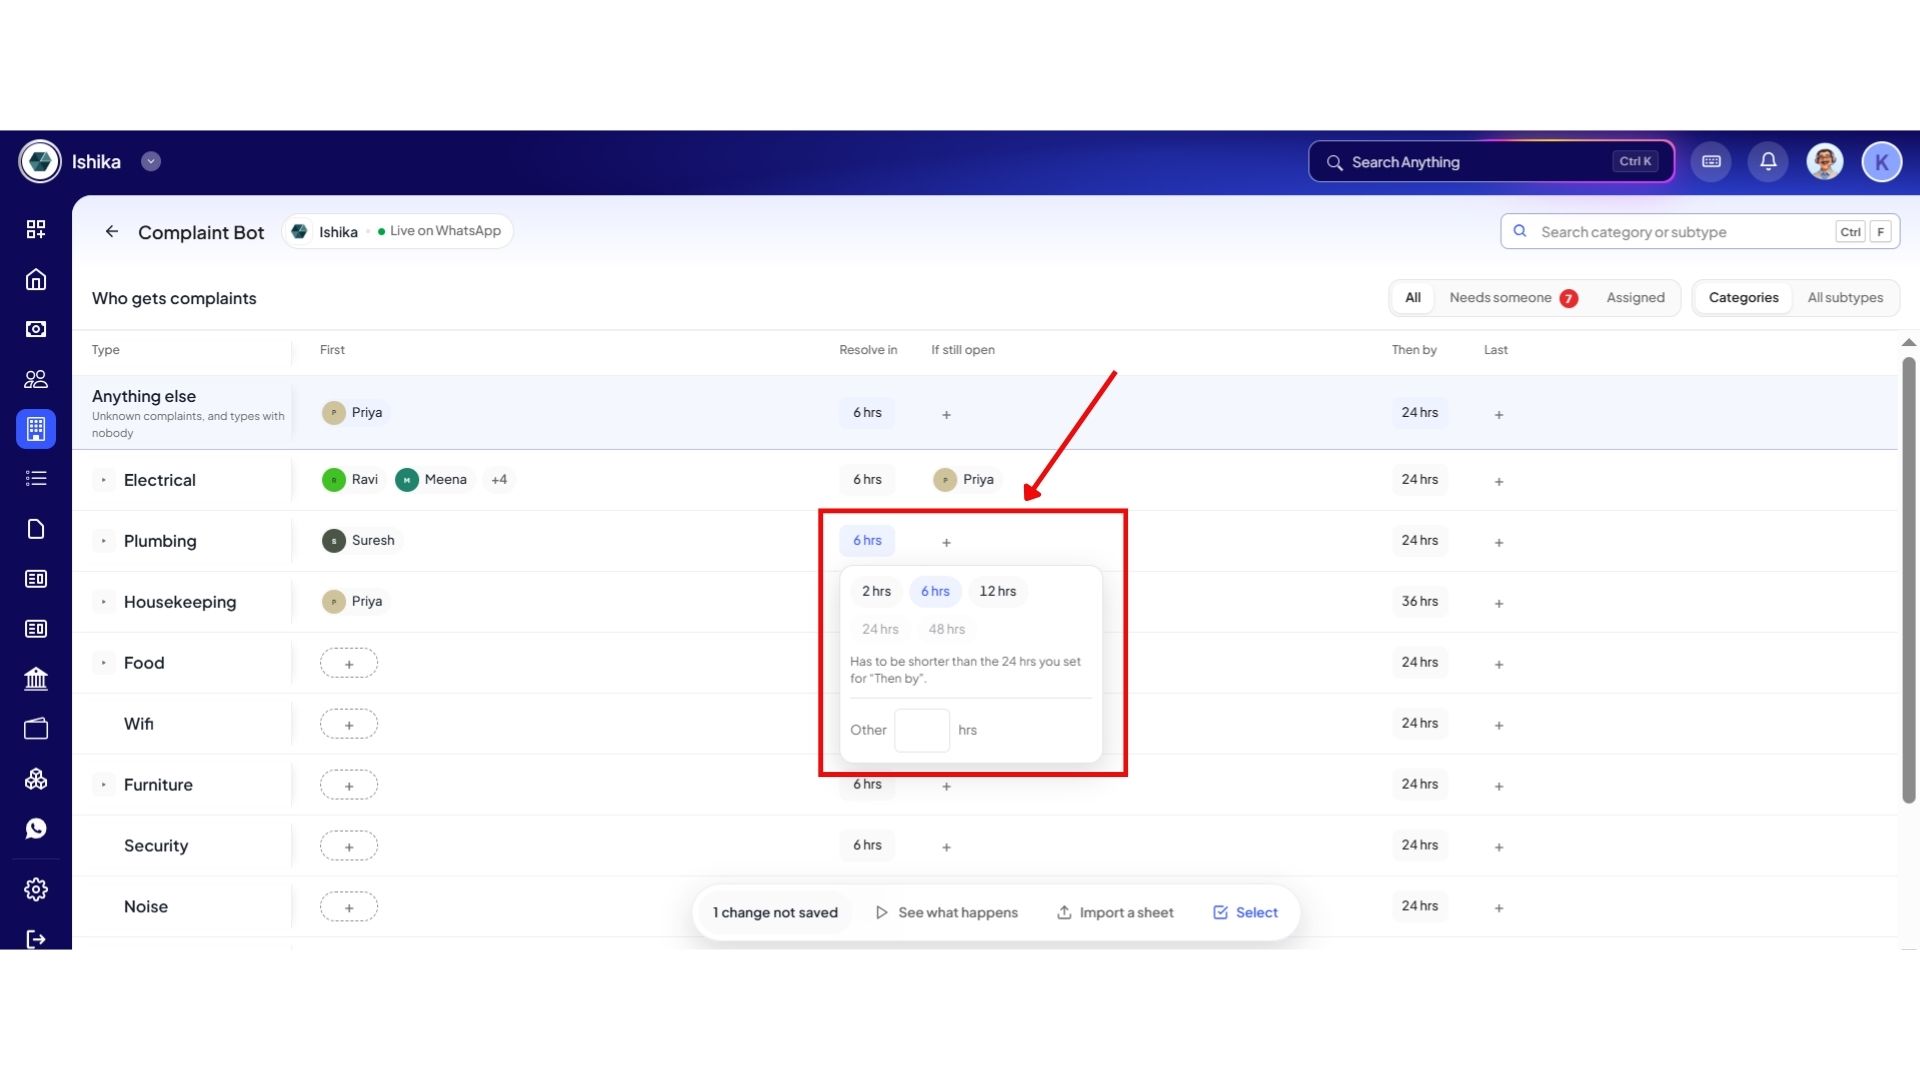
- Step 5: Set the Resolution Time
Under Resolve In, select the amount of time the assigned team member should have to resolve the complaint. If the complaint is still open after this time, it will automatically move to the next level of escalation.
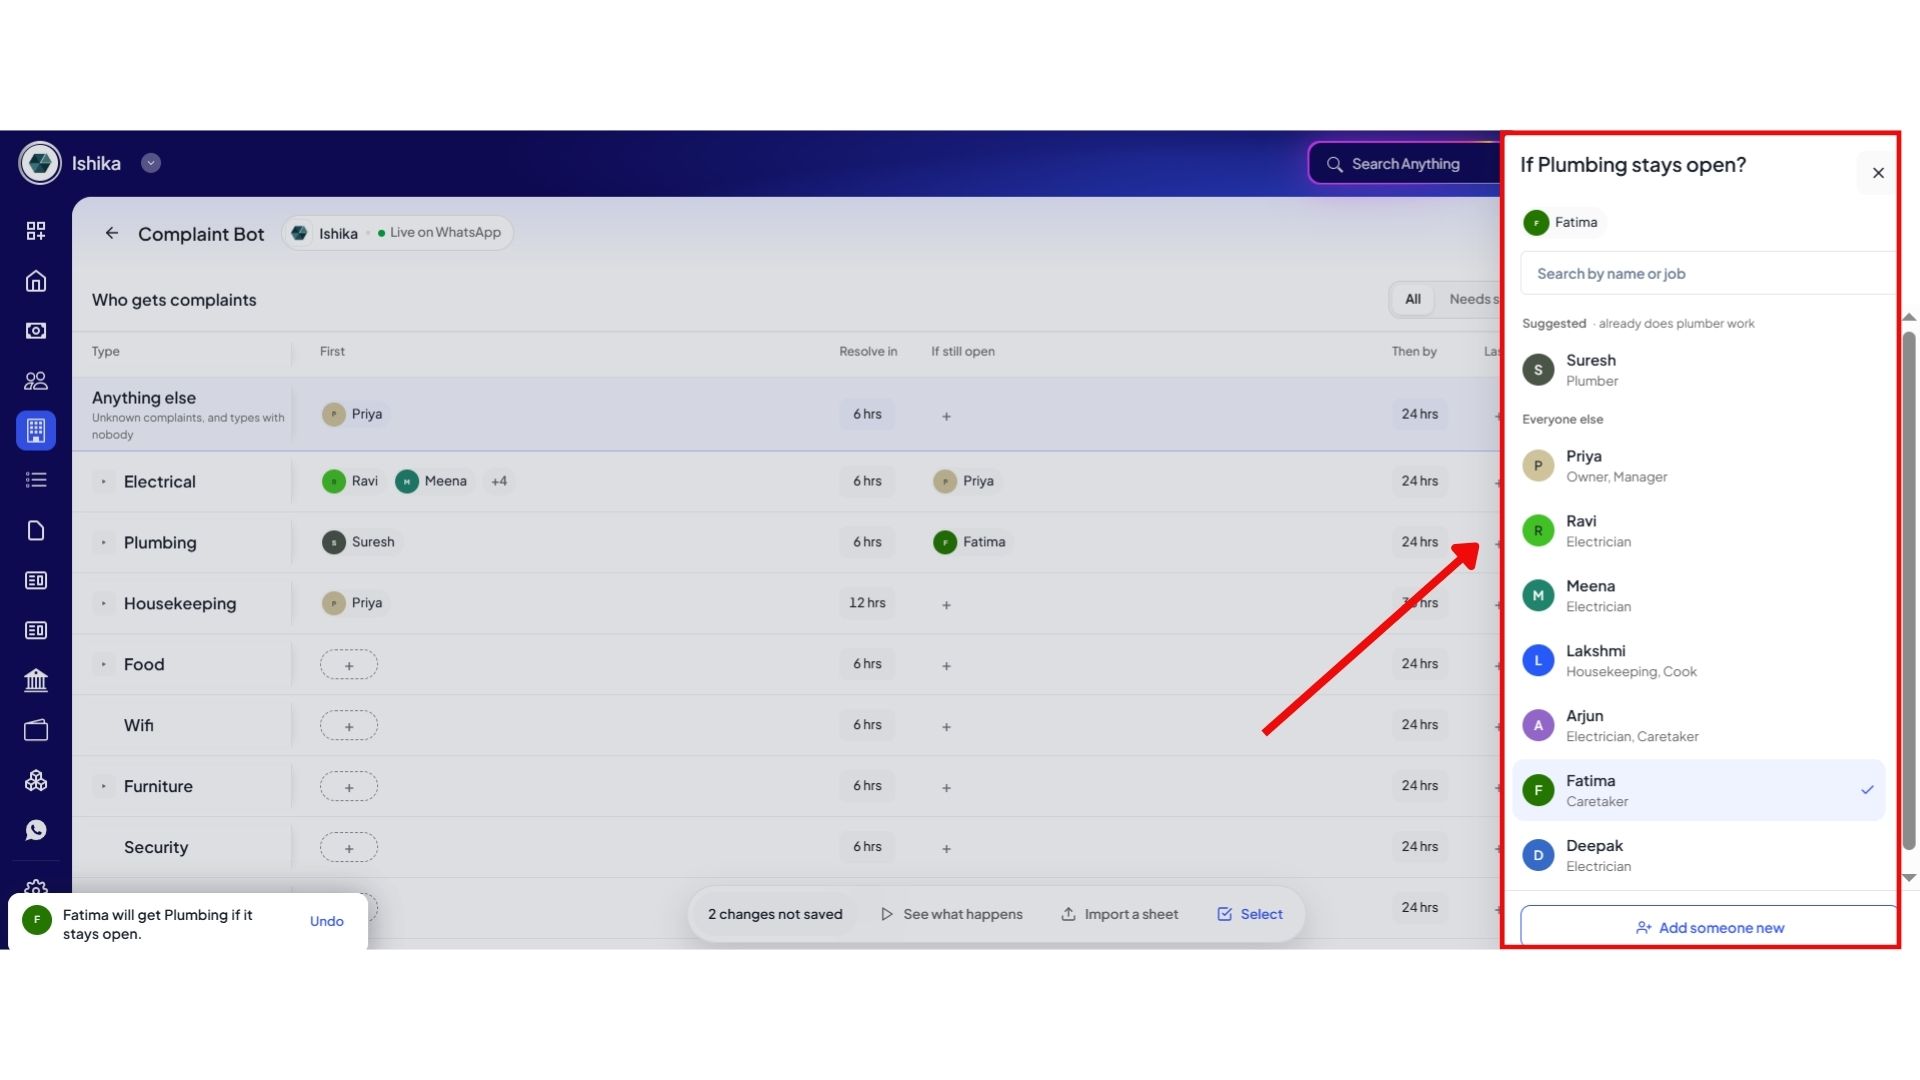
- Step 6: Set the First Escalation
Select the next person who should receive the complaint if it is not resolved within the set time. This could be a Caretaker, another Plumber, or another relevant team member.
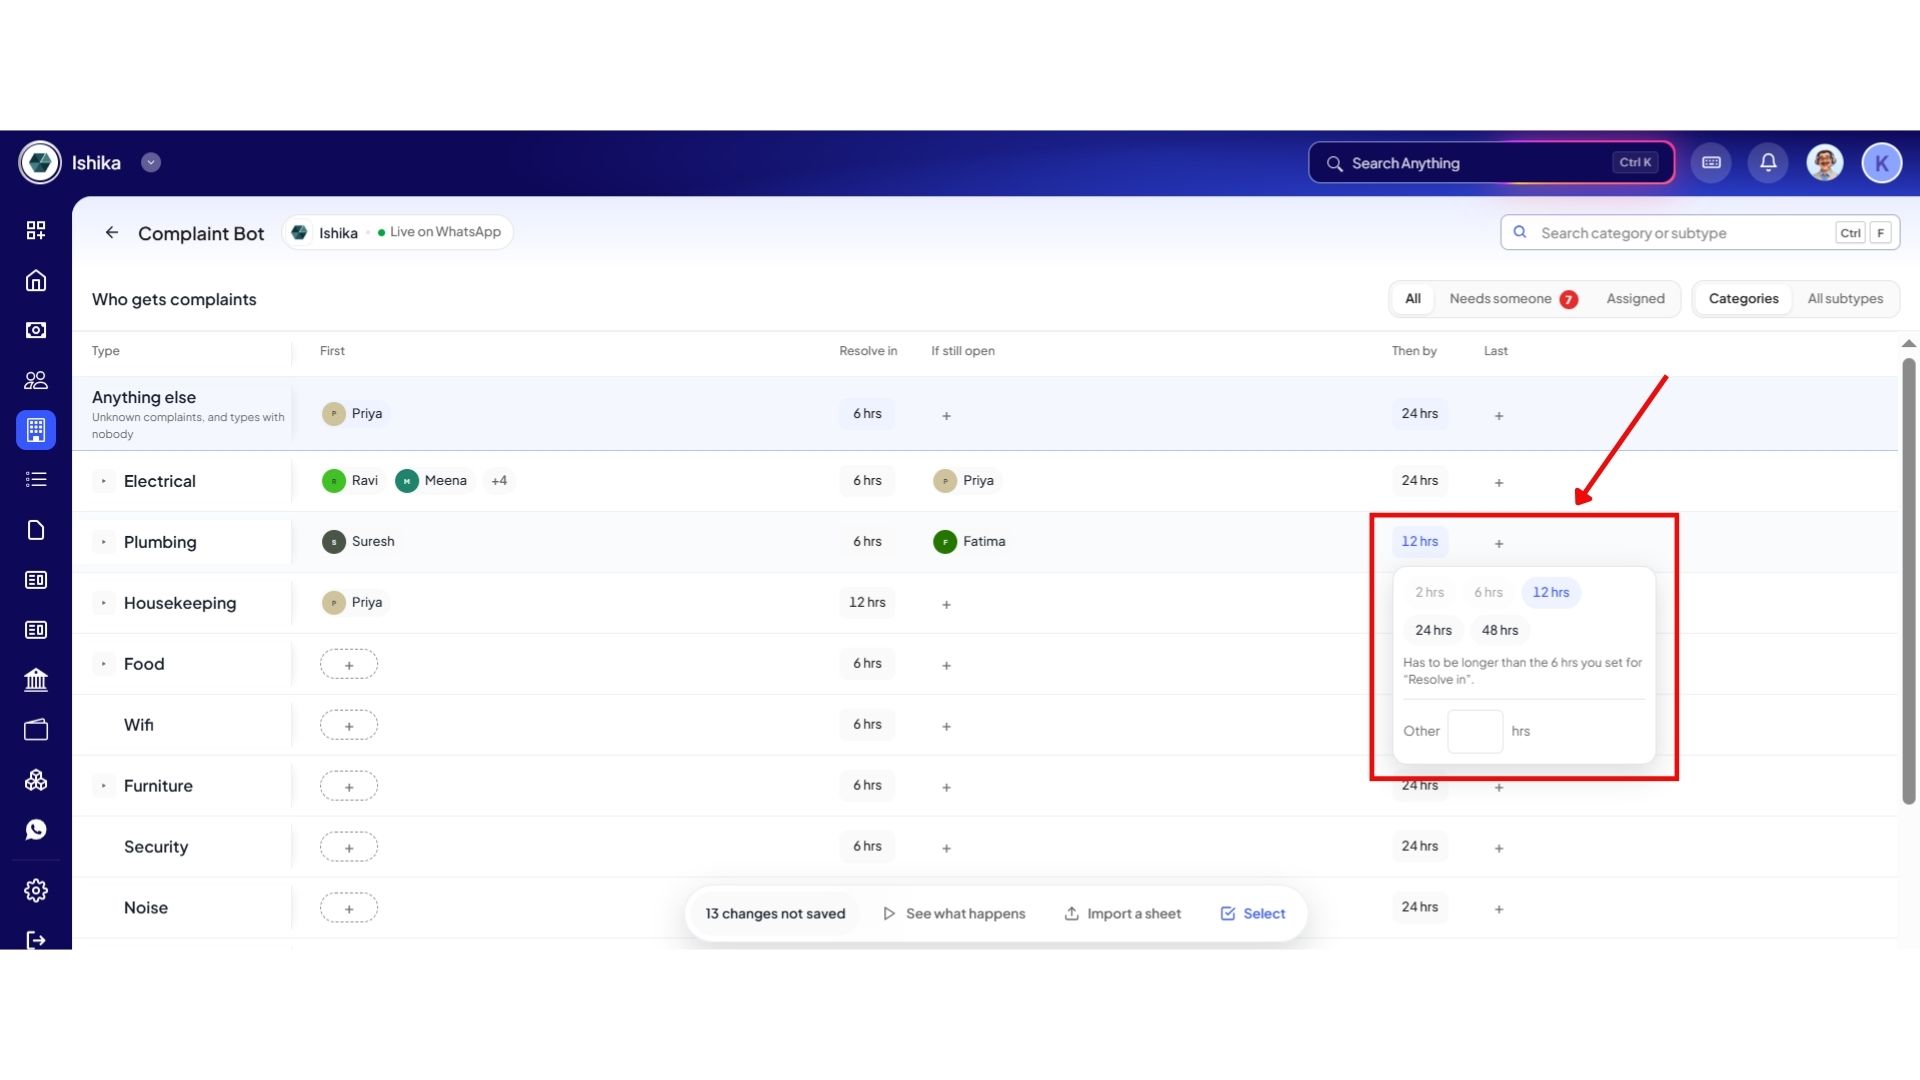
- Step 7: Set the Next Escalation
Set the resolution time for the second level and choose the next person for escalation. You can continue setting the escalation levels based on how you want complaints to be handled.
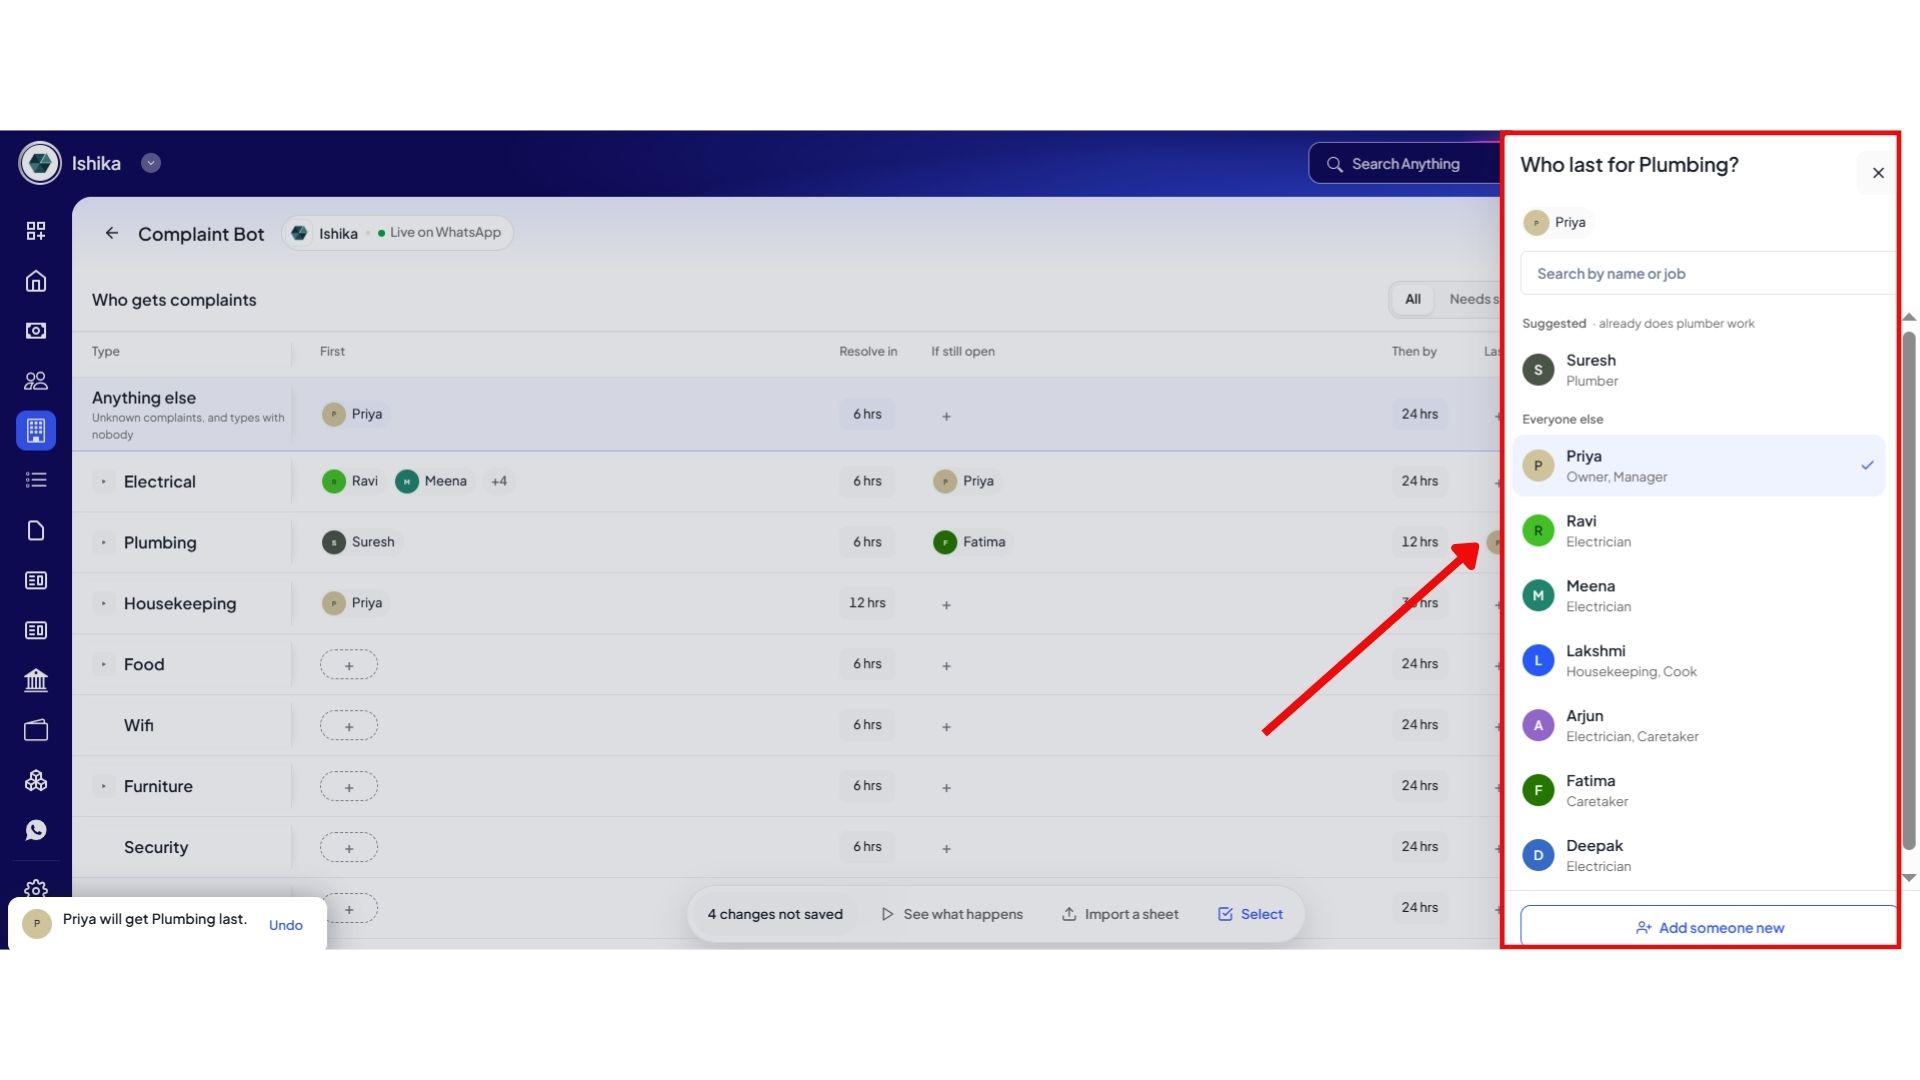
- Step 8: Add the Final Escalation
For the final level, select the person who should receive the complaint if it remains unresolved. This could be the Owner, Manager, Warden, Senior Plumber, or another appropriate authority.
- Step 9: Complete the Complaint Bot Setup
After selecting the final escalation level and setting the required resolution times, review the details you have added. Once everything is set, your Complaint Bot Setup is ready to use, and complaints will follow the escalation process you have configured.
💡 Why it matters: Tenants are far more likely to report an issue when it's as easy as sending a WhatsApp-style message. And because the whole conversation – tenant, staff, manager – happens inside the bot, nothing gets lost between a phone call and a chat. That means fewer unreported problems and faster fixes.
Analytics
We're introducing the first version of Analytics, giving you a clearer view of five key areas of your business – with graphs and visuals added throughout so the numbers are easy to understand at a glance.
Highlights
- Due Analytics – understand your pending dues better.
- Collection Analytics – Track how your collections are trending.
- Expense Analytics – see where your money is going.
- Tenant Analytics – understand your tenant base at a glance.
- Occupancy/Inventory Analytics – see how full or empty your property really is.
Note: Tapping on a number to see the underlying detailed list will come in the next release – for now, this gives you the summary view.
How To Try
- Step 1: Open the Dashboard
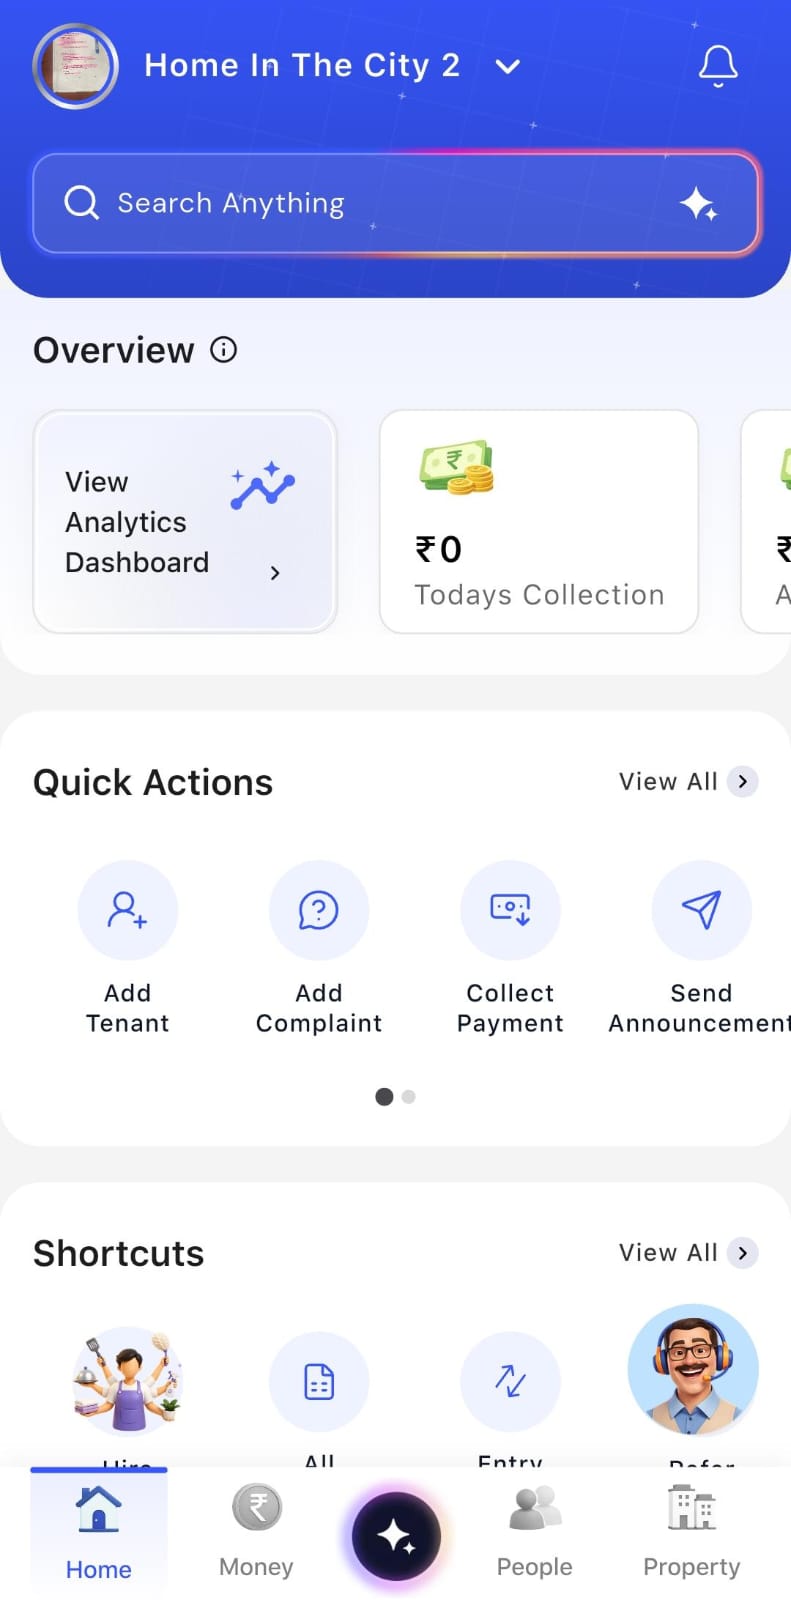
Log in to the app and make sure you are on the Dashboard screen. Look for the View Analytics Dashboard option.
- Step 2: Open the Analytics Dashboard
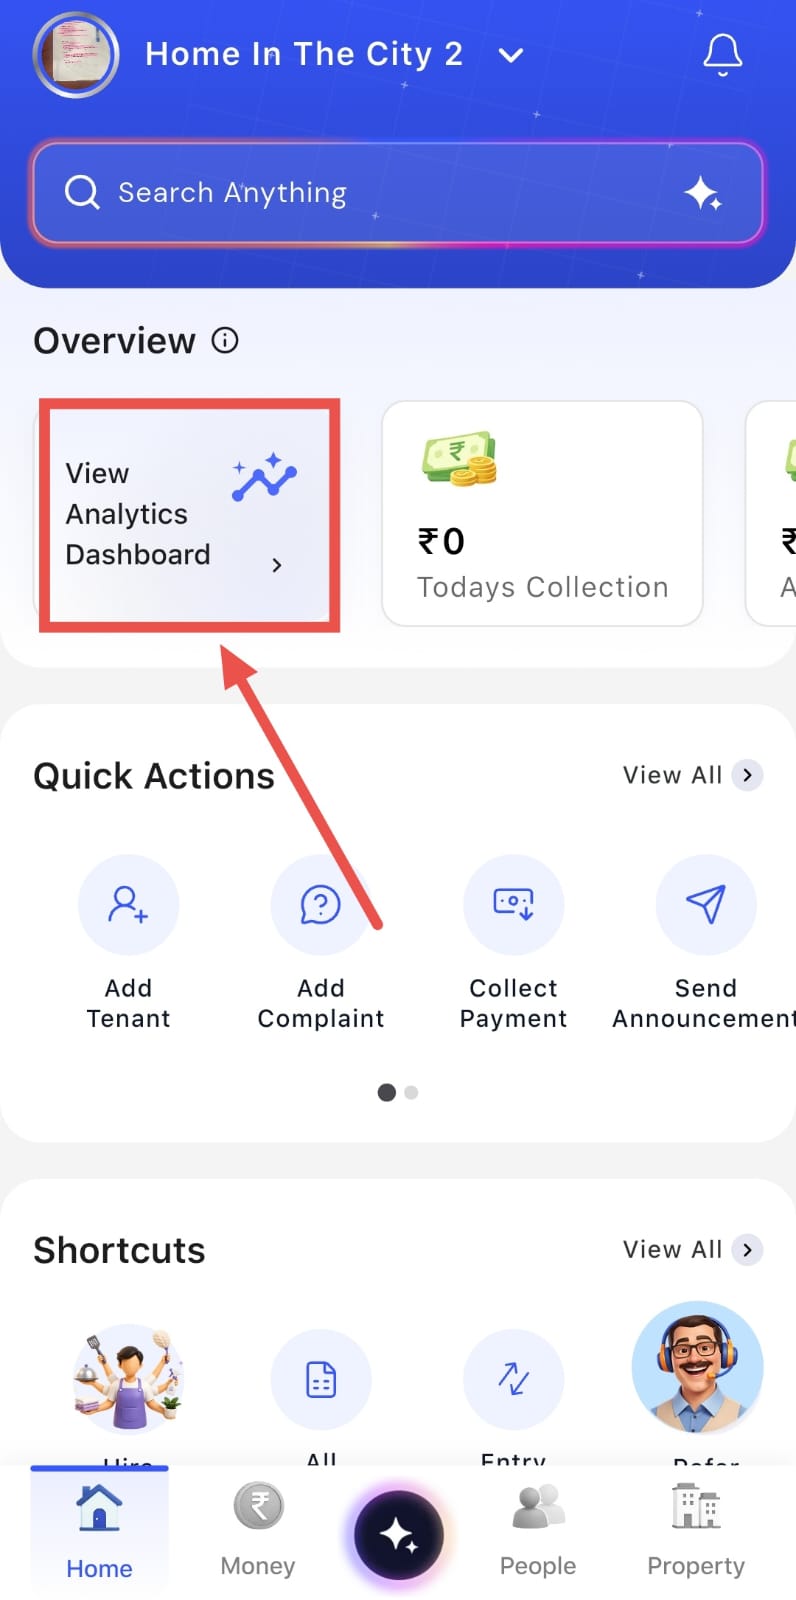
Tap on View Analytics Dashboard to open the analytics screen. You will see different analytics sections arranged in a single line at the top of the screen.
- Step 3: View Financial Analytics
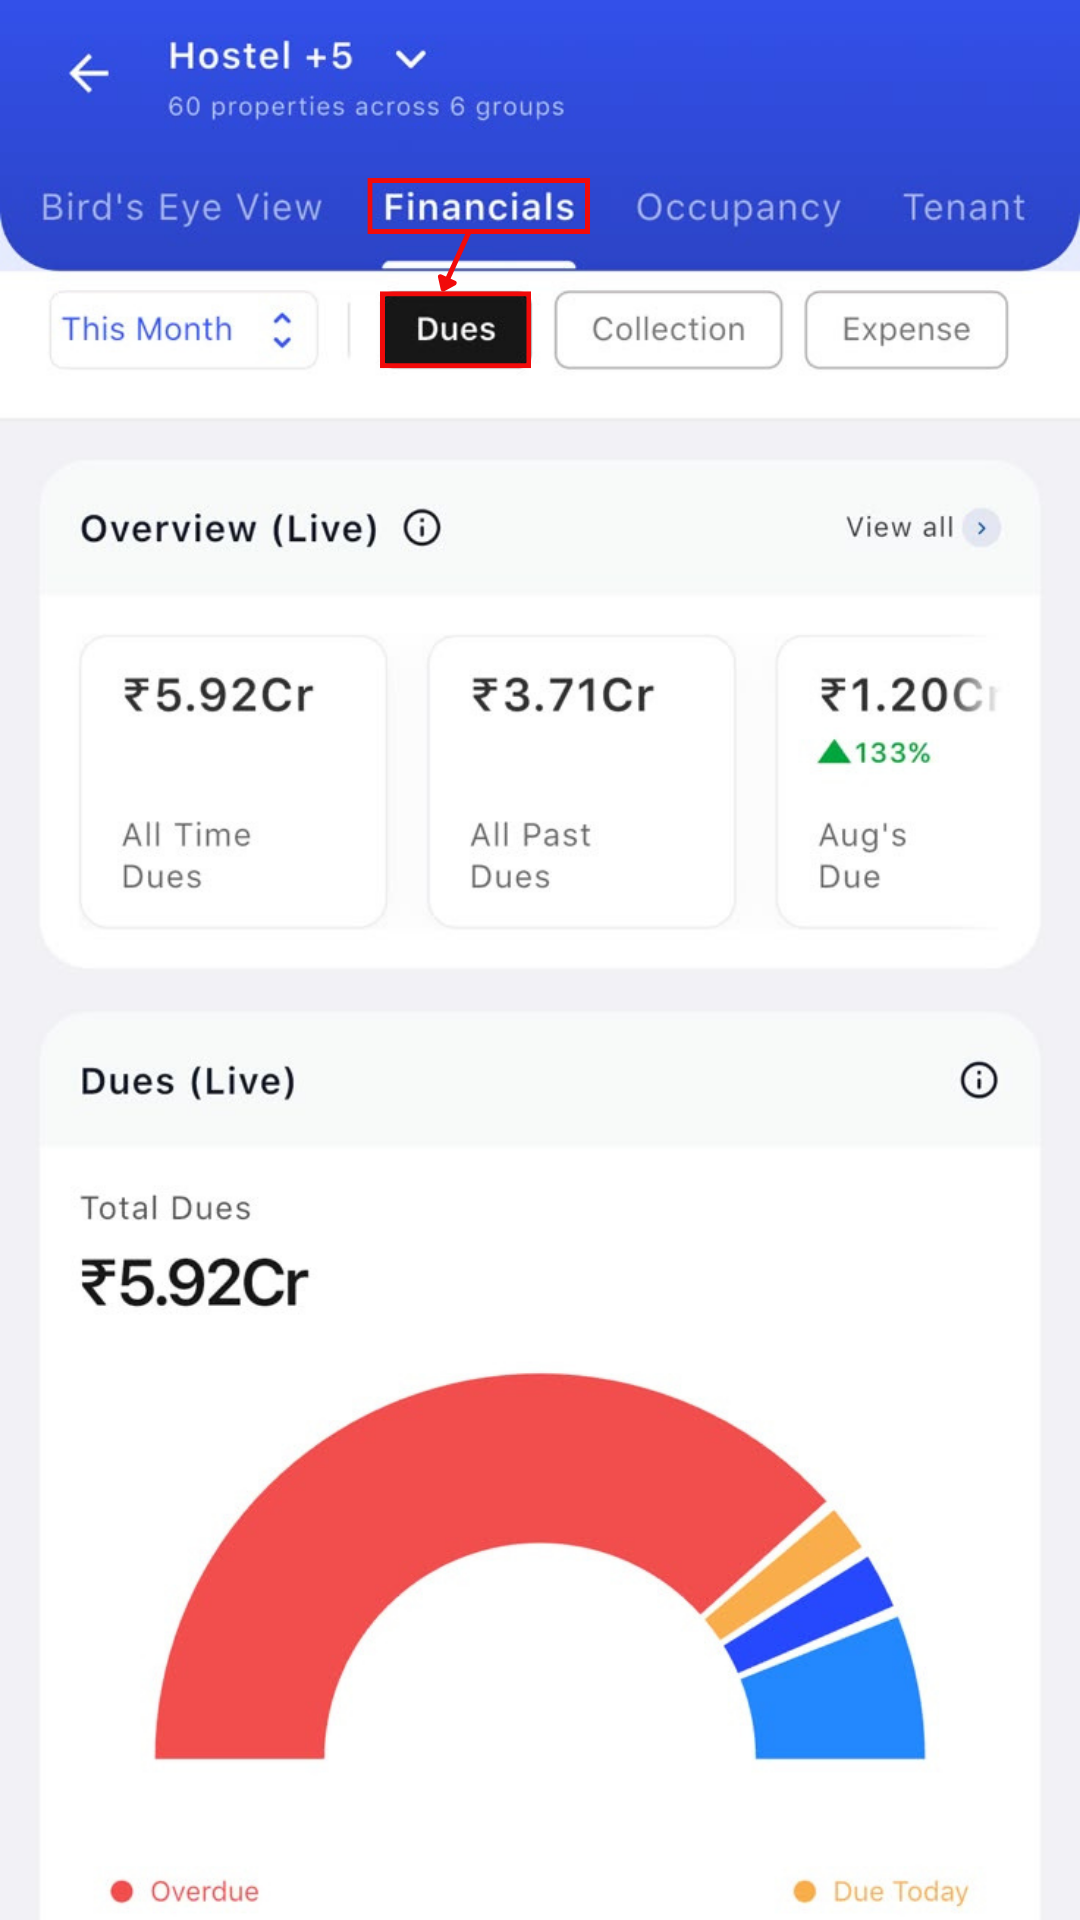
Tap on Financial to view detailed insights related to your Dues, Collections and Expenses. You can review the available data to understand your property's financial performance.
- Step 4: View Tenant Analytics
From the analytics options shown in the same line, swipe to the right until you find Tenants. Tap on it to view detailed analytics related to your tenant data.
- Step 5: View Occupancy Analytics
Swipe to the right again to find the Occupancy option. Tap on it to view detailed insights into your property's occupancy and get a better understanding of your current occupancy status.
💡 Why it matters: Instead of piecing together numbers from different sections, you get a clear, dedicated view for each part of your business.
Custom Property Groups
If you run multiple properties, you can now group them exactly the way you think about your business – not just by the default categories.
Highlights
- Create your own custom groups of properties – by region, by manager, by property type, or anything that makes sense to you.
- View your data at a portfolio level, filtered to just that group.
How To Try
- Step 1: Open the Property Section
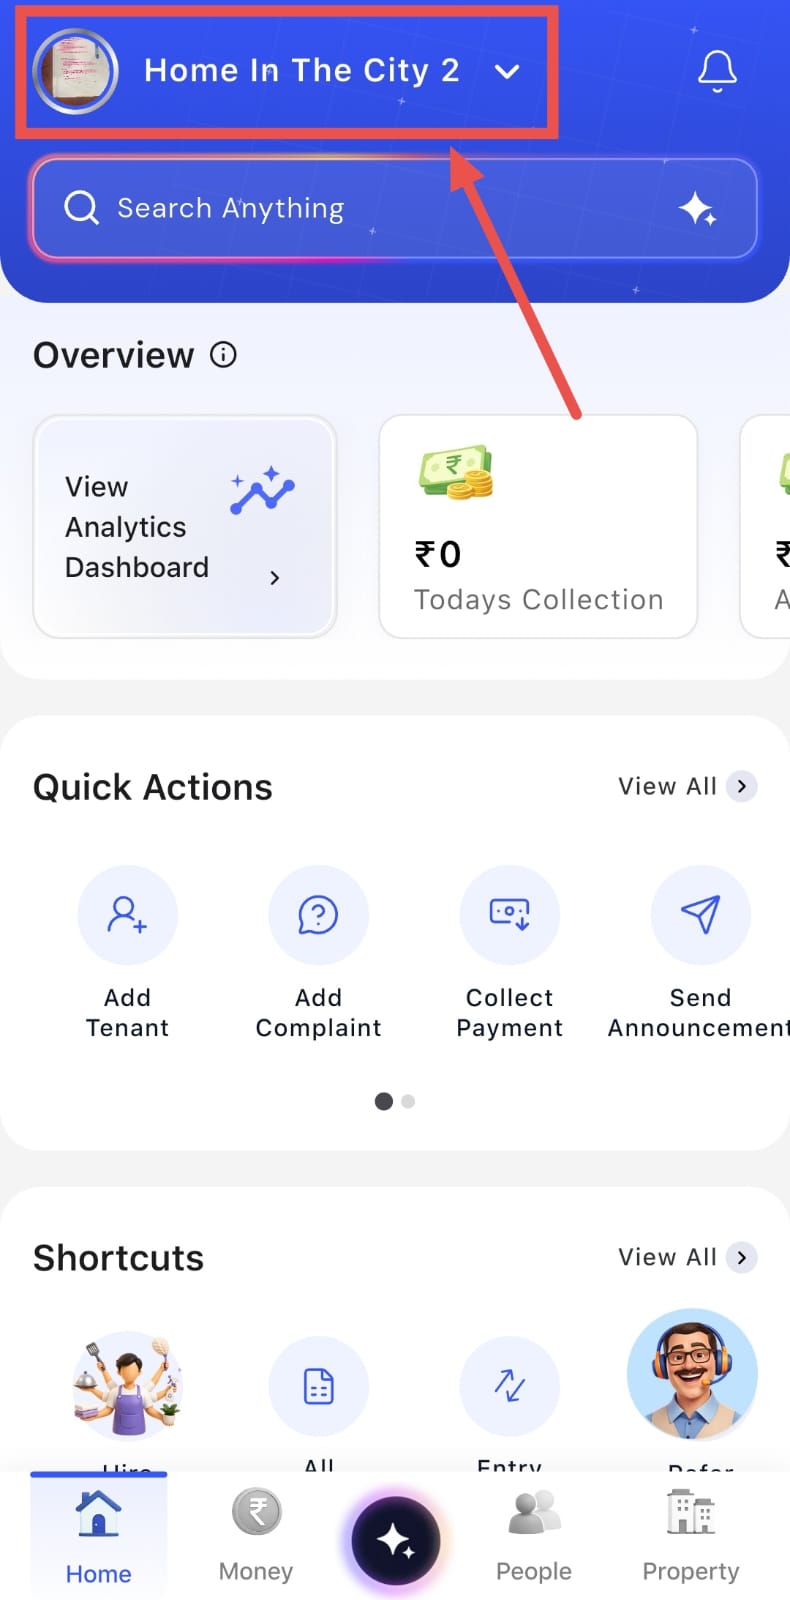
Log in to the app and make sure you are on the Dashboard screen. At the top, you will see your Property Name with a downward arrow next to it. Tap on it to open the property options.
- Step 2: Select Group View
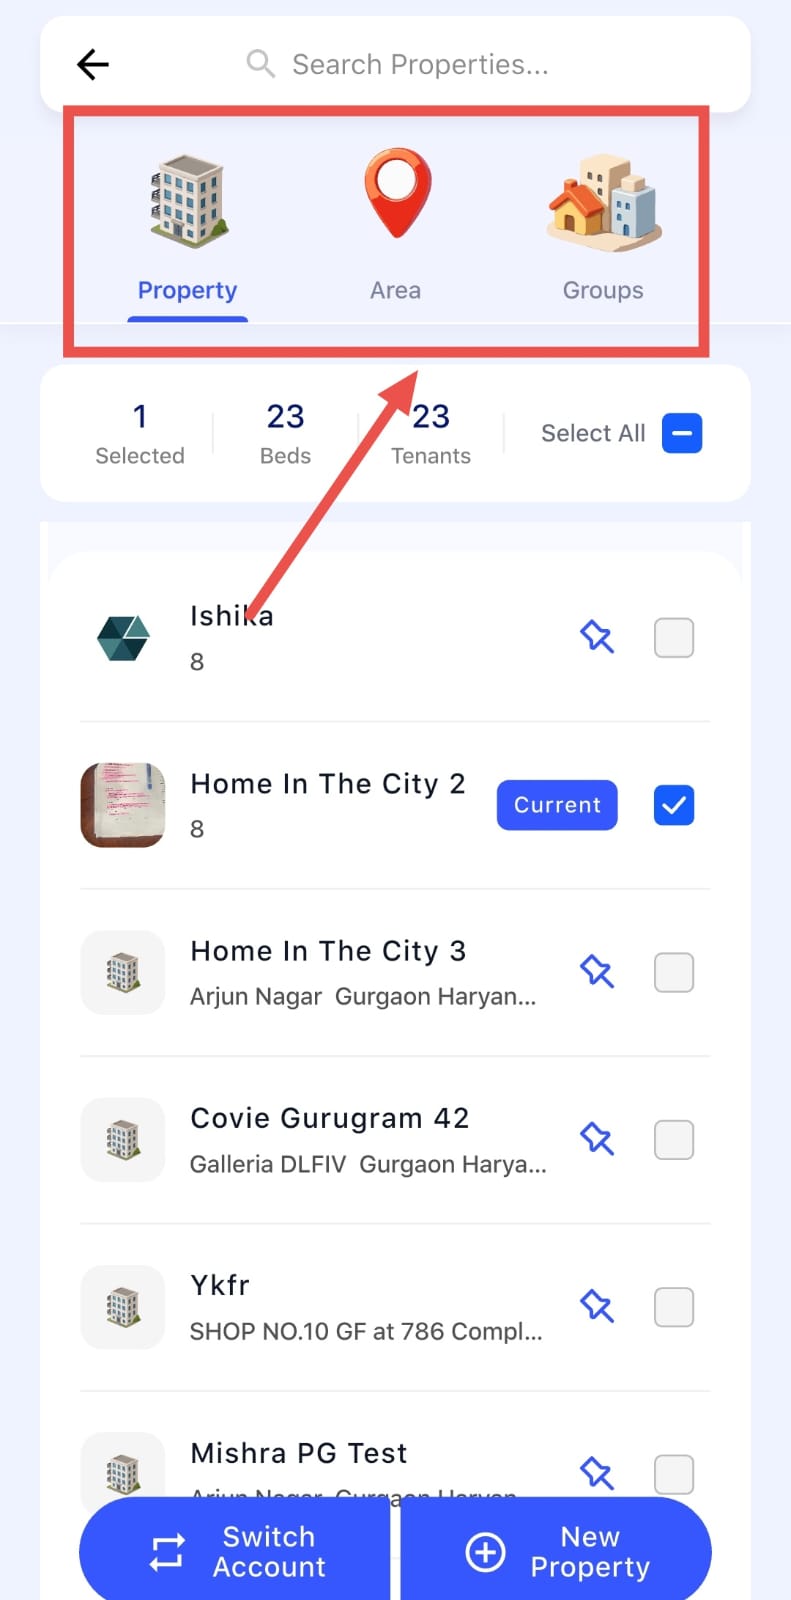
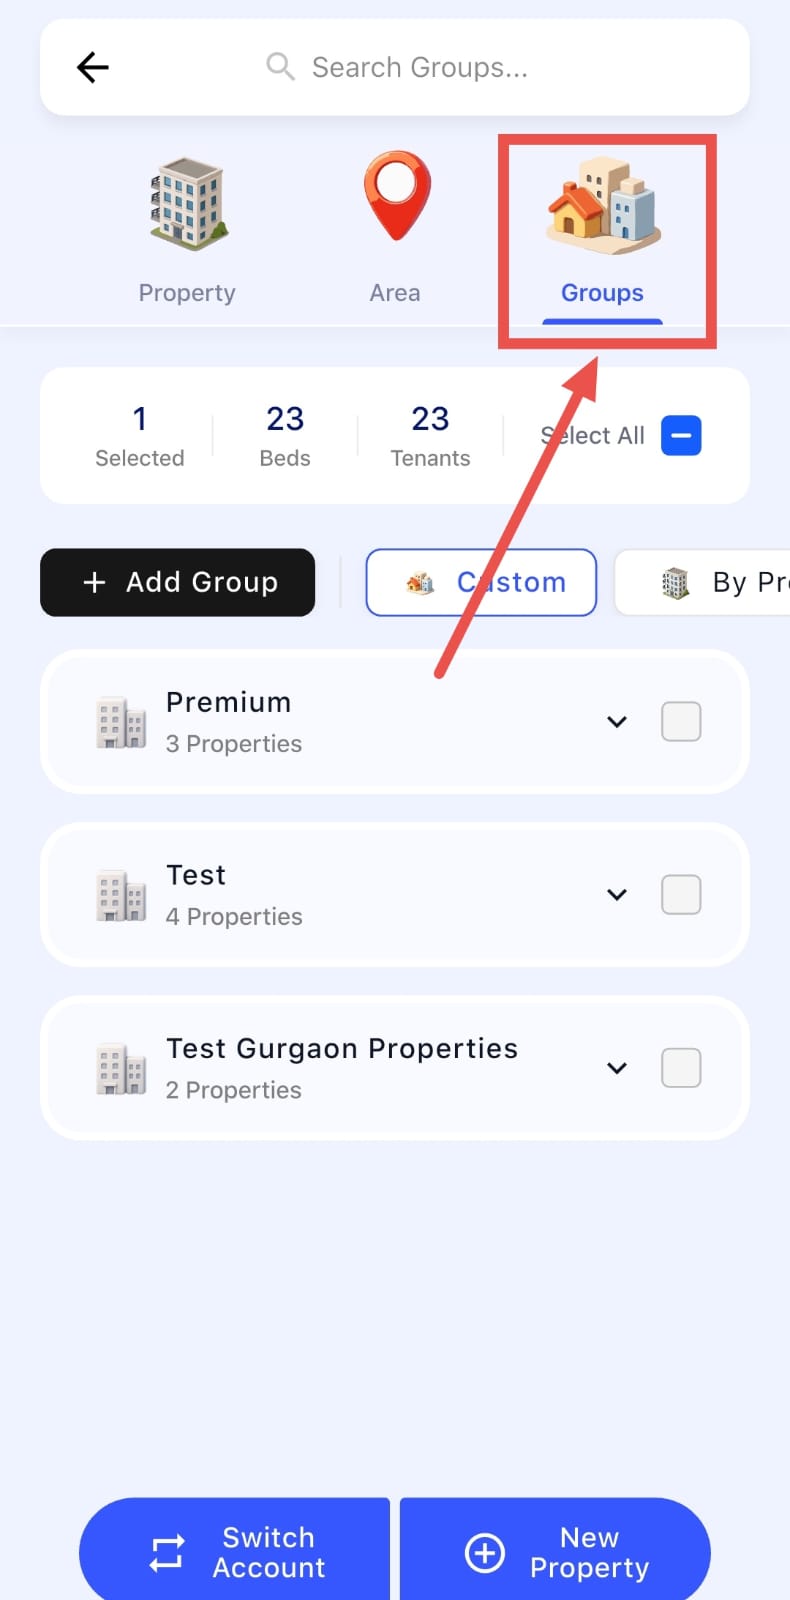
From the available options, you can choose to view your properties Property-wise, Area-wise, or Group-wise. Select Group to organise and view your properties by different groups.
- Step 3: Choose How to Group Properties
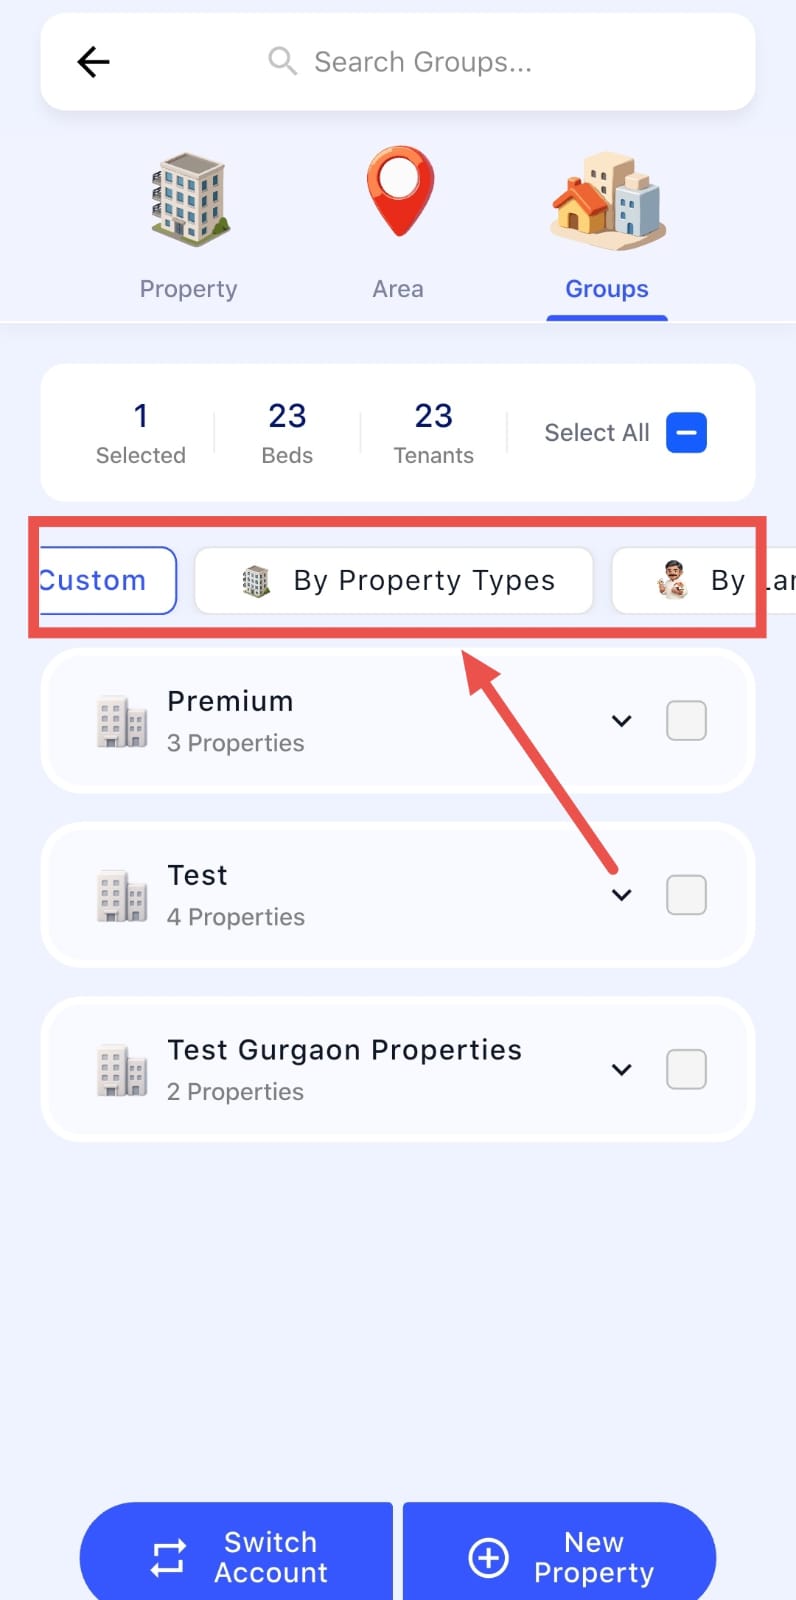
In the Group view, you can organise properties by Property Type, Landlord, or Gender. You can also select Custom to view groups that you have created yourself.
- Step 4: Create a Group
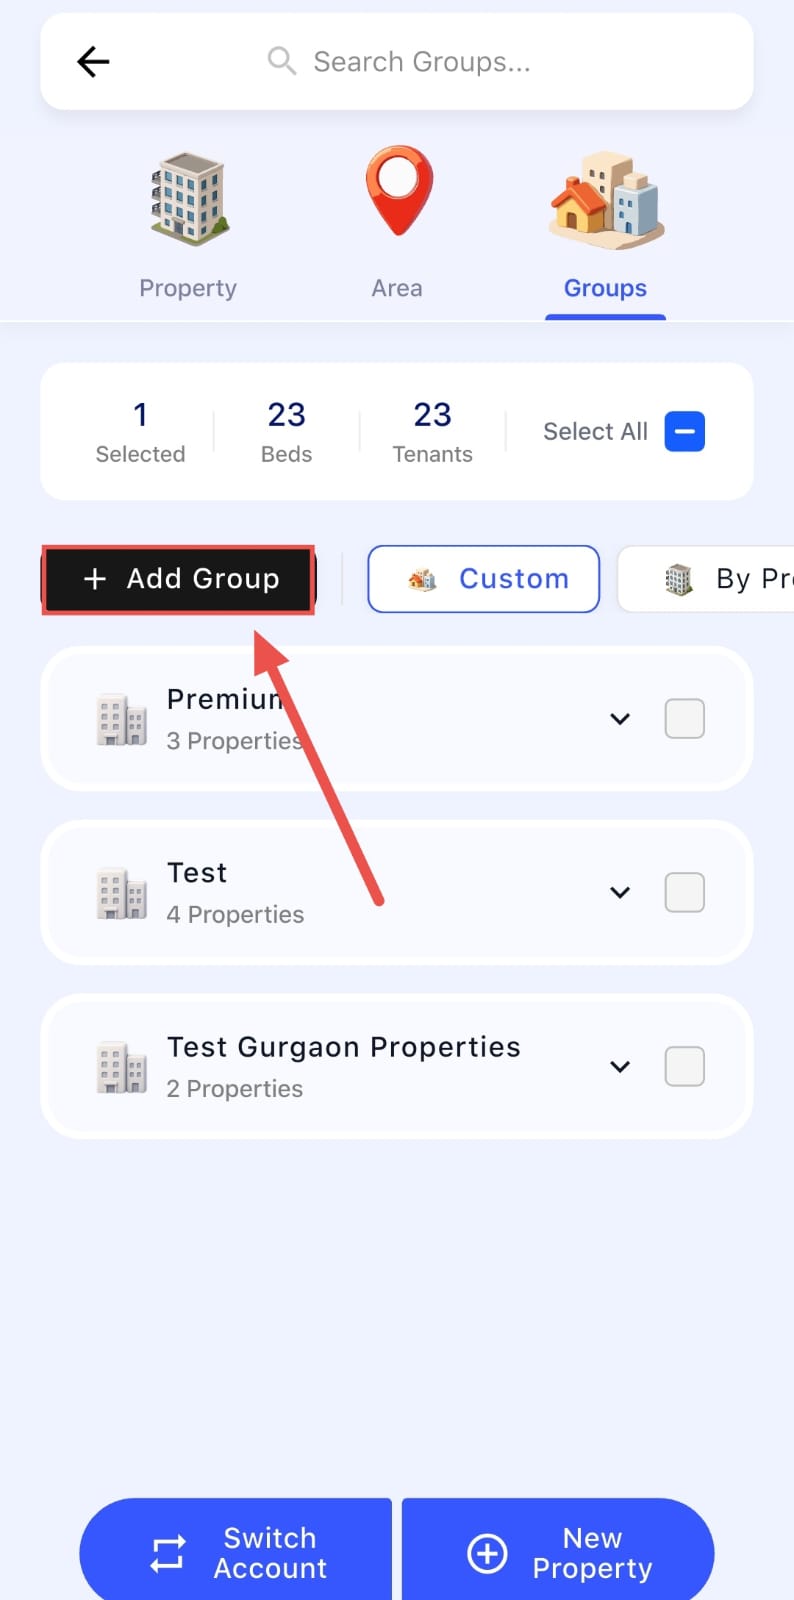
To create a new group, tap Add Group.
- Step 5: Save the Group
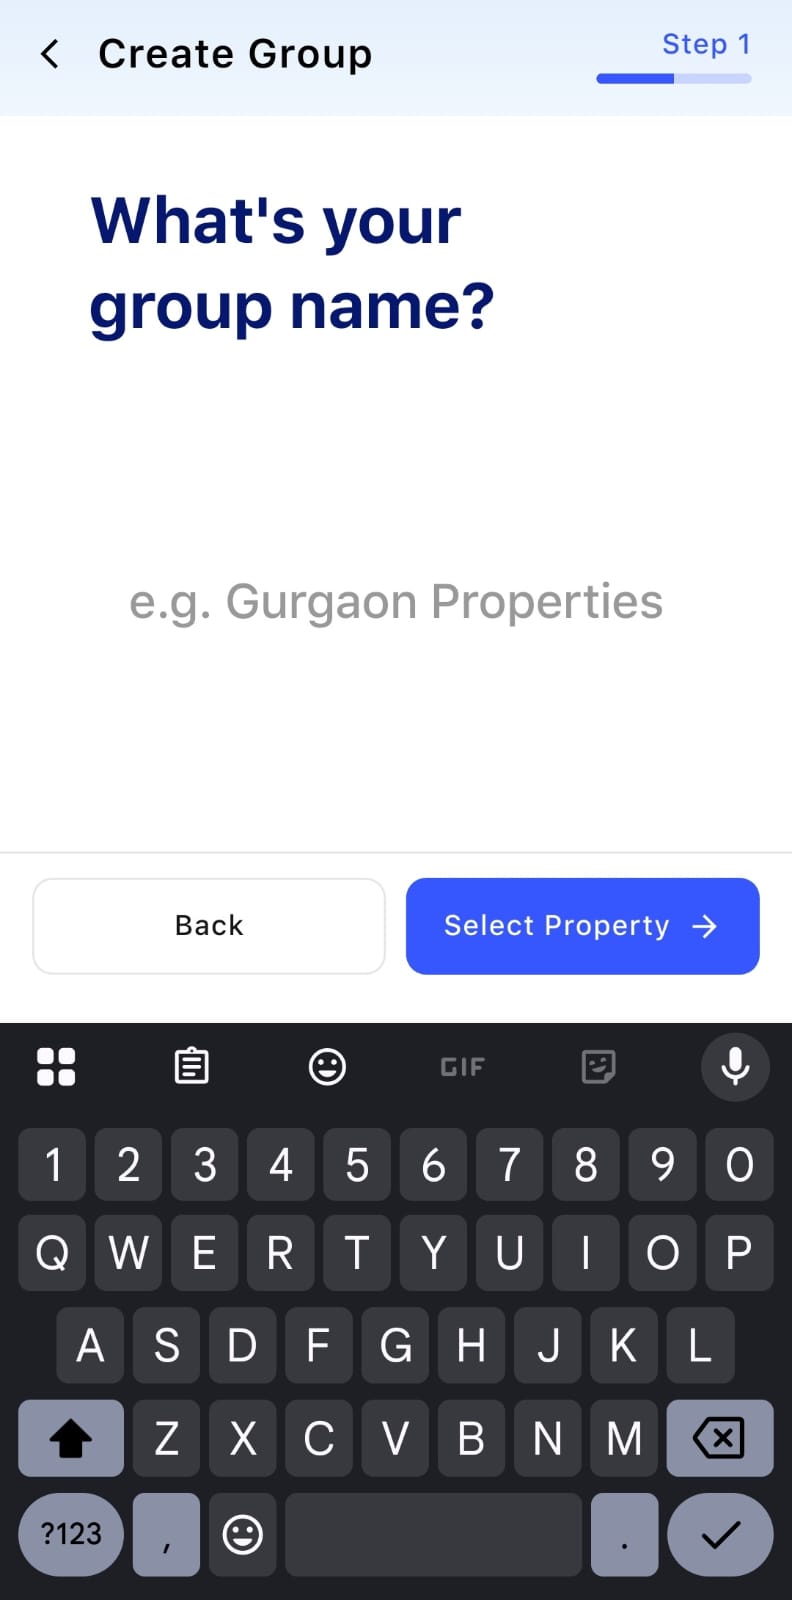
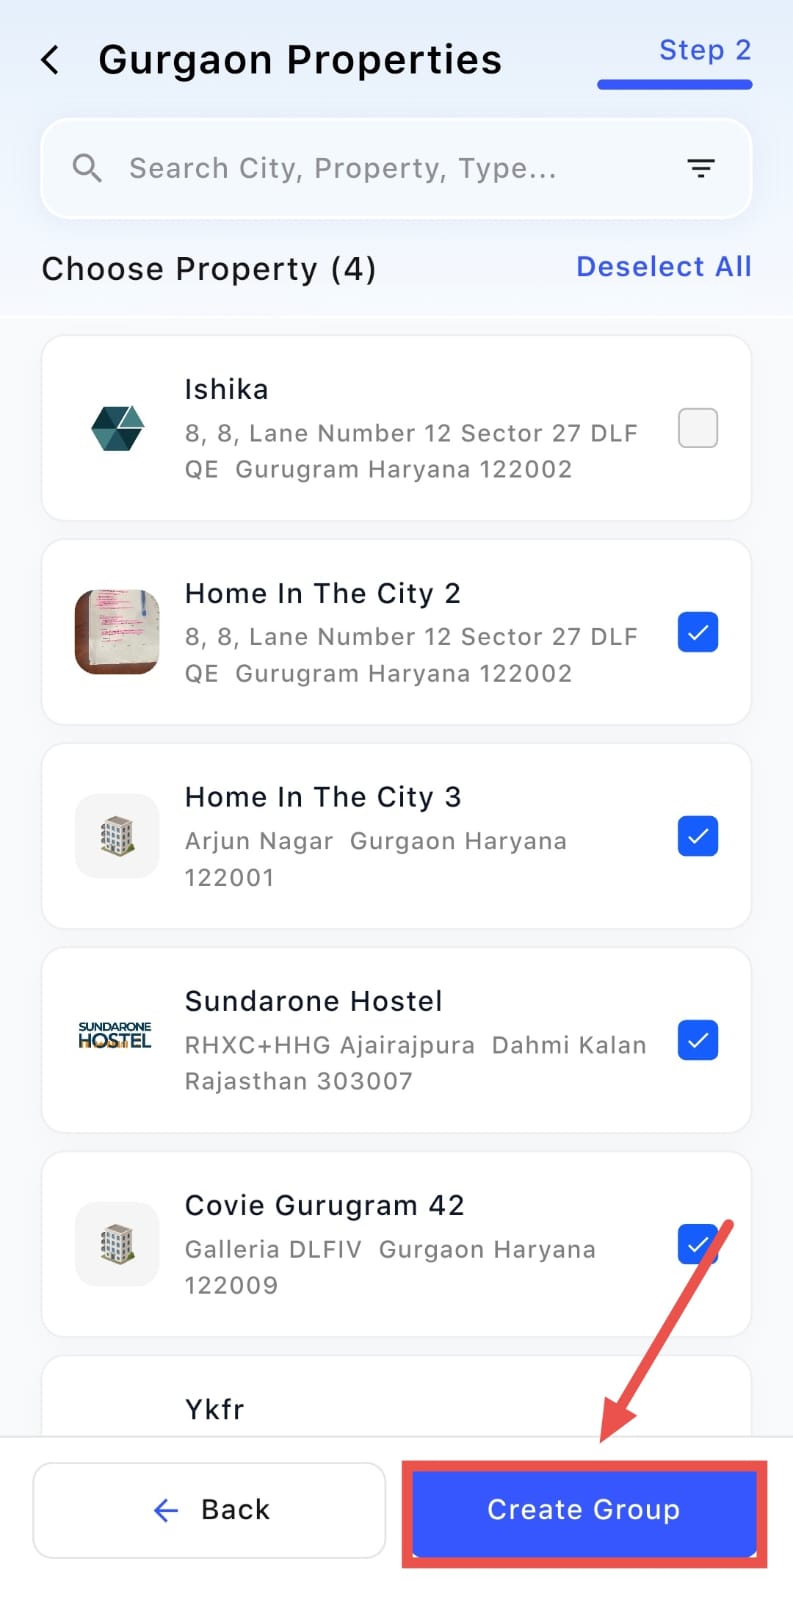
Enter a name for the group, such as Gurgaon Properties, and select the properties you want to include. Once you have selected all the required properties, tap Create Group to save the group and complete the setup. The new group will now be available under the Custom option.
- Step 6: View Your Custom Groups
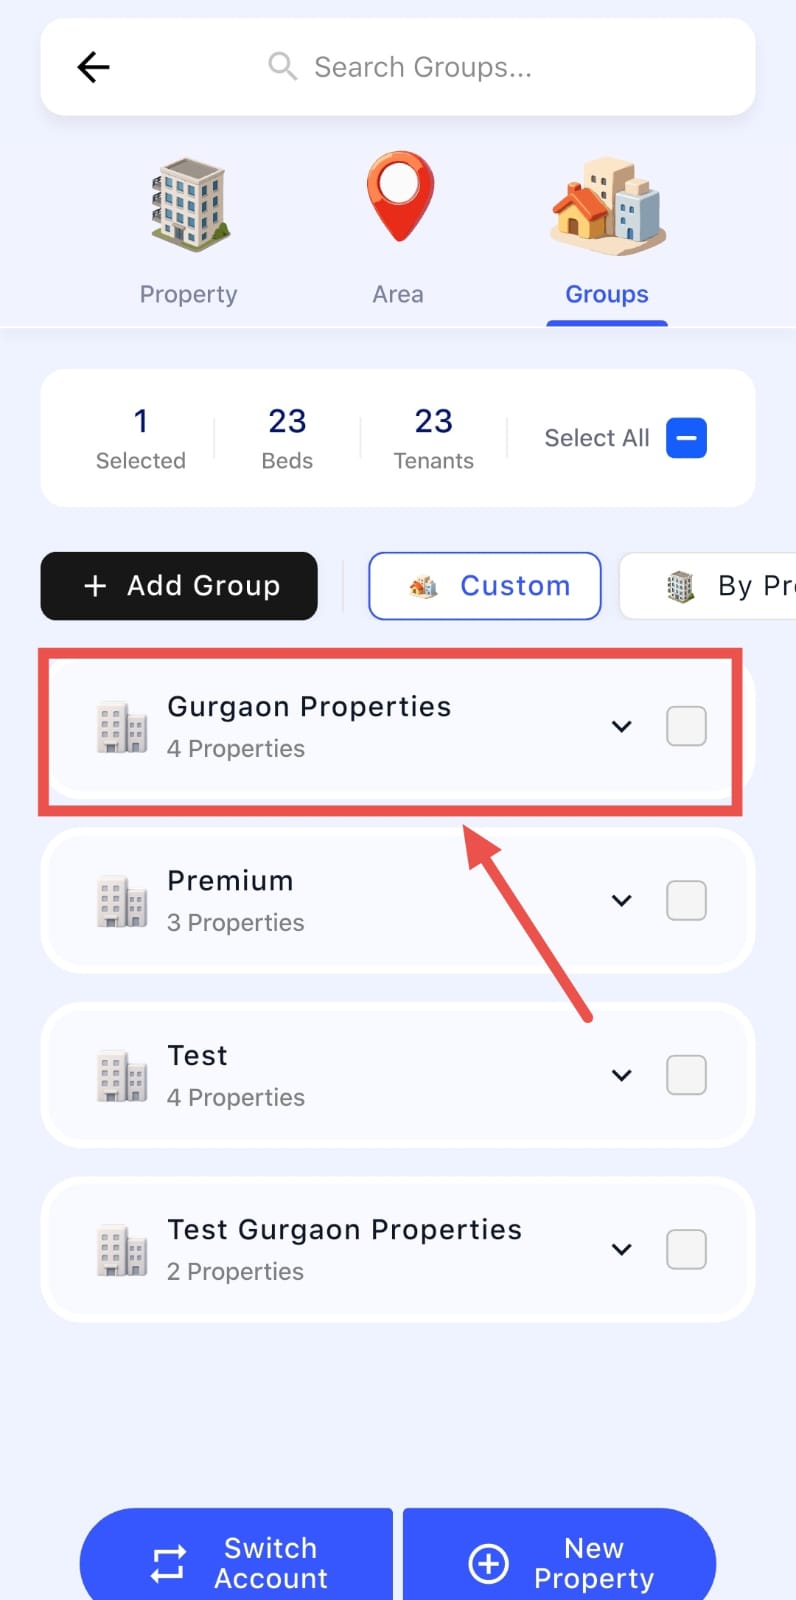
Select Custom to see all the groups you have created. You can open any group to view the properties that have been added to it.
💡 Why it matters: Every business is organised a little differently. Custom groups let you see your portfolio the way you actually manage it, not the way we assumed you would.
Surveys - On Mobile App
We've revamped surveys to make collecting tenant feedback smoother and more dependable, especially on mobile.
Highlights
- A clearer, more usable survey experience on your phone.
- Feedback and review workflows are now more reliable end-to-end.
How To Try
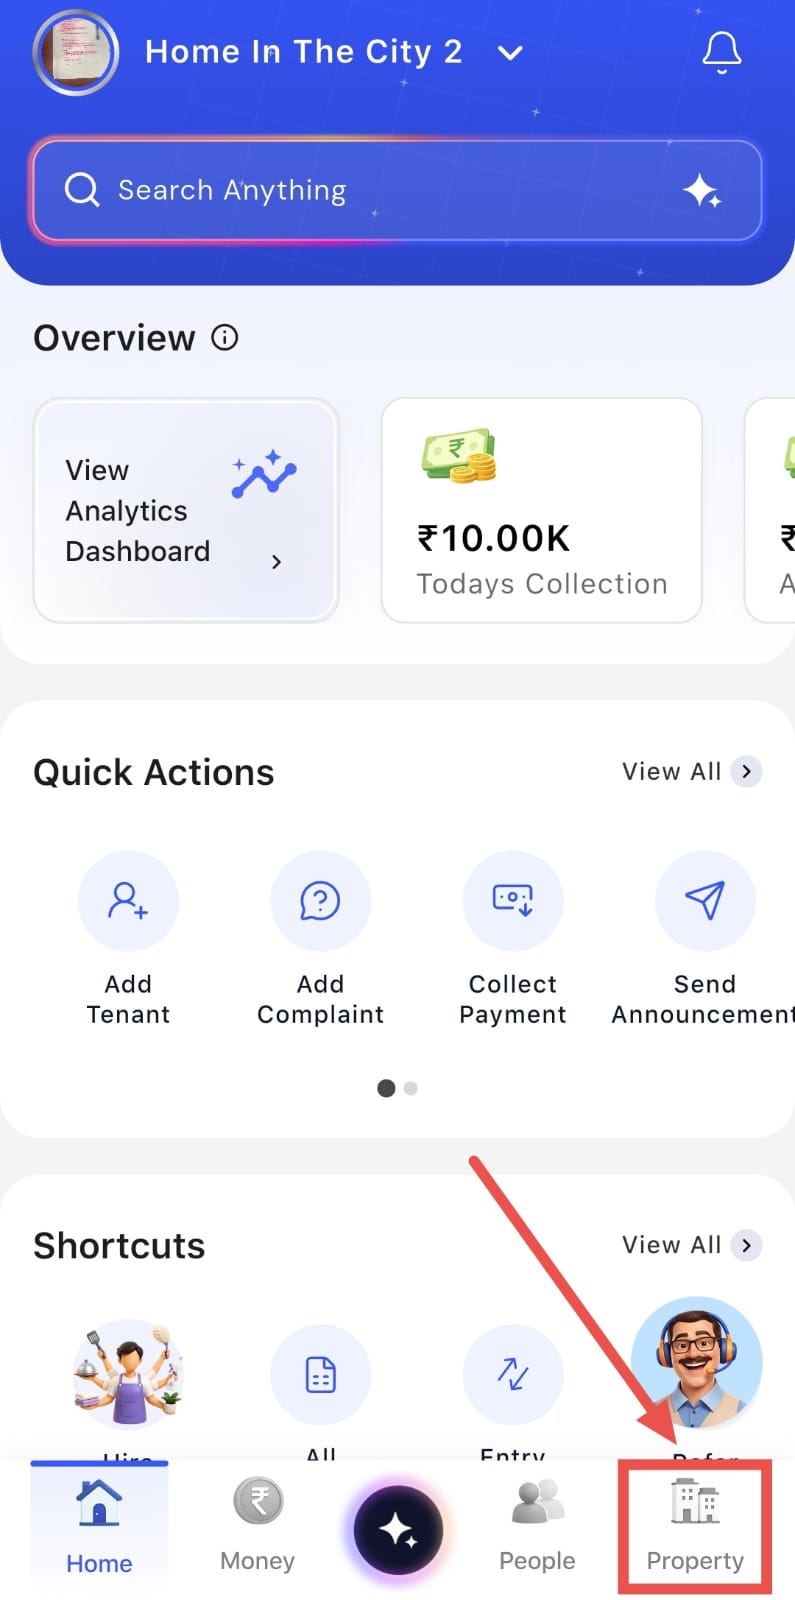
- Step 1: Open the Reviews Section
Log in to the app and make sure you are on the Dashboard screen. From the Dashboard, go to Property and select Review.
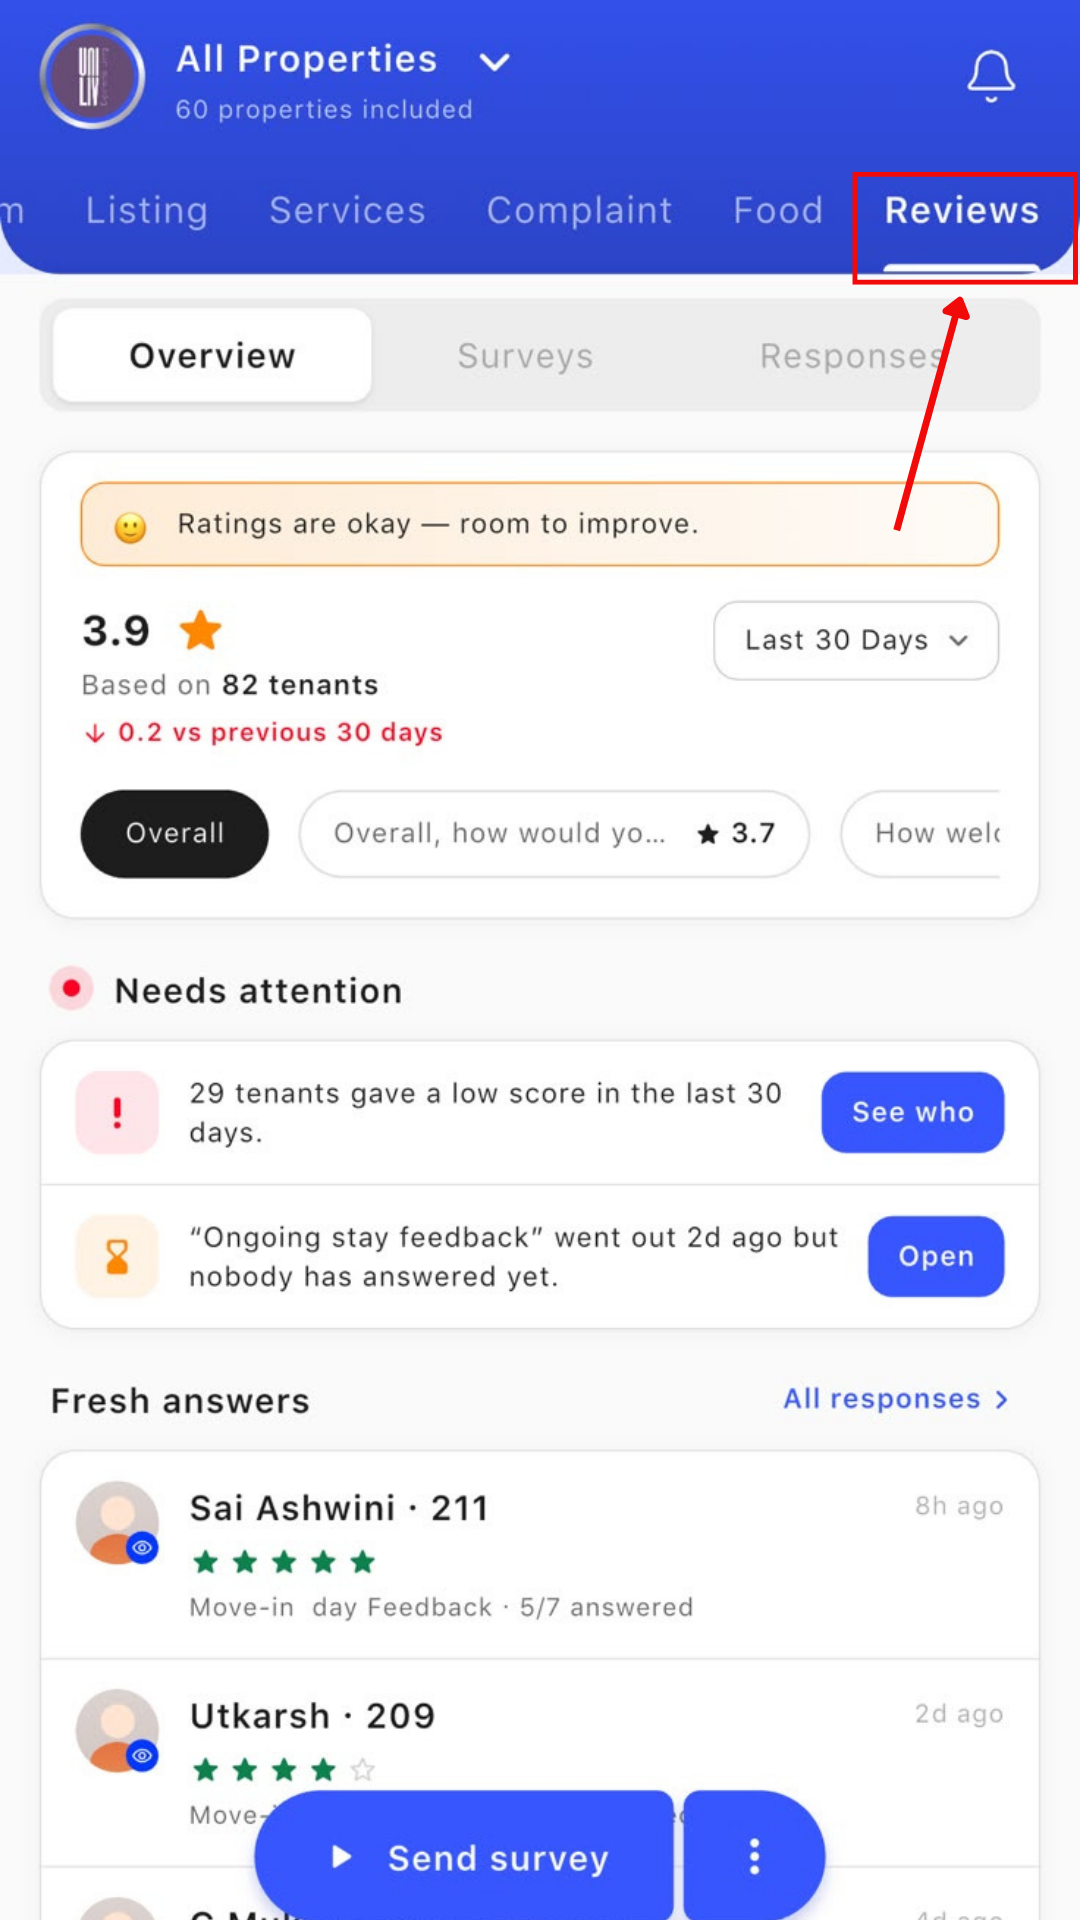
- Step 2: Explore Your Surveys
In the Reviews section, you can view an overview of all the surveys you have created.
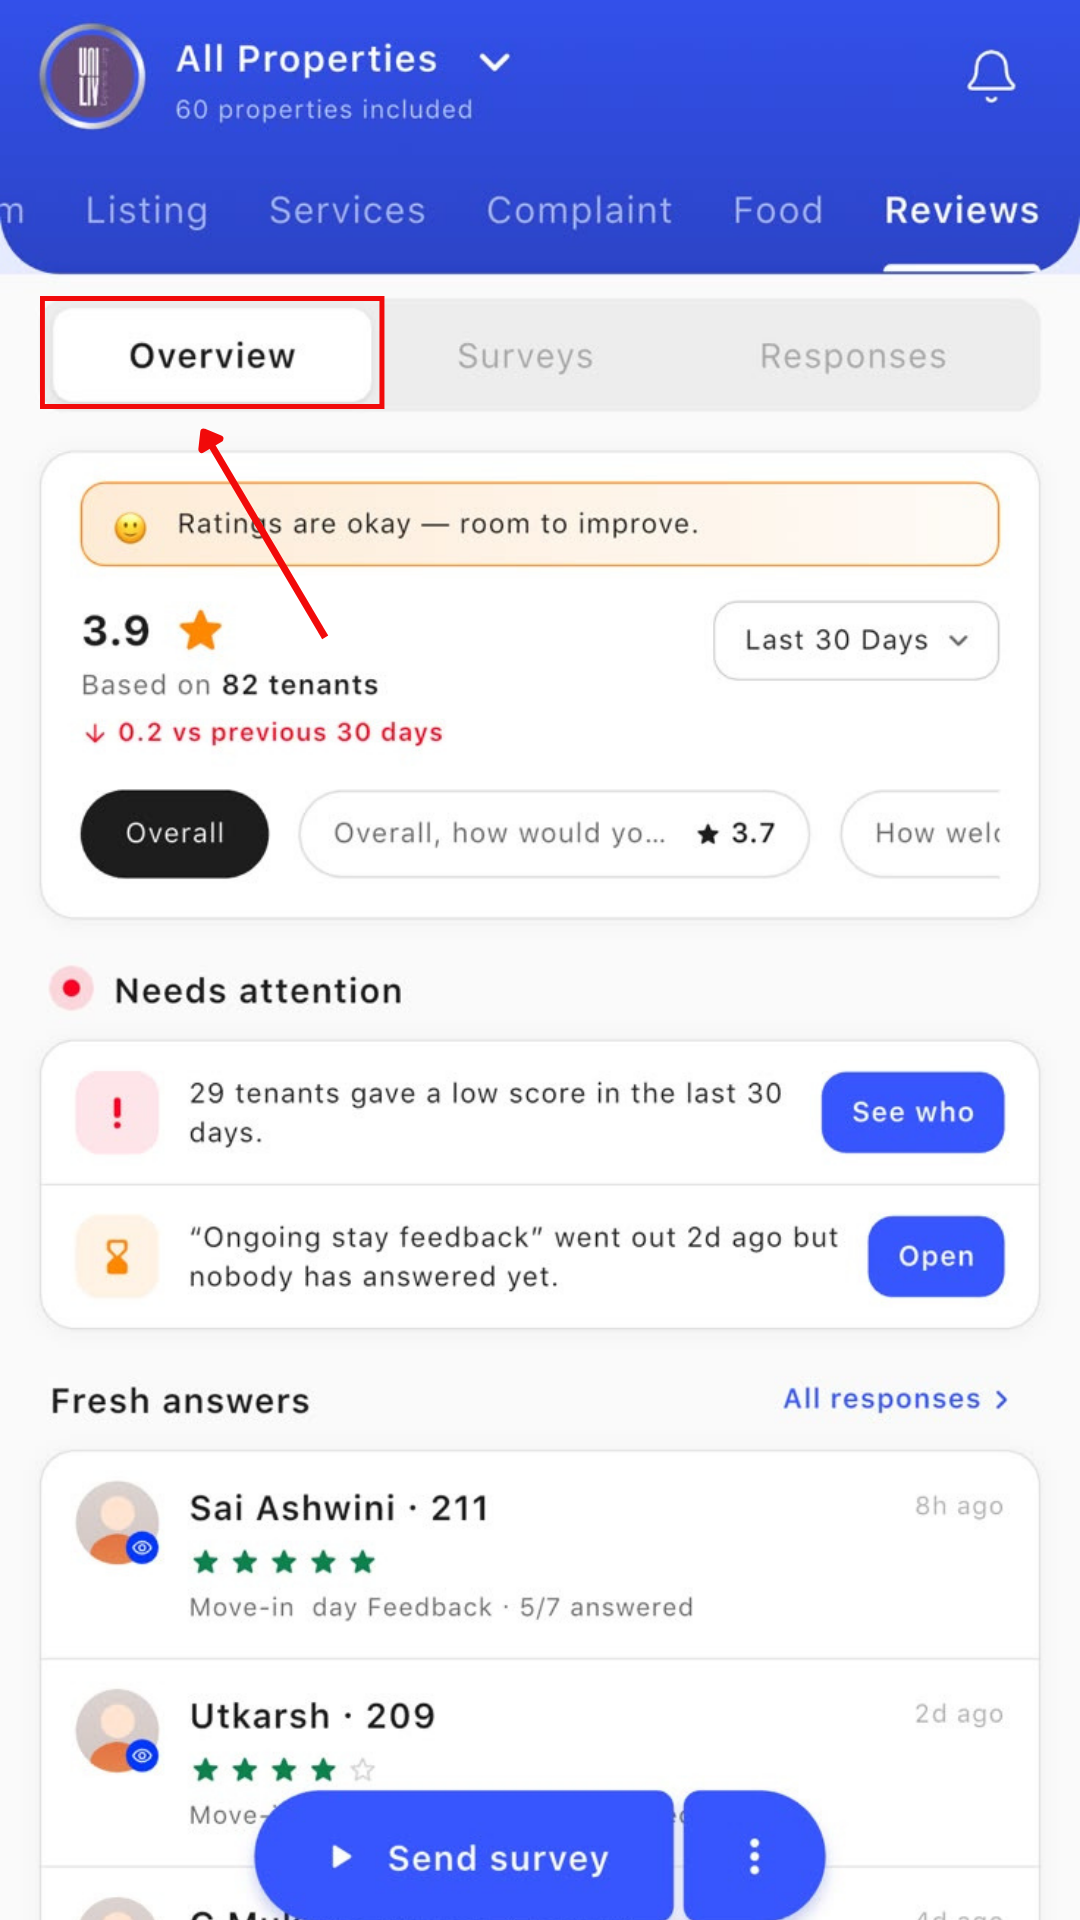
- Step 3: View Survey Responses
Open the Responses section to view the answers received from your tenants. This helps you review the feedback collected through your surveys.
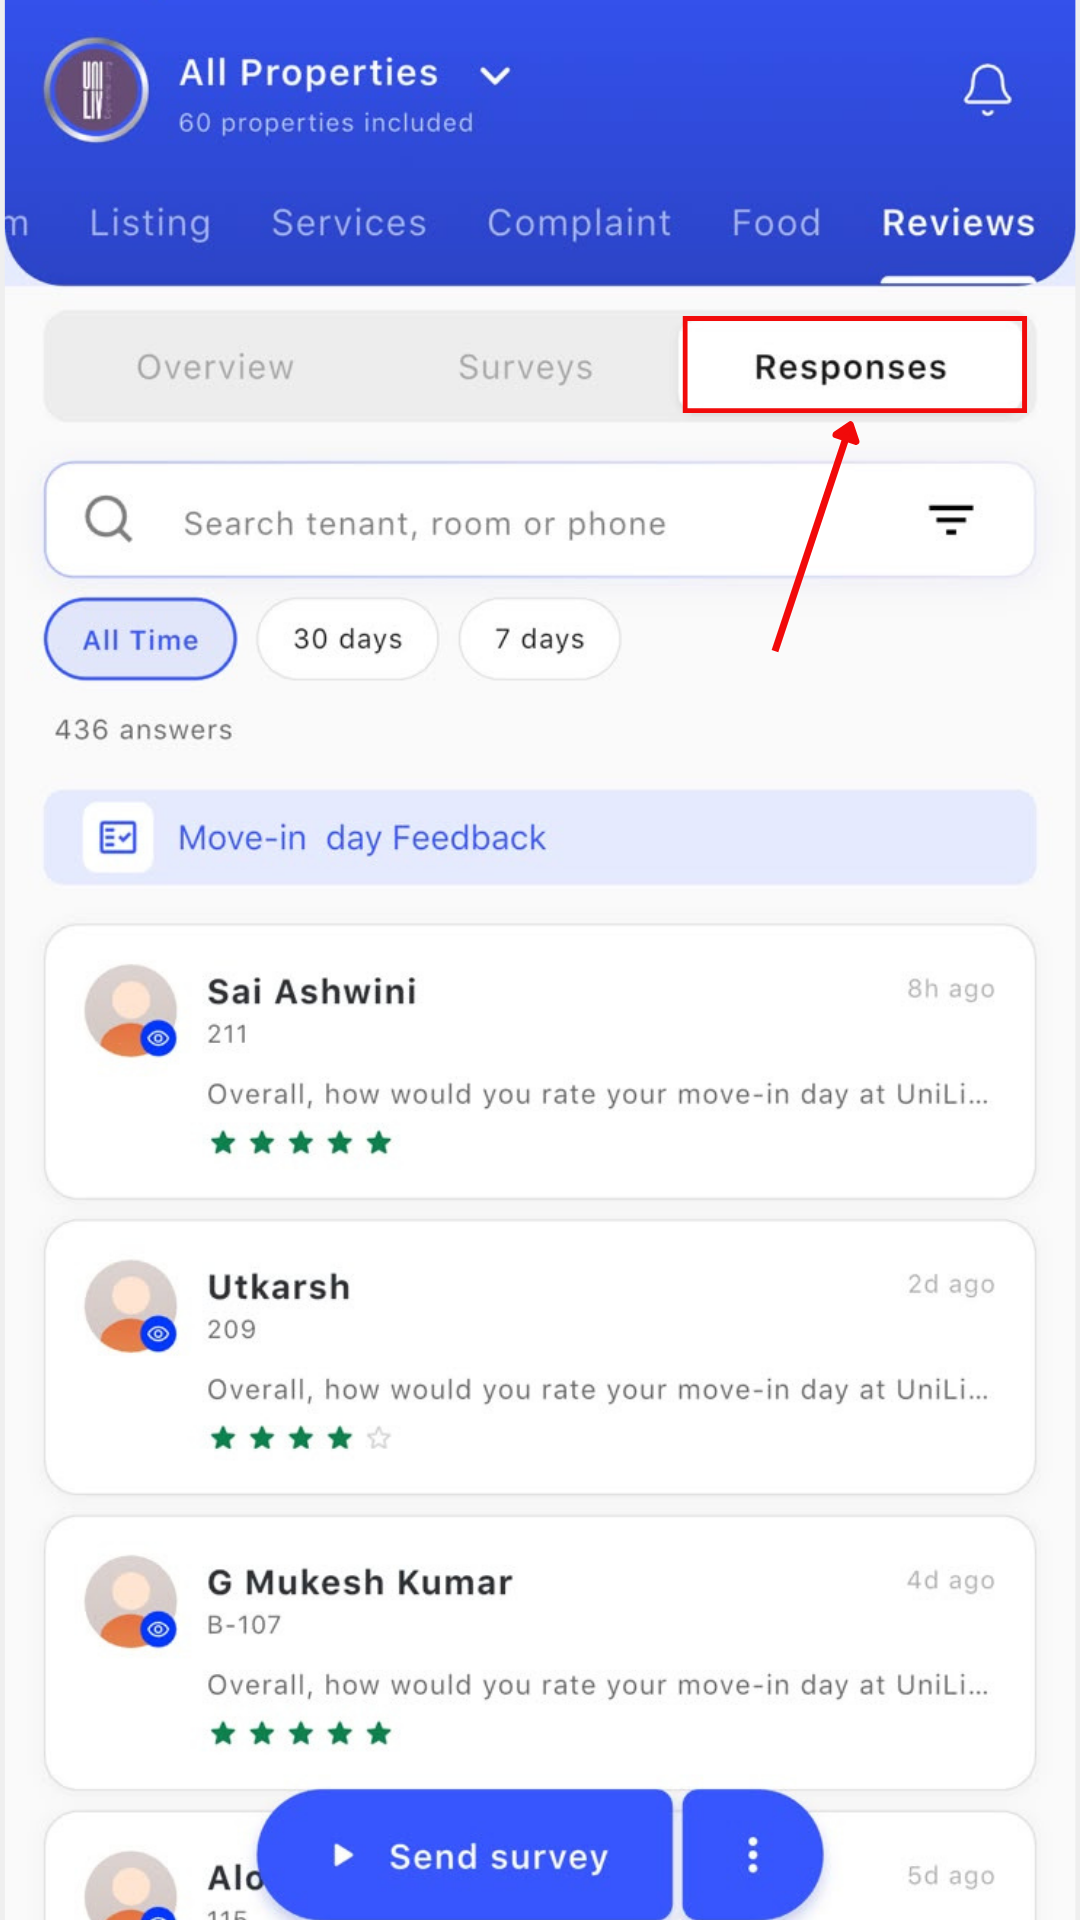
- Step 4: Go to the Surveys Section
Select the Surveys section to view all the surveys you have created so far. From here, you can also create a new survey whenever you need to collect feedback.
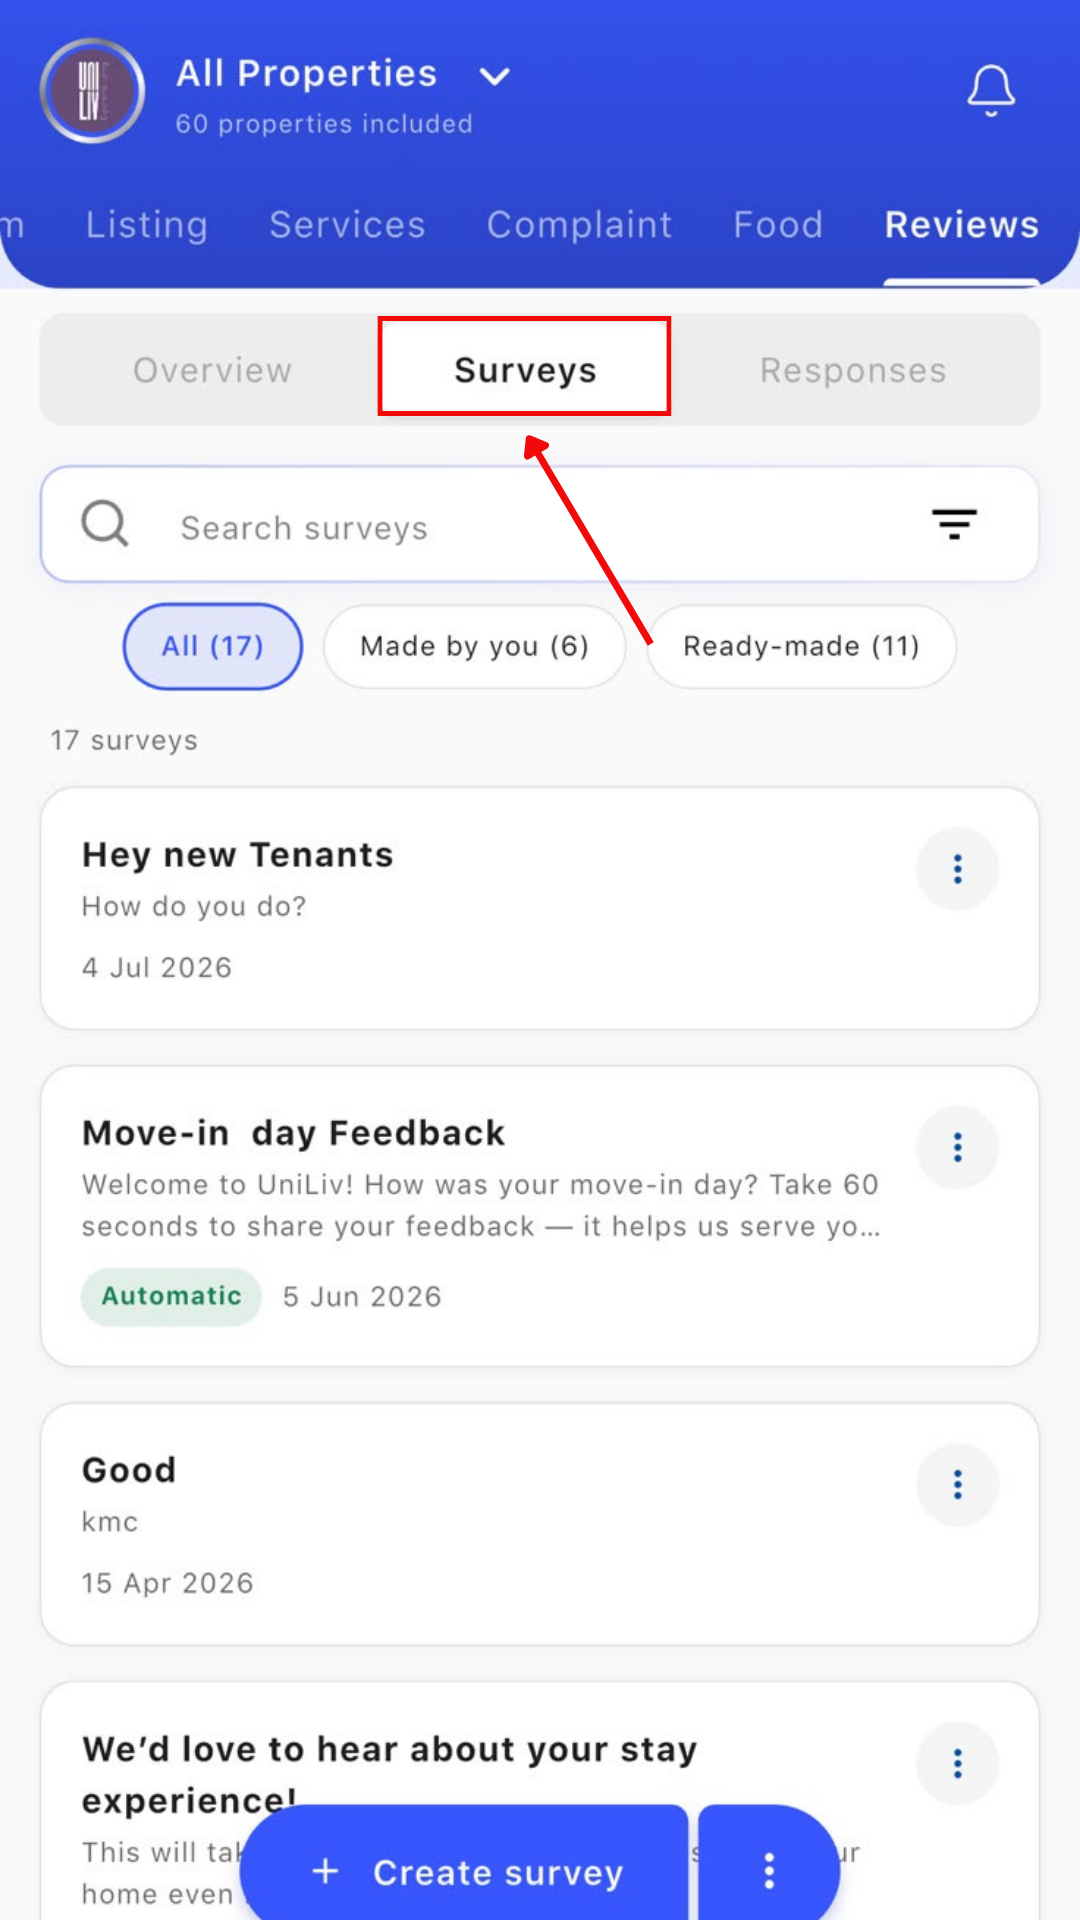
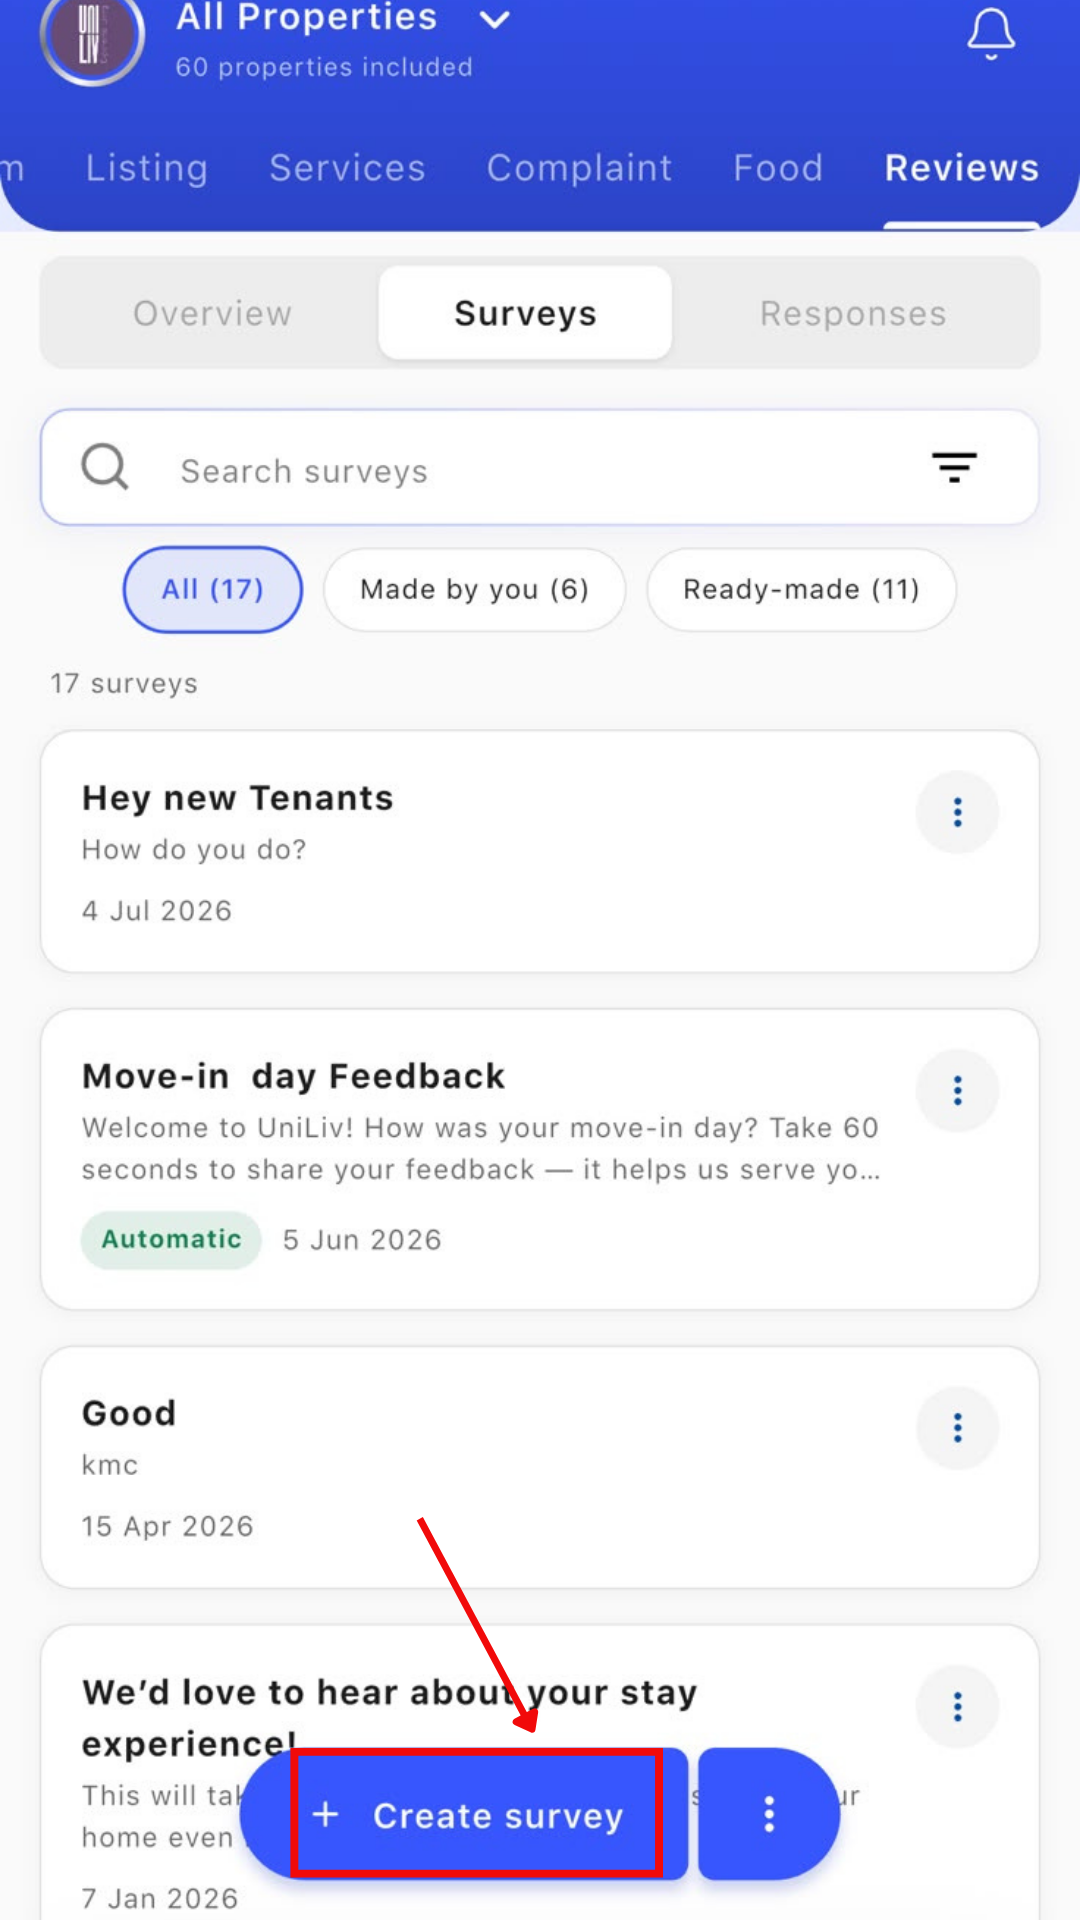
- Step 5: Create a New Survey
Click on Create Survey to start setting up a new survey. Enter a Survey Name and add a short description explaining what the survey is about or why you are collecting the feedback.
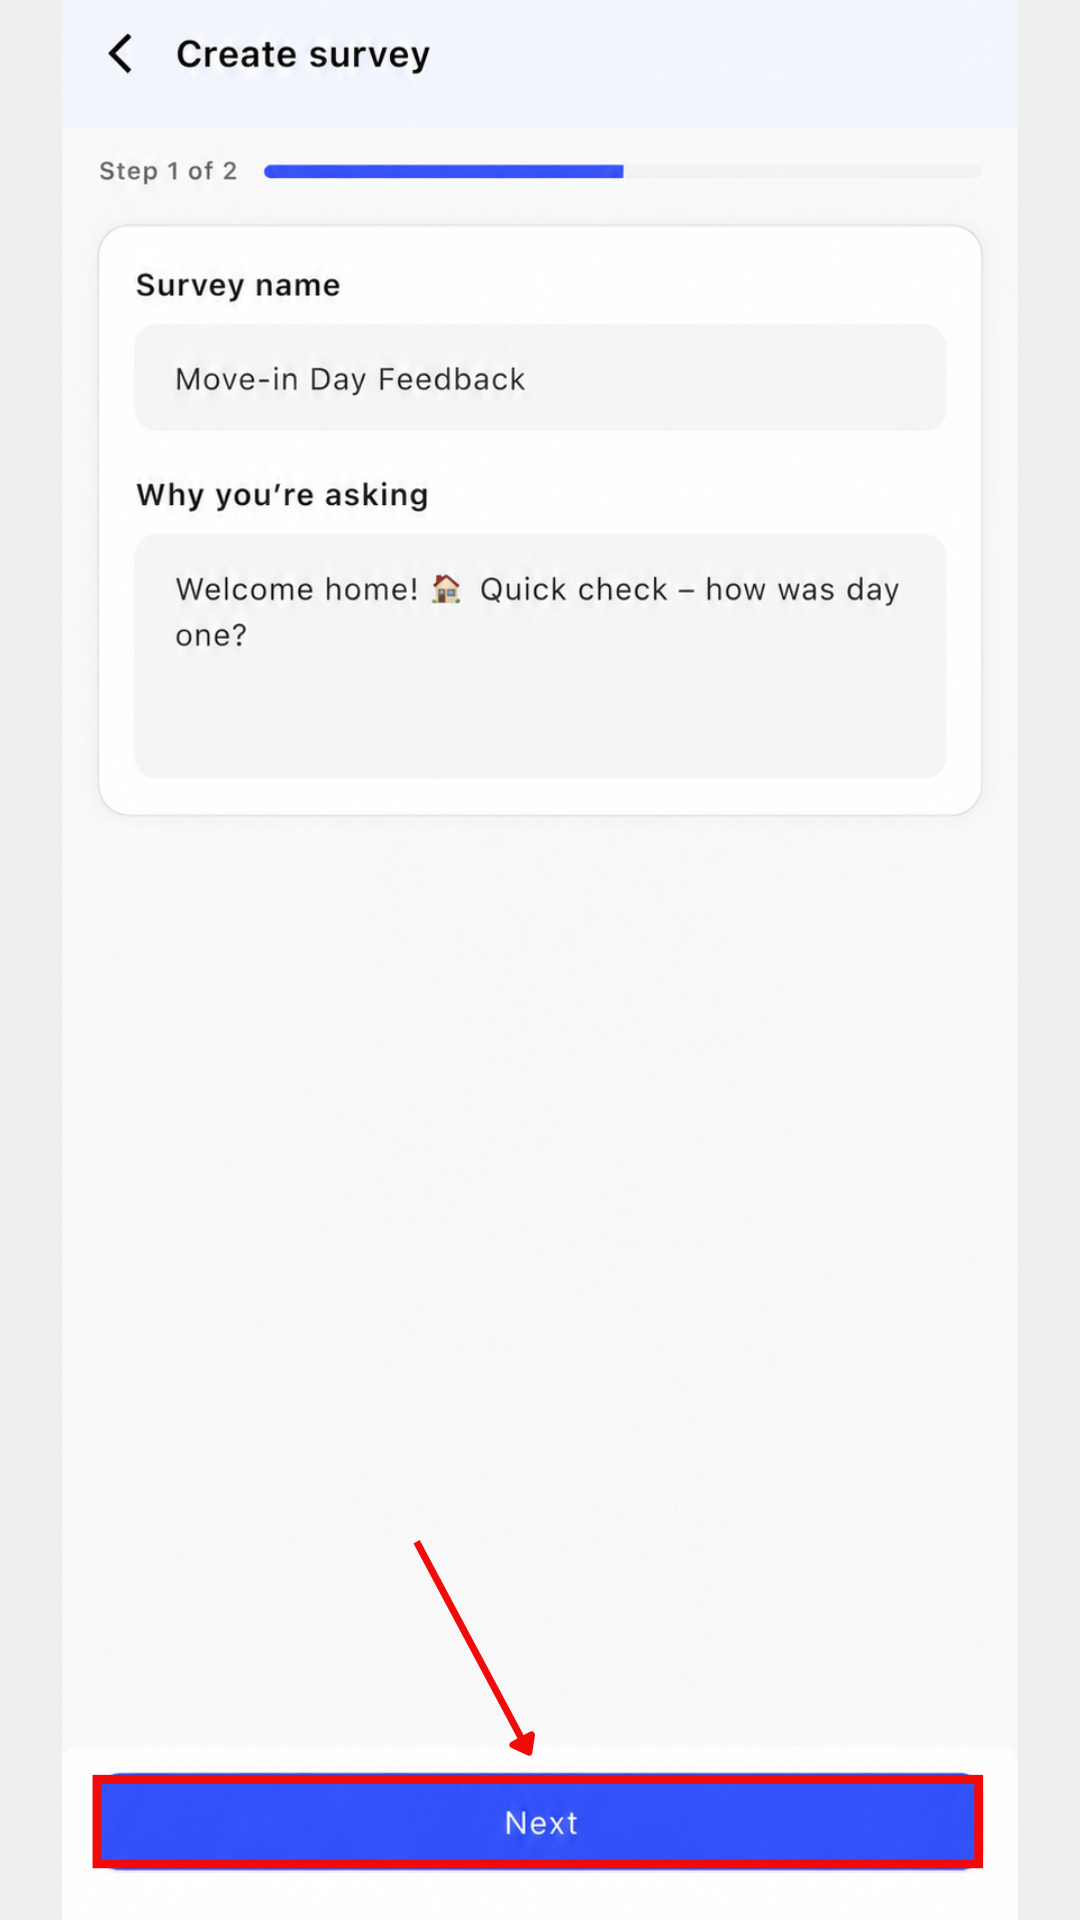
- Step 6: Continue to the Next Step
Once you have entered the survey name and description, review the details and click Next to continue setting up your survey.
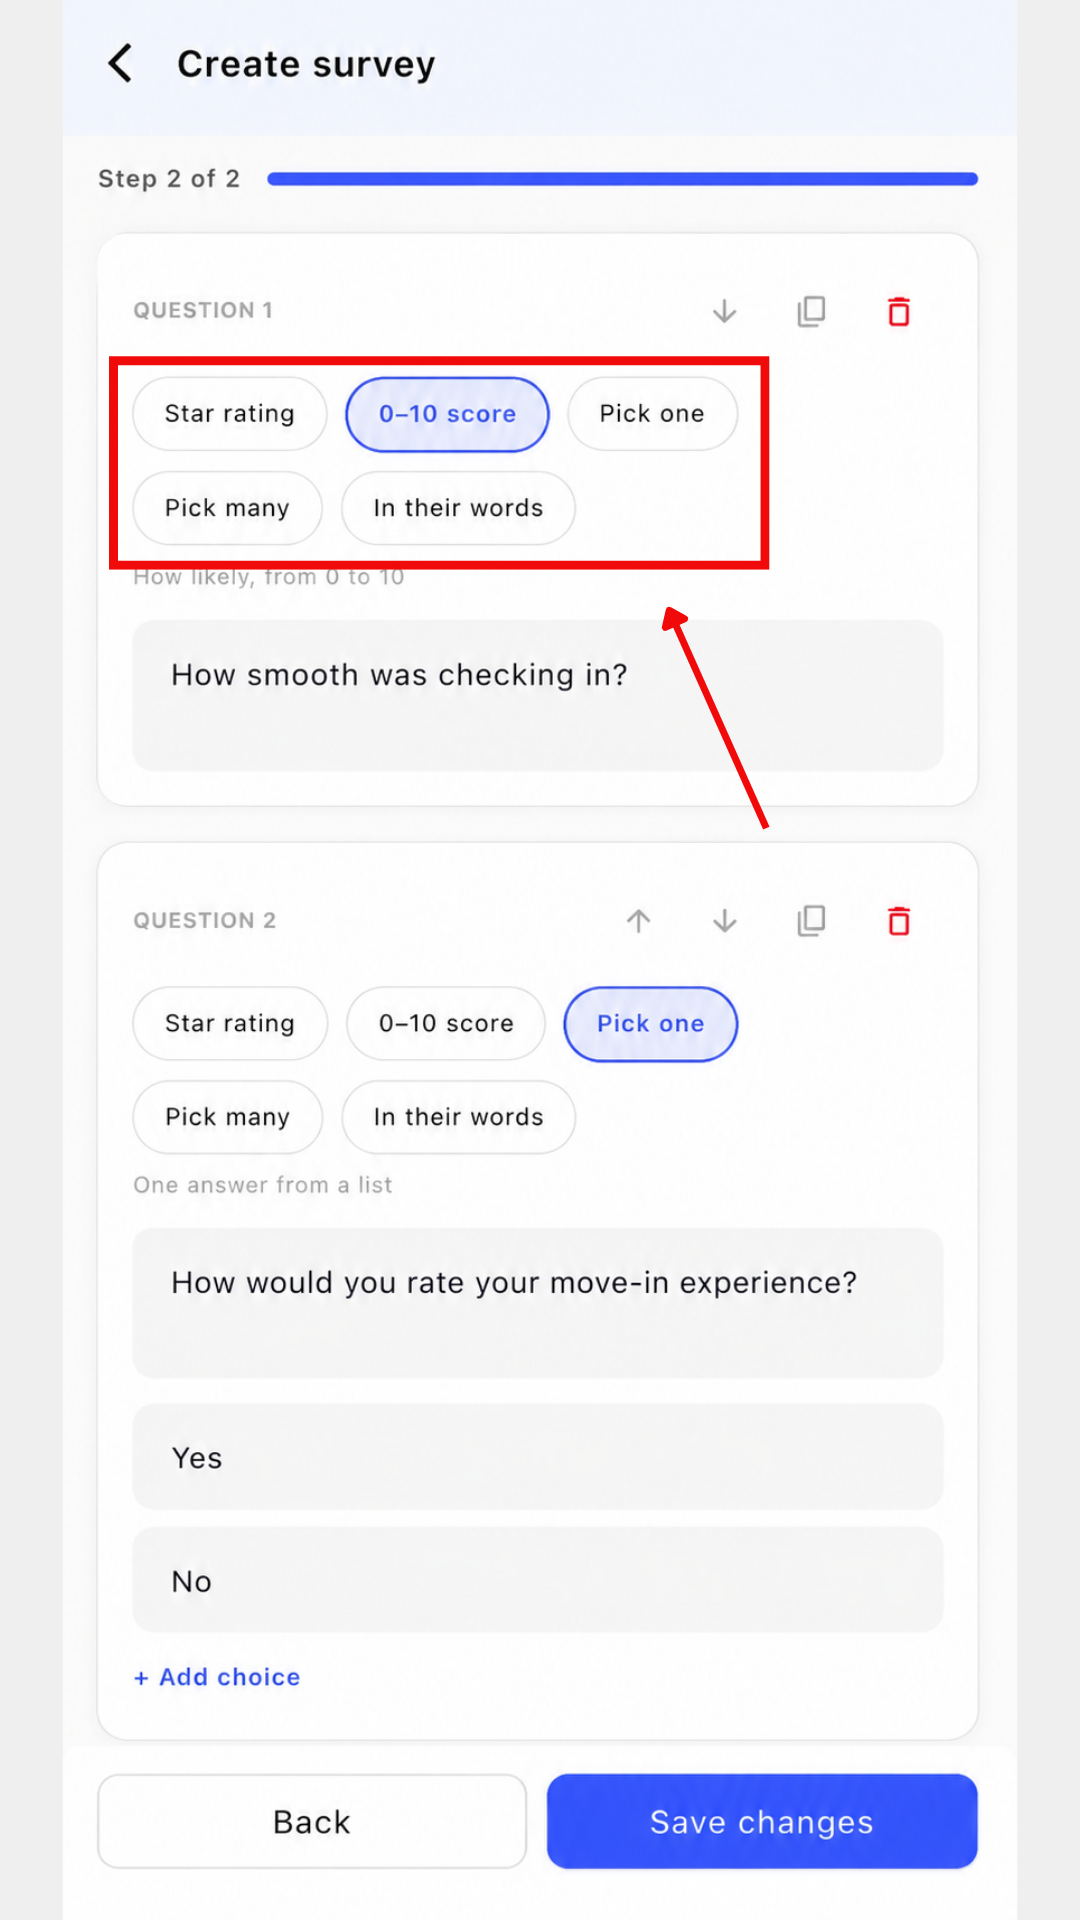
Step 7: Add Questions to Your Survey
After clicking Next, you can start adding questions to your survey. You can choose from five question formats:
- Star Rating: Lets users rate something using stars.
- Zero to Ten Score: Allows users to give a rating from zero to ten.
- Pick One: Lets users select one option from the choices provided.
- Pick Many: Allows users to select more than one option.
- In Their Words: Lets users write their response in their own words.
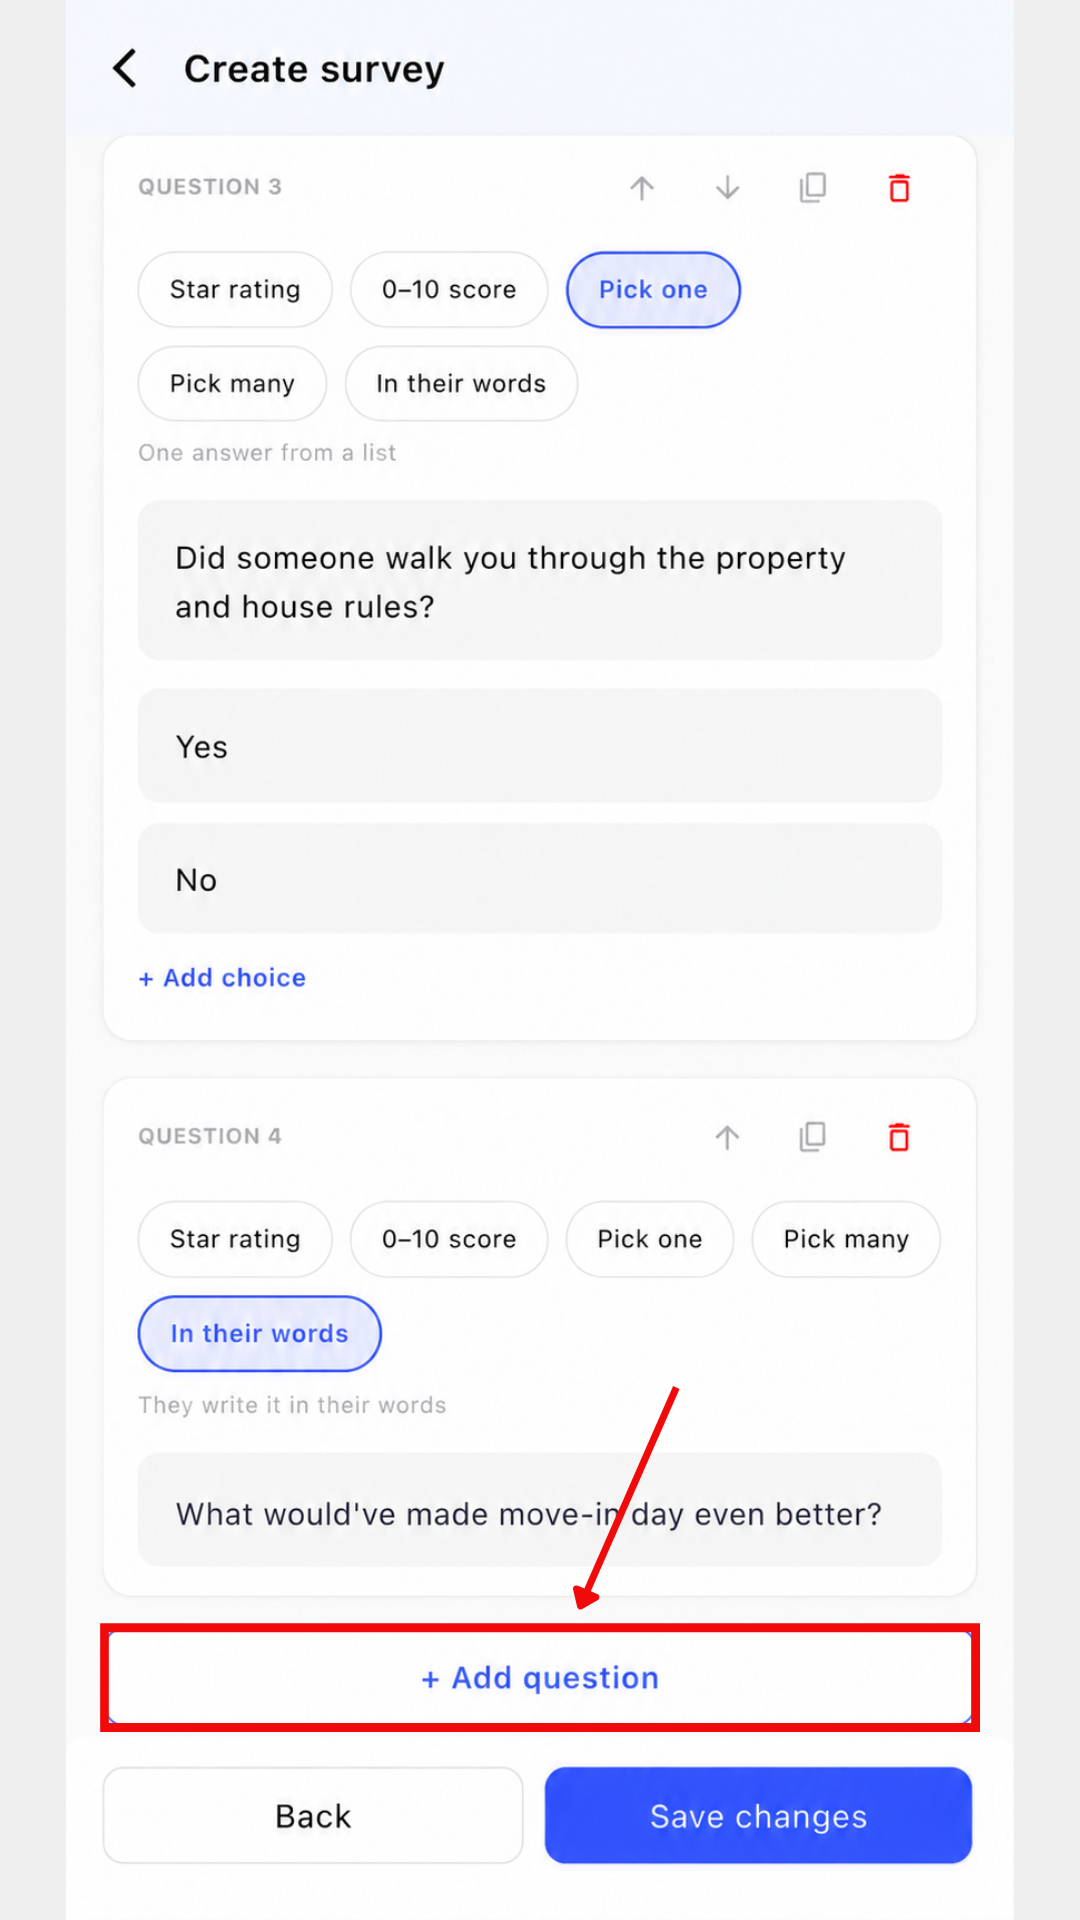
- Step 8: Add a New Question
Click Add Questions to add a new question to your survey. Select the question format you want and enter the question and available answer choices, if applicable.
- Step 9: Manage Your Questions
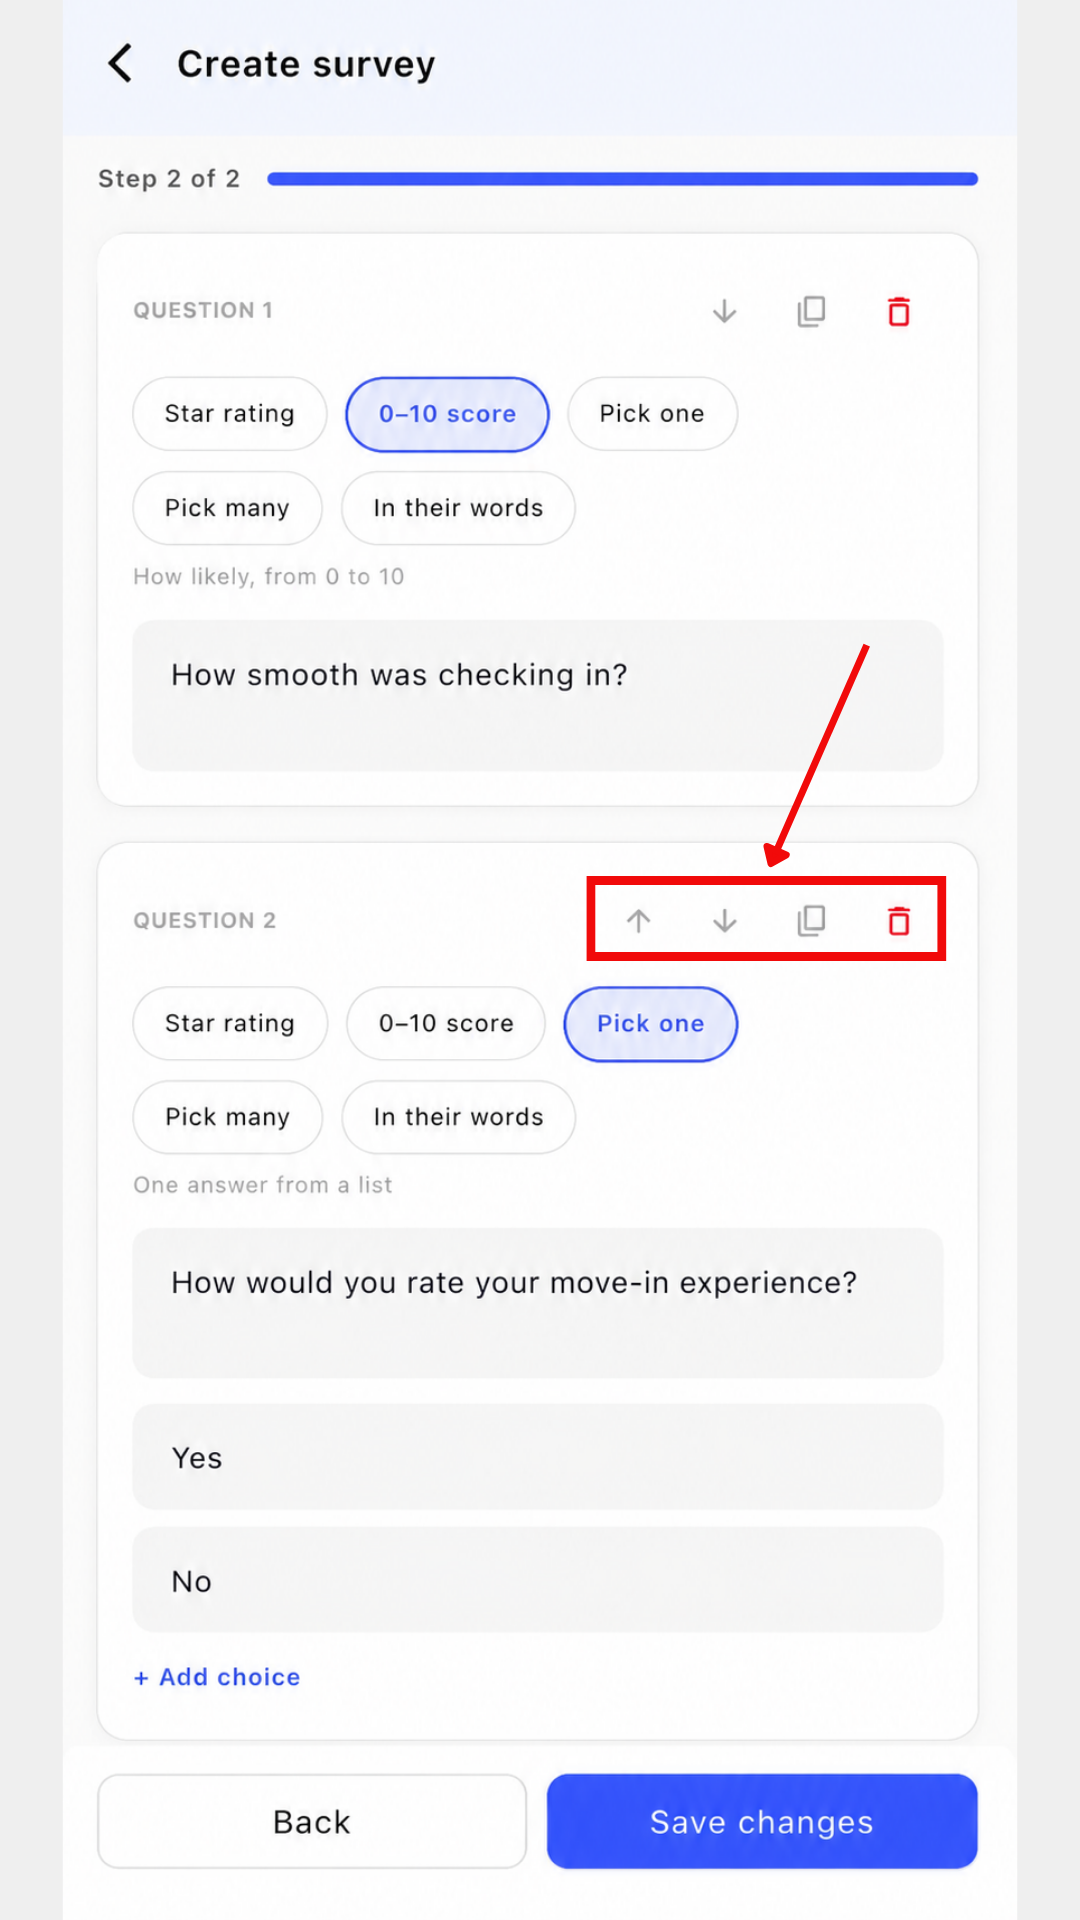
Once you have added your questions, you can manage them using the available options:
- Use the Up and Down arrows to change the position of a question.
- Click Copy to create a duplicate of an existing question.
- Click Delete to remove a question from the survey.
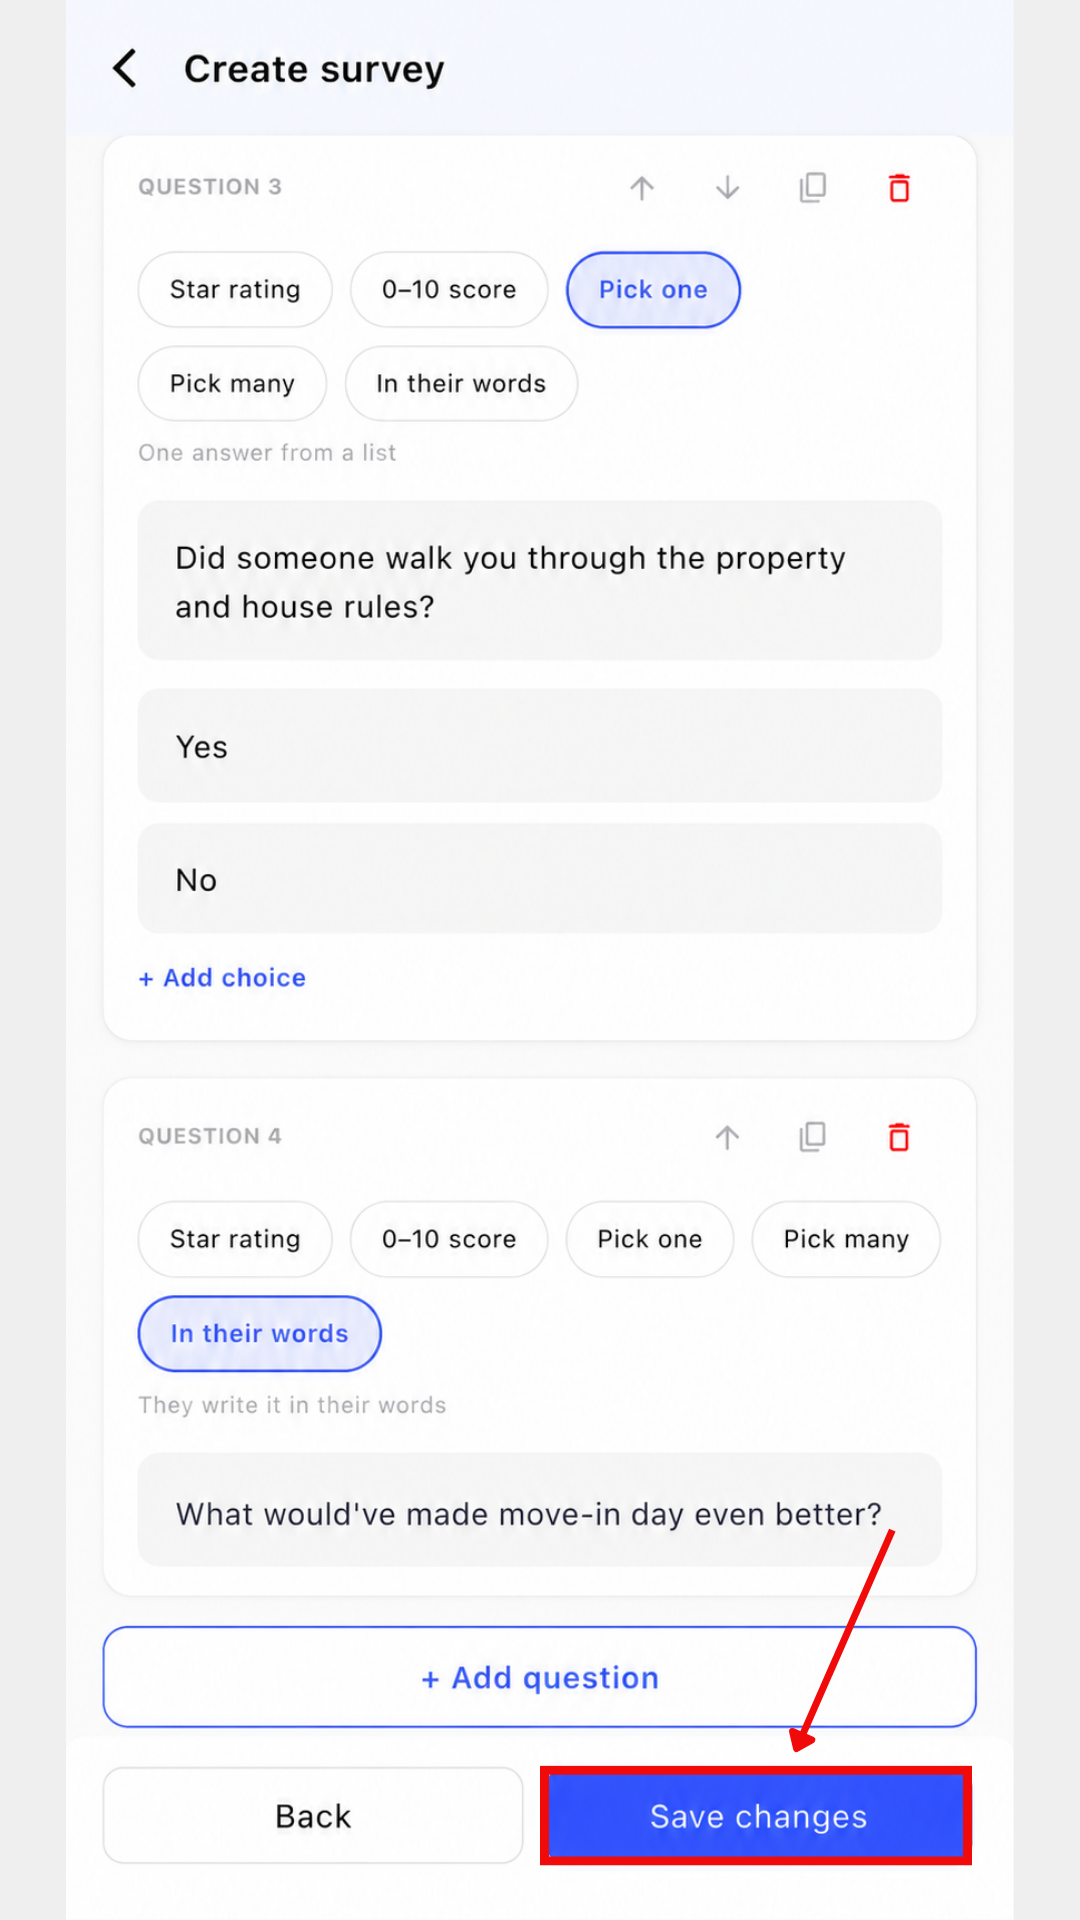
- Step 10: Save Your Survey
After adding and arranging all your questions, review the complete survey and click Save Changes. Your survey will now be created and ready for use.
💡 Why it matters: Feedback is only useful if it's easy to collect and easy to review. This makes sure that experience holds up just as well on mobile as it does on the web.
Tenant, Bed & Property IDs
Every tenant and every bed now gets its own simple, sequential ID – easy to read, easy to say out loud, and easy to search for.
Highlights
- Every tenant gets a readable Tenant ID; every bed gets a readable Bed ID.
- IDs are sequential, so they're easy to track and refer to – no more long, confusing codes.
- These IDs also show up on the relevant reports, so your records stay consistent.
💡 Why it matters: When you're on a call with a tenant or your staff, referring to "Tenant 104" is a lot faster and clearer than reading out a long internal code – and it avoids any mix-up when two people share the same name.
Task Centre - More Pending Tasks
The Task Centre now covers more ground. Alongside your existing pending tasks, you'll now see tasks from the People section and a new Compliance section too.
Highlights
- New pending tasks around people – so staff-related actions show up here too.
- A new Compliance section flags pending compliance-related work.
- Your team can see exactly what's pending and act on it quickly, without hunting across different sections.
How To Try
- Step 1: Open the Dashboard
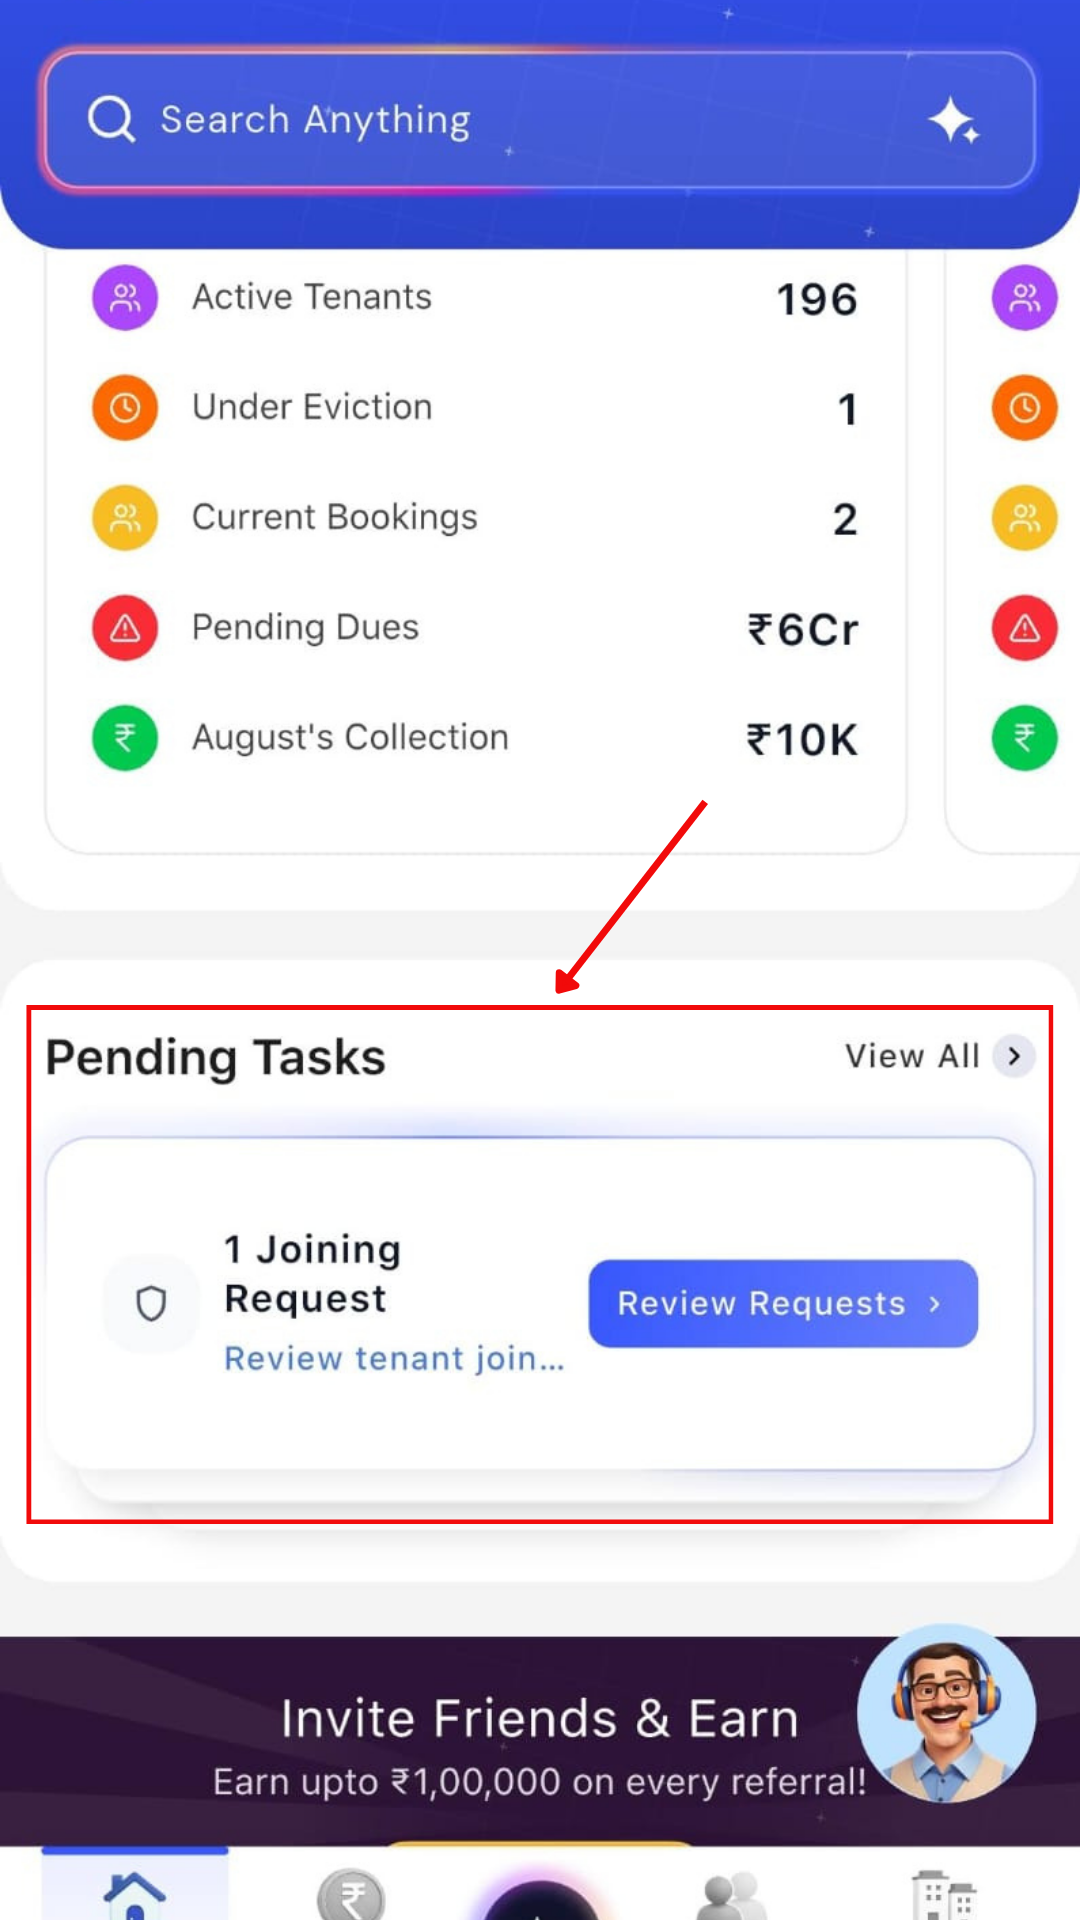
Log in to the app and make sure you are on the Dashboard screen. Scroll down to find the Pending Tasks placard.
- Step 2: Open Pending Tasks
Tap on the Pending Tasks placard to open the pending tasks screen. Here, you can see all the tasks that are currently pending for your property.
- Step 3: View Tasks by Category
Your pending tasks are divided into three categories, Money, People, and Property. Select the relevant category to view the tasks that need your attention in that area.
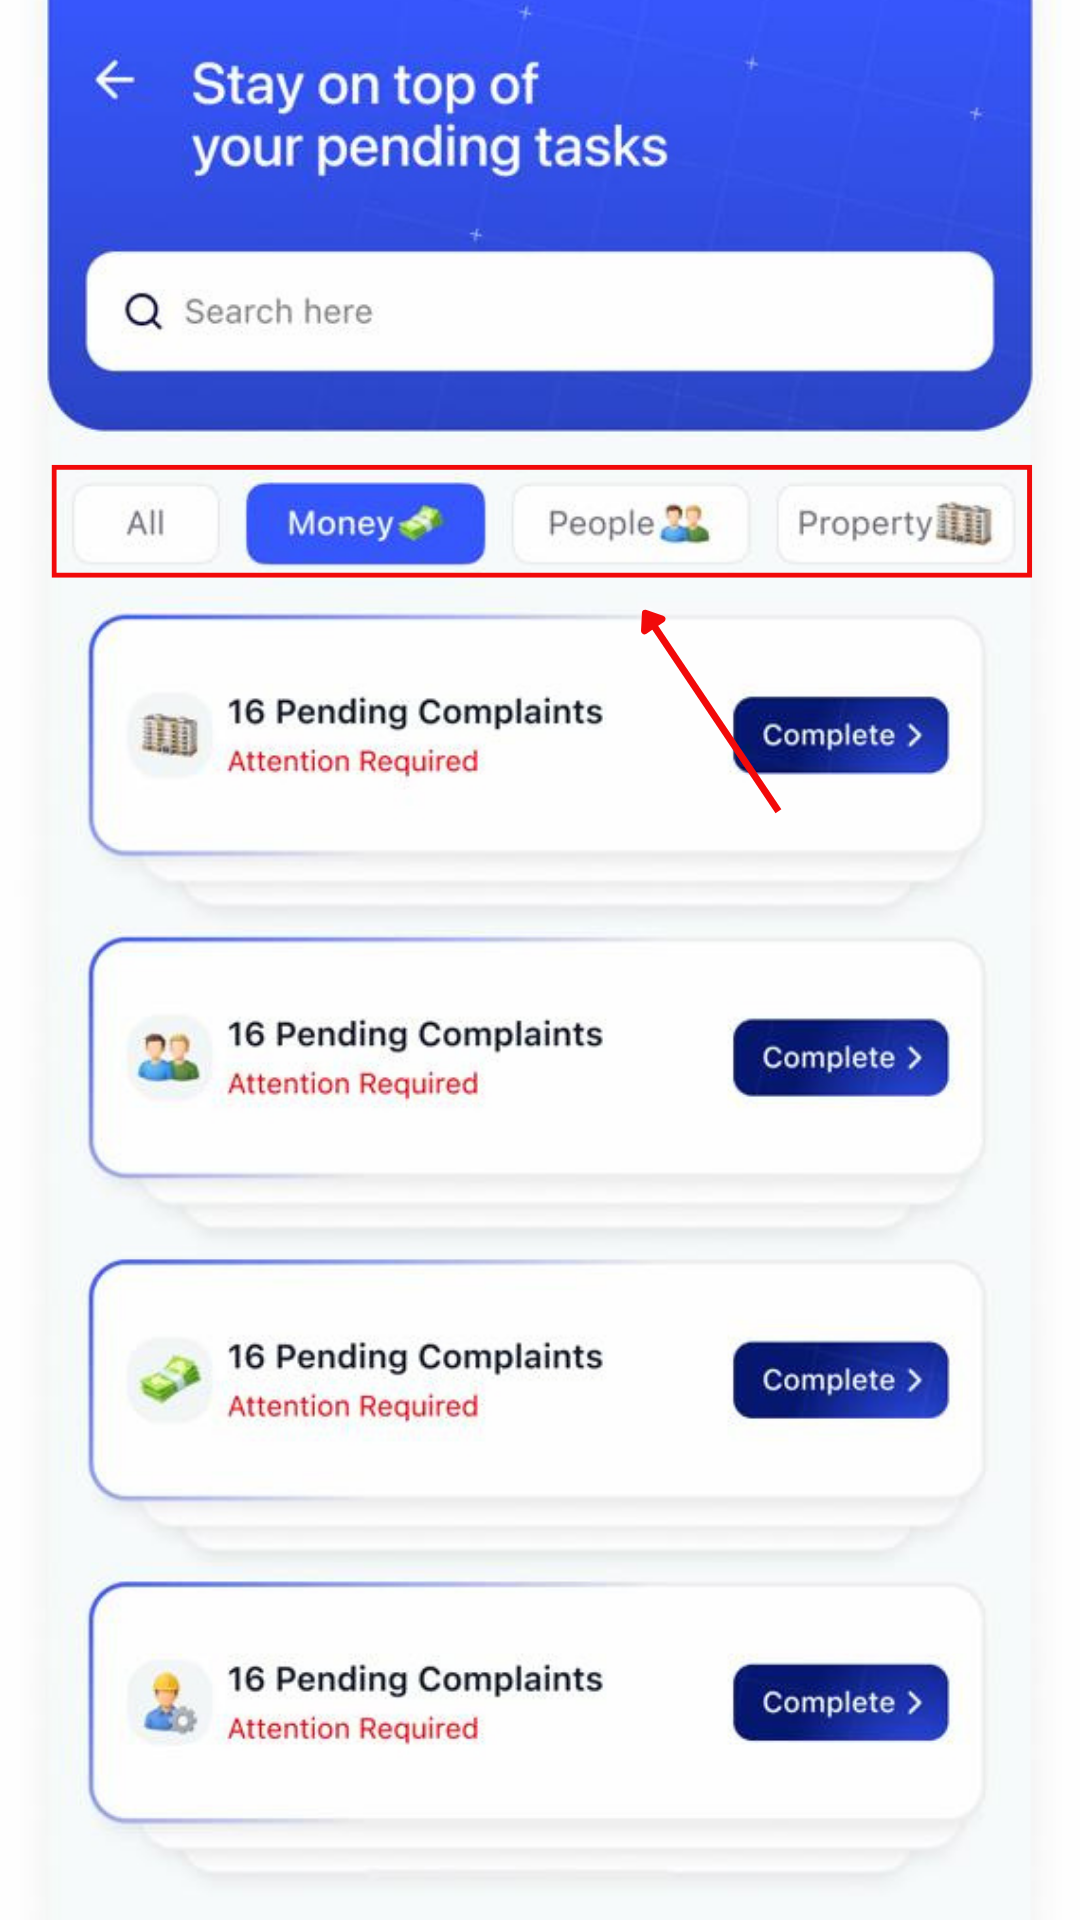
- Step 4: Review Your Pending Tasks
Go through the tasks listed under each category to keep track of the important actions that are still pending. This helps you stay on top of tasks that require you
💡 Why it matters: Instead of separately checking multiple sections for what's pending, your team gets one clear worklist to act on.
Entry/Exit - Bug Fixes
We've gone through the entry/exit flow and fixed the issues that were getting in the way of a smooth check-in and check-out experience.
Highlights
- Key bugs in the entry/exit process have been resolved.
- The flow now works reliably for both tenants and your team.
💡 Why it matters: Move-in and move-out are stressful enough without the app getting in the way. This should make the process smoother for everyone.
Fixes & Polish
Aadhaar Verification Image Fix: Fixed an issue where the front and back images captured during Aadhaar verification weren't always being saved. They'll now save consistently for every tenant.
Availability & Rollout
- Complaint Bot, Complaint Bot Setup, Genie, and Property Groups are live on the Web App.
- Tenant, Bed & Property IDs and Analytics (First Version) are live across the web and in reports.
- Task Centre updates and entry/exit fixes are live on the web and mobile.
- Survey improvements are live on mobile.
Thank You!
Have doubts or any feedback? Chat with us in-app (Help → send us a message).
We're building for you, and every suggestion counts.